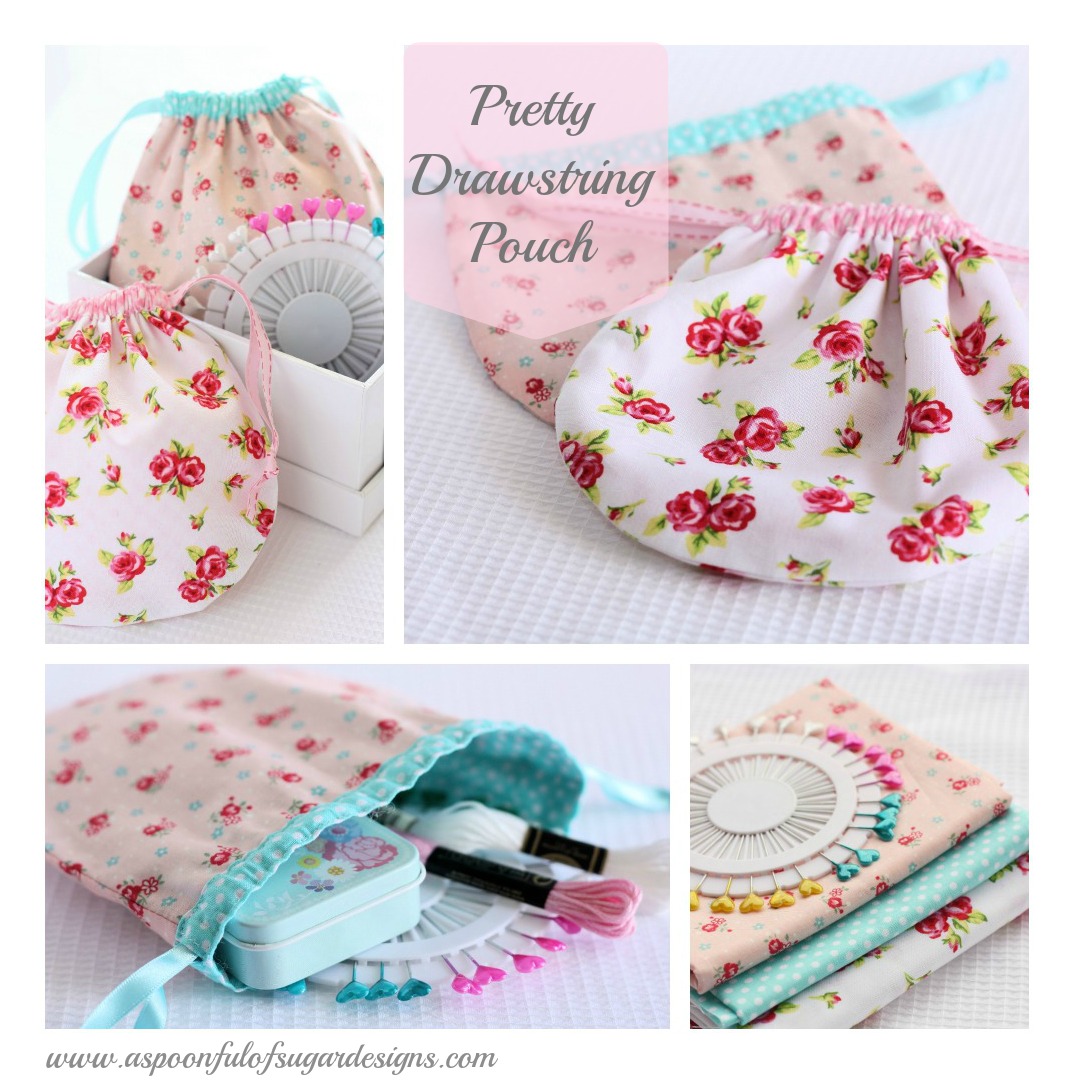
A Spoonful of Sugar

Make. Bake. Create.

Menu
  • Home
  • About
    • About Us
    • Press
    • FAQ
    • Disclosure Policy
    • Contact Us
  • Crafts
    • Crochet
    • DIY
    • Embroidery/Cross stitch
    • Gift Wrapping
    • Knitting
    • Miscellaneous
    • Paper Crafts
  • Holidays
    • New Year’s
    • Australia Day
    • Back to School
    • Valentines Day
    • Easter
    • ANZAC Day
    • Mother’s Day
    • Father’s Day
    • Halloween
    • Christmas
  • Recipes
    • Appetizers
    • Bars & Slices
    • Bread & Pastries
    • Cakes
    • Cookies
    • Confectionery
    • Cupcakes & Muffins
    • Desserts
    • Drinks
    • Ice Cream
    • Jams/Preserves
    • Main Meals
  • Sewing
    • Sewing Tutorials
    • Quilting
    • Sewing & Quilting Patterns
  • Family
    • Back to School
    • Family Fun
    • Our Home
    • Parenting
    • Travel
  • Shop
    • Pattern Store
    • Etsy Store

Pretty Drawstring Pouch {Tutorial}

August 28, 2012 By Spoonful of Sugar - 57 Comments

Thanks for all the lovely comments on my little pouch design that I shared yesterday. Now that my trusty Pfaff is sewing smoothly again, I was able to complete the tutorial today.

If you are after a little drawstring pouch to hold a few essentials or to use as gift packaging, the Pretty Drawstring Pouch will fit the bill. Made from two fat 1/8’s of quilting cotton and a length of ribbon, it can be made in under an hour. The lining is folded over to the front to make a contrasting casing for the drawstring.
It is sized at 6 1/2 x 6 1/2 inches (16.5 cm x 16.5 cm).
Materials:
  • 2 fat 1/8’s quilting cotton – floral and polka dot
  • 42 inches (107 cm narrow ribbon (1/4 inch wide)
Template can be found here.Note: Seam allowance of 1/4 inch included.
1. Using the template, cut out two outer pieces (floral), and two lining pieces (polka dot).
2. Place the two outer pieces (floral) with the right sides facing. Stitch around from one side to the other, leaving the top open. Clip corners. Press.
3. Place the outer pouch on top of the lining panel (polka dot) and make a mark with a water soluble pen, just above the stitching line on both sides (as marked in Photo 3). Pin the two lining pieces together with the right sides facing. Stitch from the mark on one side around to the mark on the other side.  Clip corners. Press.
4. Clip the seam of the lining at a 45 degree angle as shown in Photo 4. Repeat for each side. Press the seam allowance open. This will form part of the casing.

5. Stitch around the seam allowance on both sides of the casing as shown in Photo 5.
6. Turn the floral part of the pouch so that the print is facing outwards. Place the lining inside the pouch. There will be 3/4 inch (2 cm) of the lining showing at the top and this will form the casing. Press this part of the lining down so that it is level with the top of the pouch. Fold under 1/4 inch along the edge of the casing.
7. Pin the casing in place.
8. Stitch along the top and bottom edge of the casing. Cut the ribbon in half lengthwise. Using a safety pin, thread the ribbon through the casing on one side, and right around to exit on the same side. Repeat with the other piece of ribbon from the other opening. Knot the ends of the ribbon. Press.

And there you have it – a quick little pouch to hold all manner of things.
 We have modified the pattern to make a larger drawstring pouch over on this post.
Edit:  Pink fabric is 30’s Collection Atsuko Matsuyama, Lecien; White fabric is Tweet by Timeless Treasures.
Check out the Pretty Liberty Drawstring Pouch variation.
Pretty Liberty Drawstring Pouch 7

Hello! Are you new here?

If so, be sure to sign up for our newsletter here and receive a bonus sewing pattern and welcome discount. Our newsletter includes free tutorials, articles, and new patterns. Welcome to the world of sewing enthusiasts.

Filed Under: Gift Wrapping, Sewing, Sewing Tutorials Tagged With: gifts

« Pretty Pouch and my Pfaff
Vanilla Chocolate Butter Cookies »

Comments

  1. CBH says

    August 28, 2012 at 7:09 am

    Thank you so much for this post. I want to let you know that I posted a link to your blog in Creative Busy Bee Craft Inspirations, under the Page 1 post on Aug. 28, 2012. Thanks again.

    Reply
  2. Nanette Merrill says

    August 28, 2012 at 7:51 am

    It is so lovely. It makes me want to pet it and touch it. The fabrics and your technique are beautiful.

    Reply
  3. Kimberly says

    August 28, 2012 at 8:24 am

    So sweet! I love the curved shape…

    Reply
  4. Carole says

    August 28, 2012 at 9:21 am

    I’ve been looking for something like this. Reminds me of the little drawstring pouches that women carried in the 1800s. 🙂

    Reply
  5. Kristy Boucher says

    August 28, 2012 at 10:04 am

    This is so pretty! Thanks for the tutorial!

    Dear Sukie Gets Crafty

    Reply
  6. ~ko says

    August 28, 2012 at 11:30 am

    Thank you thank you for posting the tutorial! So sweet and darling. I’m sitting down this very second to make one! PS. It was a needle problem for my Pfaff too! So glad you had posted about it!

    Reply
  7. Fiona @ Dragonfly-Crafts says

    August 29, 2012 at 3:42 am

    Just beautiful. What a great tutorial. Thanks Girls xx

    Reply
  8. Simone de Klerk says

    August 28, 2012 at 12:58 pm

    Thank you for this fun tutorial!

    Reply
  9. Christine M says

    August 28, 2012 at 1:47 pm

    What lovely pouches. Thank you for the tutorial.

    Reply
  10. Rita says

    August 28, 2012 at 4:17 pm

    aargh!! i have never had trouble downloading your patterns before, but this time it says i have to log into facebook — alas, i have decided to stay out of it and have no account. Sad, sometimes things work out that way! thanks anyway — cute pattern!

    Reply
  11. Cheryl says

    August 28, 2012 at 6:08 pm

    Thank you so much for sharing. It is really a sweet lil pouch.

    Reply
  12. Kathrin says

    August 29, 2012 at 9:21 am

    I really love this kind of bag! Thank you so much for the tutorial!!

    Reply
  13. Jan says

    August 29, 2012 at 10:01 pm

    What a sweet pattern – thank you so much, girls. I’ve just finished making my first one from scraps at home – love it. I think these will be my ‘go to’ stocking stuffers this year.

    Reply
  14. Ann says

    August 29, 2012 at 11:18 pm

    Thanks for the tutorial. it helps me so much.

    Reply
  15. rosedevon says

    August 31, 2012 at 8:30 pm

    Love the fabric you used, do you know who makes it, or a name for the fabric patterns?

    Reply
  16. tbutvilas says

    September 3, 2012 at 4:38 am

    This is great! I am using a bunch of old Christmas fabric I found at a thrift shop to make little gift pouches for a local nursing home. Filling them with goodies. Love the tutorial!

    Reply
  17. Connie says

    September 6, 2012 at 10:34 am

    I love this little pouch. My grandaughters would really like these. Will have to get the pattern and see what they think. Thanks!

    Reply
  18. Anonymous says

    September 6, 2012 at 6:01 pm

    Would love to make this – such a cute pattern. Like Rita, I’m struggling to download template. Any tips?

    Reply
  19. lawanna says

    September 7, 2012 at 11:09 am

    That is stinking cute. Love the curvy shape of this. Might make a cute gift bag for tiny things like jewelry.

    Reply
  20. Elsa says

    September 12, 2012 at 8:43 am

    Such a sweet bag ~ I found your blog from ‘Sew Can She’ feature of the day.

    Reply
  21. Gina Seiders says

    September 12, 2012 at 9:06 am

    Thanks so much for sharing!

    Reply
  22. holycow175 says

    September 12, 2012 at 1:02 pm

    adorable..going to make one up for my new daughter-in-law to carry at the wedding on friday:) thank you.

    Reply
  23. Anonymous says

    September 18, 2012 at 11:53 am

    Thanks for the tutorial! So pretty!

    Reply
  24. creadientje says

    September 26, 2012 at 12:21 pm

    I used a very cute cupcake fabric to make this cute pouch for a friend
    http://creadientje.wordpress.com/2012/09/26/cupcakeswap-2/

    Reply
  25. Karina says

    September 29, 2012 at 2:26 am

    Beautiful things You do. Thank You fot this tutorial. For sure.

    Karina.

    Reply
  26. christina's eyes says

    September 30, 2012 at 10:39 pm

    hello
    I like your work.
    I am also a blogger too.
    http://christinaeseyes.blogspot.gr/
    If you like, join!

    Christina friendly

    Reply
  27. Anna M. says

    October 20, 2012 at 2:00 pm

    It’s the prettiest drawstring bag I have ever seen.

    Reply
  28. Anonymous says

    October 28, 2012 at 7:23 am

    vous faites des merveilles et merci pour vos bonnes idees; avec les fetes qui arrivent, voila une idee geniale pou faire des preents car un present fait main a beaucoup plus de valeur!!

    Reply
  29. sweeten says

    December 9, 2012 at 9:02 pm

    This is lovely! Thank you for the tutorial. I will be making a drawstring pouch to carry pins on trips to Disneyland and if I post a blog post about it, I will be sure to link to your post 🙂

    Reply
  30. Pam @Threading My Way says

    January 19, 2013 at 4:00 am

    Very clever having the lining form the casing!!!

    Reply
  31. Midori says

    January 28, 2013 at 2:52 pm

    Thank you for the great tutorial. I made the pouch with Christmas prints and just wanted you to know that I linked your page on my blog!
    http://picchie.blogspot.ca/2013/01/prettty-drawstring-pouch-chiristmas.html

    Reply
  32. Iara says

    January 31, 2013 at 6:10 am

    Parabéns pelos trabalhos e as dicas para facilitar, muito boas, um abraço a todos.

    Reply
  33. Montse says

    March 6, 2013 at 3:58 am

    Me encanta vuestro blog ,teneis cosas preciosas ,me hago seguidora para ver mas cositas de las que haceis ,un beso.

    Reply
  34. Kellynha says

    March 7, 2013 at 5:04 am

    muito bom esse blog!
    obrigada pelo passo a passo

    Reply
  35. Darlene Nemeth says

    April 17, 2013 at 10:33 pm

    Beautiful Pouches and easy to follow tutorial. I am now following you and looking forward to seeing more projects.

    Reply
  36. Judith says

    April 21, 2013 at 2:54 pm

    Thank you for sharing this tutorial. I am going to try this soon. For now I Pinned it!!

    Reply
  37. elnorac says

    June 6, 2013 at 7:43 pm

    Thank you so much for this fabulous tutorial! I just made one of the bags and posted it on my Flickr, along with a link to this tutorial.

    Reply
  38. Amy Bailes says

    July 13, 2013 at 6:19 pm

    Thank you for the lovely tutorial. My 10 yo just made her own version of this pouch. Excellent instructions.

    Reply
  39. Furstgradr says

    December 14, 2013 at 7:39 pm

    I’ve been looking for a small pouch for my granddaughter and, when I saw yours, I just knew it was the right one! Thank you so much for sharing it!

    Reply
  40. Zoe says

    April 1, 2014 at 7:49 am

    Wow. The box pouch and, this. All you do is copying those Japanese creator’s projects then post as if they are your invention. What a nerve. Very creative, ladies. I suggest you to look up a word Moral in a dictionary. And don’t think you can fool everybody because some people know where these designs come from and that they are not your ideas.

    Reply
    • A Spoonful of Sugar says

      April 1, 2014 at 4:57 pm

      Thanks for commenting Zoe – we always appreciate feedback from our readers. You will notice that I did link to the book Patchwork Please in my Box Pouch post and gave credit to Ayumi Takahashi for her design. The template for the Pretty Drawstring Pouch one was drawn by me and not copied from another designer. There is nothing original about a drawstring pouch, or a box pouch, and there are loads of variations around the internet and in books. Most craft projects are not that original – it you look on pinterest you often see the same type of project appear with some minor variations. We simply share our tutorials (which take hours of work to photograph and write up) as a way to help others learn to sew some basic projects.

      Reply
  41. Lunarius says

    July 26, 2014 at 5:19 pm

    I’ve been using this pattern (very slightly modified — I increased the overall height of the lining so that the top is a little wider) to make dice bags for my friends and fellow gamers. It’s been a fun way to use up some of my stash, and I even got the chance to teach a few of my friends the basics of a sewing machine. I use a lot of jersey knit fabric (mostly old tee shirts) but I’ve also used some heavy linen, standard fat-quarter cotton cloth, and some velour as well. This makes for a quick and satisfying project, and I wanted to thank you for sharing it.

    Reply
    • A Spoonful of Sugar says

      August 3, 2014 at 5:55 pm

      Great idea making some of game pieces for game pieces!

      Reply
  42. Alma says

    January 12, 2015 at 3:10 am

    I’ve been looking for a tutorial like this for AGES! I have a huge collection of dice I use for board games and role-playing games and I can never find a pouch that I like online. I’ll be making lots of these to give away to my D&D friends. Thank you!

    Reply
    • A Spoonful of Sugar says

      January 12, 2015 at 6:49 am

      Thanks Alma – it would be a great size for holding dice or small game pieces. Happy sewing!

      Reply
  43. Sarah says

    January 31, 2015 at 4:32 am

    Thanks so much for sharing this cute project and pattern! I’m new to machine sewing and am having trouble getting from step 4 to step 5. Am I correct in seeing that the line of stitches forms a “u” shape, moving down one side of the casing and then over and up the other side of the casing? Any chance you could share some more detail on how to do this on a machine with the fabric folded over as your photo shows? Not sure if I’m describing my confusion coherently, but if you have any tips to help me through this step, I’d be thrilled! Thanks again!

    Reply
    • A Spoonful of Sugar says

      February 14, 2015 at 6:36 am

      Hi Sarah – Sorry for the delay in responding – we have been on vacation for a few weeks. Hopefully you have sorted it out. Yes – the stitching is in a U shape. When sititching curves, you just go slowly. If you leave the needle in the fabric, then raise the presser foot and slightly pivot the fabric, then lower the foot again as you ease around the curve. You may find it easier to make a larger pouch first (see the link at the bottom of the tutorial). happy sewing.

      Reply
  44. Kay says

    April 26, 2015 at 7:47 pm

    Hi! lovely little bag. I printed out the template ( 100% ) yet it seems to be too small for the dimensions you give above. You do say that SA’s are included but Im not sure.

    Reply
    • A Spoonful of Sugar says

      April 27, 2015 at 9:55 am

      Hi Kay – seam allowances are included. In Australia our paper sizes are different. make sure you didn’t select fit to size as that will distort the pattern pieces. Hope that helps, Lisa

      Reply
  45. Eliana Negri Caminski says

    September 26, 2015 at 6:21 am

    Amei está pequena bolsa, obrigada por compartilhar!

    Reply
  46. Les bobines sans théine says

    December 31, 2015 at 3:34 am

    Hi Lisa and Sarah,

    Thanks a lot for this tutorial : it’s a lovely pouch quick-sewing !

    Reply
    • A Spoonful of Sugar says

      January 10, 2016 at 10:48 am

      Thanks you! Best wishes for a happy and creative 2016!

      Reply
  47. Alicia Williams says

    October 8, 2016 at 7:36 am

    Thanks for sharing this cute tutorial. I like the rounded design – nice to have design other than squarish or rectangle. I have cute Halloween material, and will use this tutorial to make a cute pouch for her within a few days.

    Reply
    • A Spoonful of Sugar says

      October 9, 2016 at 9:17 am

      Thanks Alicia – they would make cute Halloween treat bags.

      Reply

Leave a Reply Cancel reply

Your email address will not be published. Required fields are marked *

  • Email
  • Facebook
  • Instagram
  • Pinterest
  • Threads
  • TikTok
SUBSCRIBE TO NEWSLETTER
×

Categories

Archives

PURCHASE PDF PATTERNS

We offer over 100 affordable PDF sewing patterns available for download from our store website or Etsy store. Each pattern includes detailed instructions, numerous photos, and templates.

WEB STORE ETSY STORE

Instagram

💡 No tricky binding, no stress! This Hexagon Tr 💡 No tricky binding, no stress! This Hexagon Trivet is the ultimate beginner friendly sewing project, and the best part? The raw edges are neatly enclosed INSIDE - just turn it right side out,  press and you're done! 🎉🌟 You can use 10 inch precut squares- perfect for those leftover fabrics in your stash. Whether you're sewing for yourself or gifting homemade kitchen decor, this pattern is a gamechanger.Comment TRIVET and I'll send you the pattern link.#handmadehome #precutfabric #easysewing #sewingforbeginners #handmade #easyhexagontrivetandcoaster #quiltingcotton
🎉 Beginner Quilters, This One is for You! 🎉 🎉 Beginner Quilters, This One is for You! 🎉Want to sew a colourful Hexagon Trivet with just straight line quilting? This easy sewing project is perfect for beginners. No tricky binding to sew and you get a neat professional finish.Plus you can use 10 inch precut squares for a quick and satisfying make. Perfect for adding a handmade touch to your kitchen or gifting to a friend.Comment TRIVET and I'll send you the link.#easysewing #precutfabric #quiltlover #sewingforbeginners #handmadehome #handmadegifts #simplesewing
🏡💜 Home is where your heart is ❤️🏡I 🏡💜 Home is where your heart is ❤️🏡Introducing the Heart House Foundation Paper Piecing Quilt Block - a cosy design  that brings the warmth of home to every stitch. Available in 5 sizes (2  inch, 3 inch, 4 inch, 5 inch, and 6 inch) this sweet block is perfect for quilts, pillows, pouches and more!Because family is the heart of the home, and every home deserves a little love.Want the pattern? Comment HEART below, and I'll send you the link.#hearthousequiltblock #foundationpaperpiecing #quiltlove #homesweethome #sewingcommunity #sewinglove
✂️ Tip of the Week! ✂️Sewing with Libert ✂️ Tip of the Week! ✂️Sewing with Liberty Tana Lawn? 🌸✨ This stunning fabric deserves the best treatment! A fine needle is key to smooth, snag-free stitches—size 70/10 or 60/8 works like magic, gliding through the delicate weave effortlessly. Pair it with a sharp, fresh needle for crisp, professional results that let those gorgeous Liberty prints shine!Want more sewing tips delivered straight to you? Comment "NEWSLETTER" and I'll send you the link to sign up! 💌💬 What’s your go-to tip for sewing with Liberty fabric? Let’s swap ideas!#LibertyFabric #TanaLawn #SewingTips #FabricLover #QuiltingCommunity #SewingForFun #HandmadeSewing #TextileArt #DIYSewing #SewingInspiration
Turn your fabric scraps into something beautiful! Turn your fabric scraps into something beautiful! These Happy Scrappy Cards are the perfect DIY project - quick, beginner friendly, and fun to create with kids. Plus, they make a thoughtful Mothers Day card!✨️ Want the free tutorial? Comment CARDS and I'll send you the link!#scrapbuster #DIYcards #mothersdaycraft #sewingforfun #handmadegift #makerslife
Sewing isn't just stitches - it's life lessons. Wa Sewing isn't just stitches - it's life lessons. Want to see all 12 lessons? Comment LESSON and I'll send you the link to our free blog article.Quilting is more than just a creative pastime- it's a journey filled with valuable  life lessons. Whether you're a beginner or an experienced quilter, the process teaches persistence, patience, problem solving and self-expression.Read our article to discover all the lessons you can learn. What has quilting taught you? Share your most important lesson in the comments.Love the pillow designs in this post? Find my sewing patterns in my Pattern Store - link in profile.#sewingpatterns #DIYhomedecor #quiltedpillow #handmadehome #sewingproject #scrapbuster #sewingforfun #beginnersewing
Follow on Instagram

Featured Pattern

Travel Sewing Kit Pattern

Featured Tutorial

Retro Drawstring Bag

Featured Recipe

Lemon Pound Cake

Connect

  • Email
  • Facebook
  • Instagram
  • Pinterest
  • Threads
  • TikTok
SUBSCRIBE TO NEWSLETTER
×

Popular Posts

  • Liberty Tissue Cover
  • Pretty Liberty Drawstring Pouch
  • Sewing with Liberty Fabric
  • {Back to School} Tissue Cover
  • 10 Gifts to Sew for Mother’s Day
  • Pin Perfection: Everything you Need to Know about Sewing Pins
  • Charm Square Fabric Tray

Copyright © 2025 Lisa. K. Cox - A Spoonful of Sugar