
One of our most popular tutorials, is our Fabric Gift Pouch we posted nearly 4 years ago. Time sure flies! I made another fabric gift pouch to use as gift wrapping and took photos of the process to update the tutorial. The original tutorial was made before I acquired a DSLR camera and was sorely in need of an update!
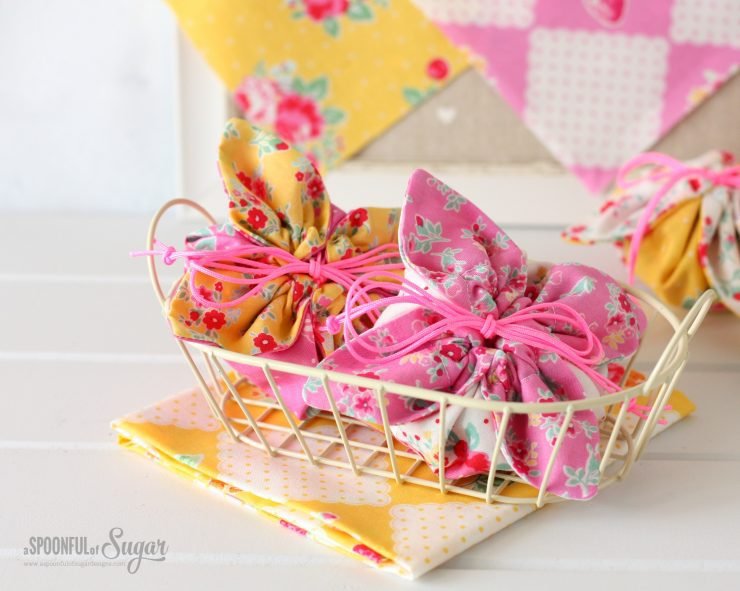
These little fabric gift pouches are perfectly sized to hold a small gift. When they are gathered up, little petals form around the drawstring opening. In this version, I used ricrac trim and simple stitching to add another element. They are so quick to make and are a great way to package little gift items. My Flower Sugar pouches are here. You can see some Christmas versions here and here.

If you would like to make one, you will need:
- Two. 8.5 x 8.5 inch inch fabric squares in contrasting fabrics. (I used a green gingham from Rosalie Quindlan Folk Hearts, and a Yellow Strawberry Print from Atsuko Matsuyma’s 30’s Collection for Yuwa – which have both been in my stash for a while).
- 1 yard white ricrac trim
- 1 small label (optional)
- white embroidery floss
- 1 1/4 yard of narrow yellow ribbon(or bakers twine)
The strawberry buttons and crocheted strawberry are just for decoration. I found those at the Perth Craft and Quilt Fair this year.

1. Pin and then baste the ricrac trim around the perimeter of Fabric 1 as shown.(This step is optional – the pouch works just as well without any edging).
2. Place the two squares together with the right sides facing and all edges aligned. Stitch them together using a 1/4 inch seam allowance and leaving a 3 inch gap in one side for turning. Clip corners and turn out through the opening. Press. Hand stitch the opening closed.
3. Using two strands of embroidery thread, stitch a running stitch around the outside of the square, approximately 1/4 inch in from the outer edge. (optional)

4. Using pins, mark 3 1/4 inches in from each corner. Fold the corners in as shown below, so each flap measures 3 1/4 inches from the tip to the fold. Press.
5. Stitch 1/2 inch from the folded edge along each flap to secure.
6. (optional) Stitch a small label to the inside of the pouch, just below the stitching on one side. Be careful to move the flap out of the way when stitching.

7. Cut the ribbon in two lengths measuring 20 inches. Thread the ribbon through all four channels, and tie ends together. Take the other length of ribbon, and starting from the opposite side of the pouch, thread the ribbon though all four channels and tie the ends together. Pull both ends of the ribbon to gather up the pouch.


If you would like to see more of what we are up to, you can follow us on Instagram, Pinterest, and Facebook.

Check out the lovely pouches made with Flower Sugar fabric here.


Well my sweet strawberries this is sew cute and practical. Thank you sew very much for sharing how-to. Creative Pouch Bliss…
Thanks Sherry 🙂
They ARE perfect! I made several and need to make one more. Believe it or not, I just visited the old post not two or 3 days ago to get measurements! I love the look of the ricrac and running stitch! Thanks for reposting!
What a coincidence Karen! I was checking it as well to get the measurements when I decided it was in need of an update 🙂 Have a great weekend.
These are adorable, I must make a couple to have on hand, thank you for sharing!
Thanks Leonie 🙂
Delicious fabrics 🙂 Such sweet version. Thank you.
Thanks Lily for stopping by! Enjoy your weekend.
This is so super cute…… I must make a few of these and my girls wold just love them to store little treasures …..
Thanks Filomena!
C’est magnifique donc j’ai tout de suite essayé, mais c’est bien moins joli que le tien.
C’est peut-être le tissu qui est trop épais.
Je recommencerai avec un autre tissu plus fin.
Merçi beaucoup
I LOVE your pouch ideas! I have SO many ideas on how to use them! I was wondering, though, if you ever thought of posting a tutorial VIDEO of it. Videos are great for beginners. My daughters Love to WATCH how certain items are made, it seems to help them feel more confident in what they do. Thanks for reading my suggestion and I love your page. I just recently found it and its my go to website!
Thanks for your feedback Monica- we are so so glad you found us! We blog as a hobby – I work, and Sarah is a student who also has a part time job. Unfortunately our time is limited and we don’t have the capacity to do video tutorials at the moment.
OOH. I hate it when my message disappears.
Anyway I was writing to say thank you. I made many of these pouches using the original tutorial. Had a bit of trouble to begin with because I couldn’t get the petals to look as nice as yours. However I got over that problem and then went on to make more in this size and an enlarged size. I also taught 4 of my grandchildren to sew the pouches (then aged 4,5,6,7). When they make something, I usually just cut the material and then sit next to them when they are sewing. They had no problems at all and put handmade bathbombs in them and gave them to their mothers. I plan to make some more using your idea with the rick rack but will also try edging with beads, lace and might try putting matching buttons on the petal ends (eg like your strawberry buttons).
Your original tutorial was on another site but I can’t remember where. I know it was yours because it was the exact pouch with the same photos and same material. Did you submit it someplace? I save projects onto my computer as I have found that sometimes on other sites the project disappears! I like how you are now putting your name on your photos – wish it had been there before because then I could have found you earlier as somehow I missed putting the site on the original. I love your site, ideas and projects. Thank you.
Hi Debby – Thanks for your comment. How lovely that you are teaching your grandchildren to sew at such a young age! Love you ideas for other methods of finishing the pouch. Must try some of those myself! The tutorial was posted a number of years ago on our blog (before we gave our blog a makeover) and we didn’t used to watermark our photos. There was at least one site who republished it in its entirety without our permission and we managed to get it removed. Hopefully no one else is sharing it without our permission. Have a great week! Lisa
This is just so cute and simple, but looks like so much more work. I might have to rethink my gift list to items that can fit into one of these! I can’t wait to make one of these!
Happy sewing Amber!
These are so cute! Thanks for sharing!
I can see many things going in these cuties!
Thanks Kerrie – they really are perfect for some many little gifts.
I recently made 42 of these from your old tutorial without a problem. I will be using them as baby shower favors this Saturday in fact!! I will be a grandma in January. I will be filling them with Hershey kisses.
A fun and simple project. Thank you for it.
Wow – you have made more of them than I have! Congratulations on becoming a grandma – enjoy your new role!
Oh so sweet! It seems quite simple to make yet the finished pouch looks fabulous!
Thanks heaps Amy! They are fun to make.
These are so cute! How big are the finished pouches? I want to make some for some candy in plastic tubs and trying to figure out if I will need to make them larger and get more fabric.
Thanks!
About how big is the finished product? I want to make some to fit plastic containers filled with chocolate and need to know if I need to make them bigger and buy more fabric. Thanks!
I tried to post earlier, but I don’t see it. I apologize if this is a duplicate.
Hi Jennifer – The Gift pouches are quite small – approx 3.5 x 3.5 x 1 inch (height). You can make them bigger – using any size square you like. Some people have used hankerchiefs or bandannas to make larger ones (personally I don’t think the larger pouches look quite so cute!).
Hi!
This tutorial is so cute! And I’m really happy I could do it! Thank you so much for sharing!
From Brasil, I wish you all the best!
Cinthia <3
Thanks Cinthia 🙂
Beautiful! I would like to make a suggestion. I did not know what you meant by channels… So I went to your old tutorial. You have a picture posted showing the thread going through the channels. You might want to post a picture like that on your new tutorial.
Thanks Becky for your feedback. Glad you enjoyed the project.
This is so cute! It’s a great way to give small gifts and I love that you can reuse the gift pouch too! Thank you for this tutorial 🙂
I featured it on my blog today, click here to see it.
Thanks so much Linda for the feature! Best wishes for Christmas.
You’re welcome! Thanks for the wishes, I wish you a very merry Christmas too!
I am in love with this idea! My daughter is graduating with her Master’s in two weeks and I have been looking for a gift bag to put the necklace I bought for her. I am so glad I came across this post! Thanks for sharing your ideas!
Congratulations to your daughter – you must be so proud 🙂
Wow, it’s the cutest and so easy to make little gift pouch I’ve seen in a long time. Thank you so much for sharing it.
Will make it as soon as I get the right materials.
Keep up the good work,.
These are so adorable! I wanted tot make them to put little trinkets in for little gifts, but when I measured 3-1/4″ from each flap, it didn’t look anything like your photo – all the points came together in the center. What am I doing wrong?
Sounds like your square was too small. My issue was the bag being too bulky to close. I will use some thinner, cheaper fabric to make my next ones to see if this will remedy that problem.
Hi, Sharon,
I just found these on Pinterest (Aug 2023) and had the same problem you did! You may not see my message here, since it‘s over 4 years since your post. Anyway, after ripping out the stitching and ironing the square flat again, I realized I was measuring the 3-1/4“ from the fold to the point in the center. That was the problem I had, all the points came together in the middle of the square. So, I tried then measuring 3-1/4“ from each corner up along each side before folding, then I folded the corners to the center and it now looks like her picture. I hope I have explained this well enough. I don‘t see how I can attach a photo to show you. Let me know if you every see this reply to your question, or if you finally figured it out like I did.
+Nov. 2022. just found this site and tutorial. Great idea. I’ll be off to fabric stores for Christmas prints. I have 4 daughters, 2 daughter-in-laws, 4 granddaughters, and 4 great granddaughters!!! yup, I’ll be busy, these look so easy to do, so after i do 3 i think the other 11 will be a snap. Need practice for sure. Merry Christmas 2022!
I’ve just found this, it’s September 23, so I’m a little late to the party, but I’m here lol. I too am thinking Christmas gifts instead of wrapping paper. Did you make your all this size, or did you go a little bigger?
Hi Denise – Welcome! I made mine this size. One year I made one for each person at our Christmas table and filled them with little treats instead of using Christmas crackers. You can make them bigger, just follow the same technique. Happy sewing!