A Spoonful of Sugar

Make. Bake. Create.

SUBSCRIBE TO NEWSLETTER
×
Menu
  • Home
  • About
    • About Us
    • Advertising
    • Press
    • FAQ
    • Disclosure
    • Grab a Button
    • Contact Us
  • Crafts
    • Crochet
    • DIY
    • Embroidery/Cross stitch
    • Gift Wrapping
    • Knitting
    • Miscellaneous
    • Paper Crafts
  • Holidays
    • New Year’s
    • Australia Day
    • Back to School
    • Valentines Day
    • Easter
    • ANZAC Day
    • Mother’s Day
    • Father’s Day
    • Halloween
    • Christmas
  • Recipes
    • Appetizers
    • Bars & Slices
    • Bread & Pastries
    • Cakes
    • Cookies
    • Confectionery
    • Cupcakes & Muffins
    • Desserts
    • Drinks
    • Ice Cream
    • Jams/Preserves
    • Main Meals
  • Sewing
    • Sewing Tutorials
    • Quilting
    • Sewing & Quilting Patterns
  • Family
    • Back to School
    • Family Fun
    • Our Home
    • Parenting
    • Travel
  • Shop
    • Pattern Store
    • Etsy Store

Tutorial: For the Closet or Wardrobe

July 5, 2011 By Spoonful of Sugar - 33 Comments

I have a few birthdays coming up this month and wanted to add a little something handmade to the gifts. After seeing Katherine’s lovely lavender sachets, I was inspired to make some Lavendar Scented Closet Sachets using brightly coloured doilies and gingham for a more modern look. 
First up, I needed some doilies (or is it doileys?). I crocheted up a bunch in front of the TV using the pattern I blogged about here. (Please note that I re-taught myself to crochet out of an American book so the abbreviations I have used are US rather than Australian. I always forget what the stitches are called here).
I also used some dyed doilies that I had on hand (bought from an etsy seller a couple of years ago). If you have an old crocheted tablecloth and want to dye it yourself, Clare has a great tutorial here. It would be a fun activity to get the kids involved in during the school holidays. 

I pulled out a stack of ginghams in different sized checks. Some bought from Japan and the rest from Materialise (local quilt store). 

For each sachet, I used:

2 squares of gingham, each measuring 3 3/4 inches x 3 3/4 inches
1 doiley – approx 2 1/2 inches in diameter
Length of brightly coloured ribbon, 2 1/2 inches in length
Dried Lavender – approx 4 tablespoons.
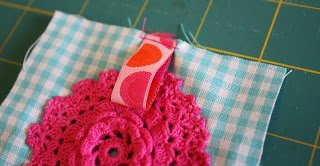
Stitch the doiley to the centre of one of the squares using a matching thread. Fold the ribbon in half and stitch it to the middle of one side using a scant seam allowance.

Layer the gingham squares together with the right sides facing. Stitch around the outside of the sachet using a 1/4 inch seam, and leaving a gap for turning on one side.
Clip corners and turn the sachet the right side out. Press. Fill with lavender and then hand stitch opening closed.

 Et Voila!

I am going to make up more of these to hang in my walk in robe. They can be attached to coat hangers or popped inside shoes to make everything smell fresh. 

Filed Under: Crochet, Sewing, Sewing Tutorials Tagged With: lavender

Never miss a post.

Get fresh new ideas delivered right to your inbox!

« Felt Wreath
Pies and Tarts »

Comments

  1. two hippos says

    July 6, 2011 at 12:34 am

    they are beautiful!

    Reply
  2. Nat @ dear little house says

    July 5, 2011 at 6:51 pm

    Very cute! I love a little doily action 🙂

    Reply
  3. Paola says

    July 5, 2011 at 8:31 pm

    So cuuuute! And useful,
    Congrats! 🙂

    Reply
  4. Handmade in Israel says

    July 5, 2011 at 9:22 pm

    These are adorable!

    Reply
  5. Siobhan says

    July 5, 2011 at 11:18 pm

    Beautiful, I love the crochet doilies.

    Reply
  6. Kathy MacKie says

    July 6, 2011 at 12:11 am

    What a great idea! I will be buying those doilies at thrift shops for sure now.

    Reply
  7. May Kristin says

    July 6, 2011 at 1:12 am

    So cute! I can even almost feel the smell of lavender through the screen! 🙂

    Reply
  8. The Pinkhouseladies says

    July 6, 2011 at 2:25 am

    wow, they are so lovely, love the crochet flowers on it, looks beautiful 🙂

    Reply
  9. clare's craftroom says

    July 6, 2011 at 2:56 am

    Oh how lovely ! Thanks so much for a great idea as I just so happen to have a few extra and now I can make these , very clever .

    Reply
  10. Linda says

    July 6, 2011 at 3:16 am

    oh these are so beautifully stunning

    Reply
  11. Catherine says

    July 6, 2011 at 4:03 am

    These look beautiful. What a lovely gift idea, thank you for the tutorial. xo

    Reply
  12. Barbara says

    July 6, 2011 at 4:22 am

    Very cute, I wouldn’t want to hide them in my closet (:

    Reply
  13. Kirsty@Bonjour says

    July 6, 2011 at 5:34 am

    Great idea, and those colours are fabulous!

    Reply
  14. nest full of eggs says

    July 6, 2011 at 5:59 am

    these are so lovely !

    Reply
  15. Echo M says

    July 6, 2011 at 9:04 am

    Another thing that is fun sometimes, is to crochet a smallish doily with a hole in the middle. then you take some dried lavender and place it in a round of cheese cloth, boil the cheese cloth pouch of lavender like you would tea, and pour the hot water over the little cotton doily. Then when they have dried, you put the doily on the hangers in your closet. This is a prettier version of the cedar disks you can buy at department stores, and it keeps the moths away. This is also great to do if you store your yarns in containers that are prone to moths. put a couple of the doilies at the bottom of the container and stack in the yarn.

    Reply
  16. Shannon says

    July 6, 2011 at 9:14 am

    So pretty!

    Reply
  17. Bela says

    July 6, 2011 at 9:46 am

    Wow, Lisa, what a wonderful idea! I just love this creation and I love crochet as well!! It seems you have creative ideas every minute, creative and lovely I must say!
    Thanks for all the sweet comments you always write to me, dear Lisa. You make my days easier and happier!!
    Love, Bela

    Reply
  18. Katherine says

    July 6, 2011 at 10:23 am

    Oh, Lisa, I love your sachets! What a fresh look those doilies have! I think I’ll try to dye some of mine and pair them with pretty fabrics like you did.

    Reply
  19. M. Brayner says

    July 6, 2011 at 11:44 am

    Lindo, obrigada por compartilhar conosco….

    Marta
    http://eucraftemuitomais.blogspot.com

    Reply
  20. Chocolate Cat says

    July 6, 2011 at 12:28 pm

    What a great modern version of the Lavender bag! May even have to teach myself to crochet again for this one. Fantastic simple tutorial, thank you.

    Reply
  21. kiki says

    July 6, 2011 at 1:34 pm

    They are so cute! I also started crocheting again! Perfect while watching TV !
    Have a nice evening,
    Kiki

    Reply
  22. JG says

    July 6, 2011 at 1:46 pm

    Lovely crocheting and these are so cute!
    ~Judy

    Reply
  23. Thimbleanna says

    July 6, 2011 at 7:29 pm

    Very Cute Lisa! I love the pretty, bright colors!

    Reply
  24. Linda says

    July 7, 2011 at 12:10 am

    Now even i could make these. I think i might try cutting out some felt doilies with my PTI dies.
    xx

    Reply
  25. KJ@letsgoflyakite says

    July 7, 2011 at 4:13 am

    I just wanted to tell you that I found you via Craft Gossip. These sachets are beautiful. When I was in Norway I picked up a bunch of crochet flowers at a craft sale this is the perfect project for them. Have a great day!

    Reply
  26. Leah says

    July 7, 2011 at 7:46 pm

    I love them!

    Reply
  27. Jill says

    July 10, 2011 at 7:52 pm

    Those lavender sachets look beautiful! Great tutorial too!

    Thanks for linking to a Round Tuit!
    Hope you have a great week!
    Jill @ Creating my way to Success
    http://www.jembellish.blogspot.com/

    Reply
  28. Christine says

    July 12, 2011 at 7:38 am

    I love this project! Not only does it look easy, but it looks fun too. If you like sachets you might also like this one for the holidays http://www.allfreecrochet.com/Christmas-Crochet/Xmas-Holly-Berry-Sachet/ct/1

    Happy Crocheting!

    Reply
  29. Anonymous says

    September 7, 2011 at 5:50 am

    I couldn’t resist commenting

    Reply
  30. Artesanatos e Mimos says

    October 9, 2012 at 10:27 am

    Hi ! I found your beautiful corner …so cute 🙂

    Reply
  31. Anonymous says

    November 26, 2012 at 8:59 pm

    Thank you very much for this great idea!

    Reply
  32. lilito handmade says

    January 25, 2013 at 5:16 am

    Beautiful, great idea!!!

    Reply
  33. CocoFlower says

    March 14, 2013 at 1:08 am

    Very nice !!!

    Reply

Leave a Reply Cancel reply

Your email address will not be published. Required fields are marked *

  • Email
  • Facebook
  • Instagram
  • Pinterest
  • Twitter
Follow on Bloglovin

My Book

Instagram

Free Tutorial: Fabric Gift Pouch Looking for a sw Free Tutorial: Fabric Gift Pouch

Looking for a sweet little project to sew? Our fabric gift pouches are one of our most popular tutorials. These cuties are quick to sew - you just need two 8 1/2 inch squares of fabric plus drawstring cord. I made these ones with pretty florals. 

You can find the tutorial over on a blog. Link to the project is in our profile. 

#aspoonfulofsugardesigns #aspoonfulsugar #flowersugarpouch #fabricgiftpouch #sewistsofinstagram #sewsewsew #sewfun #sewingtutorial #flowersugarfabric #sewing
{Wellness Wednesday} Sewing relaxes your mind and {Wellness Wednesday} Sewing relaxes your mind and body

Sewing relaxes your body and mind. Sewing is a form of meditation, as you focus on your breathing and the rhythm of the needle. Sewing can also lower your blood pressure, heart rate and muscle tension, which improves your overall health.

Stop scrolling and start sewing!

If you would like a free copy of this set of images, lease head to our blog post. Search for "Sewing for Mental Health and Wellbeing".

#aspoonfulofsugardesigns #wellnesswednesday
#sewingforwellbeing #aspoonfulsugar #justbreathe
#sewingformentalhealth
Have you started your fall sewing? If you are look Have you started your fall sewing? If you are looking for a cosy fall project, check out our Patchwork Acorn Coaster Mugrug. This is easily constructed using a courthouse steps block for the body of the acorn, and a contrasting fabric for the cap. 

The Patchwork Acorn Coaster is a Pattern of the week - it is currently 25% off in both our Pattern Store and Etsy Shop. Head to the link in our profile.

For more Fall Sewing inspiration, read out blog post on Fall Sewing Projects. The link to this is also in our profile.

#aspoonfulofsugardesigns #aspoonfulsugar #patchworkacorncoaster #acorncoaster #mugrug #sewistsofinstagram #sewsewsew #fallsewing #autumnsewing #makersgonnamake #patchwork #sewingpattern
Have you seen Tilda's new fabric range, Hibernatio Have you seen Tilda's new fabric range, Hibernation? Featuring sleeping animals and autumn accents, it us perfect for your fall sewing.

Here is a Pocketful of Sunshine Bag made with fabric from the brown and light blue colourway. 

Pattern is available in our Pattern Store and Etsy Shop - store links are in our profile.

#aspoonfulofsugardesigns #aspoonfulsugar #pocketfulofsunshinebag #tilda #tildahibernation #ilovetilda #tildaaustralia #twogreenzebras #sewist #sewfun #sewsewsew
Load More… Follow on Instagram

Featured Pattern

Travel Sewing Kit Pattern

Featured Tutorial

Retro Drawstring Bag

Featured Recipe

Lemon Pound Cake


A Spoonful of Sugar on Etsy

Categories

Archives

Connect

  • Email
  • Facebook
  • Instagram
  • Pinterest
  • Twitter

Popular Posts

  • Fall Sewing Projects: Cosy and Colourful Projects for your Home
  • Handy Guide to Quilt Sizes
  • Sunburst Quilt Block
  • Flower Sugar Pouches
  • Mushroom Ornament
  • Rotary Cutter Sewing Tool Pouch
  • Fabric Gift Pouch

Copyright © 2023 - Powered by Genesis Framework and a Creative Life - Designed by: Bellano Web Studio - Log in