A Spoonful of Sugar

Make. Bake. Create.

Menu
  • Home
  • About
    • About Us
    • Press
    • FAQ
    • Disclosure Policy
    • Contact Us
  • Crafts
    • Crochet
    • DIY
    • Embroidery/Cross stitch
    • Gift Wrapping
    • Knitting
    • Miscellaneous
    • Paper Crafts
  • Holidays
    • New Year’s
    • Australia Day
    • Back to School
    • Valentines Day
    • Easter
    • ANZAC Day
    • Mother’s Day
    • Father’s Day
    • Halloween
    • Christmas
  • Recipes
    • Appetizers
    • Bars & Slices
    • Bread & Pastries
    • Cakes
    • Cookies
    • Confectionery
    • Cupcakes & Muffins
    • Desserts
    • Drinks
    • Ice Cream
    • Jams/Preserves
    • Main Meals
  • Sewing
    • Sewing Tutorials
    • Quilting
    • Sewing & Quilting Patterns
  • Family
    • Back to School
    • Family Fun
    • Our Home
    • Parenting
    • Travel
  • Shop
    • Pattern Store
    • Etsy Store

Snowflake Cookies

December 17, 2012 By Spoonful of Sugar - 5 Comments

One of the many things we love about Christmas here at Chez Sugar is baking cookies for family and friends.  Sarah, our resident baker, is in charge of the cookie baking this year, while I sort out the cookie packaging.

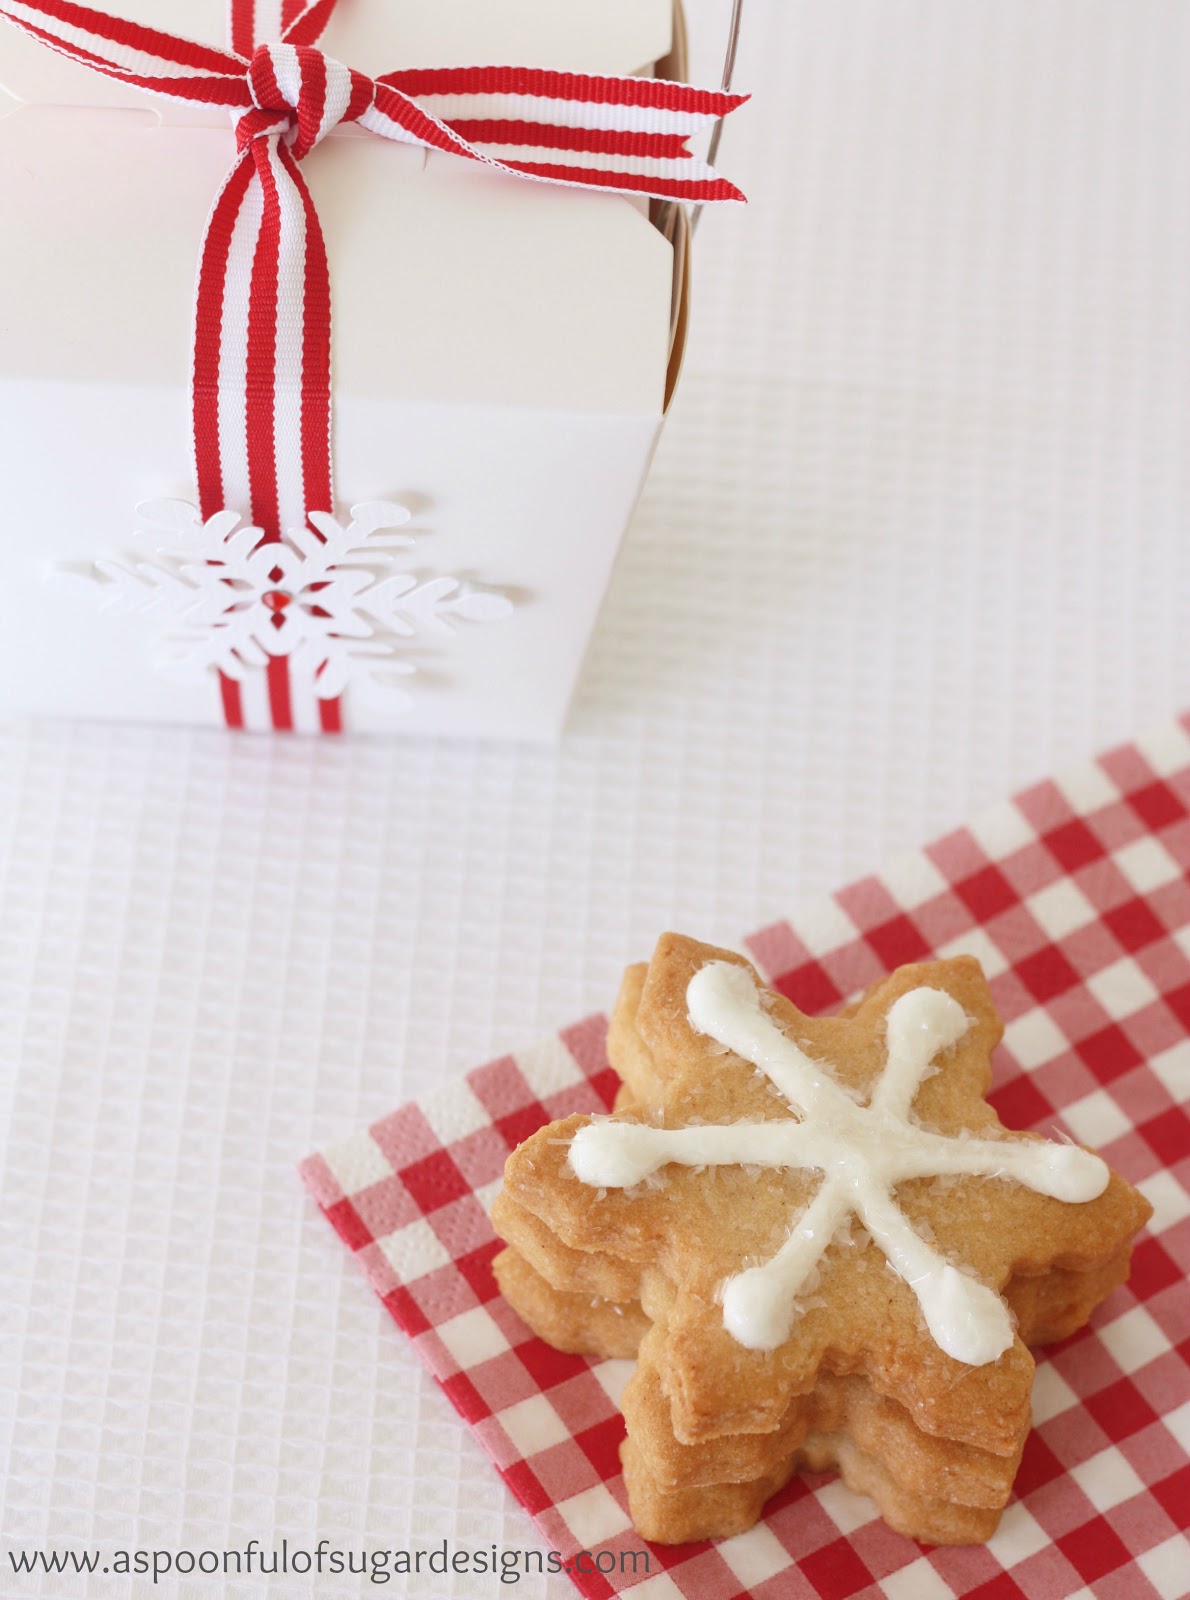
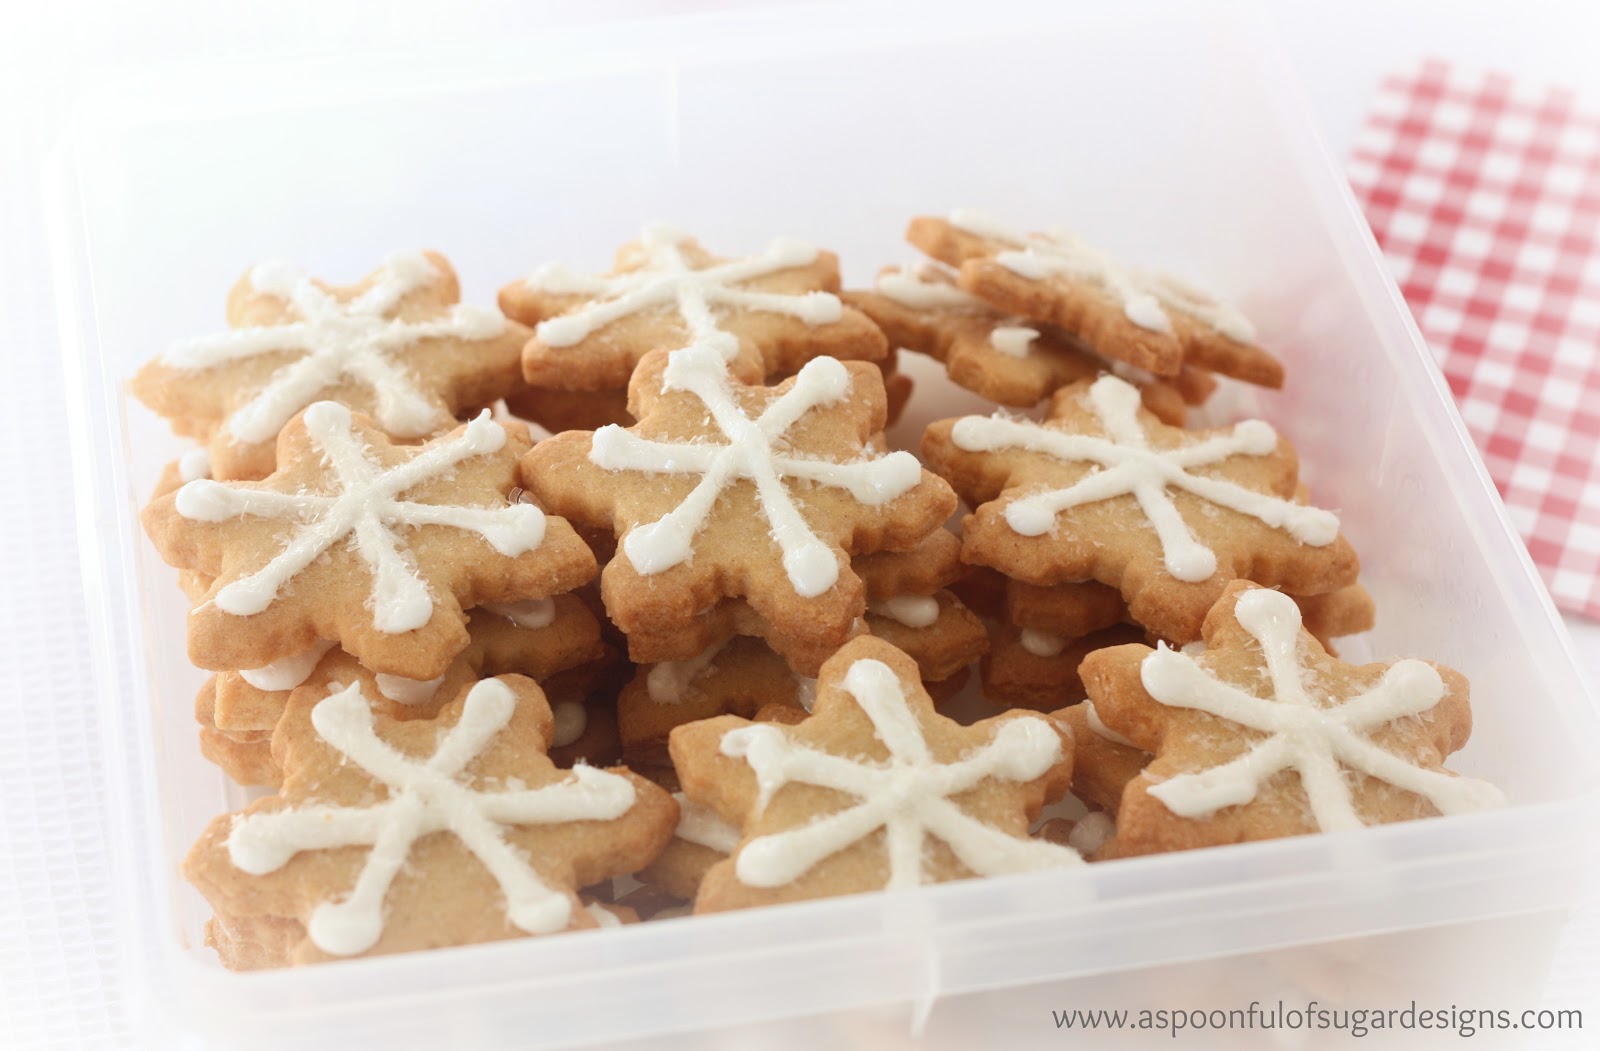
First up, Sarah has made a big batch of Cinnamon Snowflake Cookies decorated with royal icing and clear edible glitter.

Sarah used a Basic Sugar Cookie Dough to which she added 1 teaspoon cinnamon. They taste delicious and held their shape when baked.

Sugar Cookies

Ingredients:

  • 4 cups sifted plain (all-purpose) flour
  • 1 teaspoon baking powder
  • 1/2 teaspoon salt
  • 1 cup (2 sticks) unsalted butter, room temperature
  • 2 cups granulated sugar
  • 2 large eggs
  • 2 teaspoons pure vanilla extract
  • 1 teaspoon cinnamon

Method:

  1. Sift flour, baking powder, cinnamon and salt into a bowl.
  2. Put butter and sugar in the bowl of an electric mixer. Mix on medium speed until pale and fluffy. Mix in eggs and vanilla. Reduce speed to low. Gradually mix in flour mixture. Divide dough in half; flatten each half into a disk. Wrap each in plastic. Refrigerate until firm, at least 1 hour or overnight.
  3. Preheat oven to 160 deg C (325 degrees F). Let one disk of dough stand at room temperature just until soft enough to roll, about 10 minutes. Roll out dough between two pieces of plastic wrap to 1/4 inch thick. Remove top layer of plastic wrap. Cut out cookies with a 4-inch one-piece-shaped cookie cutter.  Transfer cookie dough on plastic wrap to a baking sheet. Transfer baking sheet to freezer, freeze until very firm, about 15 minutes. Remove baking sheet from freezer and transfer shapes to baking sheets lined with nonstick baking mats. Roll out scraps, and repeat. Repeat with remaining disk of dough.
  4. Bake, switching positions of sheets and rotating halfway through, until edges turn golden, 15 to 18 minutes. Let cool on sheets on wire racks.
    (Recipe Adapted from Martha Stewart)

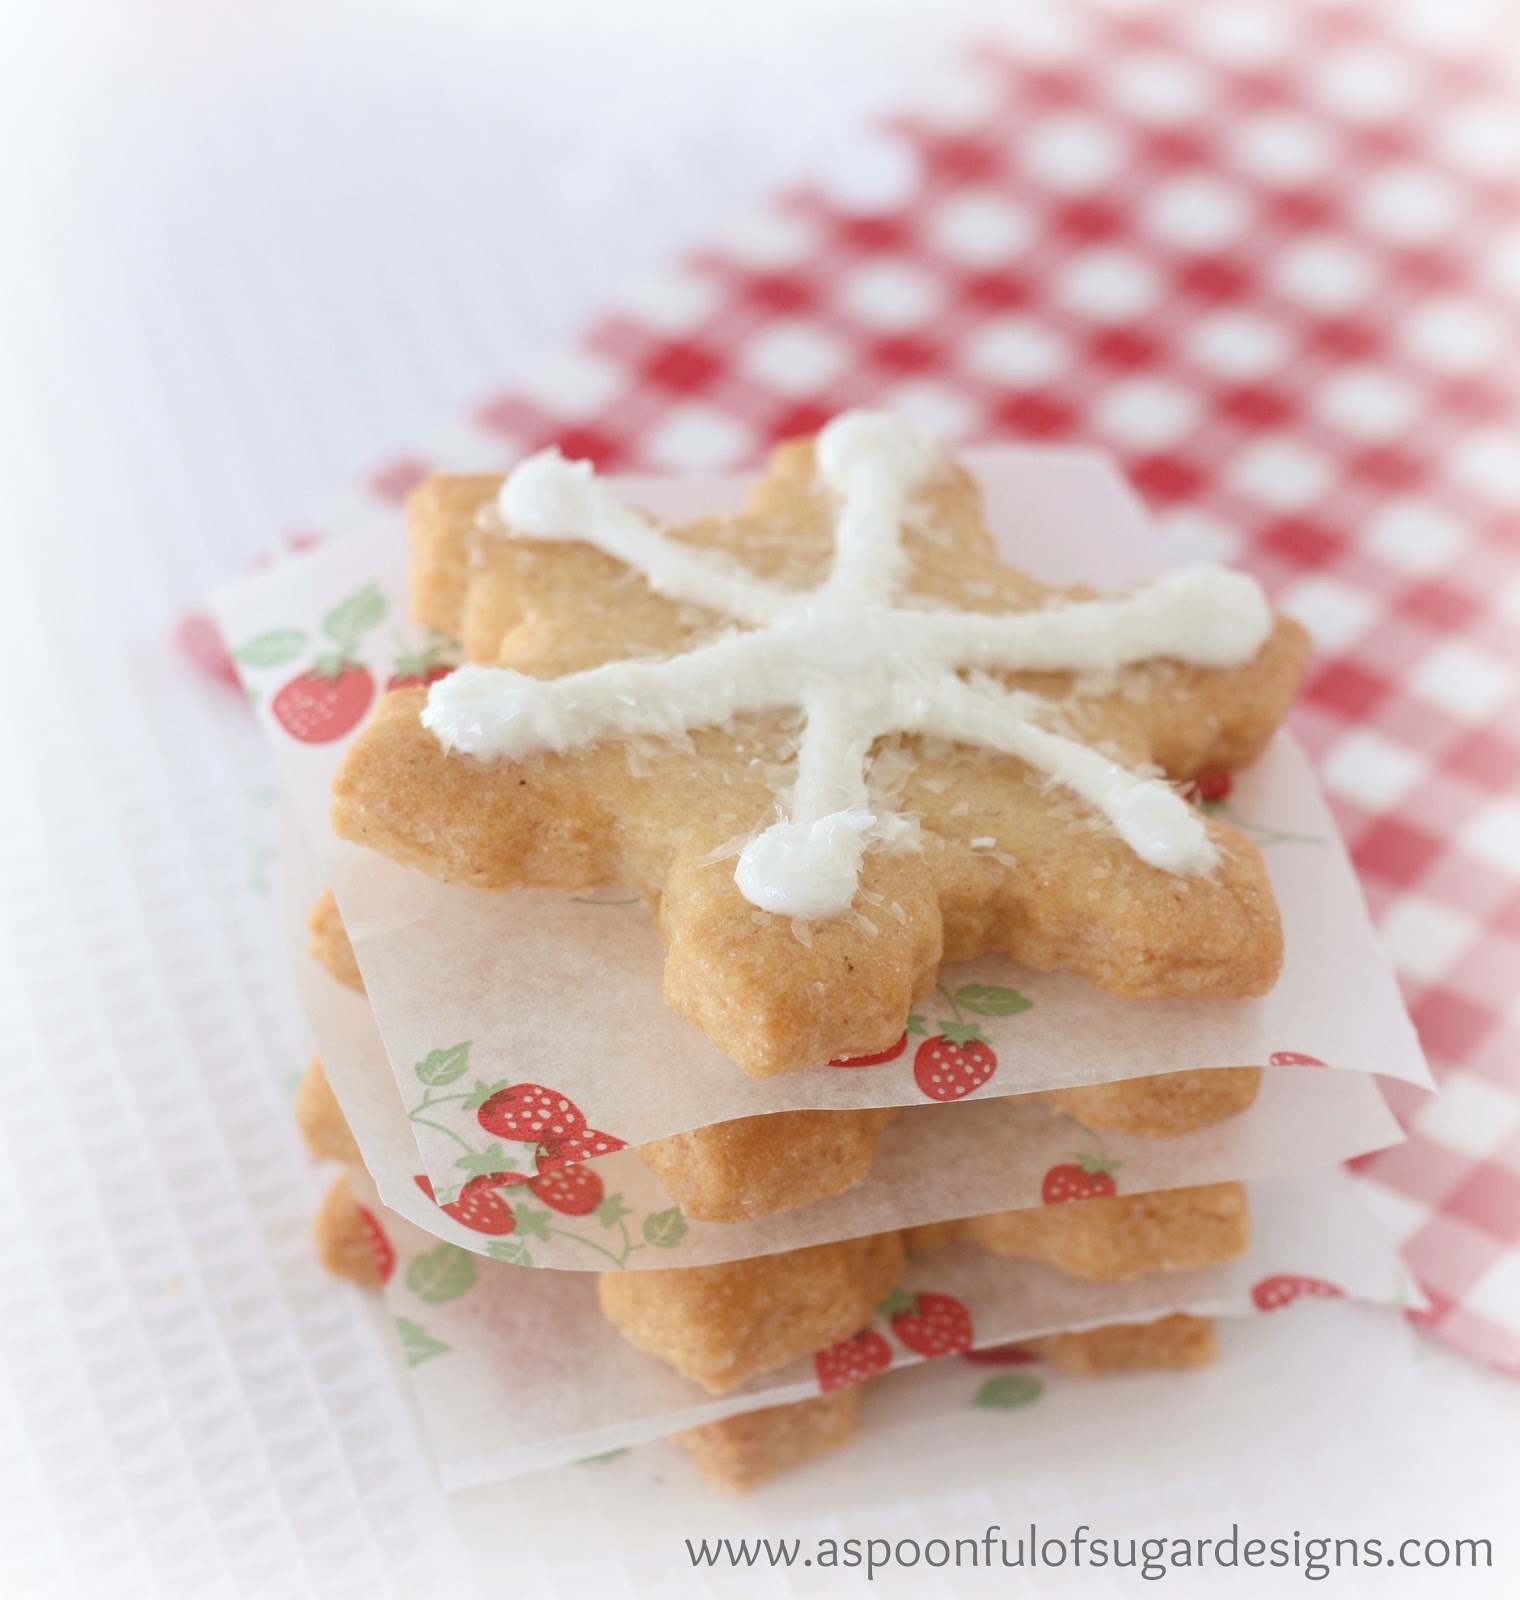
To decorate: Pipe royal icing on cookie and sprinkle with edible glitter. Allow icing to harden before stacking cookies.

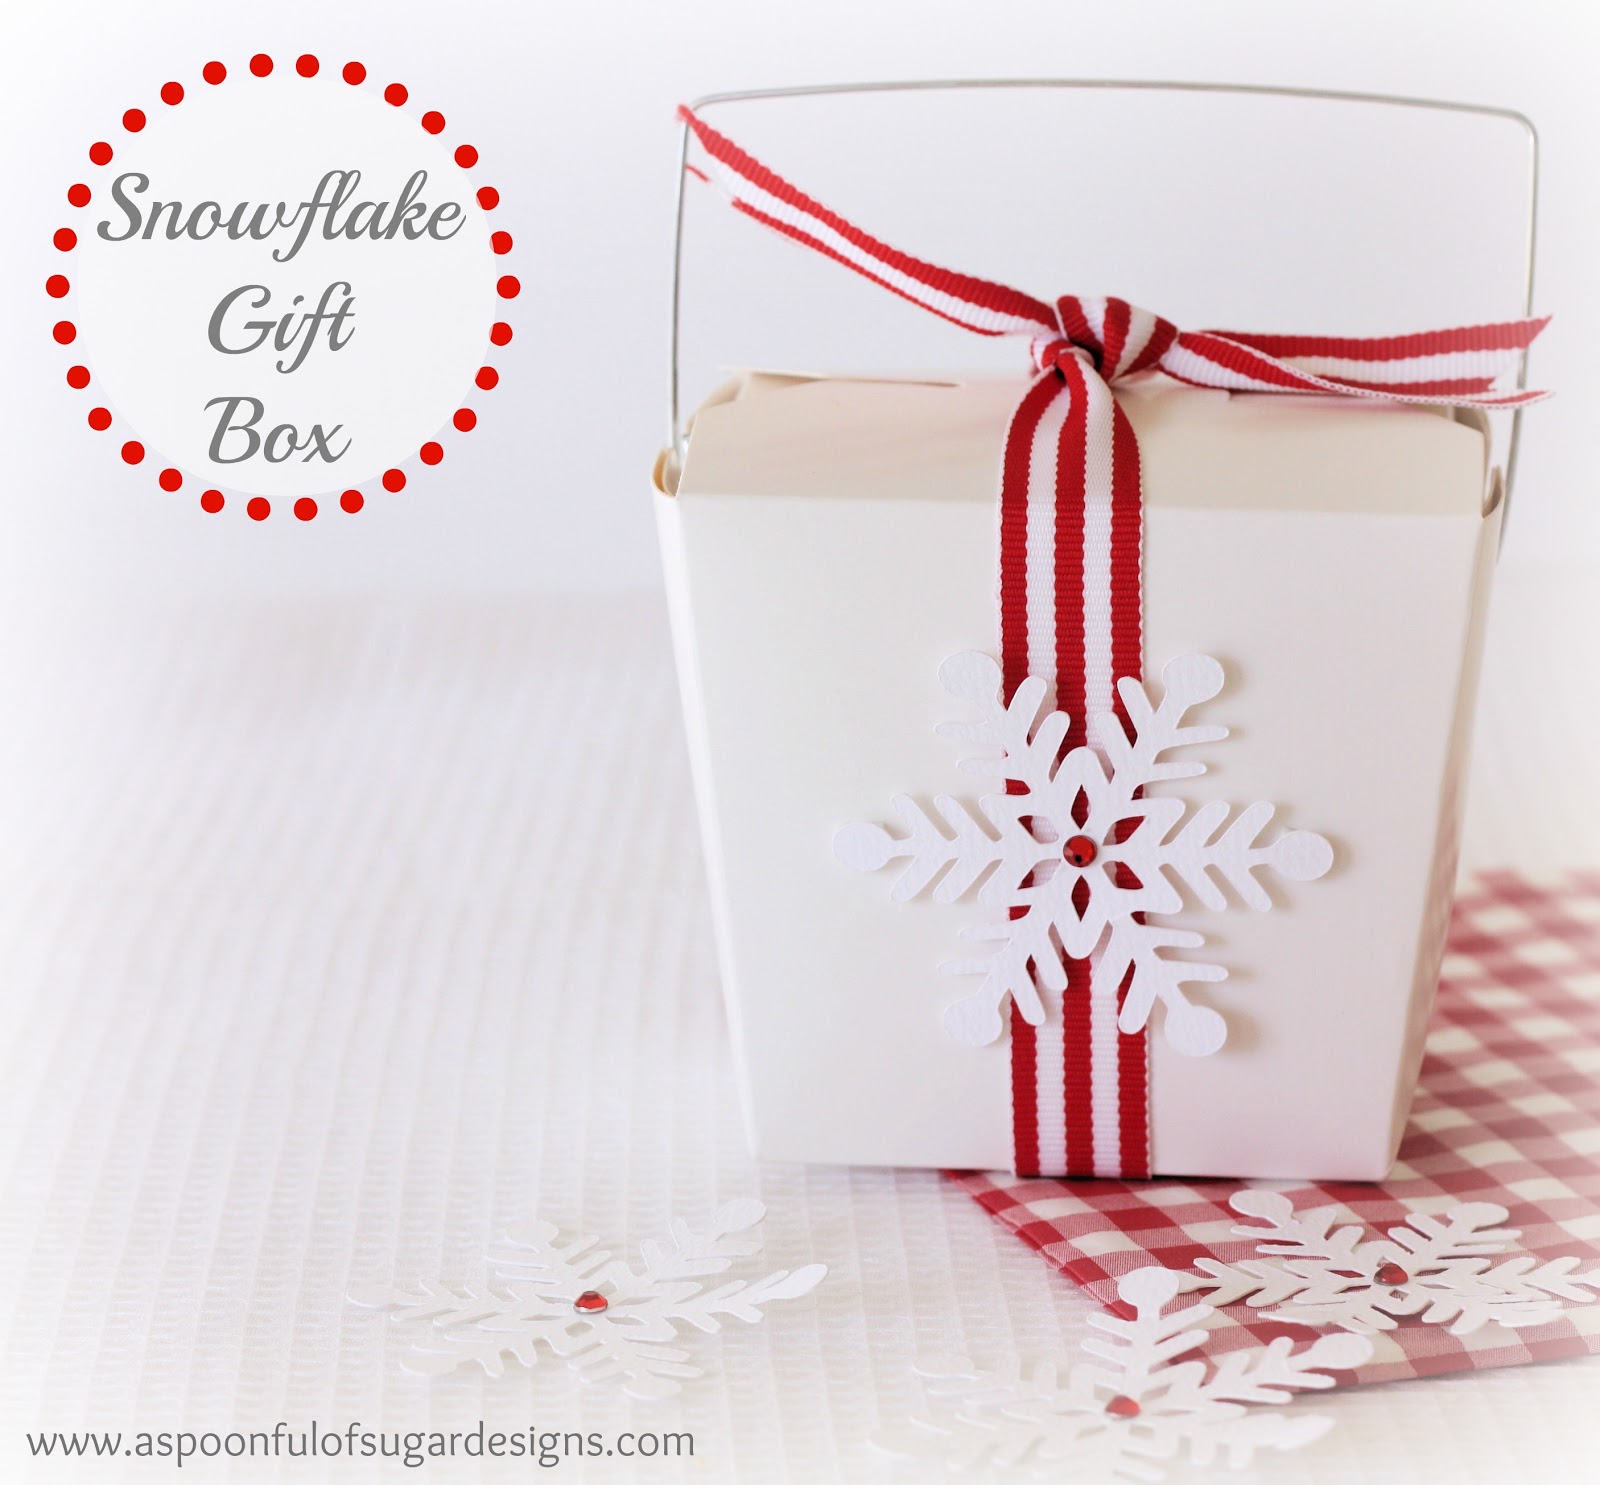
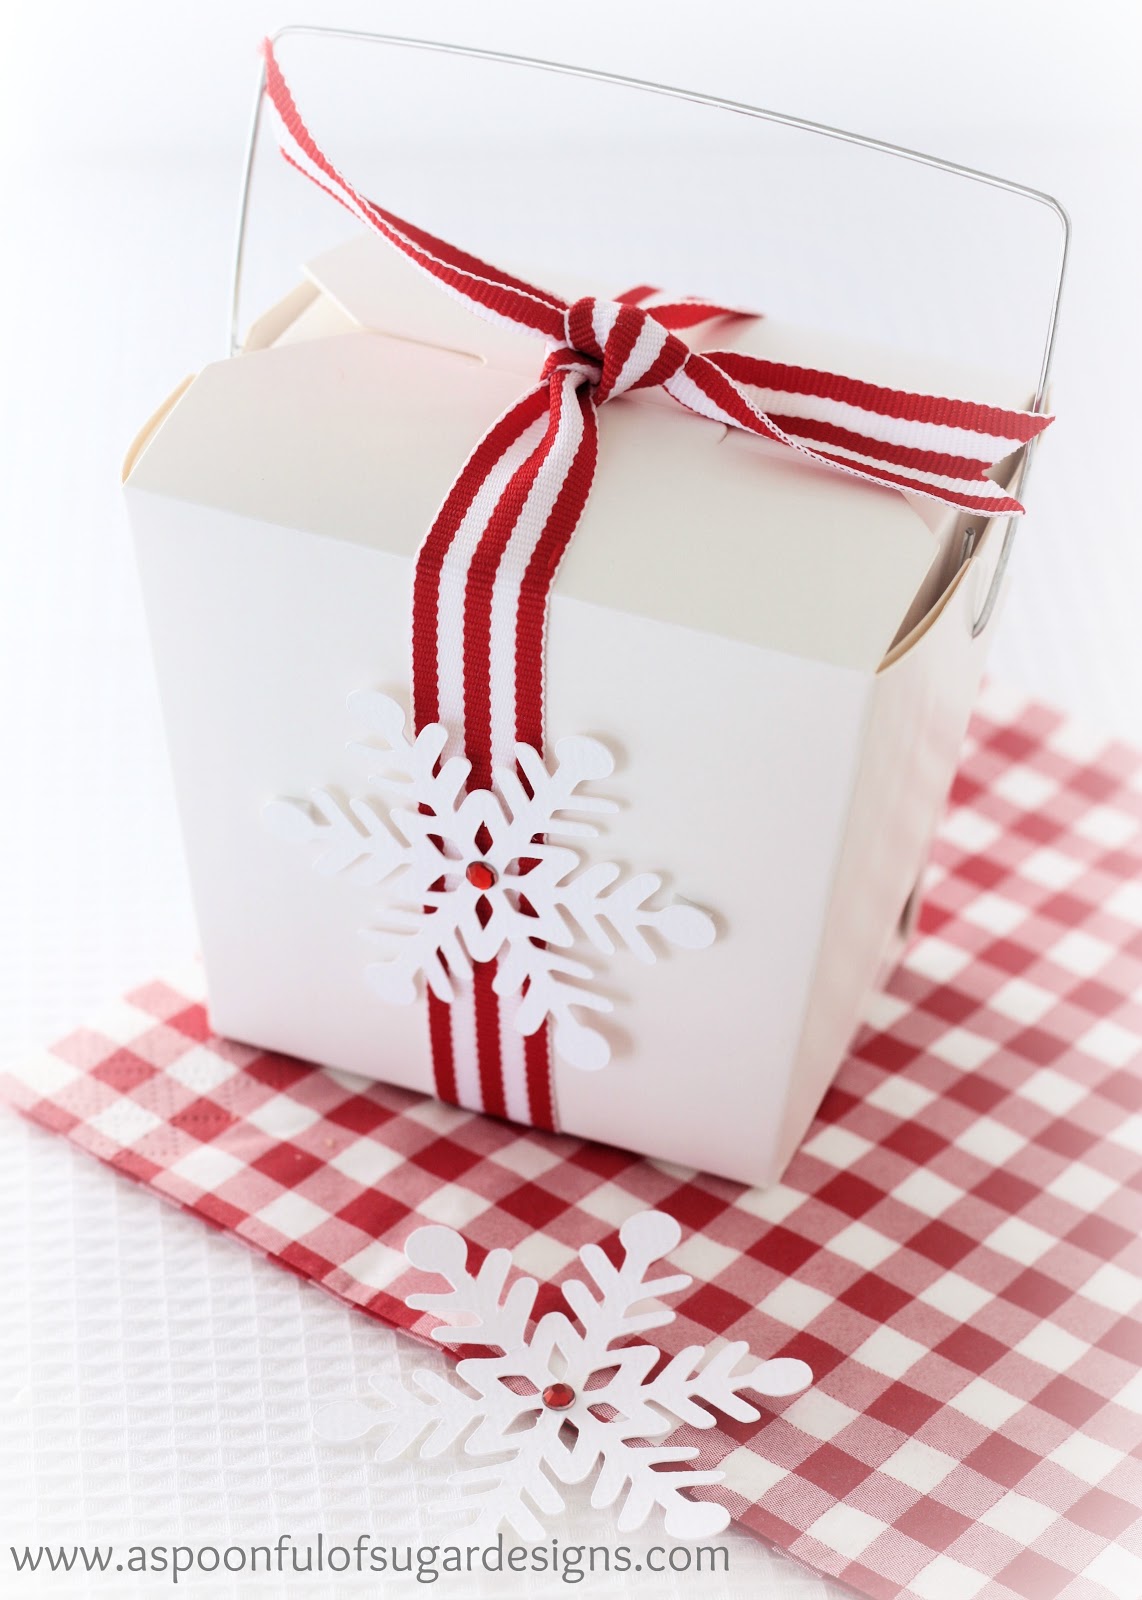
To keep with the Snowflake theme, we are packaging the Snowflake Cookies in small noodle boxes. We stacked the cookies with sheets of printed waxed paper between them. (We purchased the waxed paper at Tokyu Hands in Tokyo). We tied the box with some red and white striped ribbon, and finished it off with a die cut snowflake (using the December 25th cartridge).

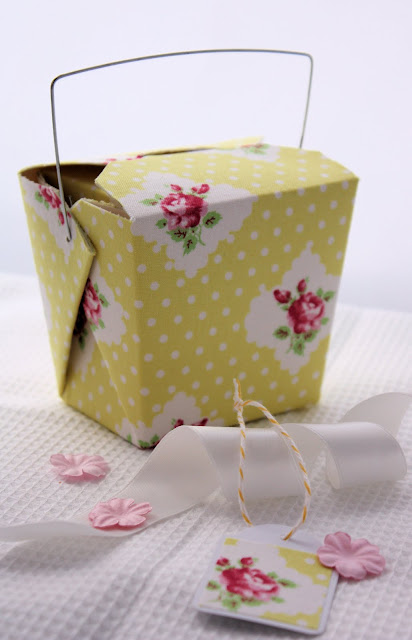
We have love Noodle Boxes and have covered them in scrap booking paper

and covered them in fabric for gift packaging.

Filed Under: Christmas, Cookies, Gift Wrapping, Recipes Tagged With: gifts

« Raspberry Ice
Don’t Delay! »

Comments

  1. VintageBettys says

    December 18, 2012 at 8:06 am

    Thankyou for sharing the recipe with us out here in blogland. They look delicious and I love the ideas of covering the noodle boxes…they look so sweet 🙂

    Reply
  2. Samelias Mum says

    December 18, 2012 at 1:39 pm

    Wonderful gift idea – especially for my children’s preschool teachers. Thanks for the inspiration 🙂

    Reply
  3. Mrs R says

    December 18, 2012 at 3:05 pm

    My first visit to your website. Those cookies look so delicious! Merry Christmas!

    Reply
  4. pigsmightfly says

    December 21, 2012 at 6:06 pm

    I am a newcomer to your blog but you ladies have some marvellous gift ideas and recipes which I could do myself. Merry Christmas and Happy New Year from us to you all :o)

    Reply
  5. Anonymous says

    December 21, 2012 at 8:49 pm

    You have the best affordable ideas for those of us who are working with a very limited budget! Love everything. Thanks for sharing.
    blugodes@aol.com

    Reply

Leave a Reply Cancel reply

Your email address will not be published. Required fields are marked *

  • Email
  • Facebook
  • Instagram
  • Pinterest
  • Threads
  • TikTok
SUBSCRIBE TO NEWSLETTER
×

Categories

Archives

PURCHASE PDF PATTERNS

We offer over 100 affordable PDF sewing patterns available for download from our store website or Etsy store. Each pattern includes detailed instructions, numerous photos, and templates.

WEB STORE ETSY STORE

Instagram

Raw edge appliqué doesn’t have to feel fiddly or i Raw edge appliqué doesn’t have to feel fiddly or intimidating. With a few simple techniques, you can create neat, crisp shapes — even tiny details like penguin beaks and hearts.I’ve put together My Top 5 Secrets for Raw Edge Appliqué to help you feel confident, whether you’re brand new to appliqué or looking to refine your finish. Save this for your next sewing session.If you’d love a quick, beginner‑friendly project to practise these tips, my Penguin Love Mugrug is the sweetest Valentine’s make — scrap‑friendly, gift‑ready, and such fun to sew.Comment PENGUIN and I’ll send you the link to the pattern. Available now in our Pattern Store and Etsy shop.  #rawedgeapplique #appliquetips #sewingtipsandtricks #mugrugpattern #penguinlove
If you’ve ever wanted to add eyelets or grommets t If you’ve ever wanted to add eyelets or grommets to your sewing projects, here’s a quick look at how I install them using my DK93 snap press. It’s the same tool I use for snaps — and it makes installing eyelets beautifully quick and consistent.For this Ribbon Pouch, I used the Liberty Gifts from the Garden collection (printed on Lasenby cotton and released in January 2026). The colours and motifs pair so well with the little ribbon tie detail.Here’s how to install the eyelets:Punch out the four holes using a hole‑cutting die.Place the eyelet into the hole.Press it into place using the snap press.That’s it — easy peasy, and it gives the pouch such an elevated, professional finish. I love how clean and sturdy the result is.Fabric is Gifts from the Garden by Liberty - kindly provided by @regent_street_fabrics — thank you!If you’d like the Ribbon Pouch pattern (it comes in 3 sizes), comment RIBBON and I’ll send the link straight to you.Ribbon Pouch Sewing Pattern: available in our Pattern Store and Etsy shop ( links in profile).#SewingInspiration #SewingProjects #Eyelets #Grommets #SnapPress
The Twirling Treasures Hot Pad & Placemat Set show The Twirling Treasures Hot Pad & Placemat Set showcases one of my favourite FPP designs — a stunning kaleidoscope‑style block that always turns out beautifully. Kaleidoscope blocks are some of my most popular FPP patterns, and this set is such a fun way to use them.  This set includes six sizes, making it incredibly versatile: use them as hot pads, trivets, placemats, or simply as a way to add a pop of colour to your kitchen.For these samples, I went with a monochromatic scrap‑busting approach, pairing fabrics from the same colour family with a low‑volume background. The black‑and‑white striped binding adds such a crisp, modern finish. It’s a wonderful project for building your FPP confidence — and a fantastic way to use up those treasured scraps.The Twirling Treasures Hot Pad set is our Pattern of the Week. It is currently 25% off this week in our Pattern Store and Etsy Shop.If you’d like to sew your own set, comment TWIRL and I’ll send the pattern link straight to you.Happy sewing! Lisa 🌸#FoundationPaperPiecing #Quilting #HotPads #ScrapBuster #KitchenSewing
The Ribbon Pouch is one of those little makes that The Ribbon Pouch is one of those little makes that feels special from the very first stitch. I made this sweet trio in the Liberty Gifts from the Garden collection, and the colours couldn’t be more perfect for gifting, organising, or adding a little beauty to your everyday.Each pouch features: 🌼 A simple ribbon tie closure 🎀 Optional sew‑in tags or DIY felt/fabric labels 🧵 Three practical sizes — perfect for notions, treats, or small gifts ✨ A quick, beginner‑friendly sewIf you’d like to make your own, comment RIBBON and I’ll send the pattern link straight to your inbox. Save this for your next weekend project — it’s such a satisfying little sew. Pattern is available in our Pattern Store.Thanks to @regent_street_fabric for the Gifts from the Garden fabric collection. (released Jan 2026)#SewingInspiration #SewingProjects #LibertyFabric #SewingPatterns #BeginnerSewing
Let’s sew a Penguin Love Coaster — the sweetest li Let’s sew a Penguin Love Coaster — the sweetest little project for Valentine’s Day gifting. Penguin Love is an irresistibly cute mugrug featuring a tiny penguin offering up a heart, brought to life with simple raw‑edge appliqué. It’s scrap‑friendly, beginner‑friendly, and such a joyful way to use those favourite little fabric pieces you’ve been saving.Whether you’re sewing for Valentine’s Day, Mother’s Day, or simply to brighten someone’s day, this quick make delivers instant charm. It’s gift‑ready, fun, and full of personality — the perfect little addition to your sewing table or a thoughtful handmade surprise for someone you love.Pattern Details: Penguin Love Mugrug PDF Sewing Pattern is available in our Pattern Store & Etsy Shop.If you’d like the link, comment PENGUIN and I’ll send the link straight to you.#rawedgeapplique #ValentinesDaySewing #HandmadeValentine #SewingProjects #BeginnerFriendlySewing
If you love making handmade gifts, here’s one of m If you love making handmade gifts, here’s one of my favourite ways to make them feel extra special — it’s all in the details. ✨This is my All Seasons Gift Tote, sewn in the beautiful Liberty Gifts from the Garden fabric. It’s a simple, versatile tote… but the right finishing touches can take it from “homemade” to handcrafted and professional.In the reel I’m sharing three of my go‑to upgrades:
✔️ Cotton bag strapping for structure and durability
✔️ Linen labels for a soft, elevated finish
✔️ Sew‑in tags to give your project that boutique feelThese little additions are quick, inexpensive, and make such a difference — especially when you’re gifting your makes.If you’d like more details on the All Seasons Gift Tote pattern, comment Seasons below and I’ll send the link straight to you.Happy sewing, friends. I hope this inspires you to add a little extra magic to your next project. ✂️Pattern Details: All Seasons Gift Tote available in my Pattern Store
Fabric Details: Gifts from the Garden by Liberty fabrics. Printed on Lasenby cotton. Thanks to @Regent_street_fabrics#libertyfabric #sewinginspiration #sewingtips #weekendsewing #bagmaking
Follow on Instagram

Featured Pattern

Travel Sewing Kit Pattern

Featured Tutorial

Retro Drawstring Bag

Featured Recipe

Lemon Pound Cake

Connect

  • Email
  • Facebook
  • Instagram
  • Pinterest
  • Threads
  • TikTok
SUBSCRIBE TO NEWSLETTER
×

Popular Posts

  • Charm Square Fabric Tray
  • Merry Little Christmas Sewing Projects
  • {Back to School} Tissue Cover
  • Raw Edge Applique Tips
  • Fabric Gift Pouch
  • Sewing Gifts 101: Easy and Affordable Ideas for Your Crafty Friends
  • Free Holiday Sewing Tutorials

Copyright © 2026 Lisa. K. Cox - A Spoonful of Sugar