A Spoonful of Sugar

Make. Bake. Create.

Menu
  • Home
  • About
    • About Us
    • Press
    • FAQ
    • Disclosure Policy
    • Contact Us
  • Crafts
    • Crochet
    • DIY
    • Embroidery/Cross stitch
    • Gift Wrapping
    • Knitting
    • Miscellaneous
    • Paper Crafts
  • Holidays
    • New Year’s
    • Australia Day
    • Back to School
    • Valentines Day
    • Easter
    • ANZAC Day
    • Mother’s Day
    • Father’s Day
    • Halloween
    • Christmas
  • Recipes
    • Appetizers
    • Bars & Slices
    • Bread & Pastries
    • Cakes
    • Cookies
    • Confectionery
    • Cupcakes & Muffins
    • Desserts
    • Drinks
    • Ice Cream
    • Jams/Preserves
    • Main Meals
  • Sewing
    • Sewing Tutorials
    • Quilting
    • Sewing & Quilting Patterns
  • Family
    • Back to School
    • Family Fun
    • Our Home
    • Parenting
    • Travel
  • Shop
    • Pattern Store
    • Etsy Store

{Sewing Tutorial} Pretty Fabric Envelopes

October 28, 2015 By A Spoonful of Sugar - 30 Comments

Pretty Fabric Envelopes Sewing Tutorial/ A Spoonful of Sugar

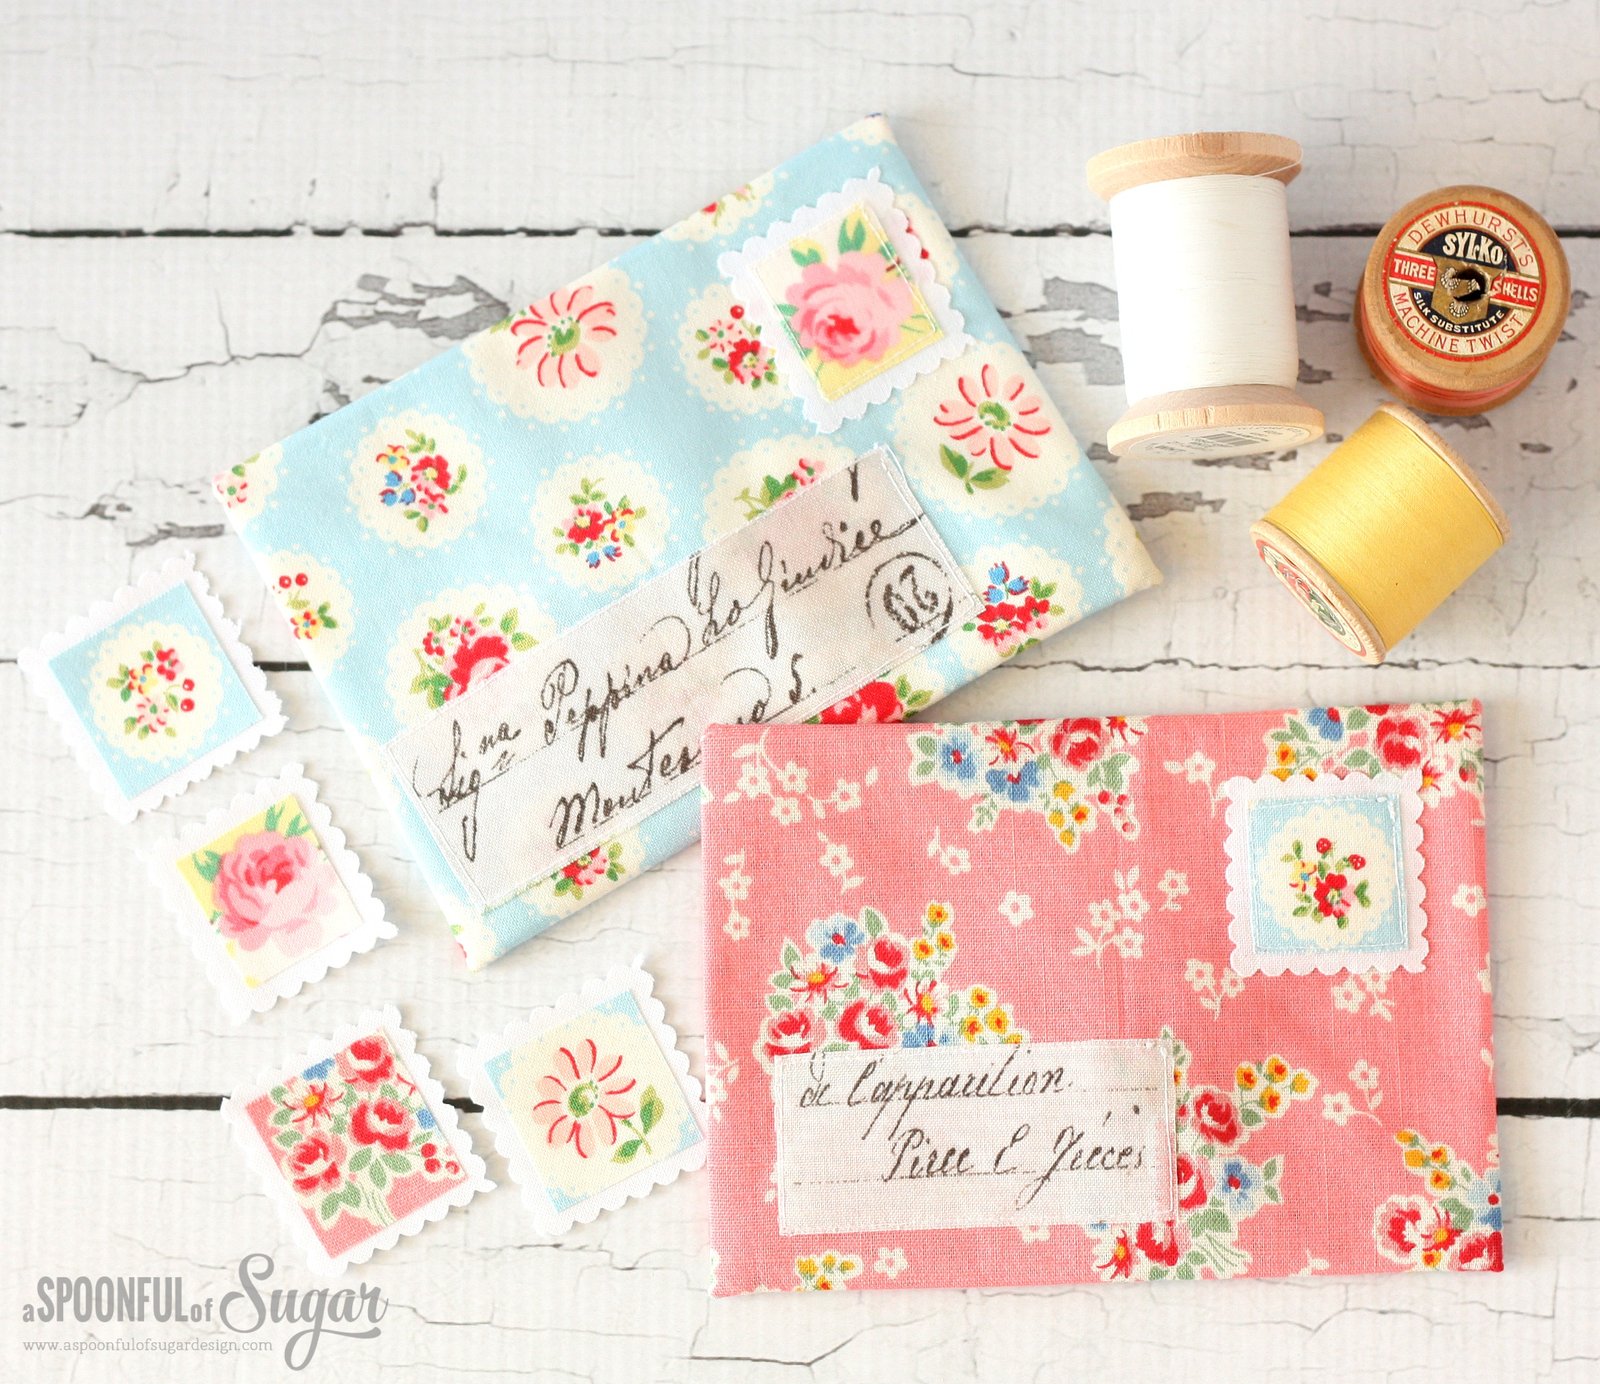
For our Christmas gift giving, we have made some Pretty Fabric Envelopes to hold gift cards or money – perfect packaging for those on your list who are hard to buy for! Made from sweet fat quarters of fabric, they feature fabric stamps, address labels, and embroidered details. They are easily constructed in under an hour and a fun way to use some fabric “scraps” .

Pretty Fabric Envelopes Sewing Tutorial/ A Spoonful of Sugar

If you would like to make your own Pretty Fabric Envelopes, you will need:

  • two fat quarters of fabric (for envelope)
  • assorted fabric scraps (for stamps)
  • small piece of white homespun fabric
  • double sided fusible web (such as steam a seam or vliesofix)
  • small piece of fusible interfacing
  • text or script print (optional)
  • embroidery thread
  • snap fastener
  • a small envelope (to use as a template)

Fabric Stamps

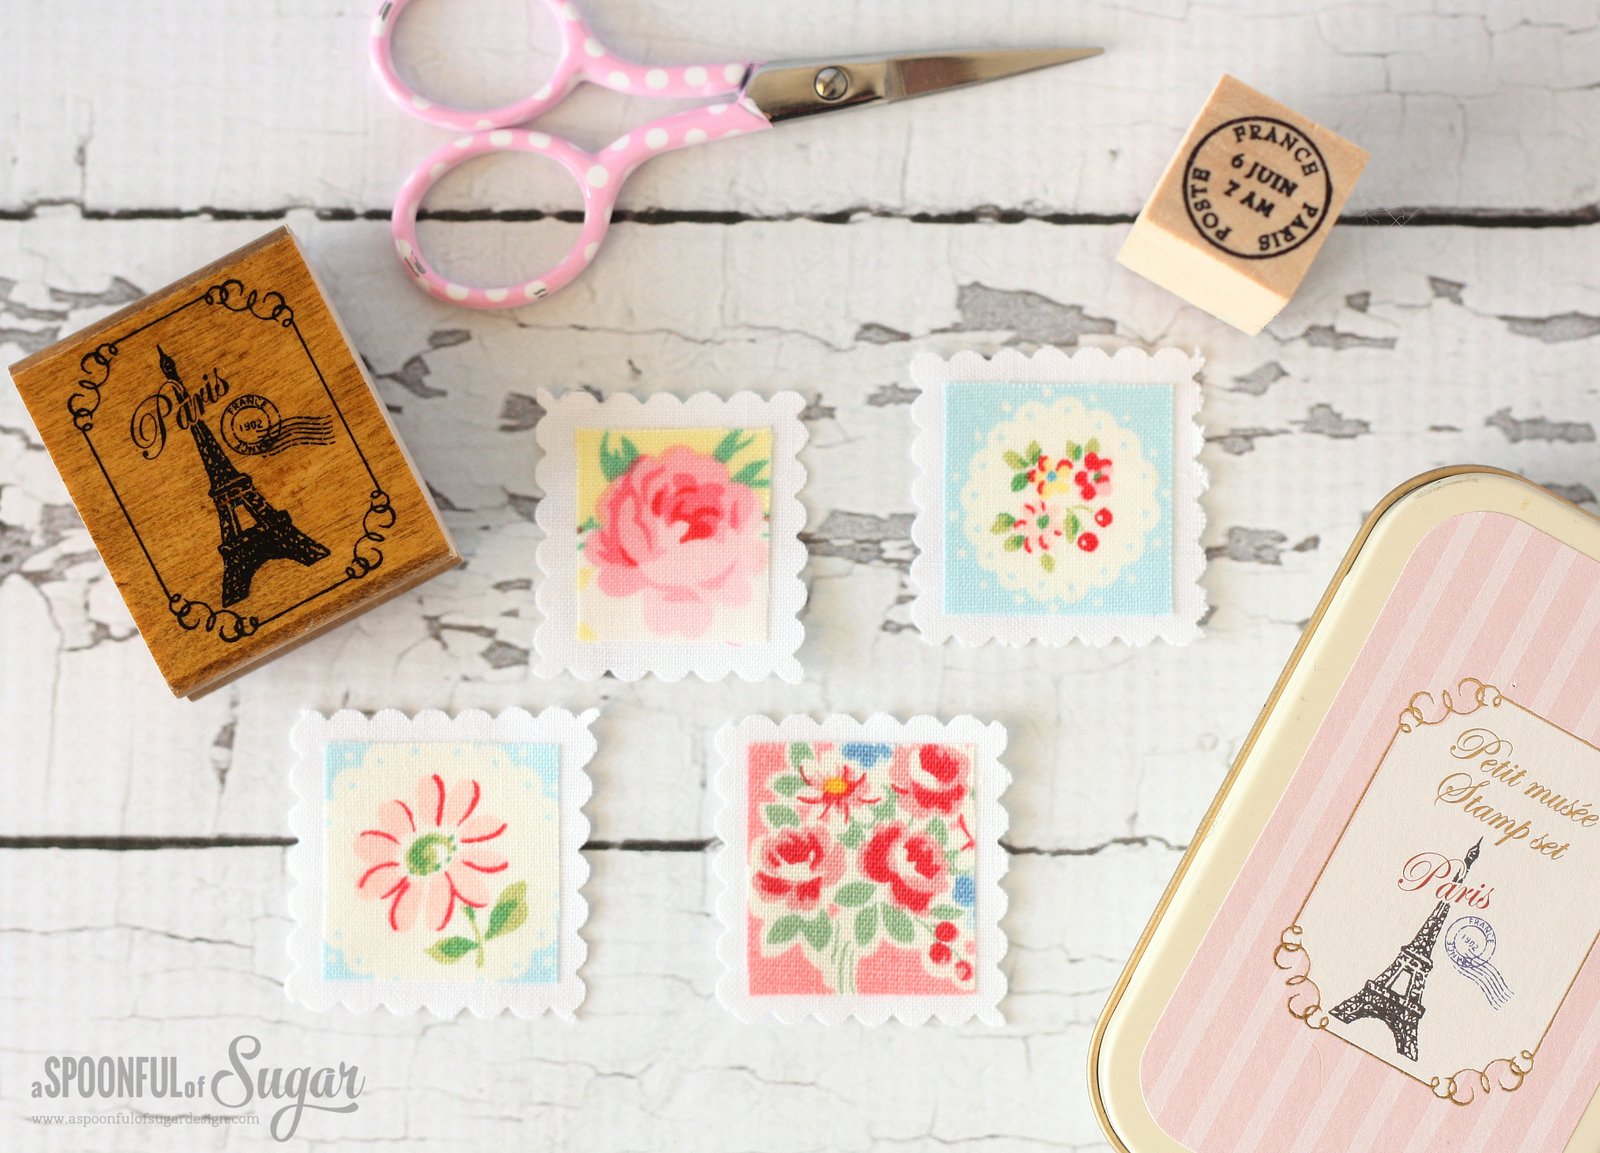
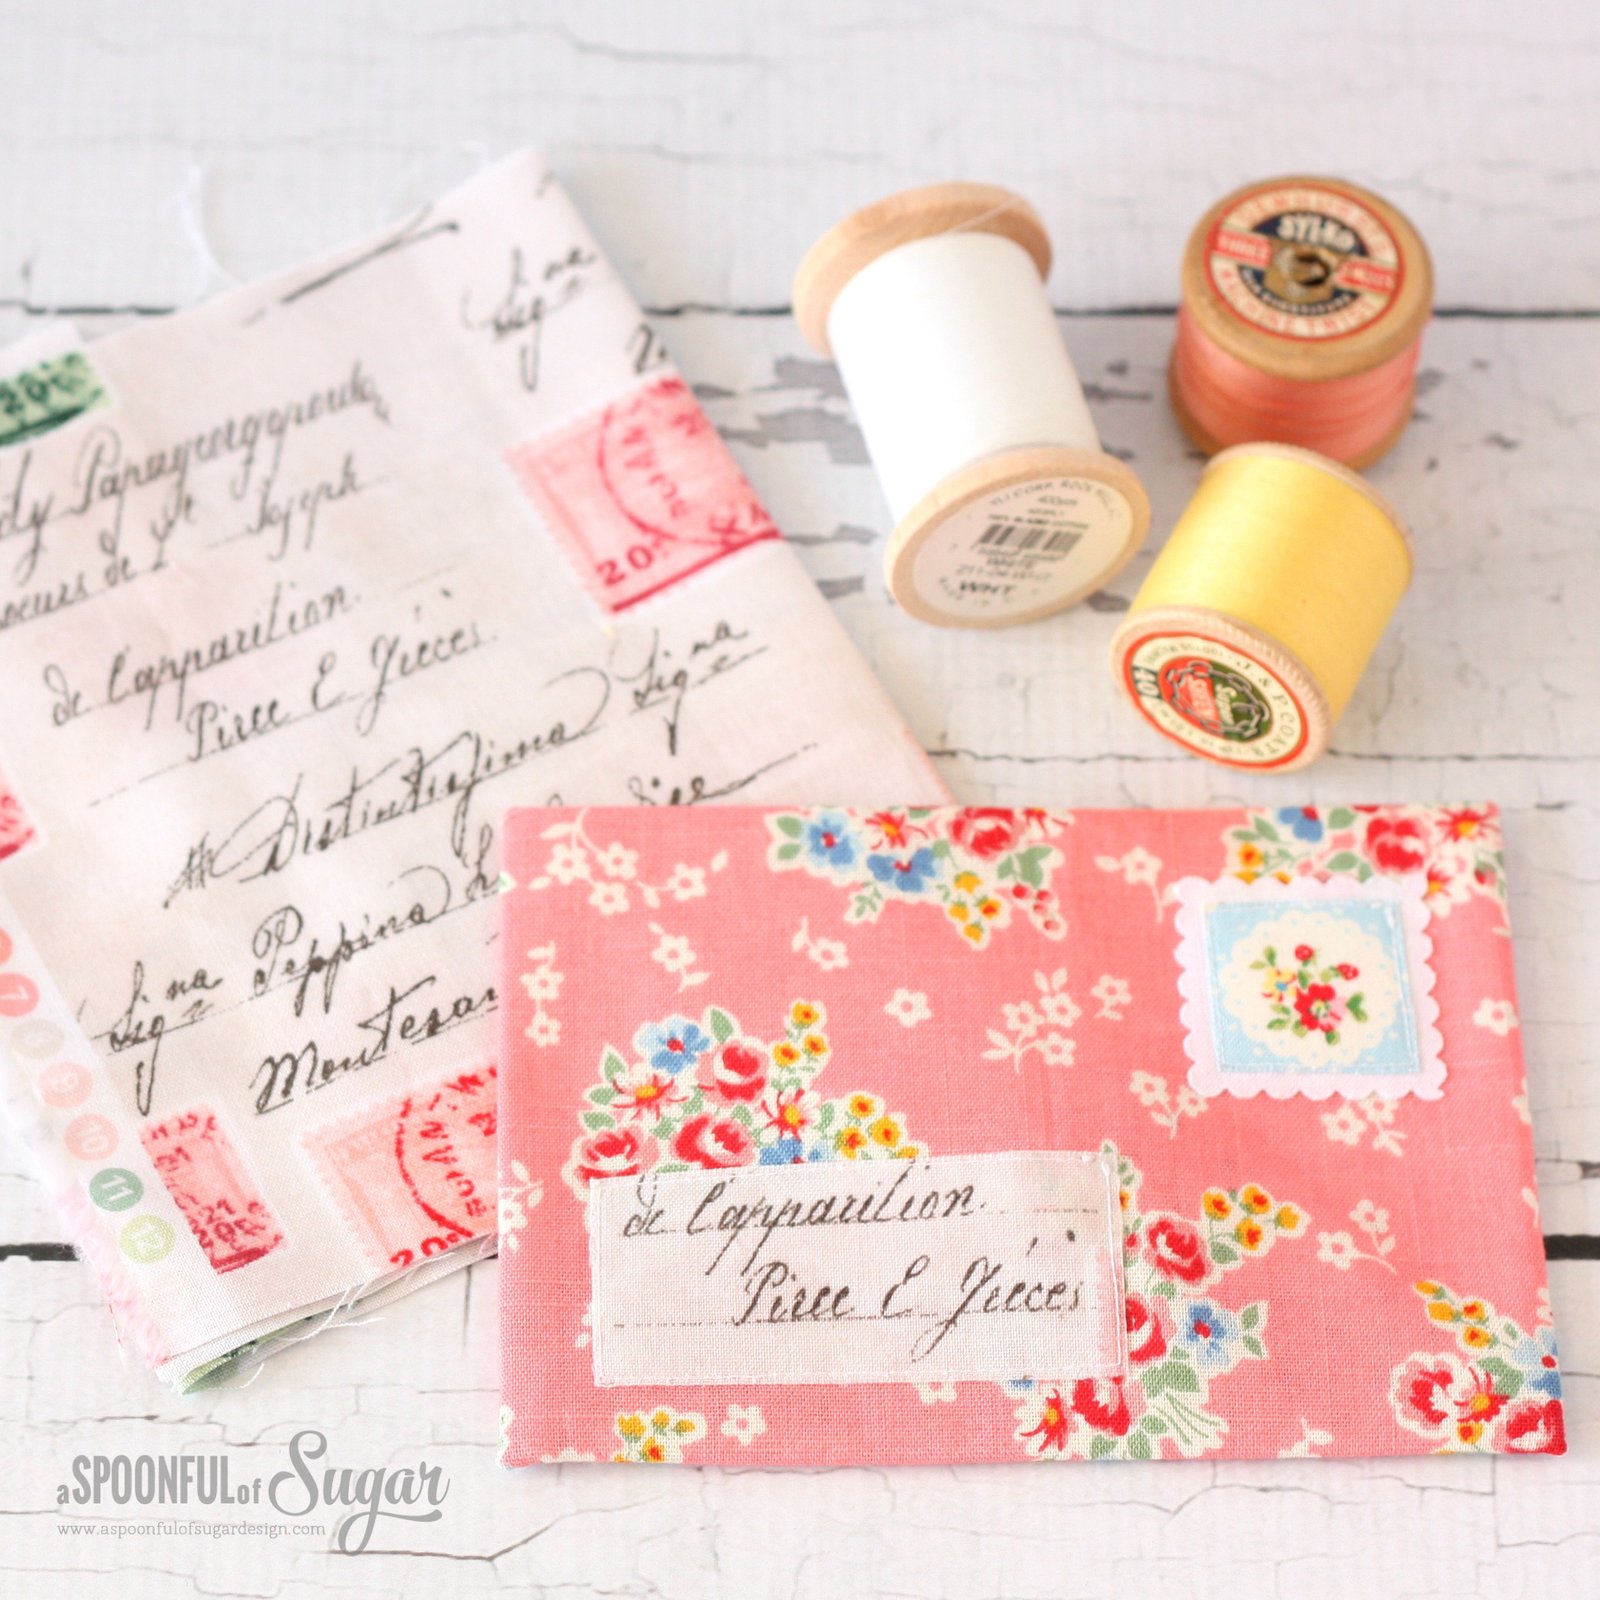
1. Firstly, make some fabric stamps to decorate the front of your envelopes. Cut out some cute fabric images from your scraps and then fuse them onto the white cotton using fusible web. Next apply another backing of fusible web to the white homespun and then cut with your fabric scallop shears or pinking shears. These fabric stamps were inspired by the stamps made by Amy Morinaka in her book, Zakka Handmades.

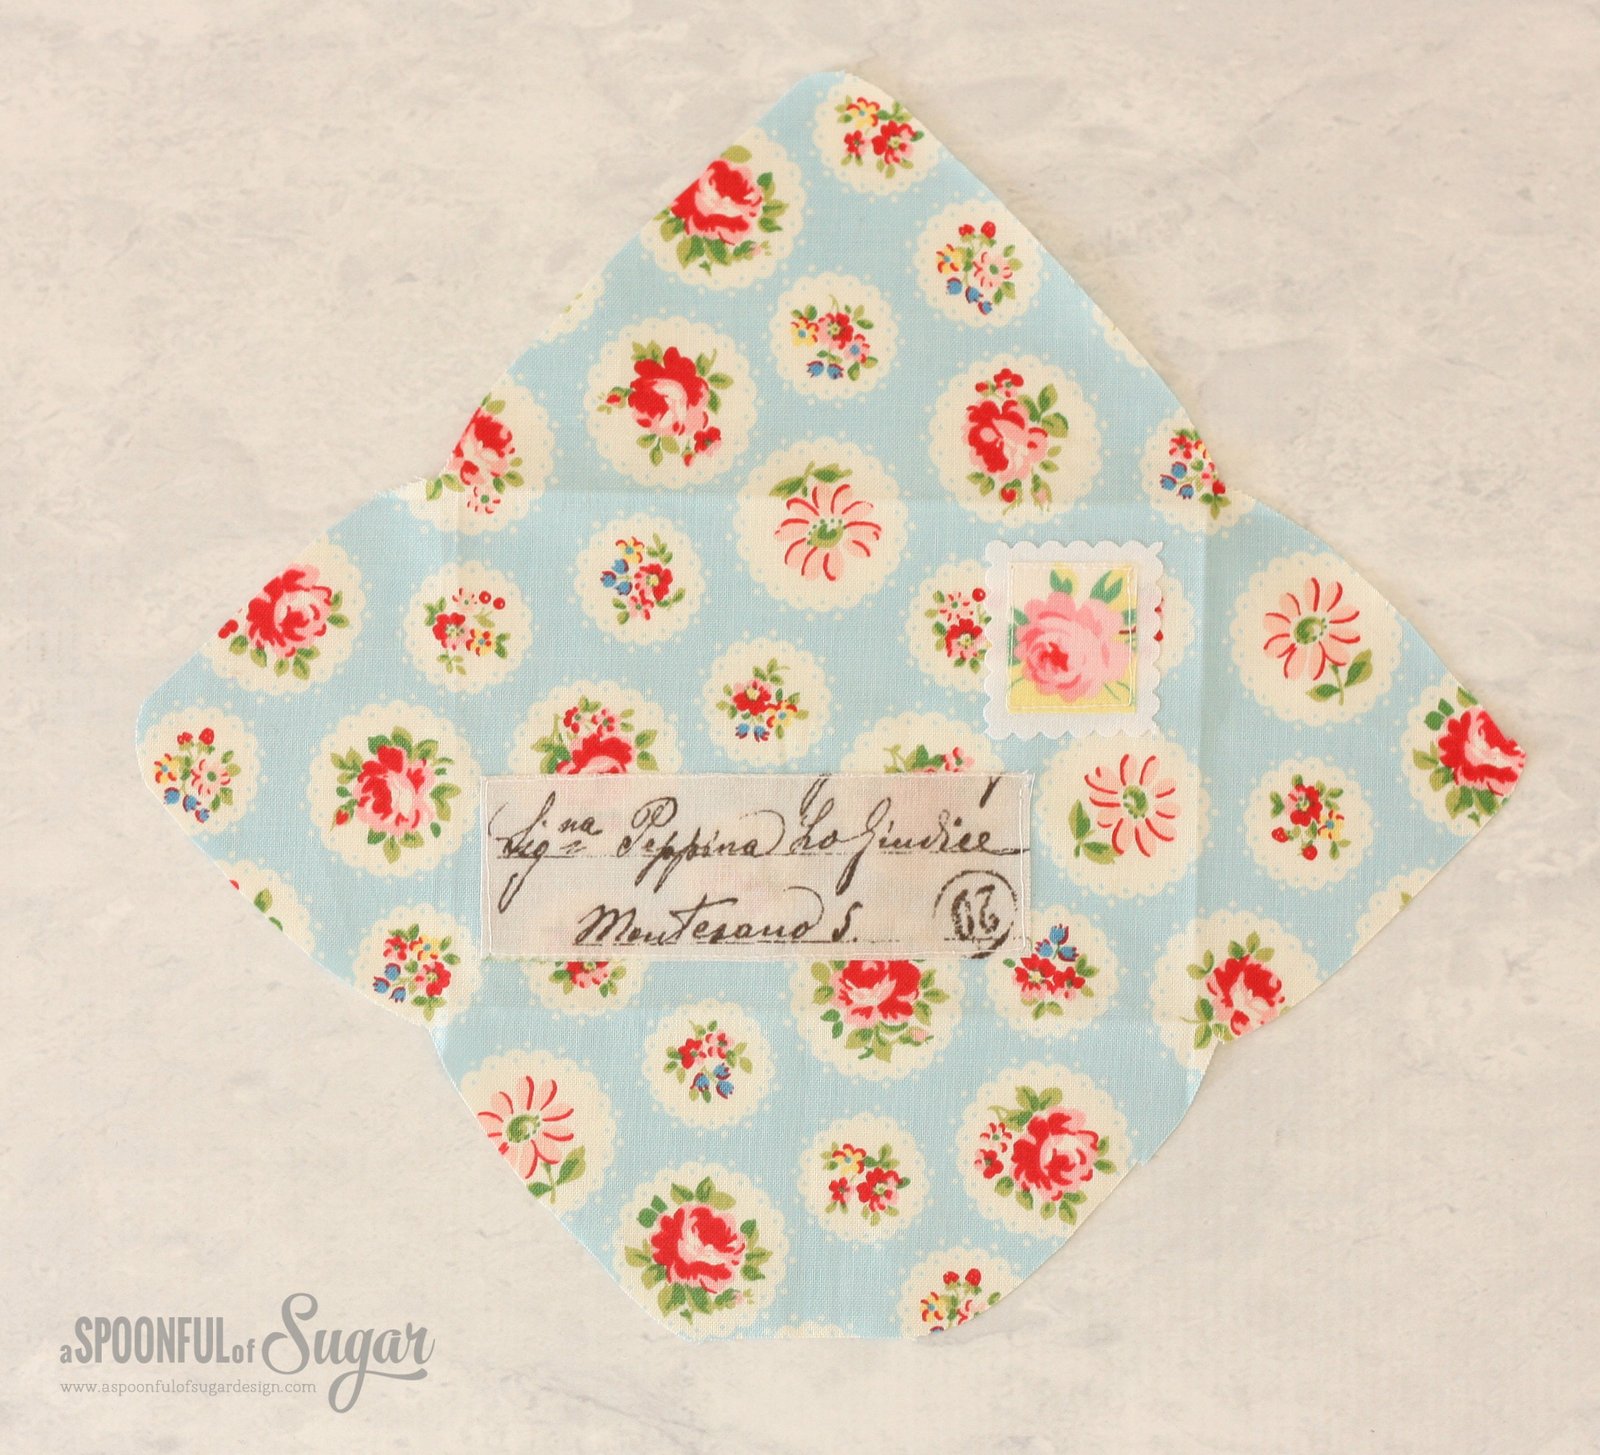
2. Make an address label using your preferred method. Options include: Use text or script print (as we have used). Cut out a rectangle of the print and apply fusible web to the wrong side in preparation for fusing it to the front of the envelope.

Alternatively, hand embroider a name/address onto a rectangle of linen fabric. Another option would be to print the address onto fabric.

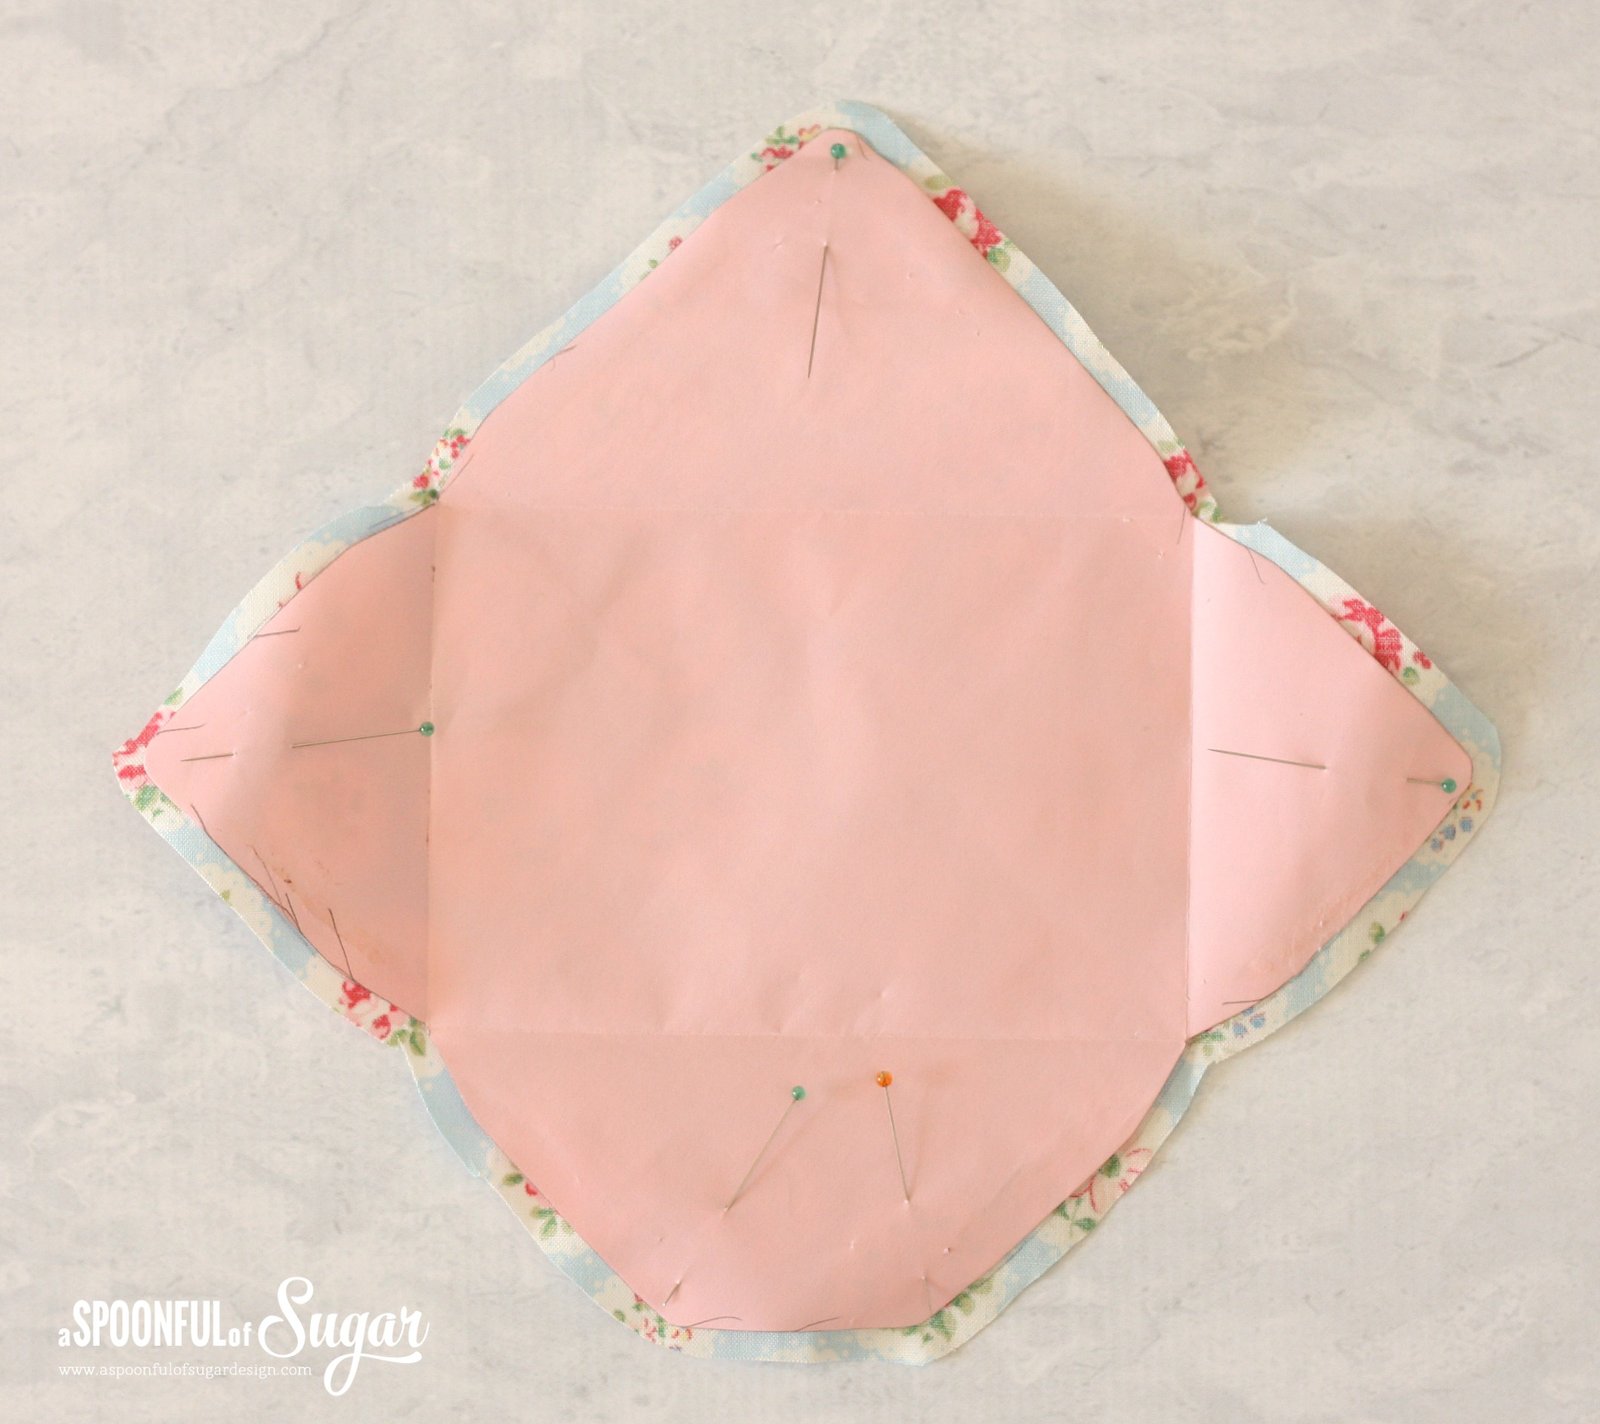
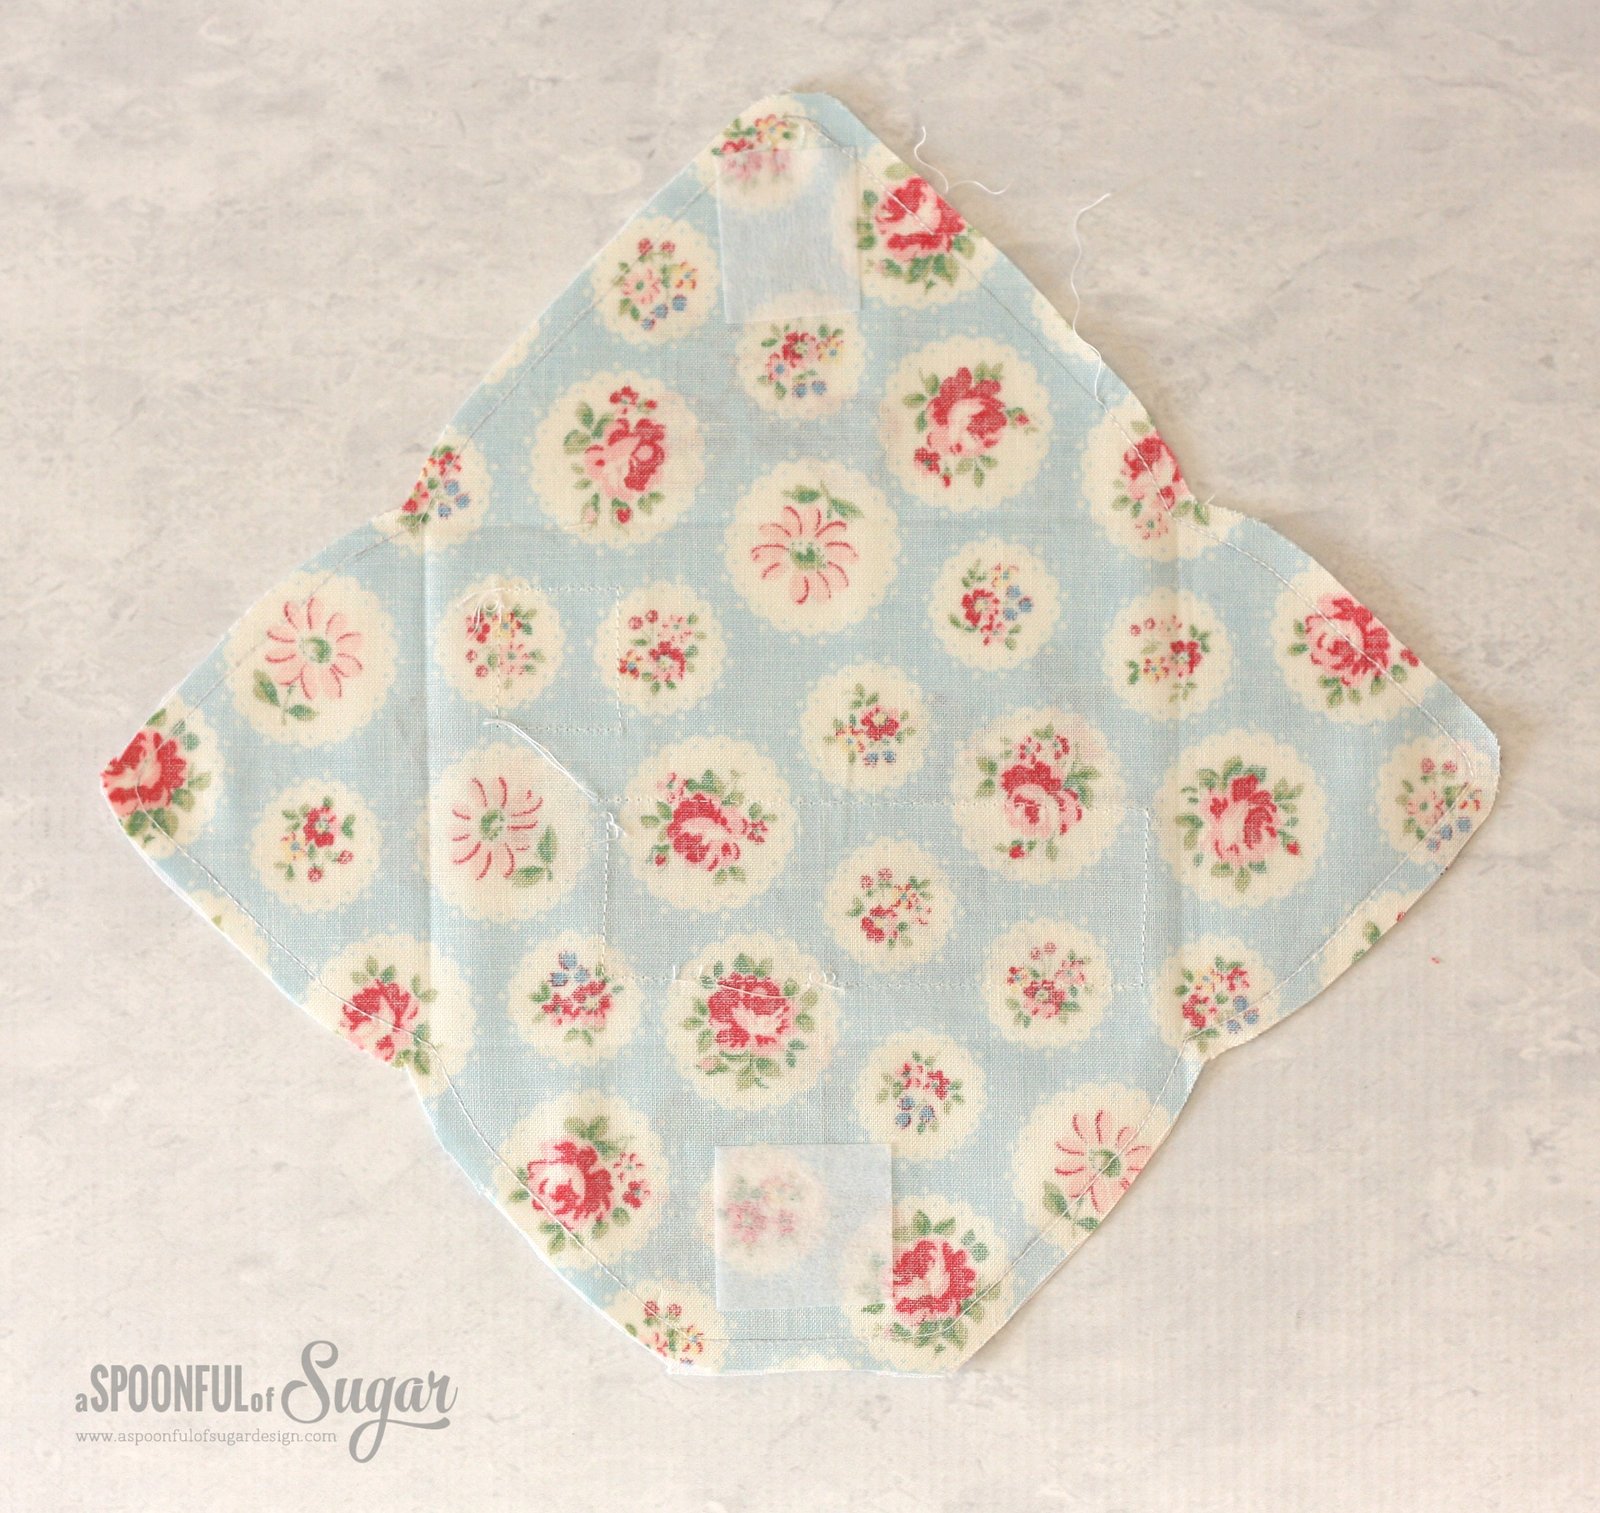
3. Carefully open up your envelope so you can use it as a template.(see below). Lay the fabric face down on a flat surface. Pin the template to the fabric. Using a marking tool (such as a pencil) trace around the envelope shape. Carefully cut out an envelope allowing a 1/4 inch seam allowance all the way around. Repeat for the envelope lining. Using the envelope as a guide, press the folds onto the fabric.

Pretty Fabric Envelopes Sewing Tutorial/ A Spoonful of Sugar

4. Position the fabric stamp and the address label on the front of the envelope as shown in the photo below, and fuse in place. Stitch around the stamp and label to secure.

Pretty Fabric Envelopes Sewing Tutorial/ A Spoonful of Sugar

5. Fuse the interfacing in position as shown in the photo below. This is where the snap will be located. Pin the envelope outer to the envelope lining with the right sides facing and all edges aligned. Stitch around the outside on the traced line using a 1/4 inch seam, and leaving a 2 inch gap in one side for turning. Turn the envelope out the right way through the gap in the lining. Press. Hand stitch the gap closed.

Pretty Fabric Envelopes Sewing Tutorial/ A Spoonful of Sugar

6. Fold the envelope along the fold lines so that it resembles an envelope (as shown in the photo below). Press.

Pretty Fabric Envelopes Sewing Tutorial/ A Spoonful of Sugar

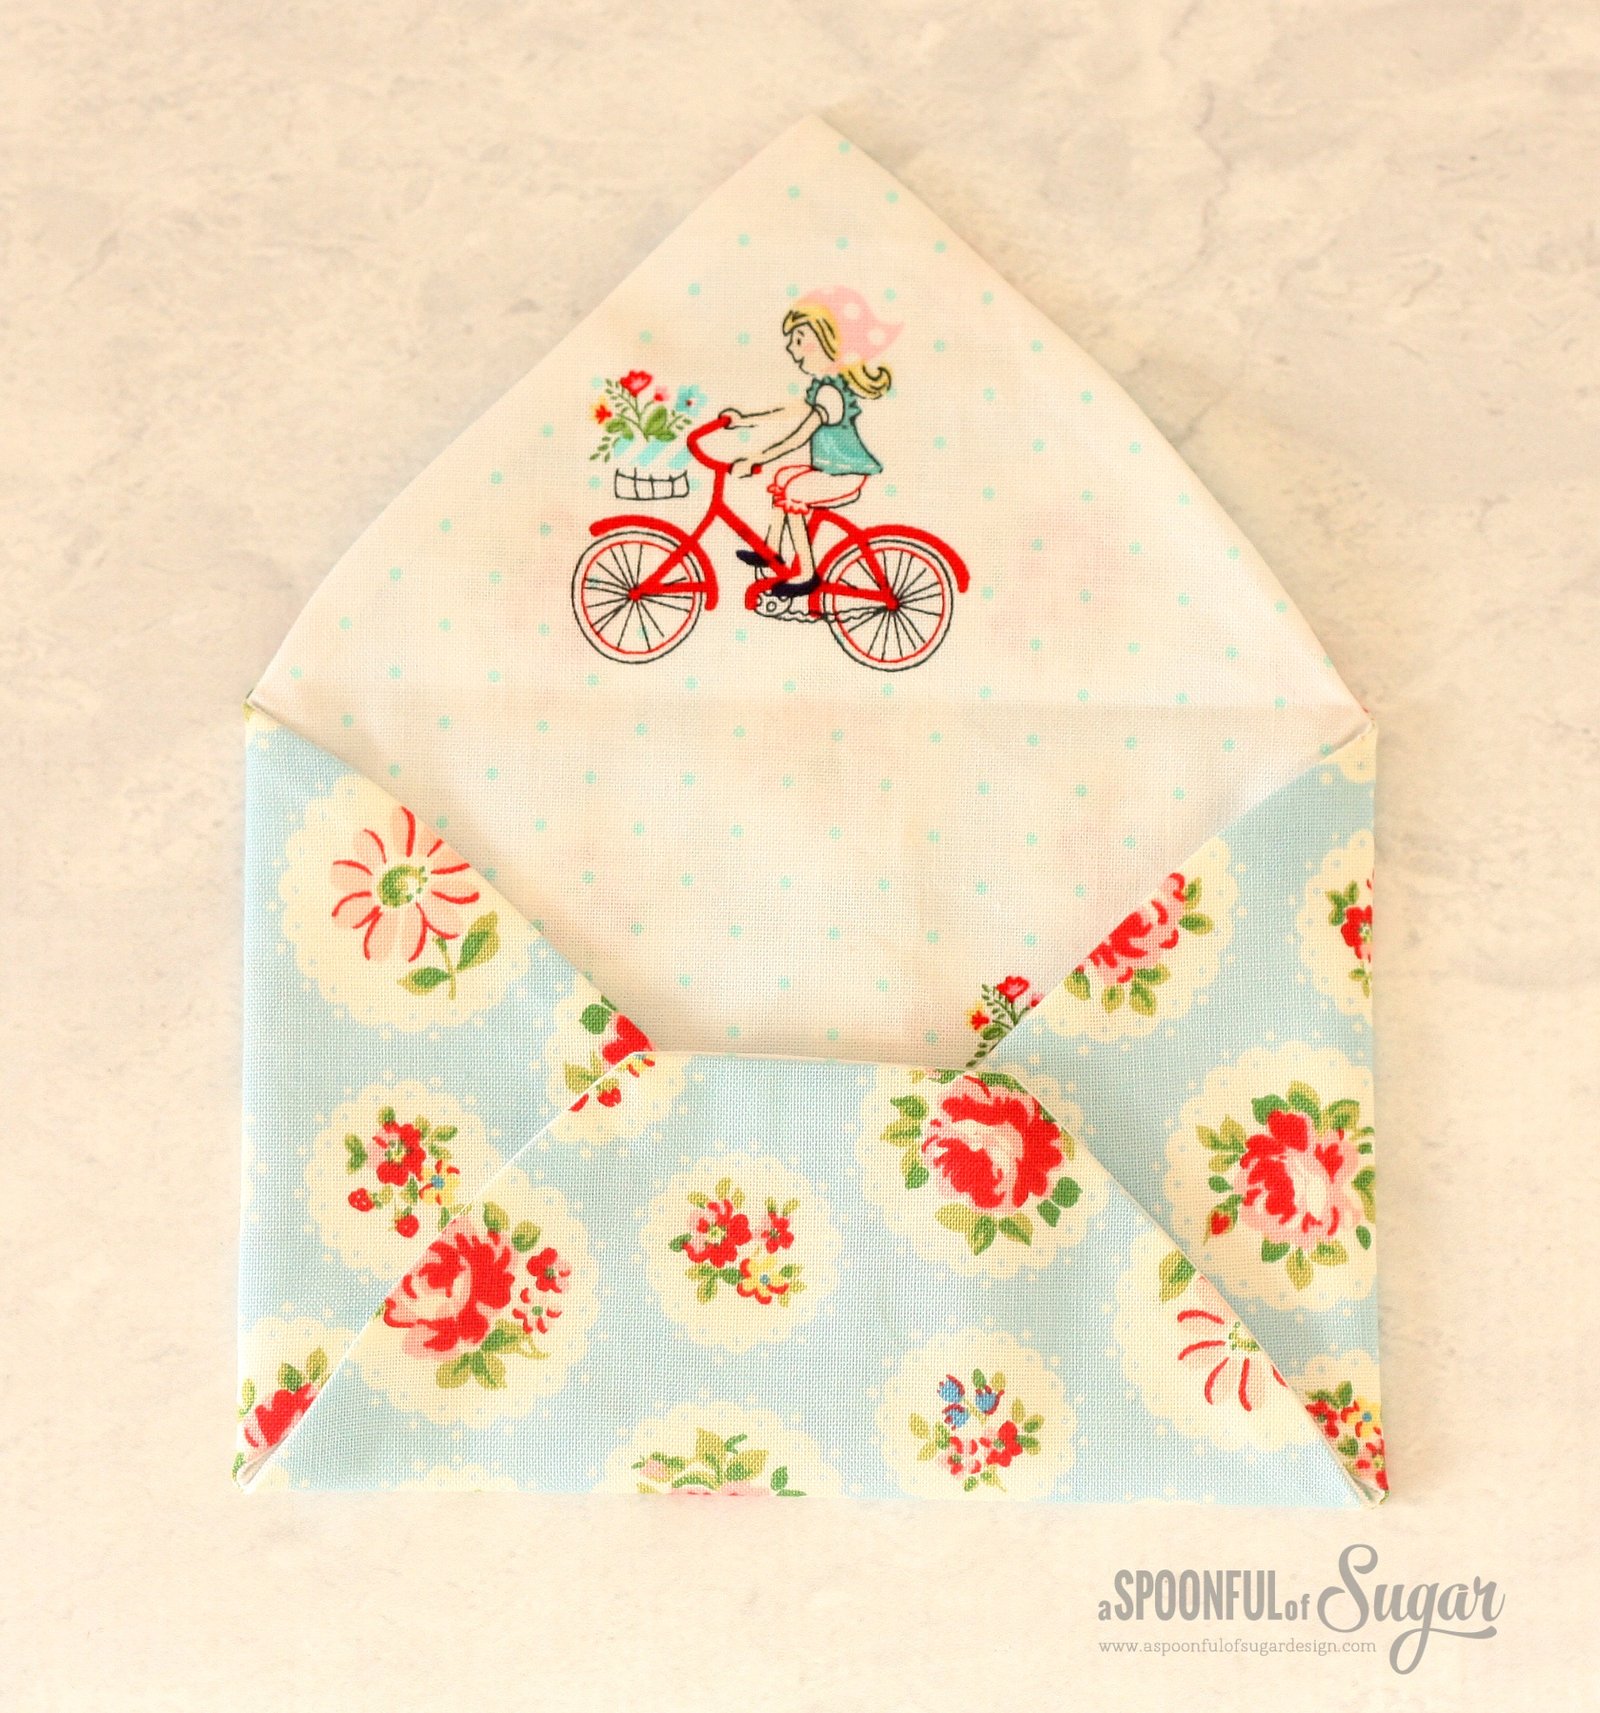
8. Using two strands of embroidery thread, stitch around the outside of the top flap and secure the bottom flap as shown. Attach the snap using a snap press or snap tool. If you don’t want to use a snap, you could use a velcro closure, button or press stud.

Pretty Fabric Envelopes Sewing Tutorial/ A Spoonful of Sugar

The Pretty Fabric Envelope is a fun project and will give the handmade touch to a gift card. You can easily personalise the envelope to suit the recipient by adding their name/address, and other details.

Pretty Fabric Envelopes Sewing Tutorial/ A Spoonful of Sugar

Pretty fabric

Check out some of our other projects/tutorials that also make perfect gift card holders:

  • Business Card Wallet
  • Men’s Business Card Wallet
  • Business Card Holder
  • Loyalty Card Wallet
  • How to Wrap a Gift Card

Filed Under: Sewing, Sewing Tutorials, Valentines Day Tagged With: gift wallet, gift wrapping, sewing, sewing tutorials

« Pretty Fabric Envelopes and Fabric Giveaway
Flower Coaster Pattern »

Comments

  1. Maria @ Feisty Tapas says

    October 29, 2015 at 12:56 am

    I love it, and I even have that pretty blue fabric in my craft cupboard. Definitely one for my to-do list. Thanks so much

    Reply
    • A Spoonful of Sugar says

      October 29, 2015 at 7:08 am

      Thanks Maria – it is a pretty fabric that blue floral!

      Reply
  2. Susan says

    October 29, 2015 at 3:38 am

    I love this idea! I have some little jewellery pieces I’m gifting, so these will be the perfect addition to it!

    Reply
  3. Christine M says

    October 29, 2015 at 4:52 am

    I love your envelopes. They are so pretty.

    Reply
  4. sherry says

    October 29, 2015 at 8:57 am

    Super sweet fabric envelopes. Thank you sew very much for sharing your tutorial. Creative Bliss…

    Reply
  5. Megan says

    October 29, 2015 at 3:30 pm

    These are gorgeous Lisa! Can’t wait to make some!

    Reply
  6. Pati from London says

    October 30, 2015 at 5:07 am

    Thanks for the sweet tutorial. Those fabrics are just gorgeous, Pati x

    Reply
  7. Lyn says

    October 30, 2015 at 3:58 pm

    Love this idea thank you for sharing. I have the perfect opportunity to make use of this project for a Christmas secret santa gift giving for a group i am a member of. Thanks again☺

    Reply
  8. Jill says

    October 30, 2015 at 7:23 pm

    Such gorgeous little envelopes! I just LOVE the idea of the fabric stamps too – so cute!

    Reply
  9. ang says

    October 31, 2015 at 12:37 am

    Thank you for the time to share this, I love it, and have just the fabric and friend for it. X

    Reply
  10. ang says

    October 31, 2015 at 12:38 am

    Subscribed! ❤

    Reply
  11. jane says

    November 1, 2015 at 8:34 am

    Super cute! I have about 8 envelope recipients in mind. Thank you for introducing them to me early enough to complete……hopefully! Blessings to you!

    Reply
  12. Allison CB says

    November 2, 2015 at 11:39 pm

    Very cute!

    Reply
  13. denise says

    November 13, 2015 at 12:06 am

    always looking for new ideas to put christmas and birthday money in a big Thankyou X

    Reply
    • A Spoonful of Sugar says

      November 16, 2015 at 10:22 am

      Thanks Denise 🙂

      Reply
  14. Regina says

    November 24, 2015 at 9:52 pm

    Such an adorable idea!

    Reply
  15. Regina says

    November 24, 2015 at 9:55 pm

    ps.: I wanted to buy the stamps, looked for them but did not find any 🙁

    Reply
    • A Spoonful of Sugar says

      November 25, 2015 at 4:51 pm

      Hi Regina – I made the stamps by cutting out some small floral rectangles and stitching them onto white homespun.They are easy to make and a great project for small scraps of fabric.

      Reply
  16. susi soler says

    March 2, 2016 at 11:49 am

    Believe it or not, you can actually MAIL these. INstead of fake stamps, stick enough stamps to cover the weight (I’ve used two)
    People LOVE to get these in the mail!

    Reply
    • A Spoonful of Sugar says

      March 3, 2016 at 6:33 am

      Wow – what lovely mail to receive! It didn’t occur to me to send them through the mail.

      Reply
  17. Lauren says

    March 13, 2016 at 7:43 am

    How did you attach real stamps to the fabric? Did you have to take them into the postoffice personally to have them mailed?

    Reply
    • A Spoonful of Sugar says

      March 13, 2016 at 9:51 am

      Hi Lauren – these were not mailed – just used as gifts. One of my readers mailed hers but I am not sure of the process. I am not sure stamps would stick that well to fabric.

      Reply
  18. ROSA A MARCHIANO says

    September 10, 2016 at 11:53 pm

    que linda idea!!!! muchas gracias por compartirla!!!

    Reply
  19. Lisa says

    February 5, 2017 at 5:12 am

    What a cute idea! I wish had seen this a month ago before I sent my mom her birthday gift card!

    Reply
  20. Shannon says

    November 16, 2022 at 12:51 am

    This is adorable, I have some cotton canvas for the outside and a stretchy French terry with sn adorable print I would love to use for the inside. I’m hesitant as this is a project that seems better suited to woven fabric. Would this work out or should I reselect my fabric?

    Reply
  21. Lea Kagel says

    January 30, 2023 at 3:36 pm

    I love these fabric envelopes! Licien fabrics from Japan make solar fabrics as those shown are hard to find now.
    Such a beautiful idea for storing jewelry and for travel.
    I may use Valentine fabric for a special Valentine card.
    Thanks so much for this. You’re so generous with your talents.

    Reply
  22. Marlene says

    February 12, 2024 at 12:52 am

    Fabulous idea. Thanks.

    Reply

Leave a Reply Cancel reply

Your email address will not be published. Required fields are marked *

  • Email
  • Facebook
  • Instagram
  • Pinterest
  • Threads
  • TikTok
SUBSCRIBE TO NEWSLETTER
×

Categories

Archives

PURCHASE PDF PATTERNS

We offer over 100 affordable PDF sewing patterns available for download from our store website or Etsy store. Each pattern includes detailed instructions, numerous photos, and templates.

WEB STORE ETSY STORE

Instagram

My Year in NumbersWhat a year it’s been! I’ve lo My Year in NumbersWhat a year it’s been! I’ve loved looking back at 2025 through a few fun little numbers — the patterns released, the scraps used, the cups of tea enjoyed, and all the tiny moments of creativity that made this year feel so full.Thank you for being part of this community. Whether you’ve sewn one pattern or twenty, left a kind comment, shared a photo, or simply followed along quietly — it all means more than you know.If you’d like to join me for an even more creative 2026, comment NEWSLETTER and I’ll send you the link to sign up for my weekly newsletter. It’s where I share new projects, behind‑the‑scenes peeks, and little sewing treats you won’t want to miss.And I’d love to get to know you a little more — tell me something about yourself in the comments. Where you’re from, what you love to sew, or your favourite make of the year.A little reminder too: all patterns are 25% off until the end of the year — my small thank‑you for your support.Here’s to a year of making, learning, and creating together. 💛#SewingCommunity #SewingInsiration #Sewing Patterns #BeginnerSewingProjects #SewistsofInstagram
As the year comes to a close, I’ve been reflecting As the year comes to a close, I’ve been reflecting on the moments that made this year so special. More than anything, I’m grateful for you — the wonderful makers, followers, and supporters who bring so much joy to this little creative corner of the world.Thank you for sewing my patterns, sharing your beautiful makes, sending kind messages, and cheering on my small business. Your creativity and encouragement mean more than I can ever say.As the year wraps up, I wanted to share a few of the things I’m truly grateful for.  And as a small end‑of‑year thank‑you, all patterns are 25% off storewide until December 31. No code needed — just a little festive gift from me to you.Wishing you a peaceful, joyful, creative Christmas season. Thank you for being here.#SewingPatterns#BeginnerSewingProjects#SewingCommunity#SewingInspiration#HandmadeGiftsIdeas
I asked AI to roast my Instagram… and let’s just s I asked AI to roast my Instagram… and let’s just say she didn’t hold back 😂 Apparently my stash‑friendly projects are just ‘fabric hoarder therapy,’ my quick‑sew reels look like I’ve got elves working overtime, and my Perth sewing room has more Hallmark Christmas energy than a snowy Vermont town. Honestly… fair! 🧵🎄But that’s exactly what I love sharing here—beginner‑friendly, stash‑friendly, quick‑sew, and gift‑friendly projects that bring joy to your sewing room. If you’re here for handmade inspiration, cozy vibes, and a sprinkle of festive fun, you’re in the right place. ✂️✨👉 Follow along for more sewing patterns, tips, and inspiration - because sewing should be fun, not perfect!#SewingCommunity #QuiltingLife #BeginnerFriendySewing #sewisthumour #makerLife
Looking for a project that’s quick, stash‑friendly Looking for a project that’s quick, stash‑friendly, and makes the sweetest handmade gift? 🎀 The Ribbon Pouch ticks all the boxes! Here are 5 reasons to love it: beginner‑friendly, quick to sew, perfect for scraps, gift‑friendly, and elevated with trims and ribbon details.It’s one of those patterns you’ll make on repeat—whether for birthdays, Christmas, or just to use up your favourite fabrics.👉 Comment RIBBON and I’ll send you the link to my pattern store so you can start sewing your own Ribbon Pouch today!  #RibbonPouch #QuickSewProjects  #StashFriendlyPatterns #sewingchristmas
#SewingCommunity
Still time to make a handmade gift this week! 🎁✂️ Still time to make a handmade gift this week! 🎁✂️ I’ve curated 10 of my quickest, easiest sewing patterns—each one can be finished in an afternoon or evening. Perfect for last‑minute gifting, stash‑friendly fabrics, and beginner‑friendly makes.From mitts to trivets, coasters to pouches, these projects are thoughtful, personal, and achievable even in the busiest season. Handmade doesn’t have to mean complicated—it can be quick, joyful, and elevated.👉 Comment PATTERN and I’ll send you a link to my pattern store so you can start sewing today.💬 Tell me—what’s your go‑to handsewn gift that you make on repeat?#QuickSewProjects #HandmadeGiftIdeas #BeginnerFriendlySewing
Want to give the gift of handmade but don’t have t Want to give the gift of handmade but don’t have time to sew? 🧵🎄 Put together a curated sewing project kit!I made this one using the Sleepy Cat Coaster pattern, fusible fleece, fabric for the back and face, a charm pack, hexagon shapes, embroidery floss, ricrac trim, cotton, tags, and appliqués. Everything is tucked neatly into a clear stationery case and tied with a ribbon. 🎁It’s personal, elevated, and thoughtful—perfect for sewing friends who will love having everything ready when they find time to stitch.👉 Comment SLEEPY and I’ll send you the link to the pattern so you can make your own kit!#sewingkit #GiftofHandmade #BeginnerFriendlySewing
Follow on Instagram

Featured Pattern

Travel Sewing Kit Pattern

Featured Tutorial

Retro Drawstring Bag

Featured Recipe

Lemon Pound Cake

Connect

  • Email
  • Facebook
  • Instagram
  • Pinterest
  • Threads
  • TikTok
SUBSCRIBE TO NEWSLETTER
×

Popular Posts

  • Maker’s Gift Guide: 15 Handmade Stocking Stuffers
  • Merry Little Christmas Sewing Projects
  • Fabric Gift Pouch
  • Makers Gift Guide: 15 Handmade Gift Bags and Wrap
  • 10 Projects to Sew for Men
  • Folded Hexagon Ornament
  • Retro Drawstring Bag

Copyright © 2025 Lisa. K. Cox - A Spoonful of Sugar