
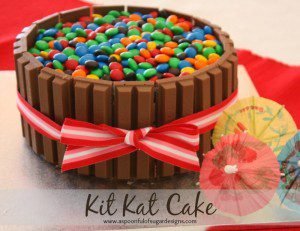
Yesterday we celebrated Sarah’s 17th birthday. When I asked her what type of birthday cake she would like, she immediately requested a Kit Kat Birthday cake. You have probably seen variations of this cake around the internet and pinterest over the past few years. The Kit Kat Birthday Cake is a chocolate lovers dream. Two layers of chocolate cake, sandwiched with chocolate buttercream, then surrounded with Kit Kats’ and topped with M & M’s. The Kit Kat cake is so delicious but very rich. We made a variation a few years ago with musk sticks which you can find over here.
If you are after an easy but effective birthday cake that ticks all the boxes, you can’t go past the Kit Kat Birthday Cake!


Kit Kat Birthday Cake
Prep time
Cook time
Total time
Author: Lisa
Recipe type: Cakes
Cuisine: Birthday
Serves: 16
Ingredients
- ¾ cup cocoa
- 1½ cups plain (all purpose) flour
- 1½ cups sugar
- 1½ teaspoons bicarbonate of soda (baking soda)
- ¾ teaspoon baking powder
- ¾ teaspoon salt
- 2 eggs
- ¾ cup milk
- 3 tablespoons vegetable oil
- ¾ cup warm water
- 1 teaspoon vanilla extract
- Frosting
- 125 g butter (1 stick), softened
- 3 cups icing (confectioners sugar)
- 2 - 3 tablespoons milk
- 1 teaspoon vanilla
- 1 tablespoon cocoa
- Decorate:
- KitKat's
- M & M's
Instructions
- Preheat oven to 175 degrees C (350 deg F).
- Grease and line two 24 cm (8 inch) cake pans.
- Sift cocoa, flour, sugar, bicarb soda, baking powder, and salt into the bowl of an electric mixer.
- Beat on low speed until just combined. Raise speed to medium and add eggs, milk, water, oil, and vanilla. Beat until smooth, around 3 minutes.
- Divide batter between pans. Bake for approximately 35 minutes, until a cake tester comes out clean. Cool in pan for 15 minutes then turn onto wire rack to cool completely.
- Frosting:Place the butter in a large mixing bowl and on medium speed of an electric mixer beat until smooth. Add the sugar, 2 tablespoons of milk, and vanilla. Beat until smooth and creamy, about 5-7 minutes. Gradually add the remaining milk or until the icing is thick enough to be of good spreading consistency. Add sifted cocoa and mix thoroughly.
- Sandwich the two cake layers together with frosting. Cover top and sides of cake with remaining frosting. Stand Kit Kats around outside of cake. We used three family sized blocks of Kit Kat Chocolate. Cover top of cake with M & M's.


not to good-when I had made the mixture it was extremely ‘liquidy’, and the batter only produced enough to fill one cake tin. After all that the cake did not cook properly or rise.
Hi Sammie – So sorry to hear that your cake was not a success. We have double checked the recipe and it is correct. The batter is supposed to be very runny due to the water, milk, oil etc. The important thing is to separate the batter into two tins. The tins will only have approx 1 inch of batter in them. The mixture does rise when cooked in two pans for 35 minutes. By the time the two layers are sandwiched with buttercream the cake is a good size for the kitkat wafers around the outside. If you cooked the batter in only one pan it would have taken a lot longer to cook properly due to the added quantity of batter. Hope this helps.
Hi there,
I know this post was some time ago but just wanted to say I did this recipe yesterday for my sons birthday and it looks amazing!!! So pleased with how it’s turned out and the recipe was so easy to follow!! Thank you for making me look like a professional mummy!
I tried the recipe and the cake is delicious. Thanks for sharing. How much can one charge for this cake?
Do not try this recipe. It is terrible. I was going to bake this for a charity event tomorrow. Now what shall I do?:-(((((((((
Sorry to hear you cake didn’t work well Liz! Suggest you bake your favourite chocolate cake recipe instead or buy an undecorated cake and use that. The feature of this cake is the kitkats and candy. It really doesn’t matter what cake you use underneath. The cake is so rich and you only cut small slices. Have a nice day!
Just wanna ask though, wouldn’t the dry ingredients whisk out of the bowl if you use an electric mixer? Is it okay if I just manually whisk it instead?
You can whisk on slow speed using electric mixer or whisk manually – whatever you prefer. Happy baking!
hello..I want to make this cake half vanilla and half chocolate what can i do..?Its my sons 7th birthday and all his friends love chocolate but he loves vanilla!
Cheers
Sharon
Hi Sharon – You could bake one layer vanilla, and one layer chocolate. Cut both layers in half and stack the two vanilla layers on top of each other and the two chocolate layers together. Put both halves together to create a circle. Cover with frosting and then decorate with kit kats etc. Once it is decorated, you won’t be able to tell that half the cake is vanilla and half is chocolate until you cut it. Happy birthday to your son!
hi, how do u make the kit kats stick to each other and stick to the cake?
Hi Sanjana – you place the kitkats on as soon as you frost the cake. The kitkats stick to the frosting. Hope that helps!
Hi .. How far in advance can I make this cake?
Hi Caroline
You could make the cake in advance and freeze it, and then on the day defrost it and then decorate it. The decorating is quite quick to do. The candy covers up any inconsistencies with the frosting. You could even use ready made frosting (eg Betty Crocker} for a faster result.
Thanks! If I were to make it on a Friday and kept it in the fridge … Would it still be good for Sunday do you think?
I think the M & M’s may fade and their crisp shell may soften. I would add the chocolates just prior to serving.
I baked and decorated my cake 24 hours ahead and placed in the fridge – it was perfect.
What measurement in grammes is a cup ? Do you use measuring cups otherwise?
Maria – Check out this site for conversions for grams to cups. http://allrecipes.com/howto/cup-to-gram-conversions/
Not very helpful recipe….should have at least indicated number of Kit Kat Bars you used in ingredients.
Thanks for your feedback Christine. The recipe does note that we used 3 Family sized blocks of Kit Kat chocolate and you can see in the image that 33 kit kat sticks were used.
hi is it OK to use only one 8 inch pan for the recipe? I only have one :/
Hi Nyie – You could use one pan and then cut it in half to make two layers or just use one thicker layer. Happy baking!
it would not ruined the cake? and will it take more time to cook? thanks
another question is, can I cover the whole inside of my pan with parchment paper?
Cut a circle of baking paper to fit the bottom of the pan. Cut a long rectangle that is the same width as the height of the pan and position it on the sides.
Yes – you will need to adjust the cooking time for a larger cake. Otherwise you could use your own favourite chocolate cake recipe.
Hi Lisa and Sarah. Brenna wanted a birthday cake with “kit kats and m@ms”. Couldn’t believe our luck when your website came up! The cake turned out perfectly and has been a hit with her party guests.
I need enough cake for about 20-25 people, how would you suggest I verify the cake recipe? 🙂
Hi Elizabeth – Sorry I have been away on vacation and only just read your message. You could make any size cake and then decorate it the same way. Ask you baking supply store what size cake they recommend for that many people. The cake is very rich so the pieces don’t need to be too big. I got 16 pieces from our cake.
My kitt kat cake turned out perfect thank you for the pictures
Thanks Christine – They are so much fun to decorate (and eat!)
Just finished making this cake for a colleague’s birthday and it smells & looks delicious the recipe was easy to follow…the mixture does come out runnier then most cake mixtures which did worry me at first but I needent of worried it came out perfectly! Thanks Victoria
Thanks Lynette – hope your friend has an amazing birthday!
Hello!
Any idea what this cake would sell for? I have $16 in it, but not sure how much is enough or too much to charge. Can you help?
Hi Angie – Sorry I am no help as I don’t sell cakes. I guess you would need to work out a fair rate for your time and add that onto the ingredients. Good luck!
Hi!
Which butter should we use for frosting- salted or unsalted butter?
Hi Niti – I used use salt reduced butter for the frosting but would recommend that you use unsalted or salt reduced. Happy baking!
I made this for my son’s 11th birthday and it was perfect! I used a slightly smaller sized pair of cake tins (all I had) and followed the instructions exactly. The cake mixture was very runny but it cooked and made a perfect cake! Cake was delicious and had the perfect number of kit kats to go around the edge. Yummy. Thanks for sharinng x
Hope your son had a wonderful birthday! Glad he enjoyed his birthday cake 🙂
How much would you sell this for in a bakery I am doing this for my school home economics project
Hi Vicky – I don’t sell cakes and have only ever made one Kit kat cake to date. I would estimate the ingredients cost around $20, plus you would need to cost for labour as well. Good luck with your project.
I have tried this recipe and I live in Singapore will the heat affect the cooling down if my cake? It took two hours before the cake loosened and could be removed from the cake pan.
I made this for my son’s 18th birthday on Friday. I told him I found a perfect cake to surprise him with. He couldn’t believe it when he saw it, he was shocked at it’s chocolatey goodness.
The cake has a very wet batter, but it baked beautifully.
Small slices are a must, but it is yummy.
Happy birthday to your son! Hope he had a great day. It is chocolate overload so small slices are perfect 🙂
Hi !
Just wanted to point out that 24cm is 10inch cake tin not 20cm 8 inch. So does this recipe require 10inch or 8inch?
Thanks
CC
Hi, i wanted a make a cake for my friends birthday and this cake looks like just the right cake for her birthday! I just wanted to know how many packets of m&ms would i need to buy to cover the whole top of the cake and how many kitkat packets would i need to get?
Thankyou
Hi Samiyah – I used a large packet of M & M’s for the top, and the Kit kat I bought as a family sized block of chocolate. I used 3 blocks.
Can I use nutella as a frosting, I want to make sure the kit kats will stay put. I will try to make it November 12 2016..my granddaughter’s 9th birthday.
You could make nutella flavoured frosting by mixing into a buttercream but I would avoid using straight nutella as it would be extremely sweet. Hope your grand daughter has a wonderful birthday.
Thanks for the advice, I will post after I make the cake…thank you.
I would make the Hershey’s “Perfectly Chocolate” chocolate cake that is on the back of Hershey’s Cocoa powder box. I would then add the KitKat’s and M&M’s for decoration.
P.S. When I mix dry ingredients into wet, I turn off the handheld mixer and stir the dry into wet, THEN turn on the mixer to finish mixing the batter. This saved me cleaning up all the powdery mess on the countertop.
Just making this for my dads birthday, the cake is in the oven and it looks great !! Thanks for the recipe
Tried this recipe for my daughters 5th birthday. Unfortunately, my cakes didn’t rise, I figured out this was from the cake mixture being overwhisked in my Themomix machine. However, I sandwiched the two together, filled the middle with frosting and M&M’s and then snapped the kit-kat fingers in half to go around the cake. It looks amazing, albeit half the size I was expecting lol. Really great idea and I can’t wait to try this recipe again with my hand whisk.