A Spoonful of Sugar

Make. Bake. Create.

SUBSCRIBE TO NEWSLETTER
×
Menu
  • Home
  • About
    • About Us
    • Advertising
    • Press
    • FAQ
    • Disclosure
    • Grab a Button
    • Contact Us
  • Crafts
    • Crochet
    • DIY
    • Embroidery/Cross stitch
    • Gift Wrapping
    • Knitting
    • Miscellaneous
    • Paper Crafts
  • Holidays
    • New Year’s
    • Australia Day
    • Back to School
    • Valentines Day
    • Easter
    • ANZAC Day
    • Mother’s Day
    • Father’s Day
    • Halloween
    • Christmas
  • Recipes
    • Appetizers
    • Bars & Slices
    • Bread & Pastries
    • Cakes
    • Cookies
    • Confectionery
    • Cupcakes & Muffins
    • Desserts
    • Drinks
    • Ice Cream
    • Jams/Preserves
    • Main Meals
  • Sewing
    • Sewing Tutorials
    • Quilting
    • Sewing & Quilting Patterns
  • Family
    • Back to School
    • Family Fun
    • Our Home
    • Parenting
    • Travel
  • Shop
    • Pattern Store
    • Etsy Store

Felt Luggage Tag

August 6, 2012 By Spoonful of Sugar - 17 Comments

We love to travel as a family and it is important to easily spot your luggage on the baggage carousel. Most people use black or dark coloured suitcases, so a luggage tag with a bright pop of colour will ensure that you can identify your case in a hurry! Felt Luggage Tags are fun to make and would make a great gift for your favourite frequent traveller!

It is sized so that a business card will show through the window. Alternatively you can print your address details on a piece of card.

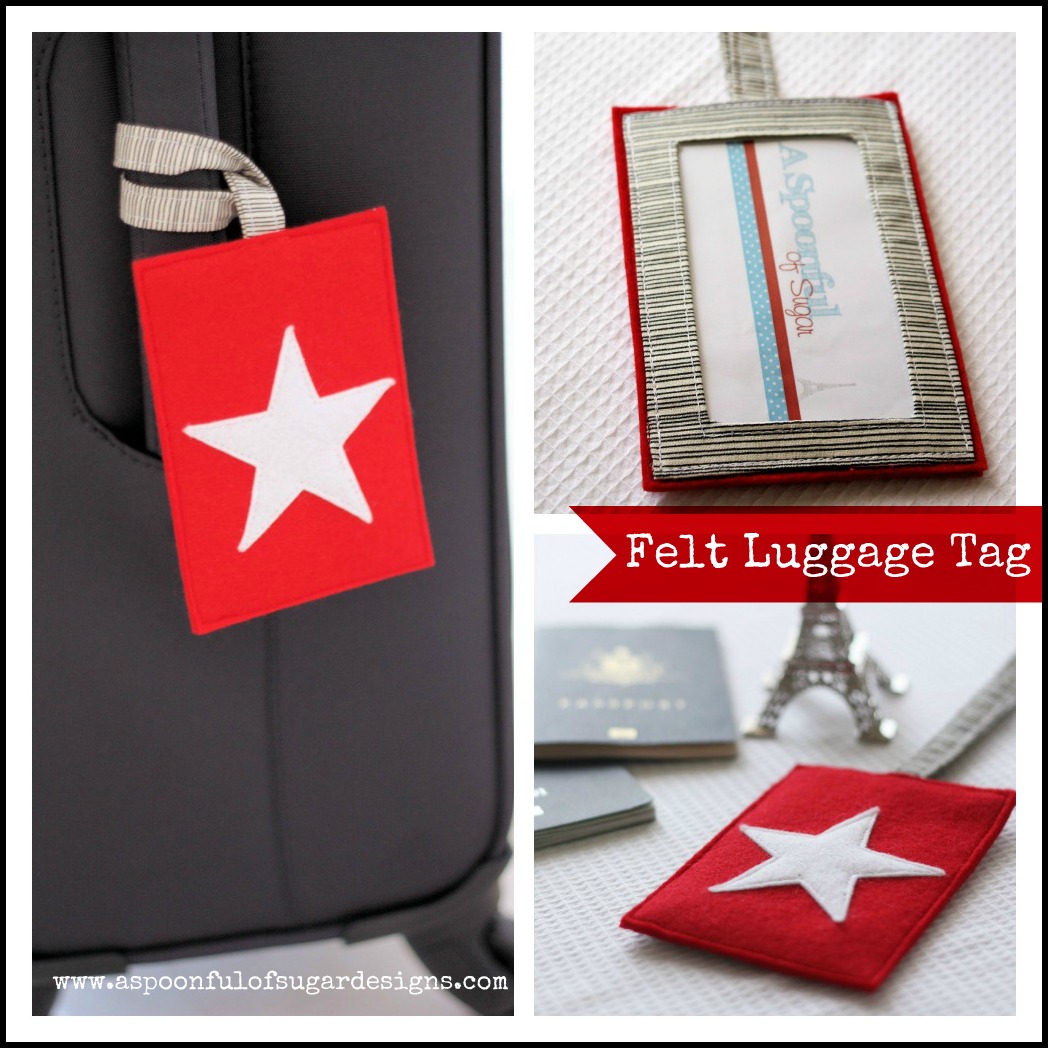
If you would like to make your your own Felt Luggage Tag, here is a tutorial.

Materials:
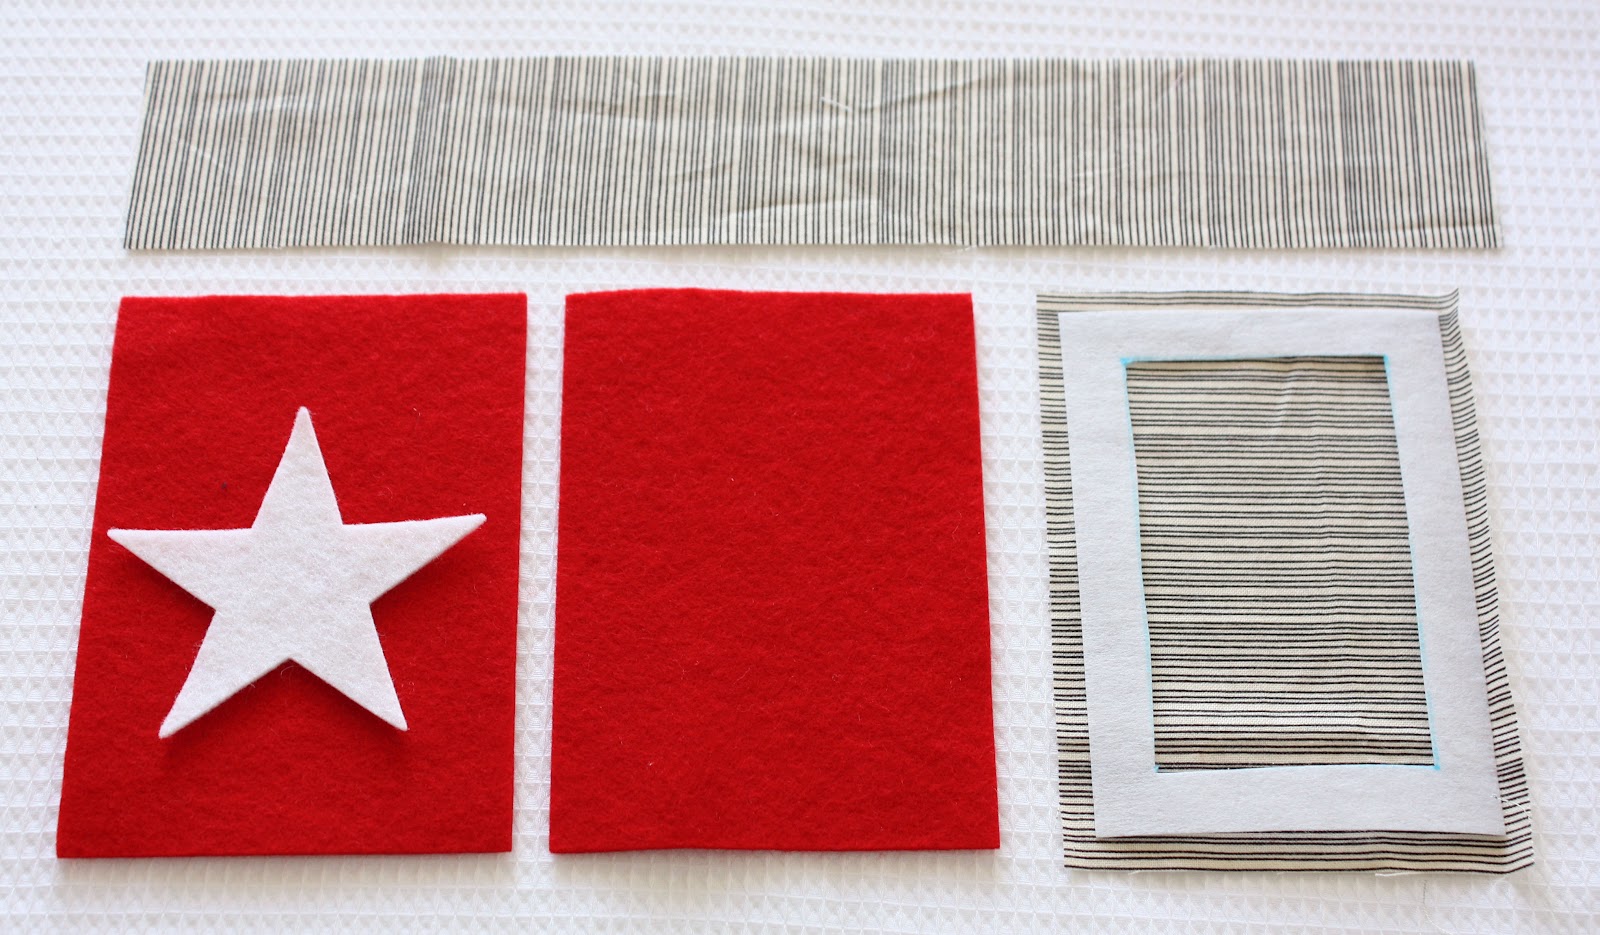
Wool Felt, two rectangles measuring 3 1/2 x 5 inches
Felt Star measuring 3 inches across (I cut this using our Accuquilt Go Cutter).
Thick fusible interfacing measuring 3 1/4 x 4 3/4 inches
Strip of fabric measuring 2 x 12 inches (for strap)
Rectangle of fabric measuring 3 3/4 x 5 1/4 for the window
Piece of acetate measuring 3 x 4 1/2 inches for the window.

Method:

1. Cut Materials to size.  To make the window on the interfacing, mark 1/2 inch in on all sides, and cut out. (Refer to Photo)

2. To make the strap, press the long piece of fabric in half lengthwise. Open up, press each side to the middle, then fold in half. Press. Edge stitch down each side, approximately 1/8 inch from the edge.

3. To make the fabric window, press the interfacing to the wrong side of the fabric. Press the outside edge in, over the edge of the interfacing (Step 1). Stitch around the edge of the window, approx 1/8 inch from the edge. Cut out the inside of the window, leaving 1/2 inch border. Clip each corner on the diagonal (Step 2).  Press the fabric on the inside of the window and stitch in place (Step 3). The front of the window has been top stitched around the inside and outside (Photo 4).

4. Layer the fabric window onto one of the pieces of felt. Stitch it to the felt on three sides, leaving the top edge open. Stitch along the existing stitching line.

5. Appliqué the felt star to the centre of a piece of felt. Pin the strap to top of the tag on the wrong side and stitch in place.

6. Pin the front and back of the tag together with the wrong sides facing. Stitch around the outside of the tag, on the felt, taking care not to catch the edges of the fabric window. Press lightly on wool setting. Slip the piece of acetate into the window. Add your business card or address label.

Attach the tag to your suitcase. Bon Voyage!

Thanks to our lovely sponsor, Katia from Plushka’s Makery for providing the wool felt for this project (Katia has 62 colours of beautiful wool felt available in her Store).

You may also wish to check out our tutorial for a Passport Protector. You can find the tutorial here.

For your daily sugar fix you can subscribe or follow us on facebook, twitter, google plus and pinterest.  

Filed Under: Back to School, Sewing, Sewing Tutorials, Travel Tagged With: felt

Never miss a post.

Get fresh new ideas delivered right to your inbox!

« White Chocolate Caramel Slice
{Sponsored Giveaway} Win a $60 Homewares Package from Mosey »

Comments

  1. Rachel says

    August 6, 2012 at 9:22 pm

    This is really helpful! We have the very standard black suitcases and I was never a big fan of the chunk of fabric tied to the handle tactic. Going to whip a couple of these up! …and then plan a vacation lol

    Reply
  2. skaleczka says

    August 6, 2012 at 10:55 pm

    I love this luggage tag, thank you for shareing this tut, I want one for myself now 😀

    Reply
  3. Craft and Decorate says

    August 7, 2012 at 12:35 am

    Definetly must try! It’s so cute & helpful! ^.^
    http://craftanddecorate.blogspot.com/

    Reply
  4. Terriaw says

    August 7, 2012 at 5:54 am

    Fabulous idea and tutorial! I love the idea of using a bright color to help spot your luggage easier, especially when everyone’s bags are black nowadays. I also love your idea of the pocket on the other side for your identification information. Great project!

    Reply
  5. Maia says

    August 7, 2012 at 9:53 am

    Thanks for this idea and for the clear tutorial. I love it!

    Reply
  6. Stephanie says

    August 7, 2012 at 1:45 pm

    Great was to spot your luggage on the carousel when so many of them look alike. Love this.

    Reply
  7. CrochetBlogger says

    August 7, 2012 at 4:47 pm

    What a terrific way to add some personal style to identify your bags without going too crazy. I’ve seen people duct tape all over their bags, yarnbomb them, paint them, etc. Anything to make it easier to see your own bags and get out of the airport!

    Reply
  8. Simone de Klerk says

    August 8, 2012 at 4:31 am

    Thank you for sharing!!

    Reply
  9. Mar says

    August 9, 2012 at 6:24 am

    Wonderful!!! I will try it. Last time I had a cute tag, it was stolen though. The tag! Not the suitcase! Hahaha

    Reply
  10. annie [pretty♥please] says

    August 10, 2012 at 10:51 pm

    too cute!

    Reply
  11. Talin's Corner says

    August 12, 2012 at 4:12 pm

    I wish I had this tutorial before I made mine. They are very pretty.

    Reply
  12. CBH says

    August 13, 2012 at 11:44 am

    Thank you so much for this post. I want to let you know that I posted a link to your blog in Creative Busy Bee Craft Inspirations, under the Page 3 post on Aug. 13, 2012. Thanks again.

    Reply
  13. Fiona @ Dragonfly-Crafts says

    August 14, 2012 at 3:53 am

    Great idea. Easier to find your suitcase.

    Reply
  14. Deborah Jennings says

    October 10, 2012 at 9:52 am

    I love this! Now I have another project to make. I’d better get busy! We have some black luggage and some red luggage. I painted the red luggage with yellow paint. Circles for Hubby and Flowers on mine. They are really easy to find. Now I need some brighter paint for the black ones. We have never had to look a lot for our red luggage. Can’t wait to get started!

    Reply
  15. Louisa says

    November 3, 2012 at 6:41 am

    I love the pop of the white star on the red background!

    Reply
  16. Mymakaline says

    January 31, 2013 at 12:18 pm

    Très jolie réalisation, le travail est minutieux et parfait, merci de ce partage

    Reply
  17. Zurainny Ismail says

    May 28, 2013 at 12:12 am

    Wow! What a cool tag! Thanks for sharing this lovely tutorial! 😀

    Reply

Leave a Reply Cancel reply

Your email address will not be published. Required fields are marked *

  • Email
  • Facebook
  • Instagram
  • Pinterest
  • Twitter
Follow on Bloglovin

My Book

Instagram

Woodland Wonder is my latest foundation paper piec Woodland Wonder is my latest foundation paper piecing quilt block. This one is perfect for Holiday projects or any season - just change the colour of the trees to create a completely different look.

This pattern includes 5 sizes:
2 x 3 inches; 3 x 4 1/2 inches; 4 x 6 inches; 5 x 7 1/2 inches; and 6 x 9 inches. Woodland Wonder will look great in a mini quilt, pillow, bag, table runner and more! Swipe to see the blocks I created using this pattern. 

Pattern Details: Woodland Wonder FPP Quilt Block PDF Pattern - available in our Pattern Store and Etsy Shop. Store links are in our profile. 

Fabric details: Reverie by @rubystarsociety 

#woodlandwonder #aspoonfulofsugardesigns #aspoonfulsugar #fpp #foundationpaperpiecing #quiltblock #quiltersofinstagram #sewistsofinstagram #miniquilt #treequilt
Free Tutorial: Fabric Gift Pouch Looking for a sw Free Tutorial: Fabric Gift Pouch

Looking for a sweet little project to sew? Our fabric gift pouches are one of our most popular tutorials. These cuties are quick to sew - you just need two 8 1/2 inch squares of fabric plus drawstring cord. I made these ones with pretty florals. 

You can find the tutorial over on a blog. Link to the project is in our profile. 

#aspoonfulofsugardesigns #aspoonfulsugar #flowersugarpouch #fabricgiftpouch #sewistsofinstagram #sewsewsew #sewfun #sewingtutorial #flowersugarfabric #sewing
{Wellness Wednesday} Sewing relaxes your mind and {Wellness Wednesday} Sewing relaxes your mind and body

Sewing relaxes your body and mind. Sewing is a form of meditation, as you focus on your breathing and the rhythm of the needle. Sewing can also lower your blood pressure, heart rate and muscle tension, which improves your overall health.

Stop scrolling and start sewing!

If you would like a free copy of this set of images, lease head to our blog post. Search for "Sewing for Mental Health and Wellbeing".

#aspoonfulofsugardesigns #wellnesswednesday
#sewingforwellbeing #aspoonfulsugar #justbreathe
#sewingformentalhealth
Have you started your fall sewing? If you are look Have you started your fall sewing? If you are looking for a cosy fall project, check out our Patchwork Acorn Coaster Mugrug. This is easily constructed using a courthouse steps block for the body of the acorn, and a contrasting fabric for the cap. 

The Patchwork Acorn Coaster is a Pattern of the week - it is currently 25% off in both our Pattern Store and Etsy Shop. Head to the link in our profile.

For more Fall Sewing inspiration, read out blog post on Fall Sewing Projects. The link to this is also in our profile.

#aspoonfulofsugardesigns #aspoonfulsugar #patchworkacorncoaster #acorncoaster #mugrug #sewistsofinstagram #sewsewsew #fallsewing #autumnsewing #makersgonnamake #patchwork #sewingpattern
Load More… Follow on Instagram

Featured Pattern

Travel Sewing Kit Pattern

Featured Tutorial

Retro Drawstring Bag

Featured Recipe

Lemon Pound Cake


A Spoonful of Sugar on Etsy

Categories

Archives

Connect

  • Email
  • Facebook
  • Instagram
  • Pinterest
  • Twitter

Popular Posts

  • Fall Sewing Projects: Cosy and Colourful Projects for your Home
  • Handy Guide to Quilt Sizes
  • Sunburst Quilt Block
  • Flower Sugar Pouches
  • Rotary Cutter Sewing Tool Pouch
  • Top Halloween Sewing Projects
  • Fabric Gift Pouch

Copyright © 2023 - Powered by Genesis Framework and a Creative Life - Designed by: Bellano Web Studio - Log in