A Spoonful of Sugar

Make. Bake. Create.

Menu
  • Home
  • About
    • About Us
    • Press
    • FAQ
    • Disclosure Policy
    • Contact Us
  • Crafts
    • Crochet
    • DIY
    • Embroidery/Cross stitch
    • Gift Wrapping
    • Knitting
    • Miscellaneous
    • Paper Crafts
  • Holidays
    • New Year’s
    • Australia Day
    • Back to School
    • Valentines Day
    • Easter
    • ANZAC Day
    • Mother’s Day
    • Father’s Day
    • Halloween
    • Christmas
  • Recipes
    • Appetizers
    • Bars & Slices
    • Bread & Pastries
    • Cakes
    • Cookies
    • Confectionery
    • Cupcakes & Muffins
    • Desserts
    • Drinks
    • Ice Cream
    • Jams/Preserves
    • Main Meals
  • Sewing
    • Sewing Tutorials
    • Quilting
    • Sewing & Quilting Patterns
  • Family
    • Back to School
    • Family Fun
    • Our Home
    • Parenting
    • Travel
  • Shop
    • Pattern Store
    • Etsy Store

DIY: Transform an Old Wooden Chair (Part 2)

April 4, 2014 By A Spoonful of Sugar - 15 Comments

{DIY PROJECT} Paint a Chair(Sponsored by White Knight Paints)

A few weeks ago, we found an old chair that was on the roadside awaiting the bulk rubbish collection. We bought it home as we had a vision on how we could transform it from someone’s old cast off furniture, into a signature piece that we could use at home and as a photo prop. You can see how we prepared the wooden chair in this post.

The final stage was to spray paint the chair. To do this, the man of the house, moved our cars from the garage and then spread some old sheets (that we use as drop sheets) over the floor of our garage to protect it from the paint. We decided to paint the chair in the garage as it was very windy outside.

He propped the chair on top of an old box to make it easier to get under and around the chair. Then he spray painted the chair. He wore a face mask as the fumes inside the garage were quite strong. He used a full can of White Knight Squirts on the first coat. He allowed the chair to dry which took around an hour. Then sprayed a second coat of paint.

Paint a wooden chair

Squirts is a quick drying, hard wearing, enamel paint. It gave a terrific finish to our chair, with a smooth coverage,  and it looks very professional. It was so easy to use and at around $8.00 a can, it makes for a inexpensive makeover. Squirts comes in a wide range of colours. I think we will be on the lookout for more furniture to paint.

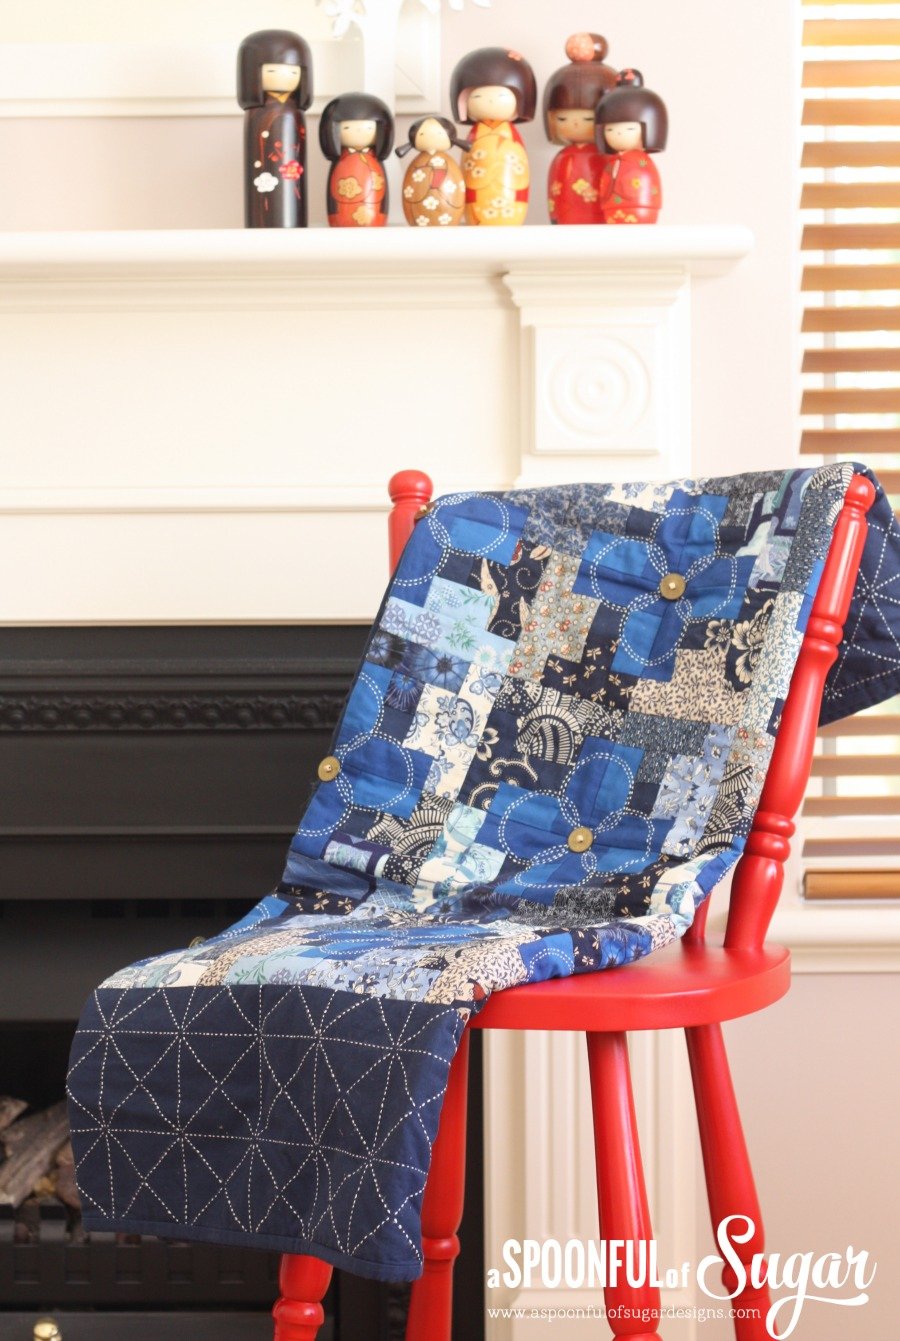
We couldn’t be happier with how our chair has been transformed from an old colonial style wooden chair into a bright, modern chair. It is such a lovely shade of red.

DIY Paint a wooden chair

We have been having fun using our new chair as a photo prop with some of our quilts and sewing projects.

DIY Paint wooden chair

Paint a Wooden Chair DIY

We can’t wait to find some more old furniture to transform.

DIY Project  Paint a Wooden Chair


Disclosure: We were provided with the White Knight Rust Guard All Purpose Primer and White Knight Squirts to use in this project. All opinions and photographs are our own.

Filed Under: DIY Tagged With: spray paint

« Easter Cupcakes
Caramel Banana Loaf »

Comments

  1. Sandie @ crazy'boutquilts says

    April 4, 2014 at 7:02 am

    I love your chair!! I am never lucky at finding discards, but if i ever do, I’ll be bringing it home to make it red too!

    Reply
    • A Spoonful of Sugar says

      April 4, 2014 at 7:16 am

      We are so thrilled with how it looks. We now need an aqua chair as well so will be on the hunt for more discards 🙂 We had so much fun positioning it around our home with different quilts etc. It is going to be a well loved piece of furniture.

      Reply
  2. Mrs. Lucky says

    April 4, 2014 at 1:32 pm

    Oh, what a darling! Very clever of you to transform it into such a beautiful chair around the house and a gorgeous photo prop.

    Reply
    • A Spoonful of Sugar says

      April 4, 2014 at 5:25 pm

      Thanks Mrs Lucky – we are so pleased with the finished result. We are looking around our home to see what we can spray paint next!

      Reply
  3. Stephanie says

    April 5, 2014 at 3:19 am

    The red chair is fantastic and really will pop in photo-product shoots. I have to ask; any idea what the pattern is for the Blue Sashiko style quilt? — I absolutly LOVE IT!

    Reply
    • A Spoonful of Sugar says

      April 5, 2014 at 7:10 am

      Thanks Stephanie. The Sashiko Quilt was one of the first quilts I made back in 2000. You can see more photos of it here: http://aspoonfulofsugardesigns.com/2008/03/east-meets-west/ It was based on a pattern in an Australian Patchwork and Quilting magazine from around that time. One of the features i love about it is that it has Japanese yen stitched on to it. I was living in USA at the time and asked on a Quilting Board if anyone had any ideas on how I get some coins and a lovely American lady stationed at a military base in Japan sent them to me.

      Reply
      • Stephanie says

        April 5, 2014 at 9:44 pm

        Thank you so much for the reply. The title of the quilt was very helpful in finding some additional pictures to use as a visual to try and duplicate. My Mom came home from Holland last summer with a gorgeous group of blue fabrics. As soon as I saw your picture….I was like “this is it”, this is the pattern I have to use for them.

        Reply
  4. Annette says

    April 5, 2014 at 3:56 am

    Hello! The idea to re-purpose a discard is great! The White Knights products used really made this transformation. Thank you for sharing!

    Reply
    • A Spoonful of Sugar says

      April 5, 2014 at 7:12 am

      Thanks Annette. It was a fun project.

      Reply
  5. Nat@DearLittleHouse says

    April 5, 2014 at 9:35 am

    What a great colour choice! Love it 🙂 Need to get around to painting a few dingy chairs I have kicking around Dear Little House!

    Reply
    • A Spoonful of Sugar says

      April 5, 2014 at 9:57 am

      Thanks Nat. It is very satisfying to see them go from dingy to colourful.

      Reply
  6. Lisa says

    April 7, 2014 at 2:25 pm

    Wow! It looks fabulous! Now I want a red chair too 🙂

    Reply
    • A Spoonful of Sugar says

      April 7, 2014 at 9:17 pm

      Thanks Lisa – I am sure it will be appearing in a lot of our photos. So many uses for a red chair.

      Reply
  7. Amy Fahy says

    May 17, 2015 at 6:41 am

    Fantastic! I would love to do this, if I ever find the “right” chair, or have the room in my already cramped house for another piece of furniture! Ha!

    Reply
    • A Spoonful of Sugar says

      May 17, 2015 at 9:05 am

      It really makes a statement! I would love an aqua chair now. Just need to find another chair to paint.

      Reply

Leave a Reply Cancel reply

Your email address will not be published. Required fields are marked *

  • Email
  • Facebook
  • Instagram
  • Pinterest
  • Threads
  • TikTok
SUBSCRIBE TO NEWSLETTER
×

Categories

Archives

PURCHASE PDF PATTERNS

We offer over 100 affordable PDF sewing patterns available for download from our store website or Etsy store. Each pattern includes detailed instructions, numerous photos, and templates.

WEB STORE ETSY STORE

Instagram

A tiny pyramid that does it all — a pattern weight A tiny pyramid that does it all — a pattern weight for your sewing table, a book weight for cosy reading, or a scented sachet for your drawers. Small, sweet, and so satisfying to sew. Comment PYRAMID for the free pattern.Fabric: Something Blue by Tilda
@tilda_australia#sewingproject #tildafabric #beginnersewing #scrapsewing #Tildasomethingblue
Meet the sweetest little project you can sew in mi Meet the sweetest little project you can sew in minutes — the Pyramid Weight. Use it as a pattern weight, scented sachet, or even a book weight… all from one triangle of fabric. Comment PYRAMID for the free pattern.Fabric is Something Blue by Tilda, releasing 1 June 2026 — with thanks to @tilda_australia.#tildasomethingblue #tildafabric #freepattern #sewingtutorial #sewinglove
The Scrappy Strips Pouch is one of my favourite wa The Scrappy Strips Pouch is one of my favourite ways to use up leftover fabric strings. Today’s version is made from patchwork strips — a fun, relaxing sew that turns scraps into something beautiful and practical.The Scrappy Strips Pouch pattern has two versions - patchwork strings and selvedges - and two sizes. Comment SELVEDGE (or SELVAGE) for a link to the pattern.Pattern Details: Scrappy Strips Pouch Sewing Pattern is in our Pattern Store and Etsy Shop.#ScrappyStripsPouch #ScrapBustingSewing #PatchworkPouch #StringQuilting #SewingProjects
If you’ve ever wanted to add eyelets or grommets t If you’ve ever wanted to add eyelets or grommets to your sewing projects, here’s a quick look at how I install them using my DK93 snap press. It’s the same tool I use for snaps — and it makes installing eyelets beautifully quick and consistent.Here’s how I install the eyelets:Punch out the four holes using a hole‑cutting die.Place the eyelet into the hole.Press it into place using the snap press.That’s it — simple, sturdy, and it gives the Ribbon Pouch such an elevated, professional finish. I love how clean and secure the result is.Fabric shown: Tilda Something Blue, releasing June 1 — thank you @tilda_australia for the beautiful fabric.✨ If you’d like the Ribbon Pouch pattern (3 sizes), comment RIBBON and I’ll send the link straight to you.Ribbon Pouch Sewing Pattern: available in my Pattern Store and Etsy Shop (links in profile).#tildasomethingblue #tildafabric #sewingtips #handmadeeveryday #sewingtools
The Ribbon Pouch is one of my favourite quick‑to‑s The Ribbon Pouch is one of my favourite quick‑to‑sew gift bags, and I couldn’t resist making a light and dark version using the new Tilda Something Blue collection. Both pouches use the same print in different colourways — such a pretty way to show how fabric choice changes the whole mood.They’re finished with satin ribbon threaded through grommets, and topped with a tiny star tag. The boxed base helps them stand beautifully, and the ribbon closure makes them perfect for birthdays, thank‑you gifts, treats, or little treasures.This is a beginner‑friendly, scrap‑friendly, quick project you’ll want to sew again and again. Pattern includes 3 sizes.If you’d like the pattern, comment RIBBON and I’ll send the link straight to you.Pattern Details: Ribbon Pouch (3 Sizes) available in my Pattern Store and Etsy Shop.Fabric Details: Tilda Something Blue - releasing on 1 June 2026. Thanks to @tilda_australia#TildaSomethingBlue #TildaFabric #SewingPattern #BeginnerSewingProject #QuickSewingProject   
Sewing with scraps is one of my favourite ways to Sewing with scraps is one of my favourite ways to get creative — small pieces, leftover corners, charm‑square offcuts… they all have so much potential.Here are 10 scrap‑friendly projects that use small pieces beautifully. They’re quick to sew, beginner‑friendly, and perfect for gifting ✂️✨Save this for the next time you want to turn your scraps into something pretty.Which one would you sew first?  Tell me in the comments — I love seeing what you’re making.Patterns are available in my pattern store (link in profile) or comment PATTERNS and I will send you the link. #scrapsewing #scrapbusting #scrapfriendly #sewinginspiration #sewingideas
Follow on Instagram

Featured Pattern

Travel Sewing Kit Pattern

Featured Tutorial

Retro Drawstring Bag

Featured Recipe

Lemon Pound Cake

Connect

  • Email
  • Facebook
  • Instagram
  • Pinterest
  • Threads
  • TikTok
SUBSCRIBE TO NEWSLETTER
×

Popular Posts

  • Cord Cosy
  • Tips for Threading a Needle
  • Travel Accessories to Sew
  • Liberty Tissue Cover
  • Charm Square Fabric Tray
  • Happy Scrappy Cards
  • Life Lessons from Sewing and Quilting

Copyright © 2026 Lisa. K. Cox - A Spoonful of Sugar