A Spoonful of Sugar

Make. Bake. Create.

Menu
  • Home
  • About
    • About Us
    • Press
    • FAQ
    • Disclosure Policy
    • Contact Us
  • Crafts
    • Crochet
    • DIY
    • Embroidery/Cross stitch
    • Gift Wrapping
    • Knitting
    • Miscellaneous
    • Paper Crafts
  • Holidays
    • New Year’s
    • Australia Day
    • Back to School
    • Valentines Day
    • Easter
    • ANZAC Day
    • Mother’s Day
    • Father’s Day
    • Halloween
    • Christmas
  • Recipes
    • Appetizers
    • Bars & Slices
    • Bread & Pastries
    • Cakes
    • Cookies
    • Confectionery
    • Cupcakes & Muffins
    • Desserts
    • Drinks
    • Ice Cream
    • Jams/Preserves
    • Main Meals
  • Sewing
    • Sewing Tutorials
    • Quilting
    • Sewing & Quilting Patterns
  • Family
    • Back to School
    • Family Fun
    • Our Home
    • Parenting
    • Travel
  • Shop
    • Pattern Store
    • Etsy Store

"The Craft Room"

May 19, 2011 By A Spoonful of Sugar - 31 Comments

Sarah and I were thrilled when the lovely people at Cloth, Paper, Scissors asked us if we would like to be interviewed for a special feature they were doing on Mother and Daughter Creative Teams in the Studios Magazine (Summer 2011).

Apart from the thrill of being featured, it also prompted us to do a big tidy up of our creative space which was an added benefit.  Here is a peek at a couple of the pages showing our Studio.

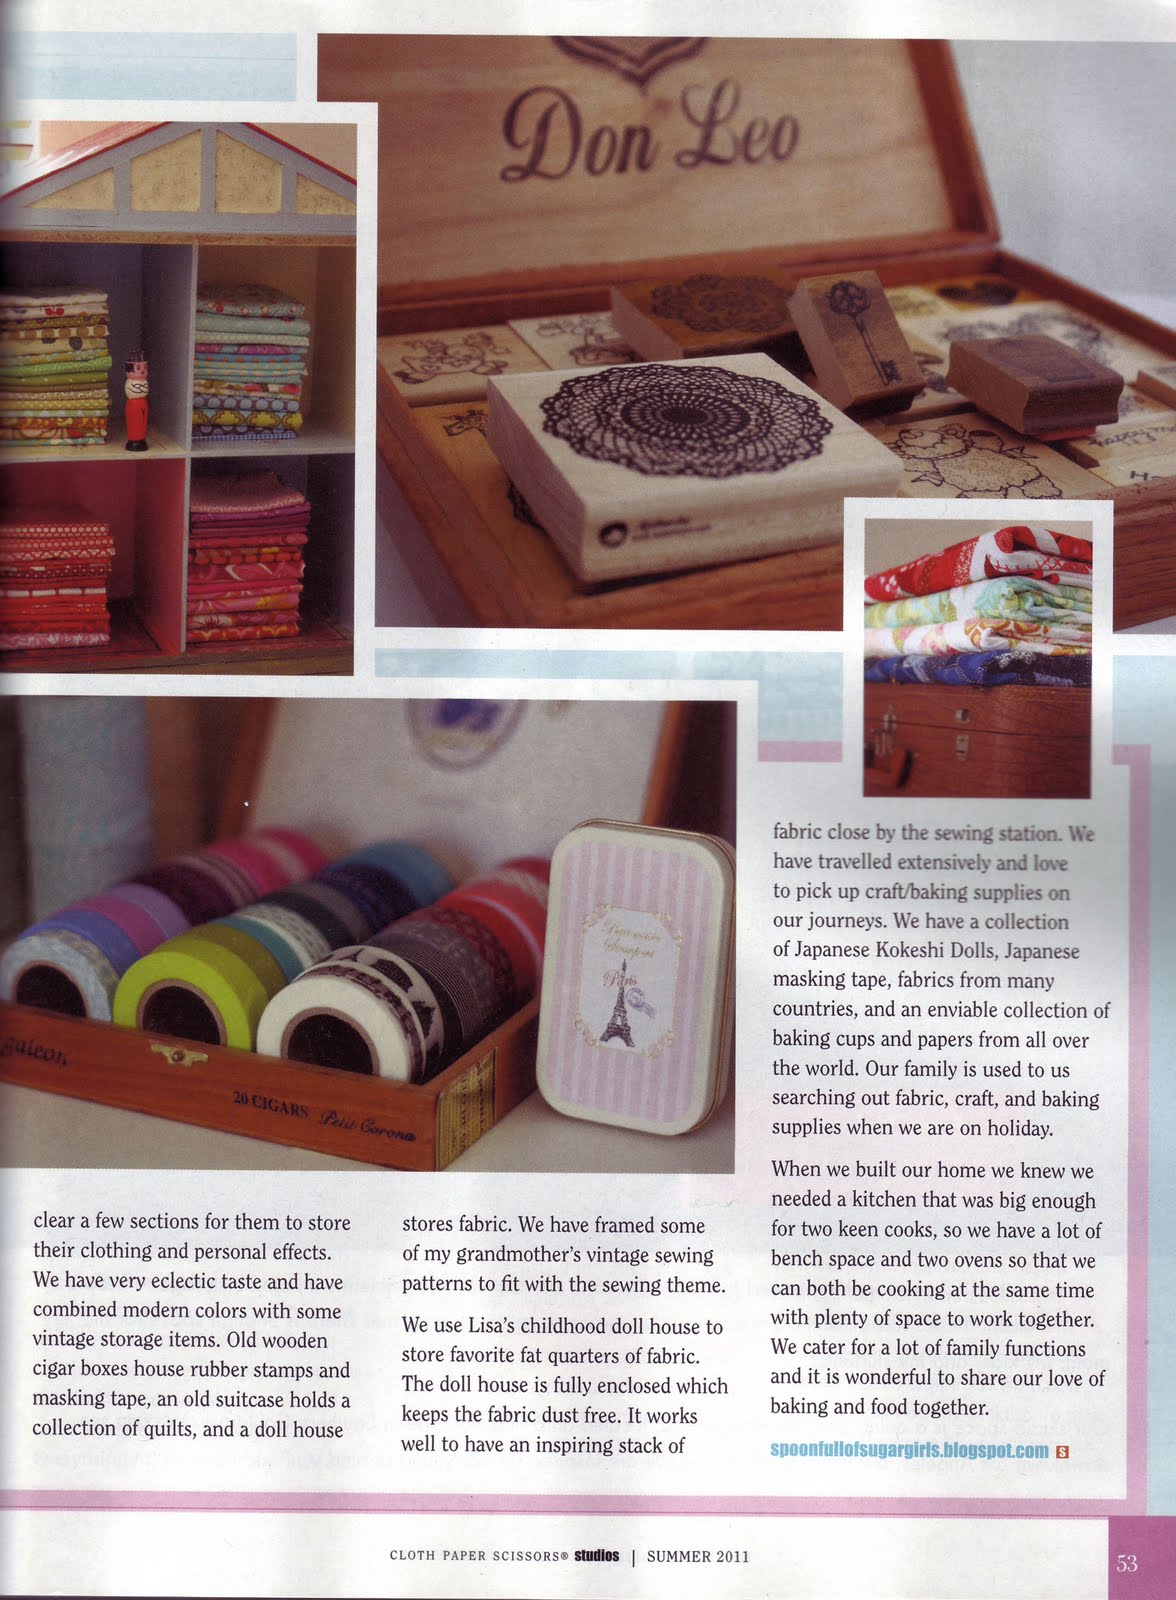
Studios Magazine is not widely available in Australia, so it was lovely to receive our complimentary copy this week and have a good read of it. There are loads of lovely studios featured and it has given us a few good ideas of how we can make the best use of our space.

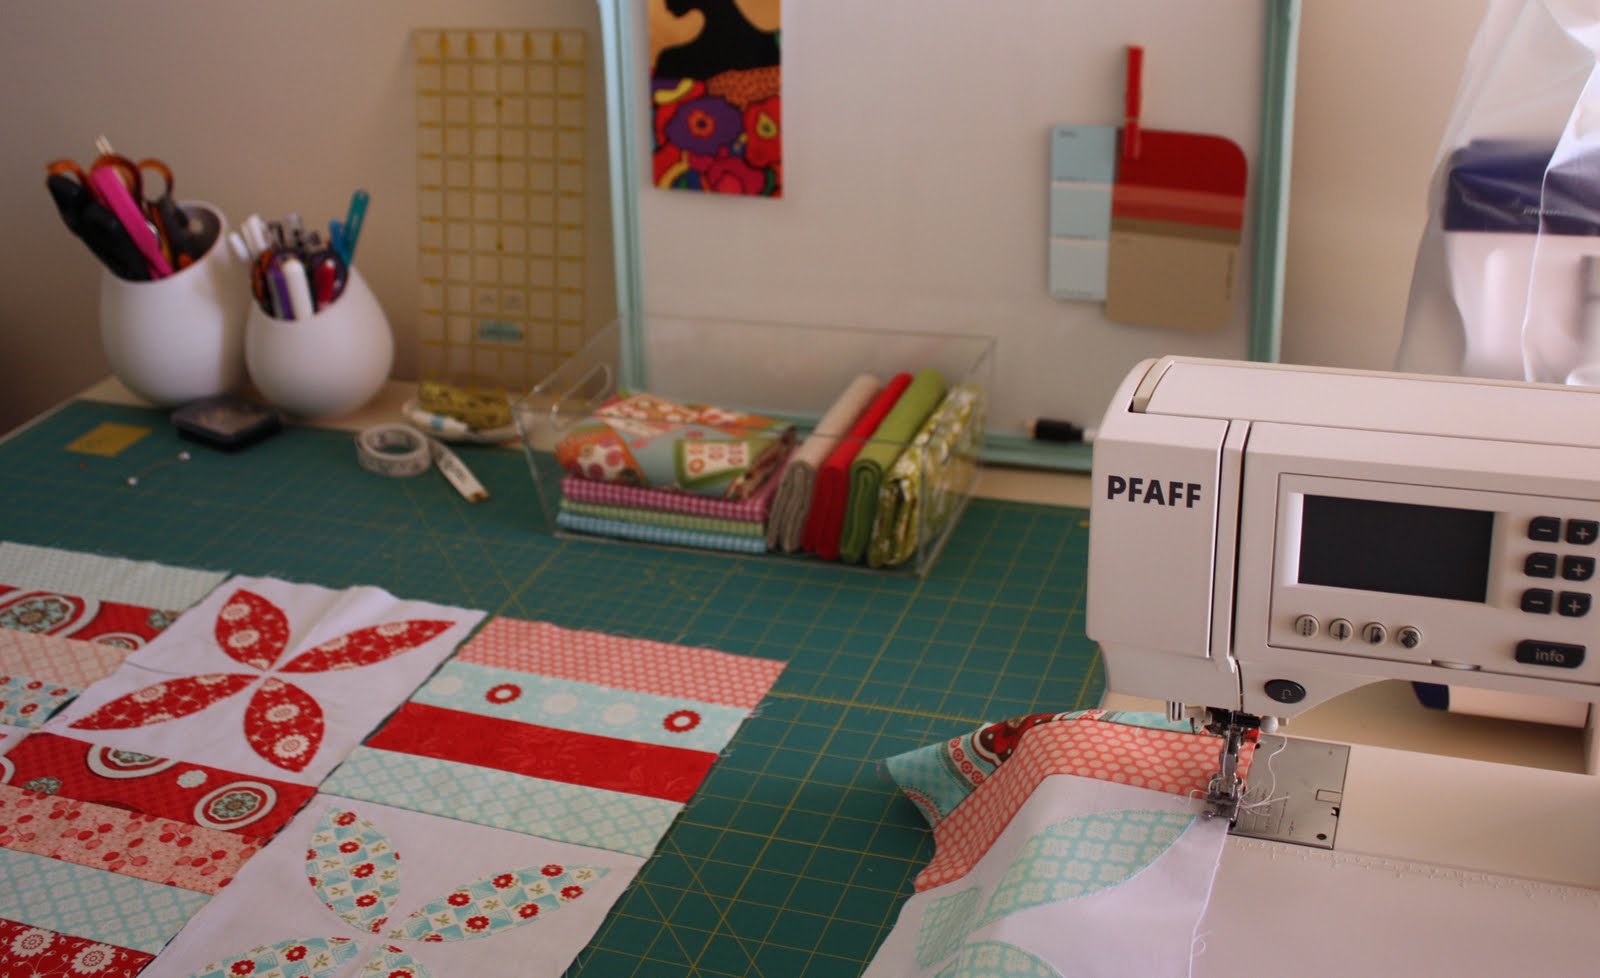
Here are a few more peeks into our Craft Room…

Our Craft Room doubles as a guest room a few times a year. When guests arrive we fold away the work  tables and move the sewing machine out, and set up the guest bed which is stored in the adjacent ensuite bathroom when not in use.

We use Ikea Expedit Shelving to store  our growing collection of books, magazines, and supplies.   Old wooden cigar boxes (that my parents bought at an antique sale) store stamps and masking tape; a suitcase that my Dad received as a 21st birthday gift holds a stack of quilts; and my childhood doll house stores fabric.  We have framed some of my Grandmothers vintage sewing patterns to fit with the sewing theme.

My son regularly joins us in the craft room to paint his models, which he finds is a good stress reliever when he needs a break from his Year 12 study.

Looking at these pictures is a good reminder for me to do another tidy up! The hard part is keeping everything in the Craft Room in its place, especially with three of us working in there! (The room is 11 ft 8″ x 11 ft 4″; 3.5 x 3.4 metres).

I am off to the Craft and Quilt Fair this week – I will be trying hard not to add too much more to my ever growing stash! Wish me luck…

Filed Under: Our Home Tagged With: craft room, home organisation

« A Little Bit of This and a Little Bit of That…
50th Wedding Anniversary »

Comments

  1. two hippos says

    May 19, 2011 at 4:47 am

    what a wonderful studio and amazingly tidy too!

    Reply
  2. Amanda says

    May 19, 2011 at 3:25 am

    Not that I would have to worry about them asking me but to tell the truth that would fill me full of terror to think someone wanted to look at my sewing room. Looks lovely Lisa.

    Reply
  3. Bee happy says

    May 19, 2011 at 3:36 am

    Ooh! your craft room is pretty and tidy! When can I move it? 😉

    Bee happy x
    Have a delicious day!

    Reply
  4. Vickie says

    May 19, 2011 at 4:01 am

    I am so excited for you girls! I can’t wait to get my copy! Have fun at the Craft and Quilt Fair!

    Reply
  5. Sandrine says

    May 19, 2011 at 4:28 am

    Congratulations girls!!It is so heart warming to see how mother and daughter can share the passion for crafting!What an inspiration !!I have a lot of similars (ikea things) in my *new* craft room and was just thinking how could it become a spare bedroom when needed…
    Sandrine x

    Reply
  6. Linda says

    May 19, 2011 at 4:31 am

    How exciting for you and Sarah, congratulations. Enjoy the craft fair, i am not going this year as i really want to spend the weekend getting my craft room up and organised. I bet your basket comes home quite a bit fuller.
    xx

    Reply
  7. Jenny of Elefantz says

    May 19, 2011 at 4:31 am

    I am definitely drooling over your beautiful craft area, Lisa, especially as I am starting to re-organise my own. You have definitely inspired me!
    Hugs
    Jenny

    Reply
  8. Bela says

    May 19, 2011 at 4:44 am

    What a lovely craft room, dear Lisa!!! You and your daughter are so cute and talented!!! Congratulations!!
    Much love to you!! Bela

    Reply
  9. Kirsty@Bonjour says

    May 19, 2011 at 4:46 am

    Congrats on being featured – I saw your smiling faces in one of the emails the publisher sends out to subscribers, very cool!

    Reply
  10. Adriana says

    May 19, 2011 at 5:00 am

    Well…
    I’m just a little bit jealous of your craft room. Love the red and white dots.
    Mine sewing room could never look that tidy – even after a clean up.

    Congratulations on the magazine spread!

    Reply
  11. Kris says

    May 19, 2011 at 5:18 am

    So pretty! I love studios and always buy a copy. (It’s all soooo inspiring!) Good luck with the stash limiting!!!

    Reply
  12. suzitee says

    May 19, 2011 at 5:51 am

    Such a versatile room Lisa…love what you’ve done with it 🙂 Congratulations to you and Sarah…you must both be thrilled!

    Reply
  13. Katherine says

    May 19, 2011 at 6:42 am

    Thanks for the peek at your creative space, Lisa! You have some lovely organizing ideas and have inspired me.

    Reply
  14. Terriaw says

    May 19, 2011 at 7:20 am

    Congratulations to you and Sara! What a cool feature. I love how adorable your creative space looks. It’s so organized, warm and inviting. I bet you could spend hours in there. Love seeing that picture of you two as well!

    Reply
  15. Katie says

    May 19, 2011 at 8:05 am

    I am starting day number 2 of my craft room declutter–I mean “makeover”. This post has given me some much needed inspiration as I start the second day of “where am i going to put this” and “how did i end up with three of these”! Thanks for sharing! Blessings, Katie

    Reply
  16. Lorrie says

    May 19, 2011 at 9:28 am

    What a great-looking, tidy, and organized craft room. May I say that I’m a tinge green here?

    Reply
  17. nest full of eggs says

    May 19, 2011 at 12:52 pm

    congrats ! how fun 🙂

    Reply
  18. crafty things says

    May 19, 2011 at 2:21 pm

    Oh, wow! Your room is so neat. Mine own space is so full that I do not think that anyone else would fit in. The green eyed monster definitely surfaced as I looked at all those wonderful pictures. Congratulations to you and your family – all great creators!

    Reply
  19. Talin's Corner says

    May 19, 2011 at 2:25 pm

    Congratulations! That must be so exciting. Your craft room is gorgeous. Anyone would love it.

    Reply
  20. Chocolate Cat says

    May 19, 2011 at 3:55 pm

    Lisa and Sarah, thank you so much for letting us have a peek at where you create! What a lovely article and what a beautiful craft room.

    Reply
  21. The Wittering Knitter says

    May 20, 2011 at 8:50 am

    Wow! I love, love, love it! I am palnning my own creative space and I get so much inspiration from you. I have even been saving my Bonne Maman jars for buttons and ribbons etc 🙂 it’ll be a while for my reveal and it won’t be a patch on yours but I do enjoy looking at your pictures and thinking about what I could do 🙂 Well done with the article too, how exciting!! 🙂

    Reply
  22. Melissa Antolovic says

    May 19, 2011 at 9:44 pm

    wow congratulations
    I’ll have to hunt down a copy so I can read the article

    Reply
  23. Bloom says

    May 19, 2011 at 11:59 pm

    What a lovely work space you girls! Thank you for sharing it. So lovely! I have the same Ikea bookcase in my sewing space and it looks like a dog’s breakfast! You have inspired me to have a tidy up!

    Reply
  24. Janellybelly says

    May 21, 2011 at 9:44 pm

    I love seeing where you create, there is so much treasure in that room! You and your trusty Pfaff have made so many beautiful creations together 😉

    Reply
  25. Mrs A says

    May 22, 2011 at 7:45 pm

    what a lovely room to be crafty in, my stuff is usually spread over the dining room table! I need to sort out my sons old room !

    Reply
  26. Shannon says

    May 29, 2011 at 10:20 pm

    I love your room – especially the splashes of red! Congratulations to you both on being featured!

    Reply
  27. Carrie says

    June 2, 2011 at 8:53 am

    Congratulations! Your studio looks beautiful and fresh. What a nice space to create in. Love love love the doll house full of fabric!

    Reply
  28. Vivi says

    June 7, 2011 at 10:59 pm

    lovely room. wish it was here !

    Reply
  29. allysgrandma says

    July 5, 2011 at 8:23 pm

    I see Bliss….My sister just got me an Expedit or whatever you call it Ikea bookcase since we don’t have an Ikea very close. Cannot wait to go get it!

    Reply
  30. Olena says

    February 26, 2017 at 8:08 pm

    Hello!
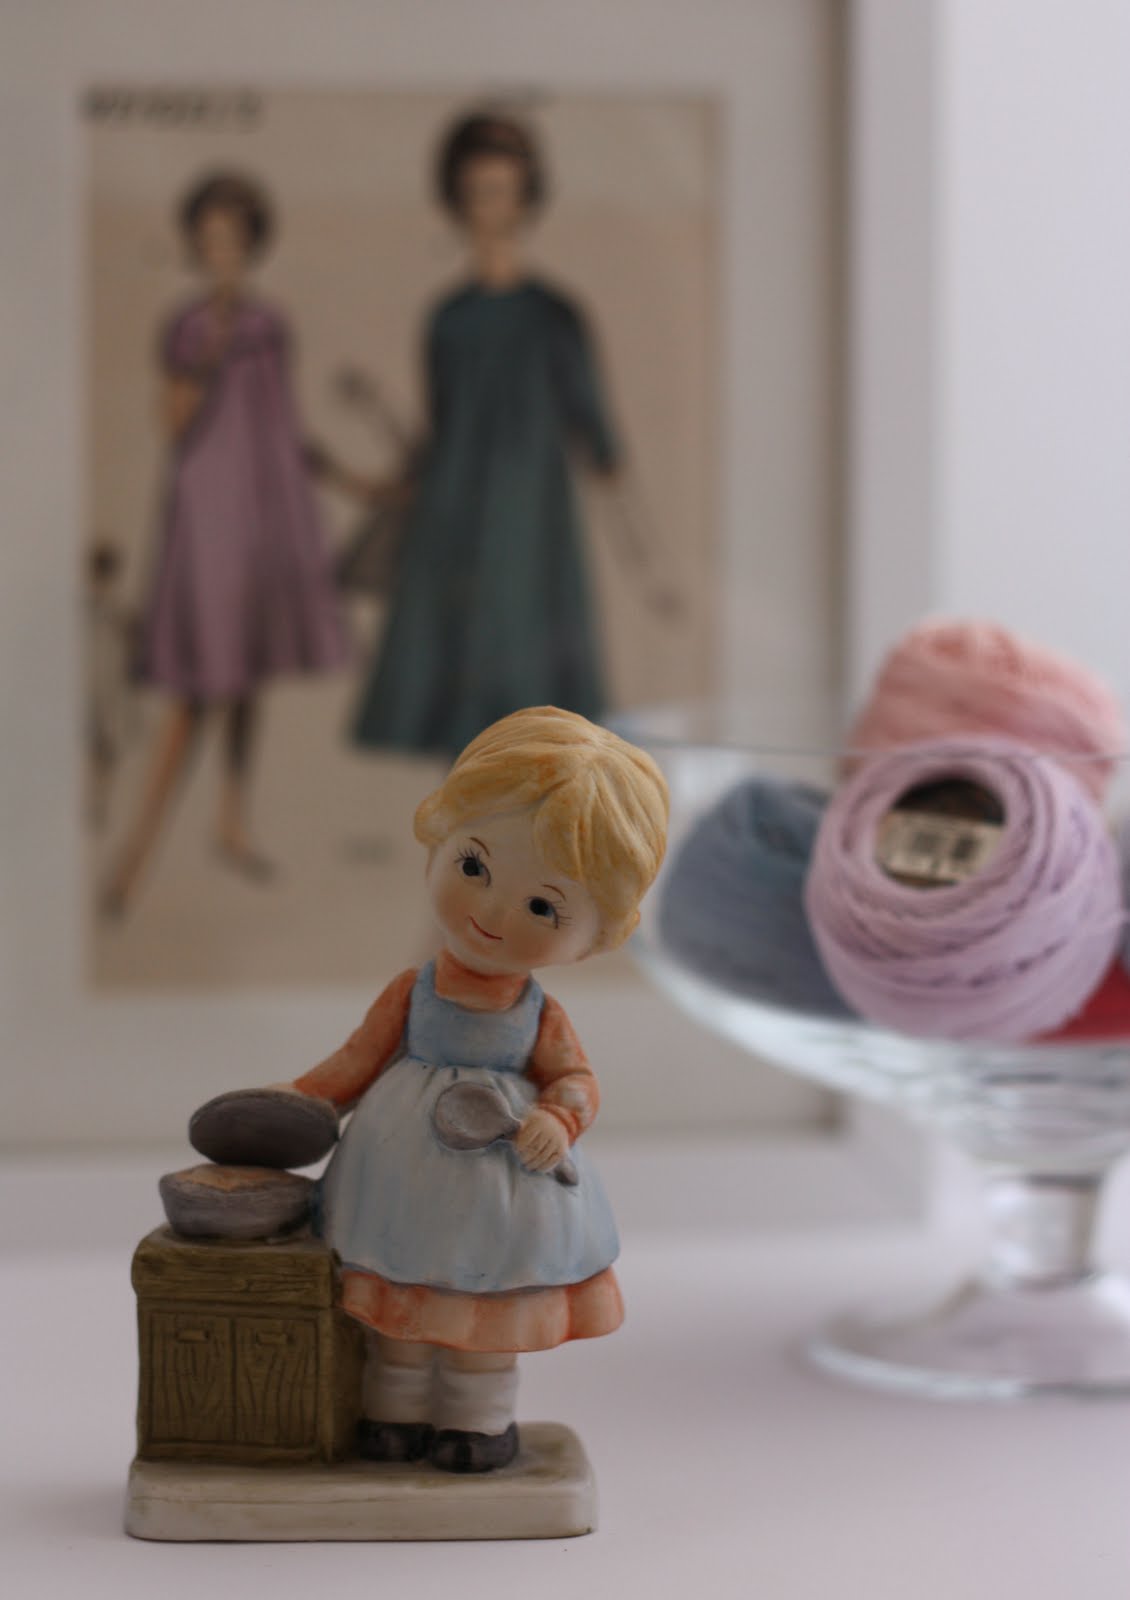
    On the wooden doll it is written: Ukrainian girl. It is in Ukrainian language ))
    I am from Ukraine and I am very pleased that your house doll is Ukrainian:))
    Thank you for your wonderful blog)

    Reply
    • A Spoonful of Sugar says

      February 26, 2017 at 9:28 pm

      Hello Olena – thank you for stopping by. I didn’t realise the doll was Ukrainian – thanks so much for translating the words for me. Lisa

      Reply

Leave a Reply Cancel reply

Your email address will not be published. Required fields are marked *

  • Email
  • Facebook
  • Instagram
  • Pinterest
  • Threads
  • TikTok
SUBSCRIBE TO NEWSLETTER
×

Categories

Archives

PURCHASE PDF PATTERNS

We offer over 100 affordable PDF sewing patterns available for download from our store website or Etsy store. Each pattern includes detailed instructions, numerous photos, and templates.

WEB STORE ETSY STORE

Instagram

If you love quick, practical sewing projects, the  If you love quick, practical sewing projects, the Baker’s Buddy Mitt is such a fun one to make. It’s scrap‑friendly, gift‑ready, and perfect for anyone who loves to bake.The Bakers Buddy Mitt is 25% off this week only. Comment BAKER and I’ll send you the link to the pattern.  #SewingProject #ScrapFriendlySewing #KitchenSewing #SewingGifts #SewingCommunity
Adding a handmade label is one of my favourite way Adding a handmade label is one of my favourite ways to personalise a project — and these little fabric + felt labels are so quick and satisfying to make.For this Ribbon Pouch, I used the Liberty Gifts from the Garden collection, which has the sweetest fruit motifs. They make perfect tiny labels for pouches, bags, and gifts.Here’s how to make your own:Press a piece of double‑sided fusible web to the back of your fabric.Cut around your chosen motif.Peel off the paper backing.Press the motif onto wool felt.Trim the felt with scalloped scissors.Sew the label onto the front of your pouch.Such a simple detail, but it adds so much charm. Fabric kindly gifted by @regent_street_fabrics — thank you!If you’d like to sew the Ribbon Pouch (3 sizes), comment RIBBON and I’ll send the pattern link straight to you.#SewingInspiration #FabricLabels #DIYLabels #LibertyFabric #LibertyGiftsFromTheGarden
A lot can change in 10 years ❤️ It’s been fun look A lot can change in 10 years ❤️ It’s been fun looking back at where I was in 2016 and how far life has come since then. Swipe for a little trip down memory lane.Back in 2016, my priorities were firmly centred around family. I was working full‑time, sewing in the guest room, sharing tutorials on my blog, and slowly dipping my toes into selling a handful of patterns on Etsy. It was a busy, full season — and creativity was something I fitted in around everything else.  Fast forward to 2026… I’m now retired and living the creative life I once dreamed of. My kids have grown up and are living in their own homes nearby. My husband and I are free to travel, explore, and enjoy this stage of life. And I get to spend my days designing, sewing, and connecting with this beautiful community.Life looks different now — in the best possible way.Were you following me back then, or what has changed for you over the past 10 years? I’d love to hear your story too.Tagging the lovely makers of my quilt: @arabesquescissors @ministryoffabric @belloquacity @alittlepatchwork @sameliasmum coleandtaffy @quiltymamaof4 @shequiltsalot @downgrapevinelane @lizzierosesews @lovethatfabric @sew_mimi.k #2026isthenew2016 #10yeartransformation #sewingjourney #sewingcommunity #aspoonfulofsugardesigns
Fall in love with sewing all over again ❤️I’ve Fall in love with sewing all over again ❤️I’ve rounded up 10 heart‑themed makes — from quick gifts to charming quilt blocks — perfect for weekend stitching or using up your favourite scraps. Whether you’re sewing for Valentine’s Day, birthdays, or just because, there’s something sweet for every maker.Comment HEART and I’ll send you a link to my Heart Pattern Collection.#sewingproject #heartsewing #quiltblock #scrapsewing #easytosew
Raw edge appliqué doesn’t have to feel fiddly or i Raw edge appliqué doesn’t have to feel fiddly or intimidating. With a few simple techniques, you can create neat, crisp shapes — even tiny details like penguin beaks and hearts.I’ve put together My Top 5 Secrets for Raw Edge Appliqué to help you feel confident, whether you’re brand new to appliqué or looking to refine your finish. Save this for your next sewing session.If you’d love a quick, beginner‑friendly project to practise these tips, my Penguin Love Mugrug is the sweetest Valentine’s make — scrap‑friendly, gift‑ready, and such fun to sew.Comment PENGUIN and I’ll send you the link to the pattern. Available now in our Pattern Store and Etsy shop.  #rawedgeapplique #appliquetips #sewingtipsandtricks #mugrugpattern #penguinlove
If you’ve ever wanted to add eyelets or grommets t If you’ve ever wanted to add eyelets or grommets to your sewing projects, here’s a quick look at how I install them using my DK93 snap press. It’s the same tool I use for snaps — and it makes installing eyelets beautifully quick and consistent.For this Ribbon Pouch, I used the Liberty Gifts from the Garden collection (printed on Lasenby cotton and released in January 2026). The colours and motifs pair so well with the little ribbon tie detail.Here’s how to install the eyelets:Punch out the four holes using a hole‑cutting die.Place the eyelet into the hole.Press it into place using the snap press.That’s it — easy peasy, and it gives the pouch such an elevated, professional finish. I love how clean and sturdy the result is.Fabric is Gifts from the Garden by Liberty - kindly provided by @regent_street_fabrics — thank you!If you’d like the Ribbon Pouch pattern (it comes in 3 sizes), comment RIBBON and I’ll send the link straight to you.Ribbon Pouch Sewing Pattern: available in our Pattern Store and Etsy shop ( links in profile).#SewingInspiration #SewingProjects #Eyelets #Grommets #SnapPress
Follow on Instagram

Featured Pattern

Travel Sewing Kit Pattern

Featured Tutorial

Retro Drawstring Bag

Featured Recipe

Lemon Pound Cake

Connect

  • Email
  • Facebook
  • Instagram
  • Pinterest
  • Threads
  • TikTok
SUBSCRIBE TO NEWSLETTER
×

Popular Posts

  • Charm Square Fabric Tray
  • Merry Little Christmas Sewing Projects
  • {Back to School} Tissue Cover
  • Hexagon Fabric Tray
  • Raw Edge Applique Tips
  • Sewing Gifts 101: Easy and Affordable Ideas for Your Crafty Friends
  • Finding More Time to Sew

Copyright © 2026 Lisa. K. Cox - A Spoonful of Sugar