A Spoonful of Sugar

Make. Bake. Create.

Menu
  • Home
  • About
    • About Us
    • Press
    • FAQ
    • Disclosure Policy
    • Contact Us
  • Crafts
    • Crochet
    • DIY
    • Embroidery/Cross stitch
    • Gift Wrapping
    • Knitting
    • Miscellaneous
    • Paper Crafts
  • Holidays
    • New Year’s
    • Australia Day
    • Back to School
    • Valentines Day
    • Easter
    • ANZAC Day
    • Mother’s Day
    • Father’s Day
    • Halloween
    • Christmas
  • Recipes
    • Appetizers
    • Bars & Slices
    • Bread & Pastries
    • Cakes
    • Cookies
    • Confectionery
    • Cupcakes & Muffins
    • Desserts
    • Drinks
    • Ice Cream
    • Jams/Preserves
    • Main Meals
  • Sewing
    • Sewing Tutorials
    • Quilting
    • Sewing & Quilting Patterns
  • Family
    • Back to School
    • Family Fun
    • Our Home
    • Parenting
    • Travel
  • Shop
    • Pattern Store
    • Etsy Store

Coconut Custard Bars

April 23, 2012 By A Spoonful of Sugar - 8 Comments

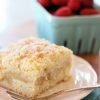
Sarah baked us some delicious Coconut Custard Bars this week. They consisted of a biscuit crust, with a delicious coconut custard filling, and topped with some shredded coconut.  She found the recipe over at the Technicolor Kitchen and adapted it slightly (leaving out the rum).
Crust:
1 1/3 cups (186g) all purpose flour
1/3 cup (67g) granulated sugar
¼ teaspoon salt
½ cup (113g/1 stick) unsalted butter, cold and chopped into 1cm (½in) cubes
1 large egg yolk
2 teaspoons cold water
¾ teaspoon vanilla extract

Filling:
2 large eggs
1 large egg yolk
¾ cup (150g) granulated sugar
1 cup (240ml) unsweetened coconut milk
1 teaspoon vanilla extract
1 tablespoon all purpose flour
pinch of salt
1 cup (100g) sweetened shredded coconut

Make the crust: preheat oven to 180°C/350°F. Butter a 22cm (9in) square pan*.
Place flour, sugar, salt in the bowl of a food processor and process until blended. Scatter butter pieces over the flour mixture and process until mixture resembles coarse meal. In a small bowl, whisk together egg yolk, water and vanilla. With food processor running, add yolk mixture through the feed tube and process just until the dough begins to come together in large clumps. Scrape the dough into the prepared pan and, using your fingers, pat it evenly into the bottom of the pan. Bake crust until golden, 20-25 minutes. Transfer the pan to wire rack and cool completely. Leave the oven on.
In medium bowl, whisk the eggs, egg yolk, and granulated sugar until blended. Slowly whisk in the coconut milk. Whisk in the vanilla, and flour and salt.
Sprinkle the coconut evenly over the cooled crust. Pour the filling through a fine sieve over the coconut, covering the crust completely. Bake for 25-30 minutes or until filling is set and the edges are golden brown. Cool completely in the pan on a wire rack. Using sharp knife, cut into bars.


Store the bars in the fridge.

I am heading off on a sewing retreat this weekend so am about to head into the sewing room to cut out the fabric for a new quilt. Can’t wait to get sewing again!

Filed Under: Bars & Slices, Recipes Tagged With: coconut, custard

« Book Review: Fresh From the Clothesline & Country Cottage Quilting
Lamingtons »

Comments

  1. Patchwork and Play says

    April 23, 2012 at 8:04 pm

    Oh yummy! I wonder whether I can convince my husband to bake this for me? Tomorrow maybe? BTW My lovely book, which I won in your recent giveaway, arrived yesterday! Thank you..it is a great read!

    Reply
  2. Maddy says

    April 23, 2012 at 9:10 pm

    Yum Yum! I like the sound of this one could give it a try tomorrow.

    Reply
  3. rebekah @ justfordaisy says

    April 23, 2012 at 10:27 pm

    Oh yum! Just reminded me I have to go bake cupcakes… must stop reading blogs! 🙂 These look delicious I will have to give it a try one day soon! 🙂

    Reply
  4. Christy says

    April 23, 2012 at 11:39 pm

    So lovely! It’s just the perfect dessert for the summer season we’re having right now. Thanks for sharing.

    Reply
  5. Nutrição, Culinária e Tecidos says

    April 24, 2012 at 4:15 am

    Hello I am a nutritionist and I love everything related to cooking and sewing.
    The candy looks great.
    Congratulations on the blog, is tasteful and inspiring. He is on my list of favorite blogs.
    hugs
    Vanessa Oliveira

    Reply
  6. Stephanie says

    April 24, 2012 at 4:24 am

    Your photos are always so pretty.

    Reply
  7. my4lilgirls says

    April 24, 2012 at 10:29 am

    Oh lordy these look amazing, my husband loves anything coconut so I will def give these a go
    Karen x

    Reply
  8. Anonymous says

    June 30, 2012 at 6:35 pm

    Baking these bars as we speak…..they look luscious! more to come

    Reply

Leave a Reply Cancel reply

Your email address will not be published. Required fields are marked *

  • Email
  • Facebook
  • Instagram
  • Pinterest
  • Threads
  • TikTok
SUBSCRIBE TO NEWSLETTER
×

Categories

Archives

PURCHASE PDF PATTERNS

We offer over 100 affordable PDF sewing patterns available for download from our store website or Etsy store. Each pattern includes detailed instructions, numerous photos, and templates.

WEB STORE ETSY STORE

Instagram

The sweetest little pouch for treats, notions, swa The sweetest little pouch for treats, notions, swaps, and tiny treasures ✨ The Mini Treat Pouch features a flat base, a handy back pocket, a fold‑over flap, and a clever elastic‑and‑button closure. It’s a quick, beginner‑friendly project and perfect for using your favourite fabric scraps. It also makes a lovely end‑of‑year teacher gift — just add chocolates, lip balm, or a gift card. Comment TREAT for a link to the pattern.  Pattern details: Mini Treat Pouch - available in our Pattern Store and Etsy Shop.#sewingprojects #scrapsewing 
#handmadegifts #beginnersewing #sewingcommunity
If you’ve been looking for a quick, satisfying wee If you’ve been looking for a quick, satisfying weekend sew… this is the one I reach for again and again. The Handy Drawstring Pouch is my most‑made pattern for a reason — actually, three.✨ A clever flat base that stands tall. Perfect for storing sewing notions, gifting, travel, or organising drawers.✨ Folds completely flat.
Tucks away beautifully between uses and makes the sweetest flat‑pack gift.✨ Reversible + 3 sizes included.
Sew a coordinated set or mix your favourite scraps — it always turns out beautifully.If you want the link, just comment HANDY and I’ll send it straight to you. Happy sewing, friends.Pattern Detauls: Handy Drawstring Pouch - 3 sizes. Available in our Pattern Store.#sewingpattern #drawstringbag #sewingproject #scrapbusting #weekendsewing  
A tiny pyramid that does it all — a pattern weight A tiny pyramid that does it all — a pattern weight for your sewing table, a book weight for cosy reading, or a scented sachet for your drawers. Small, sweet, and so satisfying to sew. Comment PYRAMID for the free pattern.Fabric: Something Blue by Tilda
@tilda_australia#sewingproject #tildafabric #beginnersewing #scrapsewing #Tildasomethingblue
Meet the sweetest little project you can sew in mi Meet the sweetest little project you can sew in minutes — the Pyramid Weight. Use it as a pattern weight, scented sachet, or even a book weight… all from one triangle of fabric. Comment PYRAMID for the free pattern.Fabric is Something Blue by Tilda, releasing 1 June 2026 — with thanks to @tilda_australia.#tildasomethingblue #tildafabric #freepattern #sewingtutorial #sewinglove
The Scrappy Strips Pouch is one of my favourite wa The Scrappy Strips Pouch is one of my favourite ways to use up leftover fabric strings. Today’s version is made from patchwork strips — a fun, relaxing sew that turns scraps into something beautiful and practical.The Scrappy Strips Pouch pattern has two versions - patchwork strings and selvedges - and two sizes. Comment SELVEDGE (or SELVAGE) for a link to the pattern.Pattern Details: Scrappy Strips Pouch Sewing Pattern is in our Pattern Store and Etsy Shop.#ScrappyStripsPouch #ScrapBustingSewing #PatchworkPouch #StringQuilting #SewingProjects
If you’ve ever wanted to add eyelets or grommets t If you’ve ever wanted to add eyelets or grommets to your sewing projects, here’s a quick look at how I install them using my DK93 snap press. It’s the same tool I use for snaps — and it makes installing eyelets beautifully quick and consistent.Here’s how I install the eyelets:Punch out the four holes using a hole‑cutting die.Place the eyelet into the hole.Press it into place using the snap press.That’s it — simple, sturdy, and it gives the Ribbon Pouch such an elevated, professional finish. I love how clean and secure the result is.Fabric shown: Tilda Something Blue, releasing June 1 — thank you @tilda_australia for the beautiful fabric.✨ If you’d like the Ribbon Pouch pattern (3 sizes), comment RIBBON and I’ll send the link straight to you.Ribbon Pouch Sewing Pattern: available in my Pattern Store and Etsy Shop (links in profile).#tildasomethingblue #tildafabric #sewingtips #handmadeeveryday #sewingtools
Follow on Instagram

Featured Pattern

Travel Sewing Kit Pattern

Featured Tutorial

Retro Drawstring Bag

Featured Recipe

Lemon Pound Cake

Connect

  • Email
  • Facebook
  • Instagram
  • Pinterest
  • Threads
  • TikTok
SUBSCRIBE TO NEWSLETTER
×

Popular Posts

  • Cord Cosy
  • Tips for Threading a Needle
  • Travel Accessories to Sew
  • Liberty Tissue Cover
  • Happy Scrappy Cards
  • Charm Square Fabric Tray
  • Crocheted Scarf {Free Pattern}

Copyright © 2026 Lisa. K. Cox - A Spoonful of Sugar