A Spoonful of Sugar

Make. Bake. Create.

SUBSCRIBE TO NEWSLETTER
×
Menu
  • Home
  • About
    • About Us
    • Advertising
    • Press
    • FAQ
    • Disclosure
    • Grab a Button
    • Contact Us
  • Crafts
    • Crochet
    • DIY
    • Embroidery/Cross stitch
    • Gift Wrapping
    • Knitting
    • Miscellaneous
    • Paper Crafts
  • Holidays
    • New Year’s
    • Australia Day
    • Back to School
    • Valentines Day
    • Easter
    • ANZAC Day
    • Mother’s Day
    • Father’s Day
    • Halloween
    • Christmas
  • Recipes
    • Appetizers
    • Bars & Slices
    • Bread & Pastries
    • Cakes
    • Cookies
    • Confectionery
    • Cupcakes & Muffins
    • Desserts
    • Drinks
    • Ice Cream
    • Jams/Preserves
    • Main Meals
  • Sewing
    • Sewing Tutorials
    • Quilting
    • Sewing & Quilting Patterns
  • Family
    • Back to School
    • Family Fun
    • Our Home
    • Parenting
    • Travel
  • Shop
    • Pattern Store
    • Etsy Store

Charming Ornaments – Part 2 – How To

November 26, 2009 By A Spoonful of Sugar - 64 Comments

I had a few requests for the instructions for making your own Charming Ornaments. You can make up a batch fairly quickly.
Supplies for each ornament:

  • small piece of quilters cotton (I used red, lime, and pink)
  • fusible webbing such as vliesofix
  • white felt (I used the polyester variety although they would be nicer made up in wool felt)
  • 10 inch length of narrow white ribbon
  • one button (I used red, white, and lime)
  • fibrefill stuffing

Trace your shape onto a piece of fusible webbing (I used hearts and stars) and iron it onto the reverse side of your cotton fabric.

Cut out the shape, peel off the paper backing, and iron it onto a piece of felt that is at least 1 inch larger than the outside of the fabric shape. Cut another piece of felt that is the same size for the backing.

Position the top layer of felt with the fabric shape, on top of the backing felt and pin together. Sew around the fabric shape using a machine buttonhole stitch or zigzag stitch, leaving a gap of approx 1 inch. You will be sewing through two layers of felt.
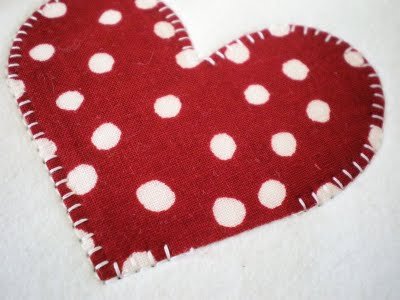
Lightly stuff the shape through gap in between the two layers of felt.

  1. Stitch up the gap in the buttonhole stitching so the stuffing is secure.
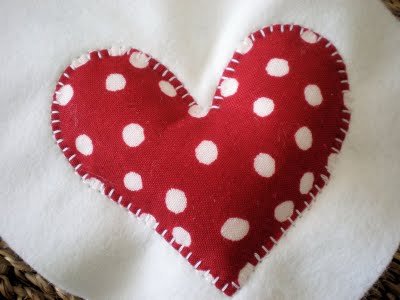
  1. Cut out the shape, leaving approx 1/2 inch of felt around the fabric shape, using pinking shears.

Overlap the ends of the ribbon as shown in the picture and secure to the top of the shape. Sew a button over the stitching to secure the ribbon.

Hang the completed ornament on the tree; or attach to a Christmas present.

Simple Christmas Ornaments 2

Edit: November 2014 – You can find an updated version of this tutorial here.

For your daily sugar fix you can subscribe or follow us on facebook, twitter, google plus and pinterest.

Posted by Lisa

Filed Under: Christmas, Sewing Tutorials

Never miss a post.

Get fresh new ideas delivered right to your inbox!

« Charming Ornaments
Monogrammed Gift Tags »

Comments

  1. two hippos says

    November 27, 2009 at 1:12 am

    Great tutorial, for some lovely decorations!

    Reply
  2. Janellybelly says

    November 26, 2009 at 11:23 pm

    Thanks for sharing the instructions, I might have to make some for my matching tree 🙂

    Reply
  3. nicolette says

    November 27, 2009 at 12:53 am

    Thanks for the tutorial. The hearts are adorable!

    Reply
  4. rebecca says

    November 27, 2009 at 2:01 am

    these are lovely, not too difficult but so effective. thanks for the fab idea x

    Reply
  5. Cascade Lily says

    November 27, 2009 at 2:20 am

    Great idea, excellent tutorial. Might have to file this one away for next year. My dance card is full this year already!

    Love this use for the Prints Charming scraps too – fantastic!

    Reply
  6. barb's creations says

    November 27, 2009 at 3:22 am

    Love,love,love them.Will have to get my skates on and try and make a few up for this year if I can.Thanks for another brilliant idea and another brilliant tutorial 🙂 Barb.

    Reply
  7. Cathy says

    November 27, 2009 at 4:15 am

    These are beautiful Lisa, thank you so much for the tutorial xo

    Reply
  8. Anita says

    November 27, 2009 at 4:23 am

    Oh I love the heart! Thanks for sharing the instructions. I’ve been looking in magazines for some simple but sweet patterns to make as gifts and now I have some. Kind regards, Anita

    Reply
  9. Karin says

    November 27, 2009 at 5:07 am

    Those hearts are really cute. I can imagine they look lovely hanging in your house or tree!

    Reply
  10. Jilly's Space says

    November 27, 2009 at 5:08 am

    Thanks so much for sharing this tutorial. This ornament is sooo sweet and something I could do!

    Reply
  11. Jenny of Elefantz says

    November 27, 2009 at 5:38 am

    Lisa, I love the elegance of all you do! Beautiful!

    Reply
  12. Philip, Melissa, & Summer says

    November 27, 2009 at 7:29 am

    so cute. I am going to get stuff for them today.

    http://www.themudpuddleproject.blogspot.com

    Reply
  13. Philip, Melissa, & Summer says

    November 27, 2009 at 7:29 am

    so cute. I am going to get stuff for them today.

    http://www.themudpuddleproject.blogspot.com

    Reply
  14. Philip, Melissa, & Summer says

    November 27, 2009 at 7:29 am

    so cute. I am going to get stuff for them today.

    http://www.themudpuddleproject.blogspot.com

    Reply
  15. Philip, Melissa, & Summer says

    November 27, 2009 at 7:29 am

    so cute. I am going to get stuff for them today.

    http://www.themudpuddleproject.blogspot.com

    Reply
  16. Philip, Melissa, & Summer says

    November 27, 2009 at 7:29 am

    so cute. I am going to get stuff for them today.

    http://www.themudpuddleproject.blogspot.com

    Reply
  17. Evelyn says

    November 27, 2009 at 9:03 am

    Those are awfully cute! Thanks for the tutorial!

    Reply
  18. Barbara says

    November 27, 2009 at 10:40 am

    Thanks for the tutorial. Those are adorable and will make great last minute gifts.

    Reply
  19. Dandelion Quilts says

    November 27, 2009 at 3:02 pm

    These are darling. Thanks for the tutorial.

    Reply
  20. Anonymous says

    November 27, 2009 at 5:18 pm

    I love this idea. I think it looks gorgeous and have plans to make my own.
    Jude, Perth WA

    Reply
  21. goldenbird says

    November 27, 2009 at 6:11 pm

    Thank you for the tutorial! When I read your first post about the ornaments I was hoping you’d share with us how to make them. They are adorable and look easy enough for even me to make :o)

    Reply
  22. suzitee says

    November 27, 2009 at 6:20 pm

    They are so gorgeous Lisa…and of course, I LOVE those colours! Hope your Christmas preparations are going well 🙂

    Reply
  23. Brenda @Cozy Little House says

    November 27, 2009 at 6:23 pm

    These are ever so charming! Thanks!
    Brenda

    Reply
  24. texmorg says

    November 28, 2009 at 4:38 am

    Thanks Lisa. No way will i get the chance to make these this christmas but when i feel like playing with fabric later on i will have to make them and then they will be ready for next christmas.
    xx Linda

    Reply
  25. jacquie says

    November 28, 2009 at 6:11 am

    so many good ideas. i loved the card tags too! i think some christmas crafts are going to be the order of the day here.

    Reply
  26. Tracy says

    November 28, 2009 at 7:01 am

    These ornaments are wonderfully fun, Lisa… Thank for sharing how to make these beauties with us for this Christmas holiday season! :o) Happy Weekend to you all there ((HUGS))

    Reply
  27. Celestial Charms says

    November 28, 2009 at 8:12 am

    Thank you so much for this tutorial. You explained the steps very clearly and that is appreciated. Now to get myself to sit down and do it, is another issue in itself! 😉
    Maureen

    Reply
  28. Simone de Klerk says

    November 28, 2009 at 11:04 am

    Thank you so much, Lisa! And the way you make your pictures makes the ornament even more beautiful!

    Reply
  29. Dogwood says

    November 28, 2009 at 7:24 pm

    Thanks, thanks for the pattern and directions! I really love the button embellishment!

    Reply
  30. Journeying Five says

    November 28, 2009 at 8:37 pm

    love it! you come up with such lovely ideas!

    Reply
  31. Handmade in Israel says

    November 28, 2009 at 11:25 pm

    These are lovely – so pretty. Your presents are going to look wonderful this year!

    Reply
  32. Laura in Paris says

    November 29, 2009 at 6:29 am

    That small white button on the white ribbon changes this red heart from trivial to unique!

    Reply
  33. bluebird-lyn says

    November 30, 2009 at 12:47 am

    Hello Lisa, love the ornaments you have made, you certainly have a wonderful gift…Warm Regards Lyn

    Reply
  34. Jenny says

    November 29, 2009 at 1:51 pm

    Just lovely-thanks for sharing:)

    Reply
  35. Cara says

    November 29, 2009 at 3:04 pm

    Oh these are gonna be so ca-ute on my tree! Thanks for sharing such a cute idea!

    Reply
  36. casserole says

    November 29, 2009 at 9:36 pm

    So pretty!! I linked to your tutorial on Craft Gossip Sewing:
    http://sewing.craftgossip.com/tutorial-felt-scrap-fabric-christmas-ornaments/2009/11/29/

    –Anne

    Reply
  37. méri says

    November 30, 2009 at 6:02 am

    Pretty! Thanks for sharing, Lisa!

    Reply
  38. Thimbleanna says

    November 30, 2009 at 10:16 am

    Oh Lisa! Your little ornaments are adorable! Thanks for the tutorial.

    Reply
  39. Carrie P. says

    November 30, 2009 at 11:51 am

    Oh, Sweet! I love all the different colors. Thanks for sharing the instructions.

    Reply
  40. http://www.papermoonies.blogspot.com says

    November 30, 2009 at 1:29 pm

    oh Thank you Thank you I have a show in L.A. and all these little bits of day of the dead fabric, now I totally know what to do with them!!!
    Brittany
    http://www.papermoonies.blogspot.com

    Reply
  41. Herondina says

    November 30, 2009 at 3:08 pm

    Lindos!!!

    Reply
  42. Knit Sew City Girl says

    December 1, 2009 at 4:08 am

    Hiya! Thank you so much for the tutorial, the ornaments are so pretty. I like the white flower button you used too.

    Reply
  43. silverpebble says

    December 1, 2009 at 10:35 am

    This heart is so lovely – thanks so much for this great tutorial Lisa. Fabulous for Christmas

    Reply
  44. Corrie says

    December 2, 2009 at 1:04 am

    too cute! I can definitely try this one before christmas!

    Corrie:)

    Reply
  45. banuca says

    December 2, 2009 at 8:38 am

    Hearts are my favor, I saved this to my pc, thanks for sharing.

    Reply
  46. mamas kram says

    December 2, 2009 at 9:05 am

    Your stars and hearts are so pretty! Thanks for this great tutorial!

    Reply
  47. nicolette says

    December 2, 2009 at 10:18 am

    Thanks for sharing the instructions! The hearts look too cute!

    Reply
  48. Handmade says

    December 3, 2009 at 3:56 am

    Charming indeed – thanks for sharing!

    Reply
  49. Rachel@oneprettything.com says

    December 2, 2009 at 2:44 pm

    Aww, I love your hearts! Thanks so much for this, I’ll be linking.

    Reply
  50. em's scrapbag says

    December 2, 2009 at 5:24 pm

    Thanks for the tute. These are adorable.

    Reply
  51. acornmoon says

    December 3, 2009 at 2:46 am

    Lovely, quick and clever, thanks for sharing.

    I am having a blog giveaway at the moment, my new fabric collection samples. Maybe you might like to join in?

    Reply
  52. Sharrieboberry says

    December 3, 2009 at 9:32 am

    Those are darling! Are you photos are super! Thanks for sharing!

    Reply
  53. Jamie says

    December 3, 2009 at 6:51 pm

    Absolutely loving these. Thanks so much for the tute.

    Reply
  54. Becky says

    December 4, 2009 at 11:16 am

    So very cute! Just another thing to add to my huge list of craft things to make before Christmas.

    Reply
  55. Mod Podge Amy says

    December 4, 2009 at 5:52 pm

    Charming is right, these are awesome!

    Reply
  56. Shannon says

    December 6, 2009 at 9:05 am

    Thanks for the how-tos. You have the best ideas!

    Reply
  57. Janet says

    December 9, 2009 at 6:30 pm

    Thank you thank you, you saved me this year with this great idea. I’ve just made some, they turned out wonderfully.

    Reply
  58. Amanda says

    December 11, 2009 at 10:39 am

    Oh, I absolutely love these! Do you mind if I make some with my youth group at Church? For fun-not money.Your blog is gorgeous…glad I found you.
    Love, Amanda x

    Reply
  59. Dancin' Puffin says

    December 19, 2009 at 2:48 am

    Hey Lisa and Sarah, long time no write, sorry! Been reading through your recent posts and it looks like you’ve been really busy making lots of lovely things. I love these decorations! Wishing you both a wonderful Christmas and a happy, healthy 2010 x

    Reply
  60. kitty says

    August 19, 2010 at 2:07 pm

    Muy bonito. muchas gracias por el tutorial.
    saludos

    Reply
  61. elliesue says

    August 21, 2010 at 8:10 am

    Thank you for this lovely ornament pattern,I love it!

    Reply
  62. Barbara says

    January 13, 2011 at 2:46 pm

    That is awesome and cute! Even I can make that. Maybe I should start making some now, it takes me that long to get organized 😉 Love your work!

    Reply
  63. Cris Etchart says

    March 30, 2011 at 7:31 pm

    Cada coisa maravilhosa no seu site! Parabéns pelo talento!

    Reply

Leave a Reply Cancel reply

Your email address will not be published. Required fields are marked *

  • Email
  • Facebook
  • Instagram
  • Pinterest
  • Twitter
Follow on Bloglovin

My Book

Instagram

aspoonfulsugar

Lover of sewing, quilting, crochet, baking, photography, & vintage haberdashery. Blogger. Designer. Author. Perth, Australia.

Lisa Cox       she/her
My Christmas sewing this week was this festive scr My Christmas sewing this week was this festive scrub top for my youngest daughter who is a doctor. I used a free Scrubs pattern by @dot.n.cross and adorable Christmas fabric from @spotlightstores I added a special touch with one of my mum's woven labels from her sewing days in the 90's. She used to make the most amazing clothes and toys for kids.A big shout out to all the health care workers who are on duty over the holidays. 🎄🎅🏻🎀🔔#aspoonfulofsugardesigns #aspoonfulsugar #scrubtop #christmasscrubs #christmassewing #holidaysewing #sewsewsew #sewistsofinstagram #sewfun #sew
Festive Fir Tree Quilt Block is the final installm Festive Fir Tree Quilt Block is the final installment of our foundation paper pieced tree series for 2023. This sweet tree is perfect for confident paper piecing beginners and can be easily pieced from your fabric scraps. Like all of our FPP patterns, this one comes in 5 sizes so it is perfect for your Christmas sewing.Our Cyber Sale ends in 27 hours so be quick to get 20% off all the patterns in our Etsy Store and Pattern Shop. Simply enter coupon code: CYBER2023 at checkout. Link to our pattern stores is in our profile.#festivefir #aspoonfulofsugardesigns #aspoonfulsugar #foundationpaperpiecing #treeblock #quiltblock #christmasquiltblock #patchworkfun #sew #holidaysewing
As a special thank you for your support of my smal As a special thank you for your support of my small business, I have compiled a blog post of 14 of my favourite free sewing tutorials to make for the holidays. These are perfect for adding handmade charm to your holidays. Read the article over on our blog. Link to the article is in our profile. 🎄There is still time left to take advantage of our biggest sale of the year. 20% off everything in our store for the next 3 days. Be Quick!! Coupon Code: CYBER2023 🎉 Link to our Pattern Store and Etsy Shop are in our profile.Tutorials shown here:
1. Retro Drawstring Bag
2. Mushroom Ornament
3. Yoyo Wreath
4. Christmas Treat Place Cards
5. Folded Star OrnamentHope you enjoy the projects.#aspoonfulofsugardesigns #cybersale #sewingpatterns #sewingtutorial #holidaysewing #christmassewing #christmasdiy #christmasfabriccrafts #feltornamentpattern #makersgonnamake #sewistsofinstagram
Are you looking for some awesome gifts to sew for Are you looking for some awesome gifts to sew for your sewing buddies? Check out my latest blog post where I show you how to turn your scraps into 12 cute and practical items your friends will love for Christmas.Link to our blog is in our profile. Nothing beats a handmade Christmas 🎄#aspoonfullofsugardesigns #handmadechristmas #christmassewing #giftstosew #christmascrafts #diychristmas #sewist #sewistofinstagram #sewsewsew #sewingproject #sewinggifts
Load More Follow on Instagram

Featured Pattern

Travel Sewing Kit Pattern

Featured Tutorial

Retro Drawstring Bag

Featured Recipe

Lemon Pound Cake


A Spoonful of Sugar on Etsy

Categories

Archives

Connect

  • Email
  • Facebook
  • Instagram
  • Pinterest
  • Twitter

Popular Posts

  • Simple Christmas Ornaments
  • Fabric Gift Pouch
  • English Paper Piecing Made Simple: A Beginner’s Guide with Projects to Inspire
  • Fabric Gift Pouch
  • Gifts to Sew for Sewists
  • Crocheted Scarf {Free Pattern}
  • Peaceful Pines Quilt Block in 5 Sizes

Copyright © 2023 Lisa. K. Cox - A Spoonful of Sugar