A Spoonful of Sugar

Make. Bake. Create.

Menu
  • Home
  • About
    • About Us
    • Press
    • FAQ
    • Disclosure Policy
    • Contact Us
  • Crafts
    • Crochet
    • DIY
    • Embroidery/Cross stitch
    • Gift Wrapping
    • Knitting
    • Miscellaneous
    • Paper Crafts
  • Holidays
    • New Year’s
    • Australia Day
    • Back to School
    • Valentines Day
    • Easter
    • ANZAC Day
    • Mother’s Day
    • Father’s Day
    • Halloween
    • Christmas
  • Recipes
    • Appetizers
    • Bars & Slices
    • Bread & Pastries
    • Cakes
    • Cookies
    • Confectionery
    • Cupcakes & Muffins
    • Desserts
    • Drinks
    • Ice Cream
    • Jams/Preserves
    • Main Meals
  • Sewing
    • Sewing Tutorials
    • Quilting
    • Sewing & Quilting Patterns
  • Family
    • Back to School
    • Family Fun
    • Our Home
    • Parenting
    • Travel
  • Shop
    • Pattern Store
    • Etsy Store

Breakfast Mat {Tutorial}

August 13, 2012 By A Spoonful of Sugar - 10 Comments

On a recent trip to IKEA we discovered some Marit placemats in a neutral cream colour for only $1.50 each. I bought a few as they are perfect for Breakfast Mats. I added a strip of patchwork made from Tumbler blocks and now it puts a smile on my face when I eat my breakfast.

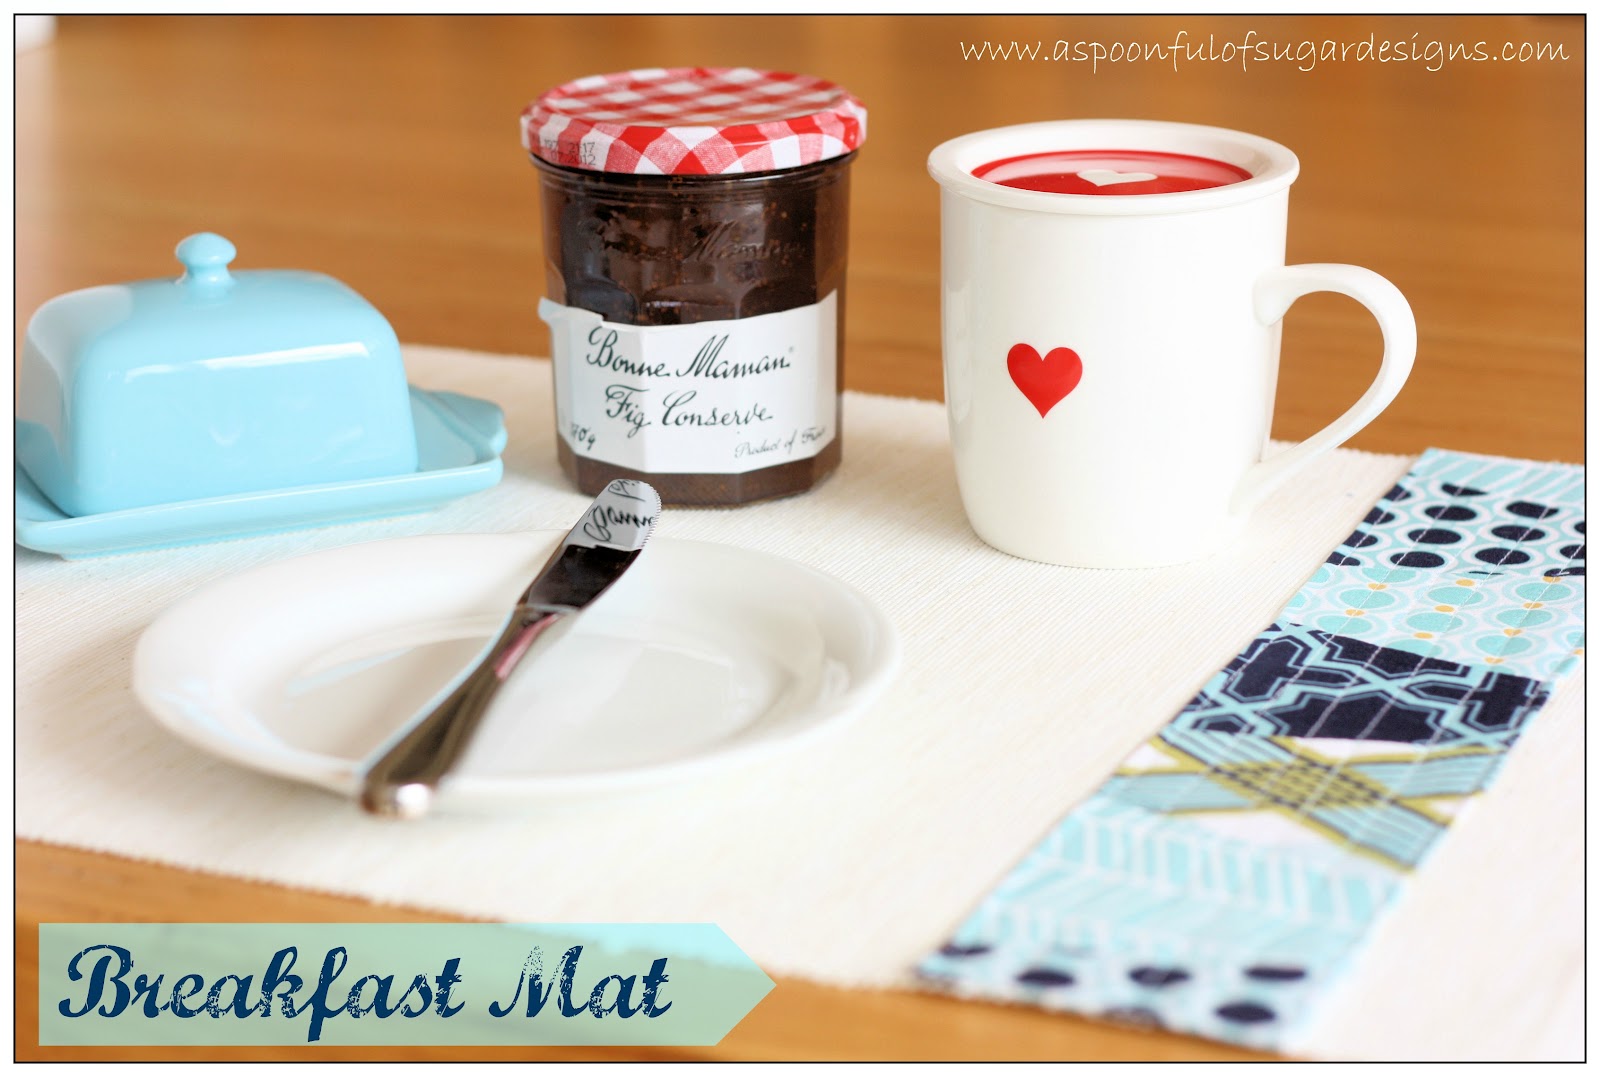
I am going to make up a batch of these as Christmas gifts – perhaps teamed with some homemade jam or preserves. I would love to make a set in Christmas fabrics for a festive breakfast on Christmas morning.
They would be great for kids made up in some bright novelty prints.

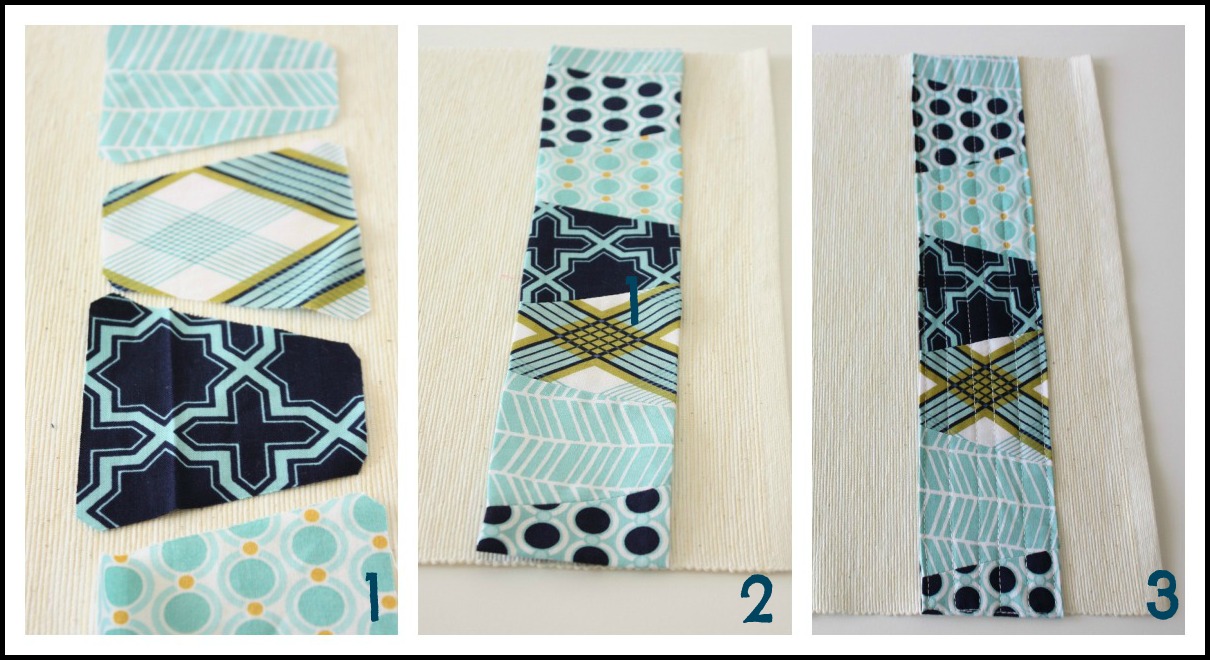
If you would like to transform a plain cotton placemat, here are a few tips.
(Note: Cotton Placemats often shrink. If you are concerned, you may wish to pre-wash them before adding the patchwork).

Materials:

  • Plain cotton placemats – such as Marit from IKEA
  • assorted fabric scraps
  • matching thread
1. I used my Accuquilt Go Baby Cutter and the Tumbler die to cut seven (7) 3 1/2 inch Tumbler blocks. If you don’t have access to a die cutting machine, cut your Tumbler blocks using a template, or just cut fabrics in 3 1/2 inch squares.
2. Stitch the fabric pieces together so that you have a long strip that measures 3 1/2 inch  x (width of placemat + 1 inch). Fold under 1/4 inch on each long endge. Press. Fold under 1/4 inch on each short edge. Press.
3. Pin the fabric strip in place, approx 2 inch from the right side. Stitch in place. Quilt a few lines, 1/2 inch apart.
Bon Appetit!
For your daily sugar fix you can subscribe or follow us on facebook, twitter, google plus and pinterest.

Filed Under: Sewing, Sewing Tutorials Tagged With: kitchen, table setting

« Golf Towel {Tutorial}
Almond Praline Madeleines »

Comments

  1. Fiona @ Dragonfly-Crafts says

    August 14, 2012 at 3:45 am

    Some more Aqua, looking great.

    Reply
  2. Kim Walus says

    August 13, 2012 at 7:28 pm

    I love it. So simple yet, so elegant. Thanks for sharing such great ideas!

    Reply
  3. notyet100 says

    August 14, 2012 at 1:45 am

    Looks cool…

    Reply
  4. Lisa M says

    August 14, 2012 at 5:53 am

    I love these. Next time I am in Melbourne I will visit Ikea and grab some Marit mats and make up a bunch of these; some for me and some for others. Thanks for such a great (and economical) gift idea.

    Reply
  5. Celestial Charms says

    August 14, 2012 at 7:15 am

    What a fabulous idea. I have lots of material scraps, so I would love to try this. Thanks for sharing!
    Maureen

    Reply
  6. CBH says

    August 14, 2012 at 8:36 am

    Thank you so much for this post. I want to let you know that I posted a link to your blog in Creative Busy Bee Craft Inspirations, under the Page 1 post on Aug. 14, 2012. Thanks again.

    Reply
  7. Simone de Klerk says

    August 14, 2012 at 10:21 am

    Love this! The patchwork really makes the difference.

    Reply
  8. Ann says

    August 15, 2012 at 12:58 am

    What a lovely idea for Christmas gifts. You could use patchwork colours that match the rest of the foodie gift too. Makes something very special out of an ordinary Ikea buy.

    Reply
  9. CJ - Food Stories says

    August 16, 2012 at 7:51 am

    I love this … it’s so cute 🙂

    Reply
  10. AvMeg says

    August 26, 2012 at 8:35 am

    Lovely idea 🙂

    Reply

Leave a Reply Cancel reply

Your email address will not be published. Required fields are marked *

  • Email
  • Facebook
  • Instagram
  • Pinterest
  • Threads
  • TikTok
SUBSCRIBE TO NEWSLETTER
×

Categories

Archives

PURCHASE PDF PATTERNS

We offer over 100 affordable PDF sewing patterns available for download from our store website or Etsy store. Each pattern includes detailed instructions, numerous photos, and templates.

WEB STORE ETSY STORE

Instagram

A tiny pyramid that does it all — a pattern weight A tiny pyramid that does it all — a pattern weight for your sewing table, a book weight for cosy reading, or a scented sachet for your drawers. Small, sweet, and so satisfying to sew. Comment PYRAMID for the free pattern.Fabric: Something Blue by Tilda
@tilda_australia#sewingproject #tildafabric #beginnersewing #scrapsewing #Tildasomethingblue
Meet the sweetest little project you can sew in mi Meet the sweetest little project you can sew in minutes — the Pyramid Weight. Use it as a pattern weight, scented sachet, or even a book weight… all from one triangle of fabric. Comment PYRAMID for the free pattern.Fabric is Something Blue by Tilda, releasing 1 June 2026 — with thanks to @tilda_australia.#tildasomethingblue #tildafabric #freepattern #sewingtutorial #sewinglove
The Scrappy Strips Pouch is one of my favourite wa The Scrappy Strips Pouch is one of my favourite ways to use up leftover fabric strings. Today’s version is made from patchwork strips — a fun, relaxing sew that turns scraps into something beautiful and practical.The Scrappy Strips Pouch pattern has two versions - patchwork strings and selvedges - and two sizes. Comment SELVEDGE (or SELVAGE) for a link to the pattern.Pattern Details: Scrappy Strips Pouch Sewing Pattern is in our Pattern Store and Etsy Shop.#ScrappyStripsPouch #ScrapBustingSewing #PatchworkPouch #StringQuilting #SewingProjects
If you’ve ever wanted to add eyelets or grommets t If you’ve ever wanted to add eyelets or grommets to your sewing projects, here’s a quick look at how I install them using my DK93 snap press. It’s the same tool I use for snaps — and it makes installing eyelets beautifully quick and consistent.Here’s how I install the eyelets:Punch out the four holes using a hole‑cutting die.Place the eyelet into the hole.Press it into place using the snap press.That’s it — simple, sturdy, and it gives the Ribbon Pouch such an elevated, professional finish. I love how clean and secure the result is.Fabric shown: Tilda Something Blue, releasing June 1 — thank you @tilda_australia for the beautiful fabric.✨ If you’d like the Ribbon Pouch pattern (3 sizes), comment RIBBON and I’ll send the link straight to you.Ribbon Pouch Sewing Pattern: available in my Pattern Store and Etsy Shop (links in profile).#tildasomethingblue #tildafabric #sewingtips #handmadeeveryday #sewingtools
The Ribbon Pouch is one of my favourite quick‑to‑s The Ribbon Pouch is one of my favourite quick‑to‑sew gift bags, and I couldn’t resist making a light and dark version using the new Tilda Something Blue collection. Both pouches use the same print in different colourways — such a pretty way to show how fabric choice changes the whole mood.They’re finished with satin ribbon threaded through grommets, and topped with a tiny star tag. The boxed base helps them stand beautifully, and the ribbon closure makes them perfect for birthdays, thank‑you gifts, treats, or little treasures.This is a beginner‑friendly, scrap‑friendly, quick project you’ll want to sew again and again. Pattern includes 3 sizes.If you’d like the pattern, comment RIBBON and I’ll send the link straight to you.Pattern Details: Ribbon Pouch (3 Sizes) available in my Pattern Store and Etsy Shop.Fabric Details: Tilda Something Blue - releasing on 1 June 2026. Thanks to @tilda_australia#TildaSomethingBlue #TildaFabric #SewingPattern #BeginnerSewingProject #QuickSewingProject   
Sewing with scraps is one of my favourite ways to Sewing with scraps is one of my favourite ways to get creative — small pieces, leftover corners, charm‑square offcuts… they all have so much potential.Here are 10 scrap‑friendly projects that use small pieces beautifully. They’re quick to sew, beginner‑friendly, and perfect for gifting ✂️✨Save this for the next time you want to turn your scraps into something pretty.Which one would you sew first?  Tell me in the comments — I love seeing what you’re making.Patterns are available in my pattern store (link in profile) or comment PATTERNS and I will send you the link. #scrapsewing #scrapbusting #scrapfriendly #sewinginspiration #sewingideas
Follow on Instagram

Featured Pattern

Travel Sewing Kit Pattern

Featured Tutorial

Retro Drawstring Bag

Featured Recipe

Lemon Pound Cake

Connect

  • Email
  • Facebook
  • Instagram
  • Pinterest
  • Threads
  • TikTok
SUBSCRIBE TO NEWSLETTER
×

Popular Posts

  • Cord Cosy
  • Tips for Threading a Needle
  • Travel Accessories to Sew
  • Liberty Tissue Cover
  • Happy Scrappy Cards
  • Charm Square Fabric Tray
  • Life Lessons from Sewing and Quilting

Copyright © 2026 Lisa. K. Cox - A Spoonful of Sugar