A Spoonful of Sugar

Make. Bake. Create.

Menu
  • Home
  • About
    • About Us
    • Press
    • FAQ
    • Disclosure Policy
    • Contact Us
  • Crafts
    • Crochet
    • DIY
    • Embroidery/Cross stitch
    • Gift Wrapping
    • Knitting
    • Miscellaneous
    • Paper Crafts
  • Holidays
    • New Year’s
    • Australia Day
    • Back to School
    • Valentines Day
    • Easter
    • ANZAC Day
    • Mother’s Day
    • Father’s Day
    • Halloween
    • Christmas
  • Recipes
    • Appetizers
    • Bars & Slices
    • Bread & Pastries
    • Cakes
    • Cookies
    • Confectionery
    • Cupcakes & Muffins
    • Desserts
    • Drinks
    • Ice Cream
    • Jams/Preserves
    • Main Meals
  • Sewing
    • Sewing Tutorials
    • Quilting
    • Sewing & Quilting Patterns
  • Family
    • Back to School
    • Family Fun
    • Our Home
    • Parenting
    • Travel
  • Shop
    • Pattern Store
    • Etsy Store

Tutorial: Modern Circle Pillow Cover Using Go! Baby

August 14, 2011 By Spoonful of Sugar - 24 Comments

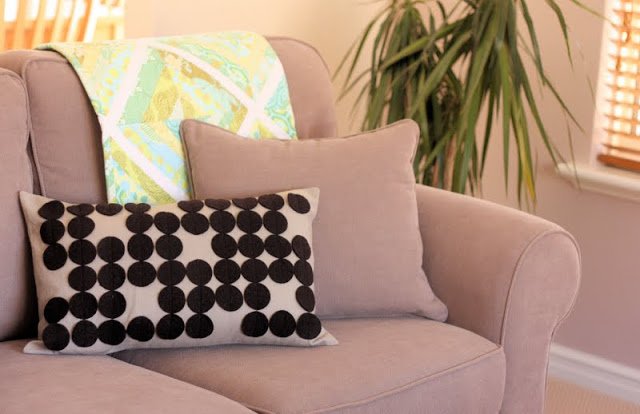
I have been wanting to make some modern pillow covers for our living room for ages. I have had this circle design in my head but the thought of cutting so many circles by hand put me off. As soon as we received our Go!Baby fabric cutter, I knew right away, what my first project would be.

Thanks for all the comments on my Go! Baby Cutter review post. Now that I have used the cutter more, I have a few additional points to raise.

  • As I mentioned in my review, the cutting mats and dies are extra, and are not included with the machine. Different sized dies, require different sized cutting mats, so be aware that you may need to buy several sizes depending on the dies you are using.
  • According to Accuquilt, you can extend the life of your cutting mats by rotating and flipping them periodically. This is what I did. However after cutting approx 70 circles, and cutting out 10 of the drunkards path template, the mat has cracked. It is still usable, but I will need a new mat before long. The mats are not that expensive, Accuquilt is selling a pack of two, 6 x 12 in mats for US$16.98. Once again you just need to be aware that the mats are a consumable.
  • When I compare the Go!Baby mats to the Cuttlebug mats, they are softer and thinner which is probably why they are not as durable.
  • You do need to pay attention to the grain of the fabric. When I was not paying attention, some of my circles ended up more “eggular” in shape.
  • I love how fast you can crank out the shapes. It really is a time saver, particularly on tricky shapes to cut like circles, which otherwise need to be cut by hand.
Now on to the tutorial.

 
Modern Circle Pillow Cover
Materials:
1/2 yard (0.4 m) of linen
1/3 yard (0.25m) of boiled wool or wool felt
two strips of fusible interfacing measuring 1 1/2 in x 15 inch
3 buttons
1 pillow form, 14″ x 21 “
* I used boiled wool as I love it’s texture. It has been pre-shrunk so it did not fray.
Method:
1. Cut out sixty 2″ circles out of the boiled wool using the 2″ circle die on the Go! Baby Cutter, or alternatively cut them out by hand.
To cut them out using the Go! Baby, I first cut the fabric into 2 1/2 inch squares and then ran them through the cutter in two layers.


2. Cut the linen for the pillow cover into:
  • 23 x 15 in rectangle (58 x 38 cm) for the pillow front
  • 15 x 8 inch rectangle (38 x 20 cm) for pillow back
  • 15 x 19 1/2 inch rectangle (38 x 49.5 cm) for pillow back

3. On the pillow front, lightly press it into four quarters to assist with placement of the circles. Lay out the circle in 6 rows x 10 columns. I then removed 8 circles to add more interest but this is up to you.

4. Pin the circles in place. Then stitch a line down the middle of each column of circles to secure. I used masking tape that is 1 inch thick to use as a stitching guide.

5. With the 15 x 19 1/2″ linen rectangle, iron the fusible interfacing strip to the wrong side on the linen along a 15″ edge. Press the edge that is interfaced under 1 1/2″. Mark the position of three equally spaced buttonholes along the folded edge, and stitch using your sewing machines buttonhole stitch. Cut the opening in the buttonholes.
6. With the 15 x 8″ piece of linen, iron the fusible interfacing strip to the wrong side along a 15 ” edge, fold under this long edge by 1 1/2″ and press.
7.  7. Position the larger backing piece on top of the pillow front with the right sides facing, and so that the edges are aligned.
8. Then position the smaller backing piece so that the interfaced edges, overlap. Stitch the pieces together around the perimeter using a ½” seam allowance. Clip corners and turn the cushion cover out the right way, and press. Attach the buttons and then place the cushion insert inside the cushion cover.
For more free patterns, you can signup to Accuquilt’s newsletter here:
22 Free Patterns - Download Now
Hope to be back soon with news of a giveaway! Accuquilt will be giving away one free Go!Baby Fabric cutter and a choice of 3 dies to one lucky reader.

Filed Under: Sewing, Sewing Tutorials

« Weekend Baking: Syrup Cakes
Go! Baby Giveaway »

Comments

  1. Handmade says

    August 14, 2011 at 2:47 pm

    Lovely design – looks simple and stylish – thanks for the tutorial.

    Reply
  2. Quilt Kitty says

    August 14, 2011 at 2:45 am

    I would not want to try cutting those circles by hand!Thanks for the other observations, good to know what else you are up for when you make this sort of purchase. Tracee xx

    Reply
  3. Janellybelly says

    August 14, 2011 at 3:54 am

    Excellent review, project & tutorial 😉

    Reply
  4. Simone de Klerk says

    August 14, 2011 at 4:30 am

    I absolutely love it. But, I don’t have a cutter, so I don’t think I’ll be making it :o)

    Reply
  5. Sue Bone says

    August 14, 2011 at 4:31 am

    I’ve read that to stop the mis-shapes, put a sheet of paper on top of the fabric.

    Reply
  6. Stephanie says

    August 14, 2011 at 4:47 am

    Love the pillow. I won an Accuquilt Go Cutter and had the same issues with cracking mat and distortion of shapes if you don’t lay the fabric out just so.

    Reply
  7. CuteStuffInside says

    August 14, 2011 at 8:31 am

    Oh, how I would love to win one of those machines! When I cut my circles, they never come out perfect.

    Reply
  8. Kimia Kline says

    August 14, 2011 at 1:29 pm

    thats adorable! what a lovely tutorial.

    Reply
  9. Patchwork and Play says

    August 14, 2011 at 1:30 pm

    I think you have found the perfect project for your cutter! Circles are almost impossible to cut perfectly free hand! Well done your cushion looks great!

    Reply
  10. Melissa says

    August 14, 2011 at 1:59 pm

    I love this! I will have to cut out the circles by hand…but the design is so great! Thanks for sharing:)

    Reply
  11. Monika says

    August 14, 2011 at 2:49 pm

    That is one super stunning cushion. Thanks for sharing.

    Reply
  12. Kelly says

    August 14, 2011 at 3:05 pm

    I love your pillow. Great review. Thank you xxx

    Reply
  13. Marydon says

    August 14, 2011 at 5:45 pm

    This is so neat! Love that cutter, hadn’t seen one like it before.

    Would you be so kind to (& tell your friends) comment on my BLOG ONLY (emails don’t count), for the Miracle Makeover fund drive. Charlie, 8 yr. old, & his story are fabulous. Every comment brings us a $1 for the next person that will be sponsored.

    Have a beautiful weekend.
    Hugs,
    TTFN ~
    Marydon
    blushingrosetoo.blogspot.com

    Reply
  14. Chocolate Cat says

    August 14, 2011 at 8:20 pm

    What a stylish cushion, looks great.

    Reply
  15. Crafty Japan says

    August 14, 2011 at 9:45 pm

    I just bought a cushion with a similar circle design on a hemp background. Would love to try your tutorials out one day 🙂

    Reply
  16. Jill says

    August 15, 2011 at 12:39 am

    Lovely pillow! How nice to have a machine to cut your circles for you!

    Jill @ Creating my way to Success
    http://www.jembellish.blogspot.com/

    Reply
  17. Homemaker Honey says

    August 15, 2011 at 2:33 am

    Looks so easy! And fun, too! Now, I think I need one. 🙂

    Deborah
    Homemaker Honey
    homemakerhoney.com

    Reply
  18. Tammy Vasser says

    August 15, 2011 at 6:34 am

    AWESOME! Outstanding! So modern! This is the first Go baby tutorial I’ve seen (and I’ve seen many lately) that’s actually made me consider buying one. Absolutely love those wool circles! Great job!

    Reply
  19. Tammy Vasser says

    August 15, 2011 at 6:34 am

    This comment has been removed by the author.

    Reply
  20. two hippos says

    August 16, 2011 at 1:07 am

    I love the cushion, sounds like a great machine!

    Reply
  21. Bela says

    August 15, 2011 at 12:01 pm

    Dear Lisa, your tutorial is perfect!! Thanks for sharing it!
    Much love to you all!!
    Bela

    Reply
  22. Corrie says

    August 15, 2011 at 6:08 pm

    woohoo so glad you did that tutorial as I have a go baby I got at christmas! i love it but you are so right on the grain! i had some wonky little squares that weren’t the right size! I got the charm square 5 inch cutter and can’t wait to get stuck into my cute fairy tales and make some charm square quilts with precious fabrics!

    enjoy!
    corrie;)

    Reply
  23. Thimbleanna says

    August 16, 2011 at 6:11 am

    Very pretty! Circles are the best reason I’ve seen for having the GoBaby — they’re so hard to cut individually!

    Reply
  24. Pat says

    August 20, 2011 at 8:06 am

    Some quilt shops let you rent their machine – so if you don’t have one, you can cut your felt or fabric at a shop. Cute pillow – I wonder if the circles will curl after a while…

    Reply

Leave a Reply Cancel reply

Your email address will not be published. Required fields are marked *

  • Email
  • Facebook
  • Instagram
  • Pinterest
  • Threads
  • TikTok
SUBSCRIBE TO NEWSLETTER
×

Categories

Archives

PURCHASE PDF PATTERNS

We offer over 100 affordable PDF sewing patterns available for download from our store website or Etsy store. Each pattern includes detailed instructions, numerous photos, and templates.

WEB STORE ETSY STORE

Instagram

🌟 Tilda Week Sew-Along! Free Pattern 🌟To 🌟 Tilda Week Sew-Along! Free Pattern 🌟Today’s free project is the perfect beginner-friendly make—cute reusable makeup pads! They’re a quick, scrap-busting way to teach someone to sew using your treasured Tilda fabric scraps. Plus, they’re as pretty as they are practical! ✨Want the free pattern? Comment MAKEUP and I’ll send you the link!Check back all week for more Tilda-inspired creations! 💖#TildaFabric #SewingProject #BeginnerSewing #ScrapBuster #SustainableSewing #CraftingWithTilda #SewistCommunity #HandmadeWithLove @tilda_australia
#freesewingpattern
🌸 Celebrating Tilda Week! 🌸This week, we’re embracing the beauty, charm, and endless possibilities of Tilda fabric—the perfect blend of soft, dreamy cotton and vintage-inspired prints. ✨Here are 5 things we absolutely love about Tilda fabric: 🪡 Soft & Dreamy – Smooth, high-quality cotton with an elegant feel. 🌷 Vintage Charm – Nostalgic florals and timeless designs. 🎨 Color Harmony – Thoughtfully curated palettes for effortless mixing. 🎭 Versatile Designs – Perfect for quilts, dolls, and home décor projects. 📖 Whimsical Aesthetic – Each print tells a romantic, inspiring story.Ready to get creative? All patterns featured during Tilda Week are available in our Pattern Store and Etsy shop! Find the links in our profile and explore endless possibilities with Tilda fabric. Cover pattern is the  Ribbon Gift Box.✨ Check out our other posts for more sewing inspiration. 💖 Share your favourite Tilda project.#TildaFabric #SewingLove #TildaWeek #QuiltingMagic #DIYWithTilda #tildaaustralia #twogreenzebras #sewfun #fabricaddict
✨ 10 Must-Sew Projects Featuring Tilda Fabric  ✨ 10 Must-Sew Projects Featuring Tilda Fabric ✨Tilda fabric, designed by Tone Finnanger, has a magical way of bringing projects to life. With its soft floral prints, whimsical motifs, and beautifully curated color palettes, it's a dream for any sewist! 🌸 This week, the new Tilda Wallflower range was released, and to celebrate I'm sharing Tilda posts all week.Today, I’m showcasing 10 of my most popular patterns, all made using gorgeous Tilda fabric ranges. From delicate florals to charming animals and cozy blenders, there's something for every style! 💕All patterns are available in our pattern store & Etsy shop—find the links in our profile! ✂️💬 Which Tilda collection is your favorite? Let me know in the comments!Thanks to @tilda_australia for providing the fabric used in these projects. #TildaFabric #TildaLovers #SewingPatterns #SewistsOfInstagram #QuiltingLife #HandmadeWithLove #SewingInspiration #FabricAddict #SewMuchFun #TildaProjects #CreativeSewing #tildaaustralia #twogreenzebras
✨ Meet your new Sewing Buddy! ✨This little ✨ Meet your new Sewing Buddy! ✨This little pincushion is not just handy—it's packed with personality! 💕 I stitched up two charming versions—one in lush green, the other in dreamy thistle—each featuring a fussy-cut face on the pocket for a whimsical, flower-child touch. 🌼With perfectly paired blender fabrics, Tilda Wallflower makes mixing and matching effortless, giving your projects that beautifully coordinated look. Whether you're making one for yourself or as a thoughtful handmade gift, this sweet sewing companion is a must-have! 🪡✨💖 Want the pattern? Comment "BUDDY" and I'll send you the link!Big thanks to @tildaaustralia for the gorgeous Wallflower fabric!#TildaFabric #TildaWallflower #SewingBuddy #SewMuchFun #HandmadeSewing #QuiltLove #PincushionPerfection #RetroFlorals #SewingInspiration #FabricObsessed #SewistCommunity
🌸 Introducing the Tilda Wallflower Collection! 🌸 Introducing the Tilda Wallflower Collection! 🌸Retro charm meets floral beauty in this stunning new fabric collection by Tone Finnanger, inspired by the dreamy designs of the 1960's and 1970's. And what better way to showcase these gorgeous prints that with the Dresden Needlebook.Using a machine blanket stitch, I secured the Dresden plate to the cover - giving it a polished, sturdy finish. But the real shows topper? A carefully fussy cut face in the Dresden centre, capturing the whimsical flower child vibe. 🌷 So sweet, so vintage, so Tilda!Dresden Needlebook is a functional way to keep your sewing essentials neat and organised. Want the pattern? Comment DRESDEN and I'll send you the link.Are you a Tilda lover? Stick around! This week I'll be sharing more sewing projects that are perfect for these sweet floral prints. Check back each day for more inspiration.❤️ Share this with friends who adore Tilda. Big thanks to @tildaaustralia for the stunning Wallflower fabrics.#ilovetilda #tildaaustralia #tildawallflower #dresdenneedlebook #sewinglove #sewmuchfun #sewingcommunity #twogreenzebras
🧵 Advice for my younger self: Start sewing soon 🧵 Advice for my younger self: Start sewing sooner, you'll thank me later!POV: Granny crafts aren't just charming, they're good for your mental health. The rhythmic hum of your sewing machine, the joy of creating something with your hands, and the satisfaction of turning fabric into something useful - it's pure therapy.Sewing teaches patience, creativity, and mindfulness. It's a stress reliever, a confidence booster, and a way to slow down in a fast paced world.Want to know more about the mental health benefits of sewing? Comment HEALTH below and I'll send you a link to my article. ❤️#sewingtherapy #mindfulmaking #craftingforwellness #sewingformentalhealth #grannycrafts #handmadehappiness #slowstitching #sewinglove
Follow on Instagram

Featured Pattern

Travel Sewing Kit Pattern

Featured Tutorial

Retro Drawstring Bag

Featured Recipe

Lemon Pound Cake

Connect

  • Email
  • Facebook
  • Instagram
  • Pinterest
  • Threads
  • TikTok
SUBSCRIBE TO NEWSLETTER
×

Popular Posts

  • Dress Form Gift Tags
  • Lavender Sachets
  • Sewing with Scraps
  • Sew Small, Sew Smart: The Joy of Making Bags and Pouches.
  • Charm Square Fabric Tray
  • Retro Drawstring Bag
  • Apple Crumble Slice

Copyright © 2025 Lisa. K. Cox - A Spoonful of Sugar