A Spoonful of Sugar

Make. Bake. Create.

Menu
  • Home
  • About
    • About Us
    • Press
    • FAQ
    • Disclosure Policy
    • Contact Us
  • Crafts
    • Crochet
    • DIY
    • Embroidery/Cross stitch
    • Gift Wrapping
    • Knitting
    • Miscellaneous
    • Paper Crafts
  • Holidays
    • New Year’s
    • Australia Day
    • Back to School
    • Valentines Day
    • Easter
    • ANZAC Day
    • Mother’s Day
    • Father’s Day
    • Halloween
    • Christmas
  • Recipes
    • Appetizers
    • Bars & Slices
    • Bread & Pastries
    • Cakes
    • Cookies
    • Confectionery
    • Cupcakes & Muffins
    • Desserts
    • Drinks
    • Ice Cream
    • Jams/Preserves
    • Main Meals
  • Sewing
    • Sewing Tutorials
    • Quilting
    • Sewing & Quilting Patterns
  • Family
    • Back to School
    • Family Fun
    • Our Home
    • Parenting
    • Travel
  • Shop
    • Pattern Store
    • Etsy Store

Paper Christmas Tree

November 15, 2012 By Spoonful of Sugar - 31 Comments

We found the perfect red gingham cupcake liners (patty pans) for our Christmas baking, and discovered we had plenty of other patty pans in Christmas colours in our ever growing stash so it was time to put some of them to use! We created some Paper Christmas Trees.

After removing the bases of the cupcake liners, the pleated paper strips are perfect to wrap around a polystyrene cone to from a Christmas tree. With so many Christmas themed patty pans/cupcake liners available, it is fun to make some trees for the Christmas table. Best of all they are really quick to assemble (under an hour to make three trees) and we had all the supplies on hand.

You will need:

  • polystyrene cone (from craft stores)
  • patty pans/cupcake liners (approx 12 for each tree)
  • sequin pins

You just pin each layer, starting at the bottom. The bottom layers will need two strips, then just cut strips to fit. Each layer overlaps the one below it by approx 1/4 inch to cover the pins. When you get to the top, you cut a complete patty pan in half. Fold that in half again so you have a quarter. Bend each side around to form a mini cone shape, pop that on top, and secure with pins (you could use tape to hold the top together if you prefer). This gives it a nice pointy tip.
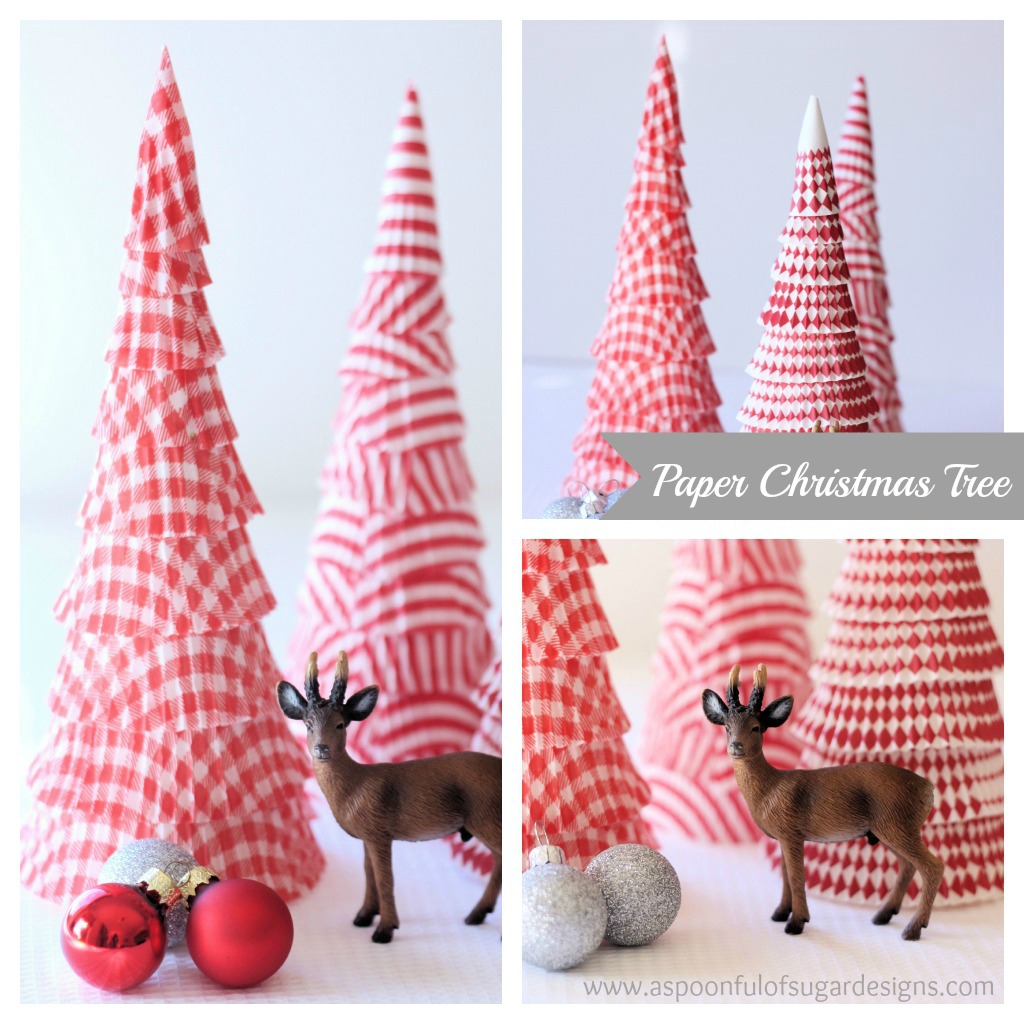
Next year we can easily replace the patty pans with something else. One of the polystyrene cones was repurposed from our button tree from a previous year.

Hello! Are you new here?

If so, be sure to sign up for our newsletter here and receive a bonus sewing pattern and welcome discount. Our newsletter includes free tutorials, articles, and new patterns. Welcome to the world of sewing enthusiasts.

Filed Under: Christmas, Crafts, Miscellaneous, Paper Crafts Tagged With: cupcake liners

« Christmas Paper Crafts + {Giveaway} Win a Cricut Mini Digital Cutter
Chocolate Spoons »

Comments

  1. Strickilotti says

    November 15, 2012 at 5:48 am

    OMG, what a cute, cute idea!!!

    Reply
  2. Fátima says

    November 15, 2012 at 6:01 am

    Lindas árvores de Natal.
    Bj

    Reply
  3. Andrea Ge says

    November 15, 2012 at 7:00 am

    I love it!!! Great idea!!!!!

    Reply
  4. Desiree @ The 36th AVENUE says

    November 15, 2012 at 7:25 am

    They are adorable!
    I made the same thing last year and we loved them. They are so fun.

    http://www.the36thavenue.com/2011/12/party-time-christmas-cards.html

    I love also the idea of your cupcake toppers.Thank you for sharing!

    Reply
  5. Cláudia D Sousa says

    November 15, 2012 at 7:28 am

    I ♥ your blog and all these amazing ideas.

    http://www.thefcode.com/

    Reply
  6. nest full of eggs says

    November 15, 2012 at 8:36 am

    very clever idea !

    Reply
  7. Nancy says

    November 15, 2012 at 4:38 pm

    Really cute. Made one today and am searching for some cupcake papers to make some more. Thanks for the directions.

    Reply
  8. seojo1 says

    November 16, 2012 at 5:01 am

    Wow these are really cute and easy to make, thanks for sharing 😀

    Reply
  9. Terry says

    November 16, 2012 at 10:47 am

    Those are so cute! :0)

    Reply
  10. Jenny of Elefantz says

    November 17, 2012 at 5:08 am

    How beautifully clever!
    Hugs
    Jenny
    xx

    Reply
  11. Terriaw says

    November 17, 2012 at 8:11 am

    What a lovely project. I think these pops of red would look so pretty on our mantel or as a centerpiece on our kitchen table. Great way to use paper cupcake liners.

    Reply
  12. Chocolate Cat says

    November 17, 2012 at 3:47 pm

    Oh that is adorable!

    Reply
  13. Sarah says

    November 18, 2012 at 6:58 pm

    These are so cute! I’m glad you liked my baking paper garland (thanks for linking to it). I still have lots of liners left so I might have to try making these trees!

    Reply
  14. Mel@Mellywood's Mansion says

    November 18, 2012 at 8:14 pm

    Oh they are so cute!, I love the red and white combo perfect!

    Reply
  15. CeLynn says

    November 18, 2012 at 9:22 pm

    Just too dang cute! Love the little deer and ornaments too.

    Reply
  16. Trudy says

    November 19, 2012 at 1:23 am

    Really effective! What a great idea, and you can get some beautiful metallic cupcake holders too – I can see loads of possibilities with this. Thanks for sharing:)

    Reply
  17. Jessica says

    November 19, 2012 at 2:59 pm

    Oh that is so cute & beautiful. I just posted it here on my german blog: http://schoenstricken.de/2012/11/diy-weihnachtsbaum-auf-papierformchen-basteln/
    Please see if that is ok with you.
    Best from Berlin, Jessica

    Reply
  18. Heidi Szczepanski says

    November 20, 2012 at 8:14 am

    Fantastic. I love these. So pretty and a great centerpiece. Thanks for sharing the idea.

    Heidi
    Buy Here Pay Here

    Reply
  19. Ladyfée says

    November 22, 2012 at 2:45 am

    j’ai acheté pour faire !!!!! Ladyfée

    Reply
  20. Anonymous says

    November 24, 2012 at 8:34 am

    Love the idea!

    Reply
  21. Narelle says

    November 29, 2012 at 1:12 am

    I’m off to buy some cones and papers 🙂

    Reply
  22. Len Capuli says

    November 29, 2012 at 8:41 am

    that’s lovely! I would love to try that paper christmas tree, they look lovely!!!!

    Reply
  23. Dawn says

    December 2, 2012 at 10:42 am

    What a pretty & simple idea! I can’t get hold of the polystyrene cone so I’m re purposing a cereal box & making a card cone! I’m hoping it works out as well, I’ll use a glue stick (or tape) instead of pins!

    Reply
  24. Ann Martin says

    December 3, 2012 at 1:04 pm

    So clever! I shared your link and a pic on the All Things Paper Facebook page and it’s enjoying lots of Likes and comments. 🙂

    Reply
  25. Inspire Me Heather says

    December 5, 2012 at 7:26 am

    Your trees are beautiful! I’m going to look for some cute cupcake liners too – there are so many pretty ones nowadays, aren’t there? I’ve got this linked to my Christmas trees post too today, it’s a little roundup of tree ideas!

    Reply
  26. Tanya Payzant says

    December 7, 2012 at 5:35 am

    Oh sweet!! This will really help my cupcake liner addiction! ;0) Linking this to our blog FB page! Thank you!

    Reply
  27. Nicola says

    January 19, 2013 at 8:18 am

    Hi,
    I thought you might like to know that this tutorials as been plagiarised (http://craftstutorials.com/paper-christmas-tree) as mine was (http://www.nexttonicx.com/blog/?p=5497).
    I’m seriously unimpressed, it looks as though they’ve copied all of their content from other blogs. So far every post I’ve googled belongs to someone else! I’m spending an hour or so to let others know.
    Regards
    Nicola

    Reply
  28. Christie says

    March 2, 2022 at 12:36 am

    They look like something you’d buy from the store! So pretty. And it would be a fun craft to do with my 10yo

    Reply

Leave a Reply Cancel reply

Your email address will not be published. Required fields are marked *

  • Email
  • Facebook
  • Instagram
  • Pinterest
  • Threads
  • TikTok
SUBSCRIBE TO NEWSLETTER
×

Categories

Archives

PURCHASE PDF PATTERNS

We offer over 100 affordable PDF sewing patterns available for download from our store website or Etsy store. Each pattern includes detailed instructions, numerous photos, and templates.

WEB STORE ETSY STORE

Instagram

A little mid‑week sewing inspiration for you ✂️💗 H A little mid‑week sewing inspiration for you ✂️💗 Here are 10 small, sweet projects that are perfect for a cosy weekend at your machine — a mix of best‑sellers, quick organisers, and a few of my most‑loved scrap projects.All beginner‑friendly. All satisfying to sew. All lovely for gifting or using up your favourite fabrics.Save this for later… and tell me which one you’d love to sew next.If you’d like the patterns, comment PATTERNS and I’ll send the link to my store straight to you.#sewingprojects #sewinginspiration #beginnersewing #scrapbusting #sewingideas
Three ways to fill your Pyramid Weights — rice, po Three ways to fill your Pyramid Weights — rice, poly pellets, or lavender. Each one gives the project a different feel and purpose.Comment PYRAMID and I’ll send you the free pattern.#freesewingpattern #sewingcommunity #weekendsewing #giftstosew #scrapsewing
The Scrappy Strips Pouch is one of my favourite wa The Scrappy Strips Pouch is one of my favourite ways to use selvedges, curated strings, or leftover strips. With its striking diagonal panel and clever fold‑over casing, it’s a quick, satisfying sew that looks beautiful in any fabric combination.Here are three ways to make it — selvedges, patchwork strings, and solids — in two practical sizes. Save this post for your next scrap‑busting project.Comment SELVEDGE or SELVAGE  and I’ll send you the pattern link.#scrappystripspouch #beginnersewing #drawstringpouch #scrapbuster #stashsewing
It’s the little details that make a handmade pouch It’s the little details that make a handmade pouch feel polished and gift‑ready. The Quadra Pouch includes a sweet sew‑in tag and neat cord end caps — two tiny touches that elevate the whole project.Beginner‑friendly, scrap‑friendly, and available in three practical sizes. Comment QUADRA and I’ll send the pattern link straight to you.Fabric: Tilda Something Blue with thanks to @tilda_australiaPattern: Quadra Pouch available in our pattern store#sewingpattern #drawstringpouch #quadrapouch #tildasomethingblue #sewingdetails
The Quadra Pouch really comes to life in Tilda Som The Quadra Pouch really comes to life in Tilda Something Blue — each side shows off a different print, giving the pouch a fresh look from every angle. I made both a light and dark version, and I love how the four‑fabric construction creates such a pretty contrast.If you’d like to sew your own, the Quadra Pouch pattern (3 sizes) is available in both our Pattern Store and Etsy Shop. Comment QUADRA and I’ll send you the link.Fabric: Tilda Something Blue — with thanks to @tilda_australia#quadrapouch #sewingproject #sewingpattern #tildafabrics #tildasomethingblue   
The sweetest little pouch for treats, notions, swa The sweetest little pouch for treats, notions, swaps, and tiny treasures ✨ The Mini Treat Pouch features a flat base, a handy back pocket, a fold‑over flap, and a clever elastic‑and‑button closure. It’s a quick, beginner‑friendly project and perfect for using your favourite fabric scraps. It also makes a lovely end‑of‑year teacher gift — just add chocolates, lip balm, or a gift card. Comment TREAT for a link to the pattern.  Pattern details: Mini Treat Pouch - available in our Pattern Store and Etsy Shop.#sewingprojects #scrapsewing 
#handmadegifts #beginnersewing #sewingcommunity
Follow on Instagram

Featured Pattern

Travel Sewing Kit Pattern

Featured Tutorial

Retro Drawstring Bag

Featured Recipe

Lemon Pound Cake

Connect

  • Email
  • Facebook
  • Instagram
  • Pinterest
  • Threads
  • TikTok
SUBSCRIBE TO NEWSLETTER
×

Popular Posts

  • Cord Cosy
  • Crafting Care Packages: A Sewists Guide to Thoughtful Giving
  • Travel Accessories to Sew
  • Tips for Threading a Needle
  • Liberty Tissue Cover
  • Crayon Box Baby Quilt
  • Happy Scrappy Cards

Copyright © 2026 Lisa. K. Cox - A Spoonful of Sugar