A Spoonful of Sugar

Make. Bake. Create.

Menu
  • Home
  • About
    • About Us
    • Press
    • FAQ
    • Disclosure Policy
    • Contact Us
  • Crafts
    • Crochet
    • DIY
    • Embroidery/Cross stitch
    • Gift Wrapping
    • Knitting
    • Miscellaneous
    • Paper Crafts
  • Holidays
    • New Year’s
    • Australia Day
    • Back to School
    • Valentines Day
    • Easter
    • ANZAC Day
    • Mother’s Day
    • Father’s Day
    • Halloween
    • Christmas
  • Recipes
    • Appetizers
    • Bars & Slices
    • Bread & Pastries
    • Cakes
    • Cookies
    • Confectionery
    • Cupcakes & Muffins
    • Desserts
    • Drinks
    • Ice Cream
    • Jams/Preserves
    • Main Meals
  • Sewing
    • Sewing Tutorials
    • Quilting
    • Sewing & Quilting Patterns
  • Family
    • Back to School
    • Family Fun
    • Our Home
    • Parenting
    • Travel
  • Shop
    • Pattern Store
    • Etsy Store

Time for Tea: Teapot Cosy {Tutorial}

September 4, 2012 By Spoonful of Sugar - 18 Comments

I love Melody Miller’s Retro Clock Fabric.  It is the perfect fabric for a Tea Cosy – as it is always Time for Tea! With the start of spring, I am imagining some lovely relaxing days reading outside in the sun with my Teapot close to hand.
If you would like to make your own Tea Cosy, it is an easy project suitable for a beginner sewer. It can be easily completed in an hour or so, and teamed with a teapot or gourmet tea would make a lovely gift.
Materials:
1/3 yard (0.3 m) quilting fabric for Teapot cosy
1/3 yard (0.3 m) quilting fabric for lining
Fat Quarter or 0.1 m quilting fabric for binding
5 inch (13cm) Twill Tape (Herringbone Tape) for Loop
5 inch (13 cm) crocheted trim or ribbon for Loop
2 pieces of batting, each measuring 10 x 13 inches (25 x 33 cm)
Finished Size: 11 inches x 8 1/2 inches (28 x 21.5 cm) sized to fit a small teapot, capacity approx 4 cups.
Teapot Cosy Template
Instructions:
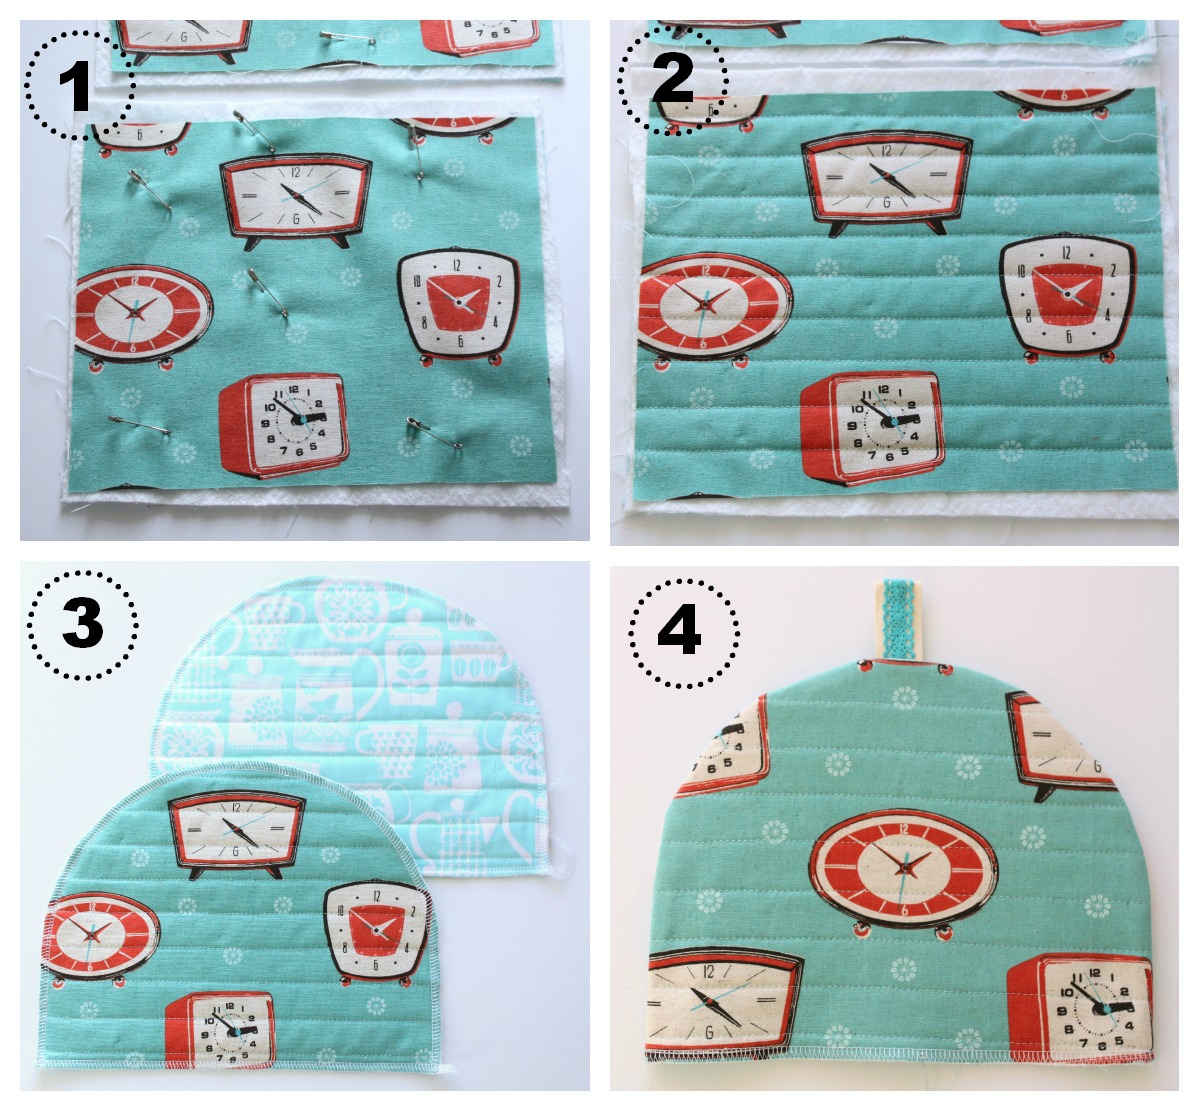
1. Cut two rectangles from the outer fabric (clock), each measuring 11 x 8.5 inches. Cut two rectangles from the lining fabric, each measuring 11 x 8.5 inches. Layer the outer fabric, the batting, and the lining, with the wrong sides of the fabric facing the batting. Baste the layers together with safety pins. (Photo 1).
2. Quilt lines approx 1 inch apart or as desired. (Photo 2)
3. Using the template provided, trace the tea cosy shape onto each quilted panel. Cut out the front and back of the tea cosy. Overlock(Serge)  or zigzag around all the raw edges. (Photo 3).
4. Pin the crocheted trim to the centre of the twill tape and stitch in place. Fold the twill tape in half and pin to the top of the cosy front. Baste in place. Layer the front and back of the cosy together with right sides facing. Using a 1/4 inch seam allowance, stitch around the cosy from one side to the other, leaving the bottom open. Turn right side out and press.(Photo 4).
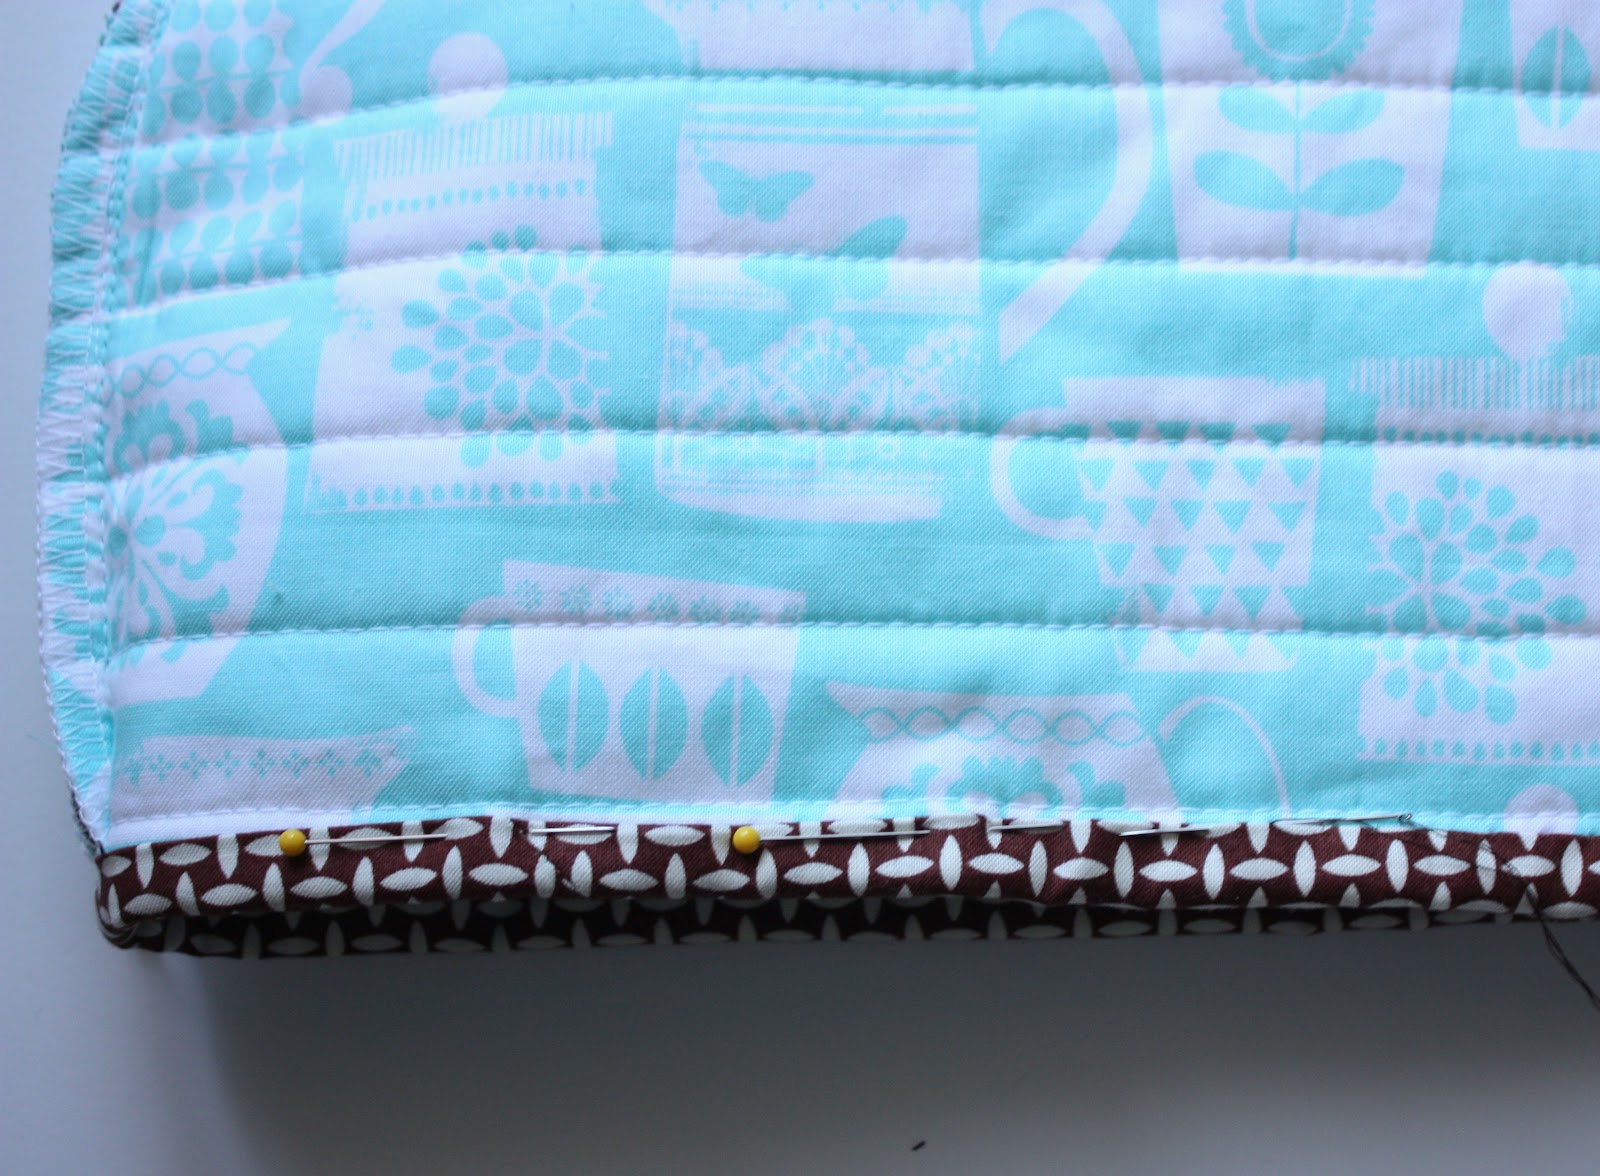
5. Cut a fabric strip for binding, measuring 2 1/4 x 26 inches. If using a fat quarter, cut two strips and join with a mitred seam. Press binding in half lengthwise. Stitch the binding on to the bottom on the tea cosy like you would if it was a quilt. If you are unsure how to do this, check out this excellent binding tutorial by Rita from Red Pepper Quilts. Hand or machine stitch the binding in place.
There you have it, a Tea Cosy, just in time for tea!

Sign up to our newsletter which includes a free tutorial each week.

Filed Under: Sewing, Sewing Tutorials Tagged With: home décor, tea

« Engraved Rocks
Cinnamon Blondie »

Comments

  1. Barbara says

    September 4, 2012 at 1:55 am

    ooohh thank you for the tutorial!!
    i like this fabric!!!

    Reply
  2. Naturally Carol says

    September 4, 2012 at 2:13 am

    I so love that fabric!

    Reply
  3. solange ich nähe... says

    September 4, 2012 at 2:17 am

    Great- I Love it!
    Maybe you look at my blog, theres a Mug-Rugs Giveaway 😉
    Manuela

    Reply
  4. ~ko says

    September 4, 2012 at 4:34 am

    Adorable! Adorable Adorable! And that fabric is toooooo cute! Love it!

    Reply
  5. Alicia Manzano says

    September 4, 2012 at 5:29 am

    Oh my goodness! This is too darling! Thanks for sharing! I am pinning now. What a great house warming gift?!

    Alicia @
    How Charming, Zeeuh!

    Reply
  6. janice15 says

    September 4, 2012 at 5:29 am

    Very sweet, I have been seeing these but they are so expensive…I’m going to try to make one…Thank you…with love Janice

    Reply
  7. Fignie says

    September 4, 2012 at 6:22 am

    Amazing tutorial! I want to make one now 🙂 Such cute fabric to boot!!

    Reply
  8. CBH says

    September 4, 2012 at 7:09 am

    Thank you so much for this post. I want to let you know that I posted a link to your blog in Creative Busy Bee Craft Inspirations, under the Page 3 post on Sep. 04, 2012. Thanks again.

    Reply
  9. Kris says

    September 4, 2012 at 8:28 pm

    Very sleek design!

    Reply
  10. Linda says

    September 5, 2012 at 8:00 am

    Lisa this is adorable and so you, I bet it looks fantastic in your kitchen.
    Xx

    Reply
  11. Dural says

    September 6, 2012 at 11:29 pm

    This is great, thanks!

    Reply
  12. notyet100 says

    September 10, 2012 at 11:14 pm

    Super cute 🙂

    Reply
  13. Anonymous says

    September 11, 2012 at 9:16 am

    Shirley said:

    This is great – been looking for a pattern to sew for a while. Just got to go and buy some nice fabric now and get sewing. Thanks again

    Reply
  14. Steph says

    November 7, 2012 at 2:36 pm

    Nice tutorial and lovely fabric choices!

    Reply
  15. Anonymous says

    November 10, 2012 at 1:10 pm

    Lovely pattern and tutorial- just can’t download pattern unless we pay to use site- bummer :(.

    Reply
  16. C.S. Weaver says

    October 11, 2014 at 8:55 pm

    I’m going to be adventurous and turn this idea into a French press cozy as I have some gorgeous coffee themed fabric on hand. Thanks for the easy to follow tute! Love your tea cozy.

    Reply
    • A Spoonful of Sugar says

      October 12, 2014 at 9:55 am

      A coffee cozy sounds lovely! Happy sewing.

      Reply
      • C.S. Weaver says

        October 17, 2014 at 2:57 am

        Here’s my finished French press cozy! It really keeps the coffee warm for hours, too. Thanks again for the tutorial.

        Reply

Leave a Reply Cancel reply

Your email address will not be published. Required fields are marked *

  • Email
  • Facebook
  • Instagram
  • Pinterest
  • Threads
  • TikTok
SUBSCRIBE TO NEWSLETTER
×

Categories

Archives

PURCHASE PDF PATTERNS

We offer over 100 affordable PDF sewing patterns available for download from our store website or Etsy store. Each pattern includes detailed instructions, numerous photos, and templates.

WEB STORE ETSY STORE

Instagram

Packing light? This little kit makes it sew easy ✨ Packing light? This little kit makes it sew easy ✨ The Travel Sewing Kit is compact, clever, and surprisingly roomy—perfect for safety pins, needles, mini scissors, and all your on‑the‑go essentials. Whether you’re heading to a retreat, stitching in a café, or just want tidy tools at home, this pouch will be your new best friend.✔ Beginner‑friendly ✔ Stash‑friendly ✔ Quick to sew ✔ Folds flat for easy packing🧵 Find the pattern in our Pattern Store + Etsy Shop!👇 Comment TRAVEL and I’ll DM you the link!#sewingonthego #travelsewingkit #handmadepouch #diysewing #sewinglove
Sewing a little Something Blue this week 💙 🧵 I’ve Sewing a little Something Blue this week 💙🧵 I’ve been stitching a few of my favourite small projects in the new Tilda Something Blue collection — the Makers Caddy, Sewing Buddy Pincushion, and Dresden Needlebook. Each one is beginner‑friendly, scrap‑friendly, and perfect for gifting or organising your sewing space.I love how the soft blues, tiny florals, and sweet details come together across all three projects. Small makes really do bring the most joy.If you’d like any of the pattern links, comment PATTERNS and I’ll send you a link to my pattern store where you will find these three patterns.Save this for your next weekend sew.Fabric: Tilda Something Blue with thanks to @tilda_australia#tildasomethingblue #ilovetilda #sewingreels #sewingprojects #scrapfriendlysewing
A little fabric pull turned into the sweetest Quad A little fabric pull turned into the sweetest Quadra Pouch 💛✂️ I love mixing a polka dot, gingham, small floral, and large floral in the same colour family — it’s such an easy way to create a coordinated look from scraps or fat quarters. This project ticks all the boxes: beginner‑friendly, scrap‑friendly, giftable, and genuinely useful for everyday storage.The tag and matching cord covers are my favourite finishing touches — small details that make the whole pouch feel extra special.If you’d like the pattern link, comment QUADRA and I’ll send it straight to you.Save this one for your next weekend sew.Pattern: Quadra Pouch — available in my Pattern Store and Etsy Shop.#quadrapouch #scrapfriendlysewing #sewingreels #sewingprojects #beginnersewingproject   
Colour Crush Series: Blue 💙 There’s something so Colour Crush Series: Blue 💙There’s something so calming about blue in a sewing room - soft, fresh, and endlessly versatile. From tiny florals to bold geometrics, blue fabrics always seem to play nicely together. 💙🧵Here are a few of my favourite blue makes. Perfect for small projects, scrap sewing, and those soothing “just for fun” moments at your machine.Save this for your next colour‑themed sewing session.#modernsewing #sewingcommunity #sewingideas #fabricpull #scrapfriendlysewing
Want your drawstrings to sit neatly every time? Th Want your drawstrings to sit neatly every time? This tiny notion does all the hard work for you. 🧵✨ Cord locks (toggles) keep your drawstrings tidy, secure, and perfectly in place — no knots, no slipping, just a clean finish.I use them on my Bitsy Baskets to keep the closure polished, especially for gifting or storing small items. They’re so simple to use: thread the ends through, press the spring, slide to lock… done.If you’d like to sew your own Bitsy Basket, comment BASKET and I’ll send the pattern link straight to you.Save this for your next scrap‑busting project.Pattern is available in my Pattern Store and Etsy Shop.#bitsybasket #cordlocks #sewingtips #drawstringbag #sewingreels
A little Sunday sewing inspiration for you 💙✂️ The A little Sunday sewing inspiration for you 💙✂️ The Dresden Needlebook is one of my most‑loved makes — pretty, practical, and such a satisfying scrap‑friendly project. Perfect for gifting… or keeping in your own sewing kit.Swipe through to see the details — two pockets, felt pages, and a neat snap fastening to keep everything secure.If you’d like the pattern, comment NEEDLEBOOK and I’ll send the link straight to you.Save this for your next weekend sewing session.Pattern Details: Dresden Needlebook Sewing Pattern - available in our Pattern Store and Etsy Shop.  #dresdenplate #sewinginspiration #beginnersewing #sewinglove   #sewinginspiration
Follow on Instagram

Featured Pattern

Travel Sewing Kit Pattern

Featured Tutorial

Retro Drawstring Bag

Featured Recipe

Lemon Pound Cake

Connect

  • Email
  • Facebook
  • Instagram
  • Pinterest
  • Threads
  • TikTok
SUBSCRIBE TO NEWSLETTER
×

Popular Posts

  • Cord Cosy
  • Fabric Scrap Crafts: No Sewing Required
  • Fiesta Potholder
  • Flower Sugar Pouches
  • What To Do With Selvedges (and Why I Save Every One)
  • Home Made Ornaments
  • Fabric Gift Pouch

Copyright © 2026 Lisa. K. Cox - A Spoonful of Sugar