A Spoonful of Sugar

Make. Bake. Create.

Menu
  • Home
  • About
    • About Us
    • Press
    • FAQ
    • Disclosure Policy
    • Contact Us
  • Crafts
    • Crochet
    • DIY
    • Embroidery/Cross stitch
    • Gift Wrapping
    • Knitting
    • Miscellaneous
    • Paper Crafts
  • Holidays
    • New Year’s
    • Australia Day
    • Back to School
    • Valentines Day
    • Easter
    • ANZAC Day
    • Mother’s Day
    • Father’s Day
    • Halloween
    • Christmas
  • Recipes
    • Appetizers
    • Bars & Slices
    • Bread & Pastries
    • Cakes
    • Cookies
    • Confectionery
    • Cupcakes & Muffins
    • Desserts
    • Drinks
    • Ice Cream
    • Jams/Preserves
    • Main Meals
  • Sewing
    • Sewing Tutorials
    • Quilting
    • Sewing & Quilting Patterns
  • Family
    • Back to School
    • Family Fun
    • Our Home
    • Parenting
    • Travel
  • Shop
    • Pattern Store
    • Etsy Store

Tutorial: Quick Notebook Cover

March 20, 2008 By Spoonful of Sugar - 24 Comments

Someone asked me recently for instructions on how to make a notebook cover. This is a super easy and quick notebook cover. It took approximately one hour. Sarah has now claimed it as her own. Fortunately I purchased two notebooks so will now have to get started on one for myself!  

Requirements:
• cover fabric
• lining fabric
• flannette
• 1 x button
• small piece of elastic
  1 x eyelet
• notebook with a sturdy bound cover (I found a great A6 sized one at Office Works)

Seam allowance: ¼ inch

1. To calculate the size of the fabric, measure notebook length from top to bottom and add 1 inch to this measurement. Measure notebook width from front cover to back cover (including width of spine) and add 5 inches to this measurement.

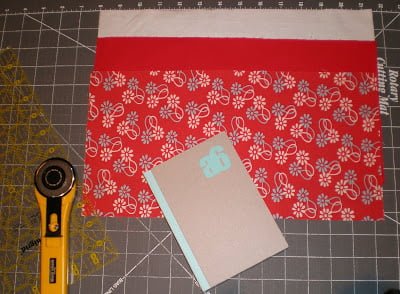
2. Cut out the fabric to the size you calculated. Cut out one piece in the main cover fabric, one in the lining fabric and one in the flannette.

3. Layer the fabric so that the right sides of the main and lining fabric are facing, with the flannel placed under the lining fabric, and pin to hold layers together.

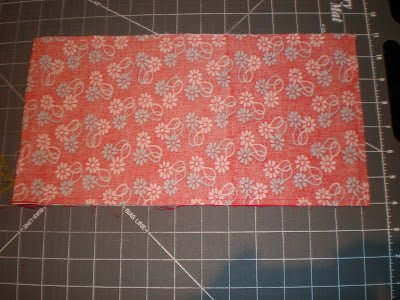
4. Sew around the edge of the fabric using ¼ inch seam allowance and leaving a 3 inch gap for turning.

5. Clip the corners, and then turn the cover so the right side is on the outside using a chopstick or turning stick to get nice sharp points in the corners. Pin the gap in the cover. Press the cover.

6. Place the cover on the notebook so that it is centred and fold the flaps in under the notebook so that both sides are even (approx 2 1/4 inch). Pin the flaps in place. Sew along the top and bottom of the cover, sewing the flaps in place, and enclosing the gap in the cover as you sew. You will need to use a 1/8 inch seam and go through all layers.

7. Position eyelet inside back flap approximately 1/3 of the way down from the top and near to the crease and attach following directions.

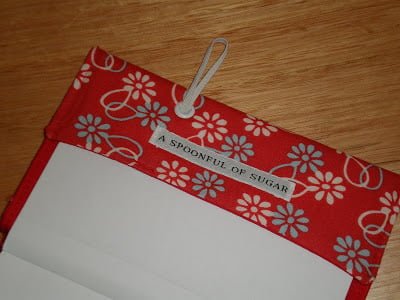
8. Position button near front edge of notebook cover approximately 1/3 of the way down from the top.

9. Thread a loop of thin elastic through eyelet and cut to size. Secure by sewing through both ends of elastic and notebook cover. Press and then Voila!!

 You could adapt the design by using a patchwork cover. Instead of using the button and elastic you could either omit this altogether or use a fabric tab and velcro to hold the notebook closed.

If you make up one of these, let me know, I would love to see the pics. The possibilities are endless!

Posted by Lisa

Filed Under: Sewing, Sewing Tutorials

« Ideas File
East Meets West »

Comments

  1. Collins says

    March 21, 2008 at 5:28 am

    I can’t wait to do this. I have the perfect Nancy Drew fabric to make one for my daughter! Thank you

    Reply
  2. Sarah says

    March 21, 2008 at 1:41 am

    Fab tute!

    Reply
  3. Lace says

    March 21, 2008 at 4:29 am

    Hey Gals!
    Thanks for posting on my blog! I just started it a few weeks back, so I get so excited when someone actually writes to me!! HAha! Great Notebook Cover, Luckily my husband brought home a couple of notebooks from work last week….(very ugly and ordinary) this cover should spice them up! By the end of the day I hope to have my never-ending quilt finished and pictures posted!!! (fingers crossed!) Cheers!

    Reply
  4. Elizabeth says

    March 21, 2008 at 8:21 am

    How very clever and nicely made! Thanks for visiting my blog. That is so cute that you and your daughter share your blog. We are about the same age…40 something, although my daughters are 22, and 18.
    Where did you get your labels that you sewed into the book cover?

    Reply
  5. MamaBlogger says

    March 21, 2008 at 9:00 pm

    Great tutorial and I love that you guys share a blog! I hope my daughter and I can do that when she’s older (she’s 2, we have quite a ways to go!) thanks for the nice comment on my blog!

    Reply
  6. Florence says

    March 22, 2008 at 3:59 am

    I love this fabric…I’ve recently bought the charm pack of Urban Chicks Swell…but oh to have such lovely large pieces to work with!

    Thank you for your comment on my blog. x

    Reply
  7. Suzy says

    March 23, 2008 at 1:46 pm

    What a great tutorial! I will definitely be trying it out.

    suzy

    Reply
  8. Marcia says

    March 23, 2008 at 7:00 am

    This was my first trip to your blog, and what did I find? A wonderful tutorial! I love me a good tut. Thanks! I’ll be back for sure.

    Reply
  9. Katie says

    March 23, 2008 at 5:04 pm

    what a great blog! thanks for stopping by mine, and for the tut!

    Reply
  10. Erna says

    March 25, 2008 at 2:18 am

    that notebook cover is so nice! Immediately want to make one myself…think I just go to town to get the supplies and whip one up today!!

    Lovely blog! and thanx for visiting mine too! xx

    Reply
  11. Melissa says

    March 25, 2008 at 7:46 pm

    Thanks for posting this tutorial- love your fabric choice.

    Reply
  12. Fiona @ Dragonfly-Crafts says

    March 27, 2008 at 2:35 am

    Wow! This looks great. Thanks for sharing, I’ve got an idea for this so I will use your wonderful tutorial.
    Thanks for popping over to my blog too.
    Hope to see you back.
    Hugs Fiona

    Reply
  13. Kate says

    March 29, 2008 at 3:25 pm

    Great tutorial and love that fabric – it is one of my favourites at the moment!

    Reply
  14. Cicada Studio says

    April 2, 2008 at 7:23 am

    Thanks for posting on my blog! Now we’re even because I’m sure I can use this tutorial for a little project I’ve been planning for a while, but haven’t wrapped my brain around the details. This helps immensely!

    Reply
  15. Ginger says

    May 18, 2008 at 4:33 pm

    Wow nice tutorial haven’t ,made a tutorial yet.That was a great idea looks so pretty, nice, neat look to it. Gives me a idea for father’s day .
    Love it !

    Reply
  16. Holly says

    June 1, 2008 at 6:52 pm

    Rats! Another tutorial to add to my growing list of “must dos”… Sew Fun!

    Reply
  17. dancin_puffin says

    July 23, 2008 at 2:02 am

    Brilliant! But you make it look so easy 🙂 I must dust off my sewing machine and get it down from the loft. Oh and I’d better learn how to use it properly too rather than foot to the floor and hope for the best! I have a diary and some fabric so there isn’t a lot stopping me! Thanks for the inspiration.

    Reply
  18. Marita says

    August 4, 2008 at 8:45 pm

    Thanks I used this tute, and was really happy with the result. Found the eyelet a little tricky, will need to practice and make a few more. Thanks!

    Reply
  19. Missie Krissie says

    September 7, 2008 at 7:27 am

    Wow, you’re so clever! And yes I am in the process of reading back through all your posts! So many great ideas, so little time!

    Reply
  20. Helen Cox says

    April 8, 2009 at 1:16 am

    Thank you so much for sharing this! I’m definitely going to have a go. Time to start picking out fabrics and notebooks methinks. I’m so glad to have discovered your blog.

    Reply
  21. peachy says

    January 2, 2010 at 11:55 pm

    wow looks great!! i’ll have to handsew it as i don’t have a machine. but i can’t wait to try it!

    Reply
  22. Al-Samt says

    March 6, 2010 at 10:31 am

    like the idea

    thanx …. have a nice day

    Reply
  23. Julie Hancock says

    August 13, 2012 at 11:12 am

    Can you explain attatching the elastic? I wasn’t sure about where you sew the elastic to attach.

    Reply
  24. Julie Hancock says

    August 13, 2012 at 11:13 am

    Can you explain attatching the elastic? I wasn’t sure about where you sew the elastic to attach.

    Reply

Leave a Reply Cancel reply

Your email address will not be published. Required fields are marked *

  • Email
  • Facebook
  • Instagram
  • Pinterest
  • Threads
  • TikTok
SUBSCRIBE TO NEWSLETTER
×

Categories

Archives

PURCHASE PDF PATTERNS

We offer over 100 affordable PDF sewing patterns available for download from our store website or Etsy store. Each pattern includes detailed instructions, numerous photos, and templates.

WEB STORE ETSY STORE

Instagram

Feeling stitchy? Here's your gentle nudge from a f Feeling stitchy? Here's your gentle nudge from a friend whose seam ripper sees too much action✂️ Change your needle. Your machine (and your fabric) will thank you.Just a reminder that the little things—like sharp tools and fresh ideas—make all the difference 💛#sewingtip #makersmoment #sewistsofinstagram #sewinglife #dearfutureself #modernsewing #makerreminder #pincushionwisdom #creativehabits #aspoonfulofsugarpatterns
Proof that festive doesn't have to wait until Dece Proof that festive doesn't have to wait until December 🌟These Tree in a Pot blocks are bringing mid-year merriment in five fun sizes! Scrap-friendly, easy to customise, and perfect for holiday makes—or whenever you’re feeling a little seasonal stitching spirit.Use them in quilts, table runners, pillows, Santa sacks… or just make a mini forest for fun! 🌲👉 Pattern available now in my Etsy shop and pattern store. 🧵 Comment POT below and I’ll DM you the link!Do you celebrate Christmas in July?#treeinapotblock #foundationpaperpiecing #scrapfriendlysewing #holidaysewing #christmasinjuly #modernquilting #quiltblockpattern #aspoonfulofsugarpatterns #quiltinspo #fppfun
☀️ 5 Tips for Summer Sewing Bliss1. Stitch i ☀️ 5 Tips for Summer Sewing Bliss1. Stitch in the Cool Hours Beat the heat by sewing in the early morning or evening when your space is cooler and more comfortable.2. Stay Hydrated & Take Breaks Keep a cool drink nearby and give your eyes and hands a rest—your creativity will thank you!3. Choose Light, Breezy Projects Opt for quick makes like zipper pouches, napkins, or mug rugs that won’t leave you sweltering under layers.4. Sew Poolside or Outdoors Take hand-sewing projects outside and enjoy the sunshine while you stitch—just don’t forget your pattern weights if it’s breezy!5. Use Summer-Friendly Fabrics Think cottons, linens, and cheerful prints in citrus, florals, or gingham to match the season’s vibe.🌼 For more warm-weather sewing ideas and inspiration, check out my article Summer Sewing Projects. Comment SUMMER and I'll send you a link.What are your top tips for sewing in warmer weather?#summersewing #sewingtips #handmadeinspo #sewingseason #sewingjoy #aspoonfulofsugarpatterns #scrapfriendlysewing #beginnersewingprojects #sewingideas #slowstitching #creativewellness #sewinginspo #diyprojects #makersgonnamake #stitchinginthesun
🎄Christmas in July just got an upgrade! Meet  🎄Christmas in July just got an upgrade! Meet Tree in a Pot—a cheerful foundation paper piecing block that’s scrap-friendly, beginner-friendly, and comes in five festive sizes. Perfect for quilts, Santa sacks, table runners, pillows... basically anywhere a little holiday charm is welcome! ✂️🎁 Feeling inspired?👉 Comment “POT” below and I’ll DM you the pattern link! 🛍️ Available now in my Etsy shop and pattern store.#christmasinjuly #fppblock #quiltblockpattern #scrapfriendlysewing #holidaysewing #foundationpaperpiecing #modernquilting #aspoonfulofsugarpatterns
Sewing just got a whole lot cuter! Say hello to th Sewing just got a whole lot cuter! Say hello to the Sewing Buddy Pincushion - my most loved pattern of 2025. It's quick, fun to sew, beginner friendly, and perfect for showcasing your scrap stash.  Whether you're gifting them, selling at markets, or just want a cheerful helper by your machine, this pincushion buddy has you covered.30% off storewide until June 30 - so now is the time to grab it! Comment BUDDY and I'll DM you the pattern link. Or head to my Etsy Store and Pattern Shop ( store links in profile).Let's fill sewing rooms everywhere with tiny helpers and big smiles.#sewingbuddypincushion #pincushionpattern #sewingnotions #scrapsewing #giftstosew #sewingreel #beginnersewingproject  #easytosew
Pet Lovers - this one's for you! 🐾If you're l Pet Lovers - this one's for you! 🐾If you're looking for a quick, fun sewing project that uses your scraps and delivers maximum cuteness - this is it! The Dog Paw Coaster Pattern is beginner friendly, comes together in no time, and makes the perfect handmade gift for your fellow dog obsessed friends.In this reel, I'm showing you how easy it is to flip these adorable paws into shape.🧵 Perfect for strip piecing
🧵 Ideal for last minute gifts
🧵 Perfect for fabric scrapsWant the pattern? Comment PAW and I'll send you the link via DM.#dogpawcoaster #beginnersewingproject #sewingfun #sewingreel ##doglovergift #dogcrafts #quicksewingproject
Follow on Instagram

Featured Pattern

Travel Sewing Kit Pattern

Featured Tutorial

Retro Drawstring Bag

Featured Recipe

Lemon Pound Cake

Connect

  • Email
  • Facebook
  • Instagram
  • Pinterest
  • Threads
  • TikTok
SUBSCRIBE TO NEWSLETTER
×

Popular Posts

  • Lavender Sachets
  • How to Make a Laundry Bag
  • Foundation Paper Piecing for Beginners
  • Teaching Children to Sew: A Fun and Creative Activity for the Whole Family
  • Apple Crumble Slice
  • 10 Projects to Sew for Men
  • Summer Sewing Projects

Copyright © 2025 Lisa. K. Cox - A Spoonful of Sugar