A Spoonful of Sugar

Make. Bake. Create.

Menu
  • Home
  • About
    • About Us
    • Press
    • FAQ
    • Disclosure Policy
    • Contact Us
  • Crafts
    • Crochet
    • DIY
    • Embroidery/Cross stitch
    • Gift Wrapping
    • Knitting
    • Miscellaneous
    • Paper Crafts
  • Holidays
    • New Year’s
    • Australia Day
    • Back to School
    • Valentines Day
    • Easter
    • ANZAC Day
    • Mother’s Day
    • Father’s Day
    • Halloween
    • Christmas
  • Recipes
    • Appetizers
    • Bars & Slices
    • Bread & Pastries
    • Cakes
    • Cookies
    • Confectionery
    • Cupcakes & Muffins
    • Desserts
    • Drinks
    • Ice Cream
    • Jams/Preserves
    • Main Meals
  • Sewing
    • Sewing Tutorials
    • Quilting
    • Sewing & Quilting Patterns
  • Family
    • Back to School
    • Family Fun
    • Our Home
    • Parenting
    • Travel
  • Shop
    • Pattern Store
    • Etsy Store

Tutorial: "Be Merry" Festive Garland

November 9, 2010 By Spoonful of Sugar - 31 Comments

Here is a project that I designed for QFD Creative Christmas in July Online Stitching Event. I wanted to share it here as a free tutorial. 

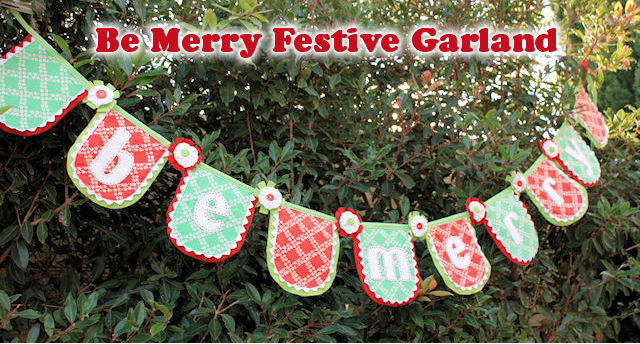
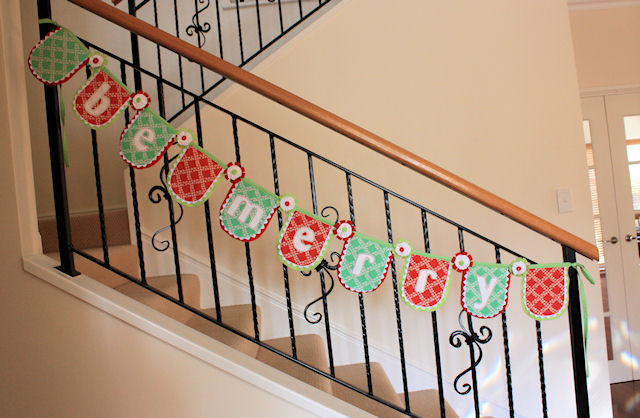
This sweet bunting with its scallops, yo yo’s and ricrac edging has a vintage feel. It will set the scene in your living room this Christmas and it is sized for stringing across your mantelpiece or staircase to bring some festive cheer.
Materials:
0.15 m white wool felt
0.2 m green wool felt
0.2 m red wool felt
0.2 m red printed quilting cotton
0.2 m green printed quilting cotton
0.15 m green polka dot quilting cotton
4m white cotton ricrac trim
Scrap of white fabric for yo yo’s
9 assorted red and green buttons
1 x A4 sheet of appliqué film/fusible webbing (such as vliesofix or steam a seam 2)
0.3 m medium weight fusible interfacing
DMC Perle 5 in colours red (no: 321) and green (no: 703)
Spray starch
Card
Templates – Template 1 and Template 2
Supplies:
Computer and printer
Iron
Scissors
Sewing machine
Co-ordinating thread
Clover Yo Yo maker – large (optional)
Hand sewing needles
Marking pen

Please read all instructions before commencing the project. Careful and accurate cutting and sewing is essential to ensure success with this project. It is recommended that fabric be 100% cotton, pre-washed and well ironed. Requirements are based on fabric 112 cm wide (44 in). A seam allowance of ¼ inch has been used in this project.


Instructions:
1. Print out the letters to spell “be merry” using template provided (Font used: Mellow; Size : 370).
Trace the letters in reverse onto the back of the appliqué film (paper side). Cut around the letters leaving ½ cm allowance. Press the letters onto white felt. Cut out the letters, and peel off the paper backing.
2. Trace the scallop templates onto card and cut out. Trace the flower template onto card and cut out.
3. Cut out the fabrics:


Using the felt template, cut out 5 large scallops out of red felt; and 5 out of green felt.

Using the Cotton template, cut out 5 medium scallops out of red printed cotton; and 5 out of green printed cotton.
Using the pressing template, cut out 10 scallops out of interfacing.
Cut the polka dot binding fabric into 3 strips, each measuring 5 cm.
Using the flower template, cut out 9 flowers from red and green felt.
4. Press the interfacing to the wrong side of the fabric scallops.
5. Using spray starch, moisten the edges of a fabric scallop. Place the scallop face down on the ironing board, put the pressing template on top, and press the edges over the template. Remove the template. The fabric scallop should have ¼ inch seam allowance pressed to the back.  Repeat for all 10 scallops.

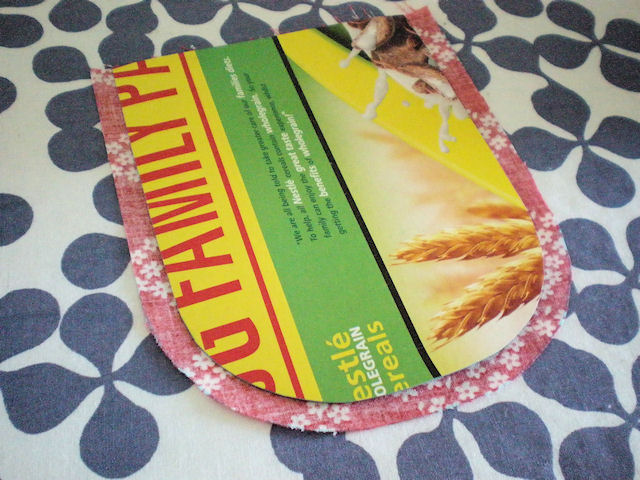
Photo: Making Scallop


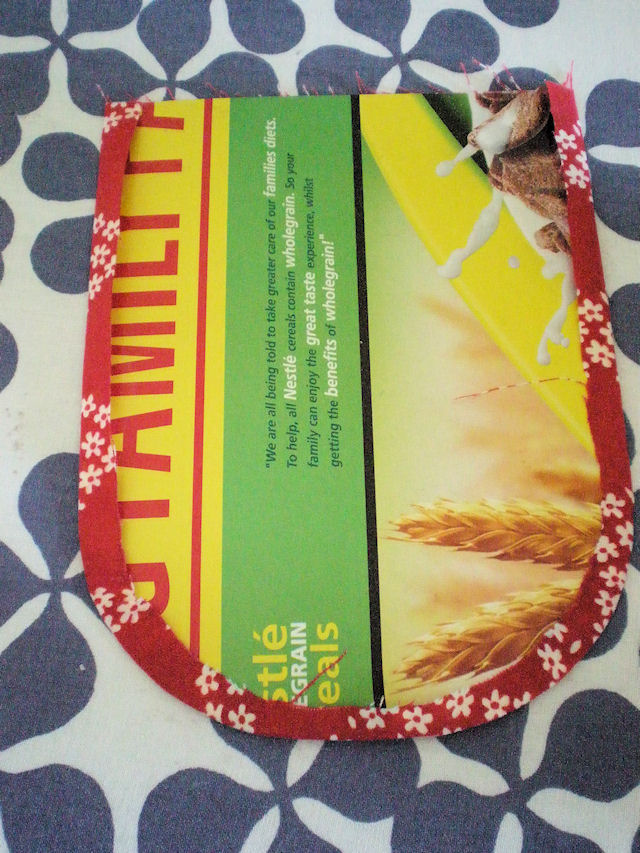
Photo: Pressing under scallop

6. Alternating red and green scallops, press the letters to the middle of the scallops. Stitch around the letters using perle thread and a running stitch. With the letters fused to red fabric, stitch in green perle cotton. With the letters on the green fabric, stitch in red perle cotton.


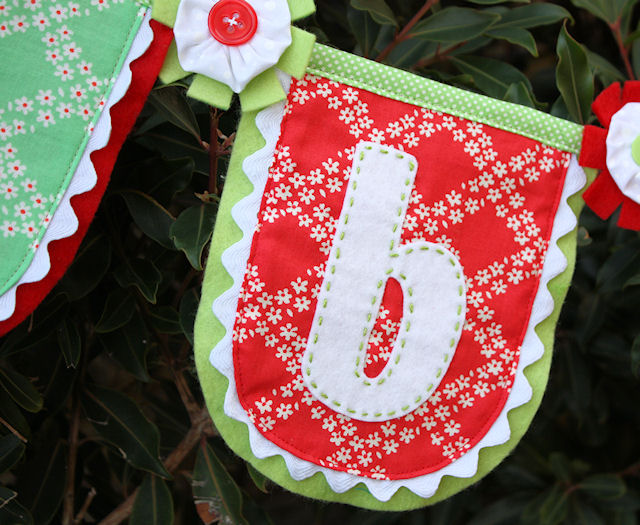
Photo: Closeup of Letter

7. Layer the red scallops onto green felt, and the green scallops onto red felt. Pin the ricrac under the edge of the cotton fabric so half the ricrac is visible. Stitch the fabric scallops to the felt using a scant seam allowance, catching the ricrac in position as you stitch.
Repeat for all the scallops.

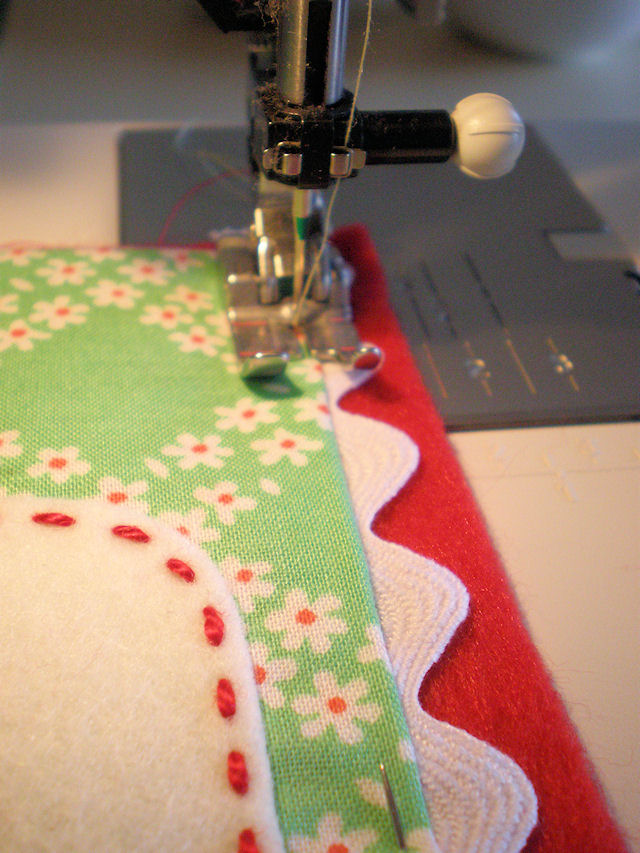
Photo: Stitching ricrac

8. Position the scallops so that the colours alternate and spell out “be merry” There should be an extra scallop at each end, and one between the words.
9. Stitch the three binding strips together using a mitred join. Press the strip in half lengthwise. Open it out and then fold each long edge in towards the crease and press. Fold in half again to create a strip that measures 1.25 cm x 318 cm (approx).
10. Pin the binding over the top of the scallops. The scallops should be positioned 2.5 cm apart, with equal lengths of binding at each end. Stitch the flags to the binding, and press.
11. Make 9 yo yo’s using the yo yo maker and white fabric following the directions on the yoyo maker. If you do not have a yoyo maker, make a cardboard circle template that is 10 cm in diameter. Use this template to trace circles on the wrong side of your fabric. Following your traced line, cut out a circle of fabric. Fold under a scant 3 mm along the edge of your circle and stitch close to the edge. Use a strong thread and make sure that it is long enough to go right around the circumference of your circle. Pull on the thread to gather the edges to the centre. Flatten the yoyo and even out the gathers. Sew a few stitches to secure.
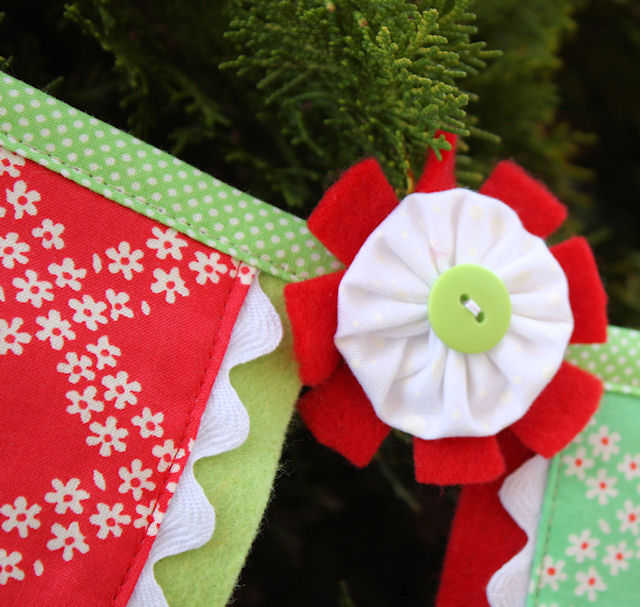
12. Layer a yoyo onto a felt flower and stitch them together, positioning a button in the centre (Refer to photograph).
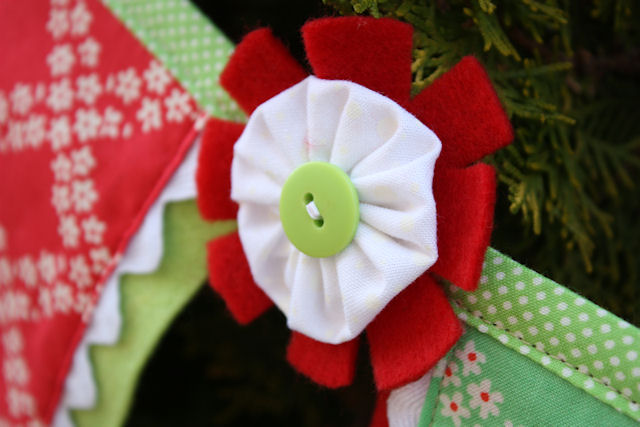

Photo: YoYo Flower

13. Stitch a Yoyo flower between each scallop.

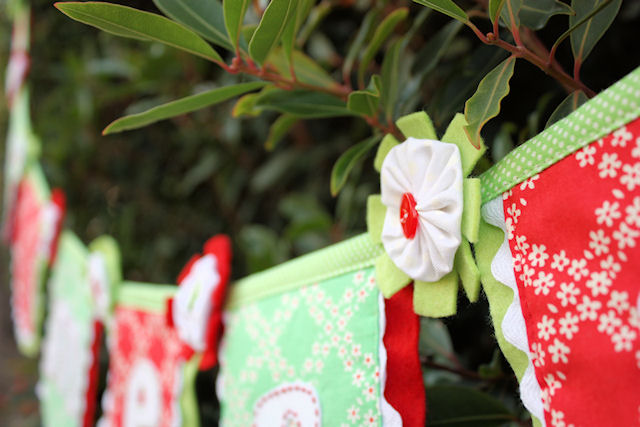
Photo: Festive Garland

The fabric for this project came from Quilt Fabric Delights. 

 ©Lisa Cox from A Spoonful of Sugar
www.spoonfullofsugargirls.blogspot.com
For your personal use only


For your daily sugar fix you can follow us on facebook and twitter.


Filed Under: Sewing, Sewing Tutorials

« Lounge Pants
My Bags are Packed, I’m Ready to Go….. »

Comments

  1. two hippos says

    November 10, 2010 at 2:09 am

    what fabulous bunting!

    Reply
  2. Terriaw says

    November 9, 2010 at 6:44 pm

    I really love garlands, and this one is SO cute! I love the ricrac in between layers, making it look like a scalloped. Also love the use of handstitching around each letter and the use yo-yos to connect each letter. Well done Lisa!

    Reply
  3. clare's craftroom says

    November 9, 2010 at 6:47 pm

    Oh Lisa it is just beautiful , I love it and will be making one . Thanks so much !

    Reply
  4. Thimbleanna says

    November 9, 2010 at 7:16 pm

    It’s beautiful Lisa! I especially love the ric-rac and hand stitching — very cute! Thanks for taking the time to photograph all the steps!

    Reply
  5. mandapanda says

    November 9, 2010 at 7:35 pm

    Lisa, that is awesome!! Thanks so much for the tute!

    Reply
  6. Kelli says

    November 9, 2010 at 7:40 pm

    LOVE THIS!!!! Can’t wait to make this – what a great idea! Thanks for the tutorial!

    Reply
  7. Janellybelly says

    November 9, 2010 at 7:53 pm

    Such Gorgeousness 🙂 We are so blessed to have you share your creativeness with us all. I am trying to figure out if I can get it made before Christmas!

    Reply
  8. suzitee says

    November 9, 2010 at 8:01 pm

    Such a gorgeous project Lisa. Thank you for sharing…it is lovely!

    Reply
  9. Happy Cottage Quilter says

    November 9, 2010 at 9:39 pm

    Very pretty and clever. I love yo-yo’s 🙂

    Reply
  10. Brenda says

    November 9, 2010 at 9:50 pm

    Such a sweet garland. I love your creativity.

    Brenda

    Reply
  11. Bloom says

    November 10, 2010 at 2:11 am

    What a gorgeous garland! It looks spectacular on the stairway. Very lovely. Thank you for sharing it with us. Ros x

    Reply
  12. Bela says

    November 10, 2010 at 3:07 am

    Wow, Lisa, thanks for sharing this amazing project!!! I love the colors you used. Last Aila’s birthday I made a banner and as it was my first try the result was not sooo bad:o)
    Be sure I will try making this pretty one up there and if it looks all right I will show you!
    Love! Bela.

    Reply
  13. FabiolaTeles says

    November 10, 2010 at 4:35 am

    Beautiful !!
    Fabiola.
    http://blogencontrandoideias.blogspot.com/

    Reply
  14. Vickie says

    November 10, 2010 at 4:50 am

    This is great! I love it!
    I have a window this would be perfect for! Thanks for sharing!

    Reply
  15. Tania says

    November 10, 2010 at 4:55 am

    ANOTHER bees knees project. You must go to sleep at night dreaming of bees and their knees. I’d love to give that one a whirl – if only I could get. past.all.the.birthdays.

    Reply
  16. nursing scrubs says

    November 10, 2010 at 5:56 am

    If I am going to make as beautiful as that I am so sure it will take me weeks or months to finish that one.

    Reply
  17. Linda says

    November 10, 2010 at 5:59 am

    Thanks Lisa its gorgeous and thanks for all of the time you must have spent putting the tutorial together.

    Reply
  18. Tracy says

    November 10, 2010 at 6:38 am

    That is the happiest Christmas garland I think I’ve ever seen–TOO CUTE!! Many thanks for sharing this, Lisa… I’ve been playing with felt lately, so my fingers itch to have a go at this! ;o) Happy Day ((HUGS))

    Reply
  19. Rumi says

    November 10, 2010 at 6:58 am

    CUTE! You are so very clever!

    Reply
  20. Shirley says

    November 10, 2010 at 8:52 am

    Oh my goodness! I love this!! You are so generous to share this with us. Thank you!! I can’t wait to make it.

    Reply
  21. randi---i have to say says

    November 10, 2010 at 9:21 pm

    this is so cute! i will link this in my next links post. 🙂

    Reply
  22. Suzie says

    November 11, 2010 at 1:47 am

    Thanks so much, Lisa! It’s a great tutorial for a lovely idea!

    Reply
  23. Romi Jade says

    November 11, 2010 at 3:14 am

    Awww these are gorgeous!

    Reply
  24. Celestial Charms says

    November 11, 2010 at 8:19 am

    Absolutely beautiful garland. So merry indeed!
    Maureen

    Reply
  25. Talin's Corner says

    November 11, 2010 at 9:02 am

    Very pretty.

    Reply
  26. Pamela says

    November 11, 2010 at 12:36 pm

    It IS a festive garland! Love the colors you chose. The lounge pants are calling my name, too.

    Reply
  27. Sinta Renee says

    November 11, 2010 at 12:57 pm

    that’s a really sweet garland! I like the way you made yours and adding the felt and ric rac is adorable.

    Reply
  28. Shannon says

    November 12, 2010 at 10:43 am

    Thanks so much for sharing this – it is an early Christmas present! I absolutely love it, and can’t wait to get to the fabric store!

    Reply
  29. Tine says

    November 12, 2010 at 11:29 am

    what a cute garland 🙂

    Reply
  30. Anonymous says

    July 25, 2012 at 3:41 pm

    Thank you for sharing your idea! This garland its a beauty!

    Reply
  31. euapap says

    July 26, 2012 at 1:08 pm

    Fantastic very professional

    Reply

Leave a Reply Cancel reply

Your email address will not be published. Required fields are marked *

  • Email
  • Facebook
  • Instagram
  • Pinterest
  • Threads
  • TikTok
SUBSCRIBE TO NEWSLETTER
×

Categories

Archives

PURCHASE PDF PATTERNS

We offer over 100 affordable PDF sewing patterns available for download from our store website or Etsy store. Each pattern includes detailed instructions, numerous photos, and templates.

WEB STORE ETSY STORE

Instagram

Packing light? This little kit makes it sew easy ✨ Packing light? This little kit makes it sew easy ✨ The Travel Sewing Kit is compact, clever, and surprisingly roomy—perfect for safety pins, needles, mini scissors, and all your on‑the‑go essentials. Whether you’re heading to a retreat, stitching in a café, or just want tidy tools at home, this pouch will be your new best friend.✔ Beginner‑friendly ✔ Stash‑friendly ✔ Quick to sew ✔ Folds flat for easy packing🧵 Find the pattern in our Pattern Store + Etsy Shop!👇 Comment TRAVEL and I’ll DM you the link!#sewingonthego #travelsewingkit #handmadepouch #diysewing #sewinglove
Sewing a little Something Blue this week 💙 🧵 I’ve Sewing a little Something Blue this week 💙🧵 I’ve been stitching a few of my favourite small projects in the new Tilda Something Blue collection — the Makers Caddy, Sewing Buddy Pincushion, and Dresden Needlebook. Each one is beginner‑friendly, scrap‑friendly, and perfect for gifting or organising your sewing space.I love how the soft blues, tiny florals, and sweet details come together across all three projects. Small makes really do bring the most joy.If you’d like any of the pattern links, comment PATTERNS and I’ll send you a link to my pattern store where you will find these three patterns.Save this for your next weekend sew.Fabric: Tilda Something Blue with thanks to @tilda_australia#tildasomethingblue #ilovetilda #sewingreels #sewingprojects #scrapfriendlysewing
A little fabric pull turned into the sweetest Quad A little fabric pull turned into the sweetest Quadra Pouch 💛✂️ I love mixing a polka dot, gingham, small floral, and large floral in the same colour family — it’s such an easy way to create a coordinated look from scraps or fat quarters. This project ticks all the boxes: beginner‑friendly, scrap‑friendly, giftable, and genuinely useful for everyday storage.The tag and matching cord covers are my favourite finishing touches — small details that make the whole pouch feel extra special.If you’d like the pattern link, comment QUADRA and I’ll send it straight to you.Save this one for your next weekend sew.Pattern: Quadra Pouch — available in my Pattern Store and Etsy Shop.#quadrapouch #scrapfriendlysewing #sewingreels #sewingprojects #beginnersewingproject   
Colour Crush Series: Blue 💙 There’s something so Colour Crush Series: Blue 💙There’s something so calming about blue in a sewing room - soft, fresh, and endlessly versatile. From tiny florals to bold geometrics, blue fabrics always seem to play nicely together. 💙🧵Here are a few of my favourite blue makes. Perfect for small projects, scrap sewing, and those soothing “just for fun” moments at your machine.Save this for your next colour‑themed sewing session.#modernsewing #sewingcommunity #sewingideas #fabricpull #scrapfriendlysewing
Want your drawstrings to sit neatly every time? Th Want your drawstrings to sit neatly every time? This tiny notion does all the hard work for you. 🧵✨ Cord locks (toggles) keep your drawstrings tidy, secure, and perfectly in place — no knots, no slipping, just a clean finish.I use them on my Bitsy Baskets to keep the closure polished, especially for gifting or storing small items. They’re so simple to use: thread the ends through, press the spring, slide to lock… done.If you’d like to sew your own Bitsy Basket, comment BASKET and I’ll send the pattern link straight to you.Save this for your next scrap‑busting project.Pattern is available in my Pattern Store and Etsy Shop.#bitsybasket #cordlocks #sewingtips #drawstringbag #sewingreels
A little Sunday sewing inspiration for you 💙✂️ The A little Sunday sewing inspiration for you 💙✂️ The Dresden Needlebook is one of my most‑loved makes — pretty, practical, and such a satisfying scrap‑friendly project. Perfect for gifting… or keeping in your own sewing kit.Swipe through to see the details — two pockets, felt pages, and a neat snap fastening to keep everything secure.If you’d like the pattern, comment NEEDLEBOOK and I’ll send the link straight to you.Save this for your next weekend sewing session.Pattern Details: Dresden Needlebook Sewing Pattern - available in our Pattern Store and Etsy Shop.  #dresdenplate #sewinginspiration #beginnersewing #sewinglove   #sewinginspiration
Follow on Instagram

Featured Pattern

Travel Sewing Kit Pattern

Featured Tutorial

Retro Drawstring Bag

Featured Recipe

Lemon Pound Cake

Connect

  • Email
  • Facebook
  • Instagram
  • Pinterest
  • Threads
  • TikTok
SUBSCRIBE TO NEWSLETTER
×

Popular Posts

  • Cord Cosy
  • Fabric Scrap Crafts: No Sewing Required
  • Fiesta Potholder
  • Flower Sugar Pouches
  • What To Do With Selvedges (and Why I Save Every One)
  • Home Made Ornaments
  • Fabric Gift Pouch

Copyright © 2026 Lisa. K. Cox - A Spoonful of Sugar