A Spoonful of Sugar

Make. Bake. Create.

Menu
  • Home
  • About
    • About Us
    • Press
    • FAQ
    • Disclosure Policy
    • Contact Us
  • Crafts
    • Crochet
    • DIY
    • Embroidery/Cross stitch
    • Gift Wrapping
    • Knitting
    • Miscellaneous
    • Paper Crafts
  • Holidays
    • New Year’s
    • Australia Day
    • Back to School
    • Valentines Day
    • Easter
    • ANZAC Day
    • Mother’s Day
    • Father’s Day
    • Halloween
    • Christmas
  • Recipes
    • Appetizers
    • Bars & Slices
    • Bread & Pastries
    • Cakes
    • Cookies
    • Confectionery
    • Cupcakes & Muffins
    • Desserts
    • Drinks
    • Ice Cream
    • Jams/Preserves
    • Main Meals
  • Sewing
    • Sewing Tutorials
    • Quilting
    • Sewing & Quilting Patterns
  • Family
    • Back to School
    • Family Fun
    • Our Home
    • Parenting
    • Travel
  • Shop
    • Pattern Store
    • Etsy Store

Pyjama Bag

January 5, 2013 By Spoonful of Sugar - 17 Comments

Drawstring bags are very handy to have in your suitcase to organise clothing and supplies. To store Sarah’s new travel themed PJ’s, I made up a little drawstring bag to match. It is an unlined drawstring bag as we didn’t want to add extra weight to our luggage! They will be perfect for storing the Pyjamas in her suitcase on our next holiday.

Colourful PJ’s pants, a drawstring bag, and some travel sized toiletries would make a great gift idea for a teenage girl.

Pyjama Bag

Size: 11 1/2 x 16 inches ( 29 x 40.5 cm)

Materials:

  • 2 rectangles of fabric measuring 12 x 16 inches (travel themed fabric)
  • 2 strips of fabric measuring 12 x 2 1/2 inches (pink polka dot)
  • 2 1/2 yards white twill tape (1/2 inch wide)  for drawstring

Method:

1. Place the two fabric rectangles with their right sides facing. Stitch around the bottom and the two sides using 1/4 inch seam allowance. Overlock (serge) the raw edges.
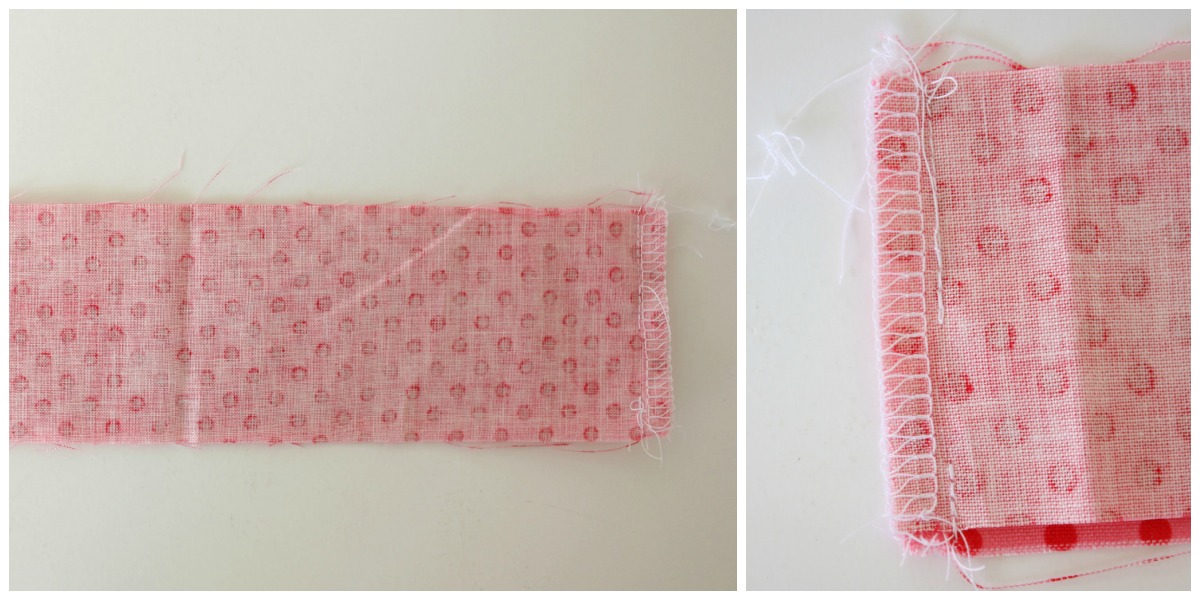
2.  Overlock (serge) the edges on the short sides of the polka dot strips. Place the two strips of fabric with their right sides facing.Stitch them together at each end, leaving a 1/2 inch opening as shown in the photo. (This is where the drawstring will pass through). The polka dot fabric is now a circular piece.
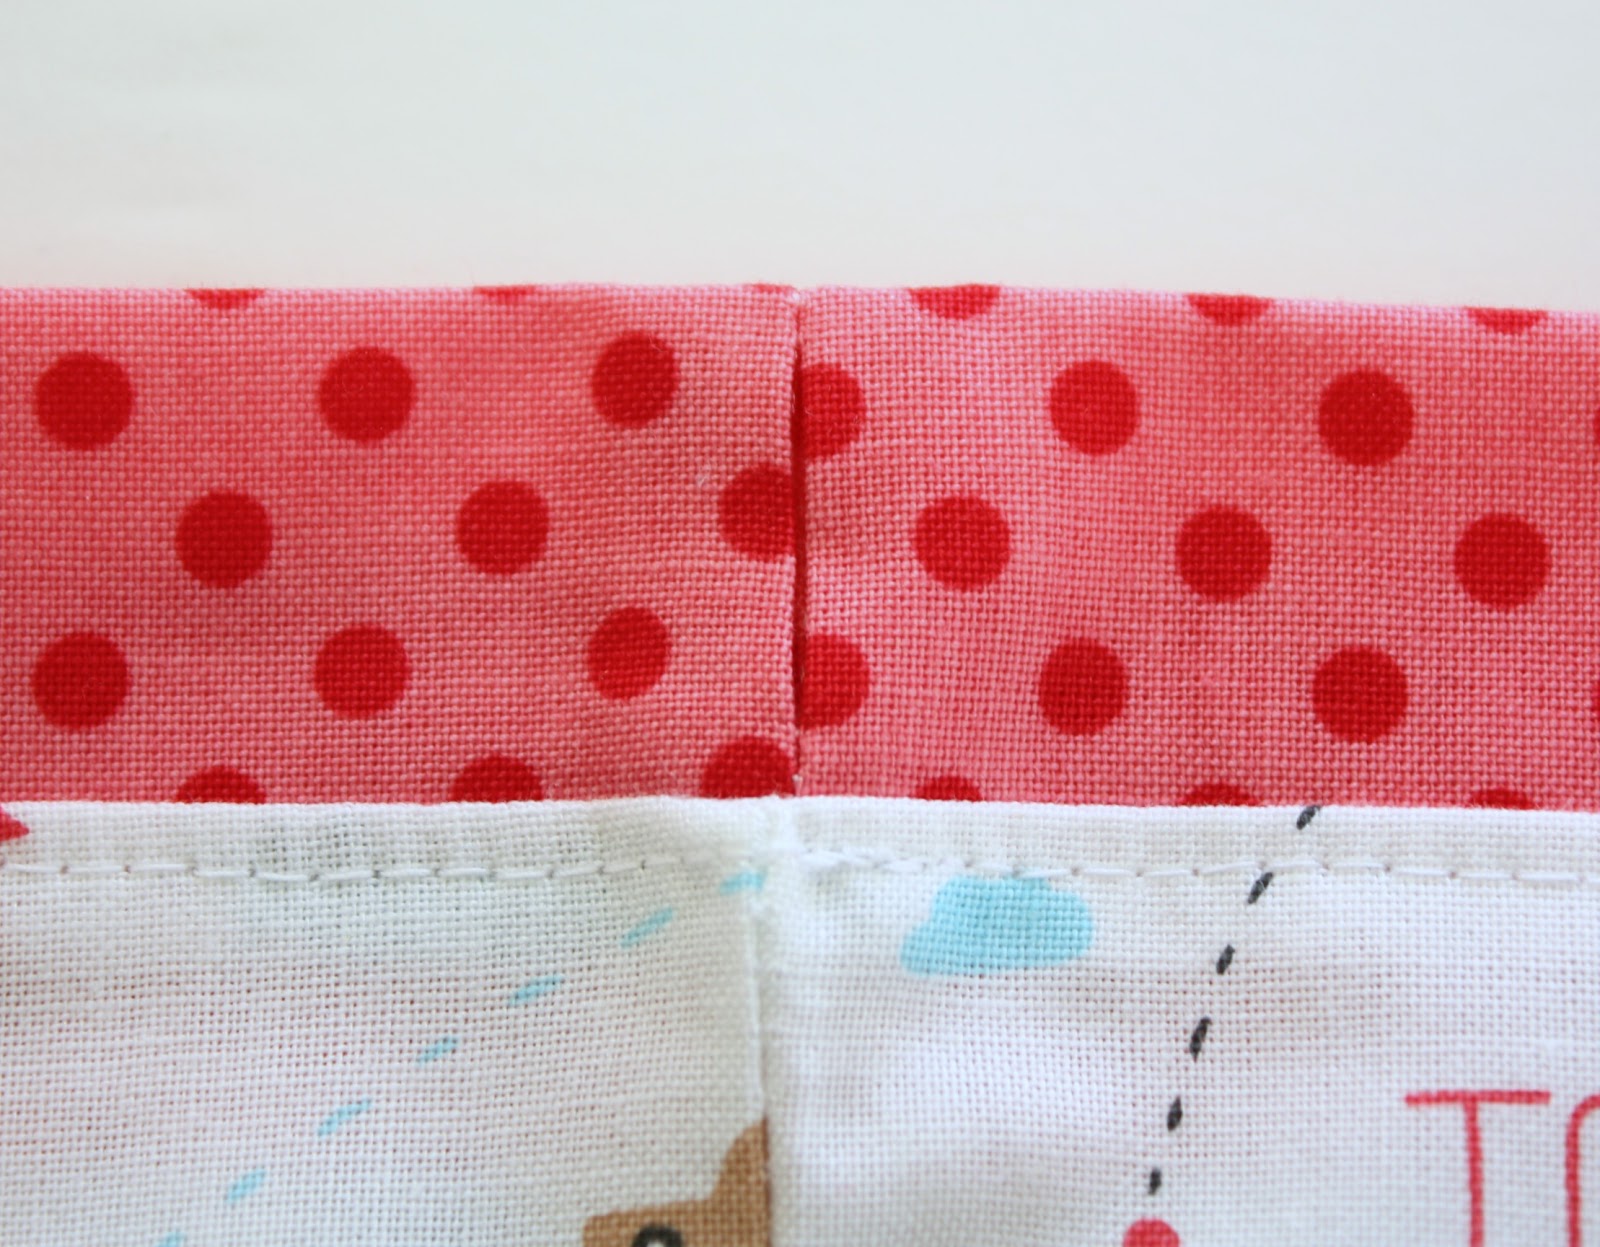
3. Press the seams on the polka dot fabric open. Fold the fabric in half lengthwise and press. Pin the raw edges of the polka dot fabric to the opening of the bag, with the seams aligned. Stitch in place around the opening of the bag. Overlock the edges. Press. Topstitch around the opening of the bag as shown in the photo.
4. Cut the twill tape in two. Thread the twill tape in one opening using a bodkin or safety pin. Thread the tape right around the drawstring casing until it comes out the same end that it started. Tie the ends together to secure. Thread the remaining piece of twill tape through the opening in the other side, pass it right around the casing, and back out the same gap. Tie ends together.
Pull both ends to gather up the bag.
Thanks to XO Gigi Fabrics for providing the fabric for this project.
For your daily sugar fix you can subscribe or follow us on facebook, pinterest, twitter, and google plus.

Filed Under: Sewing, Sewing Tutorials, Travel

« Spice Cakes
Patchwork Needlebook »

Comments

  1. Happy in red says

    January 6, 2013 at 2:24 am

    I LOVE that fabric, fabulous!!
    Esther.

    Reply
  2. Terriaw says

    January 6, 2013 at 10:12 am

    Adorable and so easy to make. I use drawstring bags for so many things.

    Reply
  3. JoJo Eloise says

    January 6, 2013 at 10:26 am

    So cute!! And your right,this would make a great gift for a teenage girl or frequent traveler 🙂 thanks for sharing it with us.
    Angelina

    Reply
  4. Carole says

    January 6, 2013 at 11:07 am

    I LOVE this way to make a drawstring bag! I’ve never seen it done this way before and it’s super-cute. Thank you for another great project.

    Reply
  5. Samelias Mum says

    January 6, 2013 at 4:40 pm

    Great Tute! Love the fabric too.

    Reply
  6. Cheryl says

    January 6, 2013 at 5:28 pm

    Love your fabric selection….and what a great tutorial!!! Thanks so much.

    Reply
  7. Darmowa Bramka says

    January 7, 2013 at 8:31 am

    Hiding pyjamas under the pillows is so boring. Thanks to you, my kid won’t have to do it ever again – I’m sure it will be so much fun for him to use such a cute bag!

    Reply
  8. Janine says

    January 12, 2013 at 1:18 am

    great tutorial … BUT … do you have a pj pattern? that’s what miss 15 really needs!

    Reply
  9. Pam @Threading My Way says

    January 17, 2013 at 4:52 am

    LOVE your fabric choice!!! It’s perfect for a drawstring bag to carry in luggage. This is the first time I’ve even seen the Sydney Harbour Bridge on fabric. I’m trying not to add any fabric to my ever growing stash, but this may well change my mind. I would love you to share the Pyjama Bag Tutorial at our Ongoing Link Party that’s just for Drawstring Bags .

    Reply
  10. Nancy Bandzuch says

    January 17, 2013 at 11:51 am

    Such a clear tutorial–even I think I could make this!
    Love for you to stop by and check out some of my project:
    http://www.dosmallthingswithlove.com
    Also, I host and “oldies” link party on Tuesdays–a way to get come traffic out of our awesome, but old projects we posted long ago.
    Hope to see you there–and excited to be following you via rss.
    Nancy

    Reply
  11. Palak says

    August 9, 2013 at 6:07 pm

    I love the idea of a pyjama bag, and this one is so cute with the contrast band at the top! I wanted to let you know I feature it at Sewistry.com. Here’s the link: http://sewistry.com/2013/08/pyjama-bag/. Thanks!

    Reply
  12. Patricia Parson says

    April 26, 2016 at 8:28 pm

    Please explain the term serge the fabric

    Reply
    • A Spoonful of Sugar says

      May 1, 2016 at 9:32 pm

      Serge is the same as overlock. It means to finish the edges. If you don’t have an overlocker or serger machine, you can finish with a zigzag stitch to finish the raw edge.

      Reply
  13. Quadri astratti moderni says

    June 6, 2016 at 4:24 pm

    Good ideas, I love the order and be organized. Thank you

    Reply
  14. Anna says

    February 19, 2017 at 3:55 am

    Great tutorial thank you for sharing!!!

    Reply
  15. Anna says

    April 6, 2020 at 10:33 pm

    Hi, I just wanted to say a massive thank you for this pattern. In the midst of the covid-19 pandemic, I have used it to make bags for NHS workers in the UK who don’t wear scrubs and so have to take their uniforms home – they can put it all in a bag at the end of shift and then throw the whole lot in the wash. They are being very gratefully received! It’s a fab pattern that I can whip up in no time xx

    Reply
  16. Melissa Clarke says

    December 11, 2021 at 10:30 pm

    Thanks so much for this tutorial!
    I completed one from start to finish in less than 20 mins and that’s including the adding of the recipient’s name!
    This is a great last minute gift idea, now to add a pair of pjs!

    Reply

Leave a Reply Cancel reply

Your email address will not be published. Required fields are marked *

  • Email
  • Facebook
  • Instagram
  • Pinterest
  • Threads
  • TikTok
SUBSCRIBE TO NEWSLETTER
×

Categories

Archives

PURCHASE PDF PATTERNS

We offer over 100 affordable PDF sewing patterns available for download from our store website or Etsy store. Each pattern includes detailed instructions, numerous photos, and templates.

WEB STORE ETSY STORE

Instagram

💡Sewing doesn't have to be complicated! This Hexag 💡Sewing doesn't have to be complicated! This Hexagon Trivet comes together in minutes—no binding, no stress, just turn, press, and you’re done. 🎉🌟 Perfect for charm packs or leftover 10" squares. Handmade kitchen decor has never been easier.✨ Comment TRIVET for the link + enjoy 25% off this week only!Pattern Details: East Hexagon Trivet and coasters - available in our Pattern Store and Etsy Shop.#sewingproject #precutsquares #easysewing #sewingaddict #stashbuster
Fresh makes for the season! Looking for your next Fresh makes for the season! Looking for your next weekend project? These spring patterns are perfect for brightening your sewing table.✨ Comment SPRING for a link to our spring pattern collection. 🧵 Which one will you make first? 📌 Save this post for when you need inspiration.#springsewing #eastersewing #beginnersewing #makersgonnamake #quicksew
✂️ Cute end caps are the quickest way to give your ✂️ Cute end caps are the quickest way to give your drawstring bags a really polished finish.They keep your cords tidy, add a pop of colour, and make the whole project feel more intentional.Want to sew this mini bag? Comment MINI and I’ll send the pattern link your way.Pattern details: Mini Drawstring Gift Bag - available in our pattern store and etsy shop.Fabric details: Tilda Songbird, thanks to @tilda_australiaEnd Caps: available on Amazon#tildafabric #bagmaker #beginnersewing #sewingcommunity #tildasongbird
✨ Hop into Easter sewing! ✨ These sweet little bun ✨ Hop into Easter sewing! ✨ These sweet little bunnies are quick to stitch and make the perfect seasonal gift or decoration. With Easter just around the corner, now’s the time to add a touch of handmade charm to your celebrations.🐇 Comment BUNNY below and I’ll send you the pattern link straight to your inbox. Bunny Coaster pattern is available in our Pattern Store and Etsy Shop.Will you be stitching one up for your Easter table or gifting them to someone special? 🌸💛#eastersewing #handmadebunny #sewngforEaster #DIYGiftideas #aspoonfulofsugardesigns
✨ One Caddy, Many Uses ✨ Meet my brand new Makers ✨ One Caddy, Many Uses ✨ Meet my brand new Makers Caddy sewing pattern — the ultimate organizer for all your creative supplies!🧵🧶✂️ In this reel I’m showing three different ways to use it, but the possibilities are endless.📍 Available now in our Pattern Store and Etsy Shop.💬 Comment CADDY below and I’ll send you the link directly!#makerscaddy #sewingproject #sewinglove #sewingaddict #craftstorage
✨ Introducing my newest sewing pattern – the Maker ✨ Introducing my newest sewing pattern – the Makers Caddy! ✨ Perfect for keeping your creative supplies organised, whether you’re a knitter, quilter, or crafter. I’ve filled mine with knitting essentials so everything is right at hand.This project is fun to sew and makes a beautiful, practical addition to your sewing room or craft space.💬 Comment CADDY below and I’ll send you the link to the pattern!Pattern Details: Makers Caddy Sewing Pattern - available in our Pattern Store and Etsy Shop#makerscaddy #sewingcommunity #sewingpattern #makersgonnamake #gifttosew
Follow on Instagram

Featured Pattern

Travel Sewing Kit Pattern

Featured Tutorial

Retro Drawstring Bag

Featured Recipe

Lemon Pound Cake

Connect

  • Email
  • Facebook
  • Instagram
  • Pinterest
  • Threads
  • TikTok
SUBSCRIBE TO NEWSLETTER
×

Popular Posts

  • Gathered Round Basket – 3 Sizes
  • Hexie Pincushion {Free Sewing Tutorial}
  • The Ultimate Resource for Vintage Haberdashery Lovers
  • Easter Projects to Sew
  • The Ultimate Guide to Drawstrings
  • Tutorial: Gathered Round Basket
  • Charm Square Fabric Tray

Copyright © 2026 Lisa. K. Cox - A Spoonful of Sugar