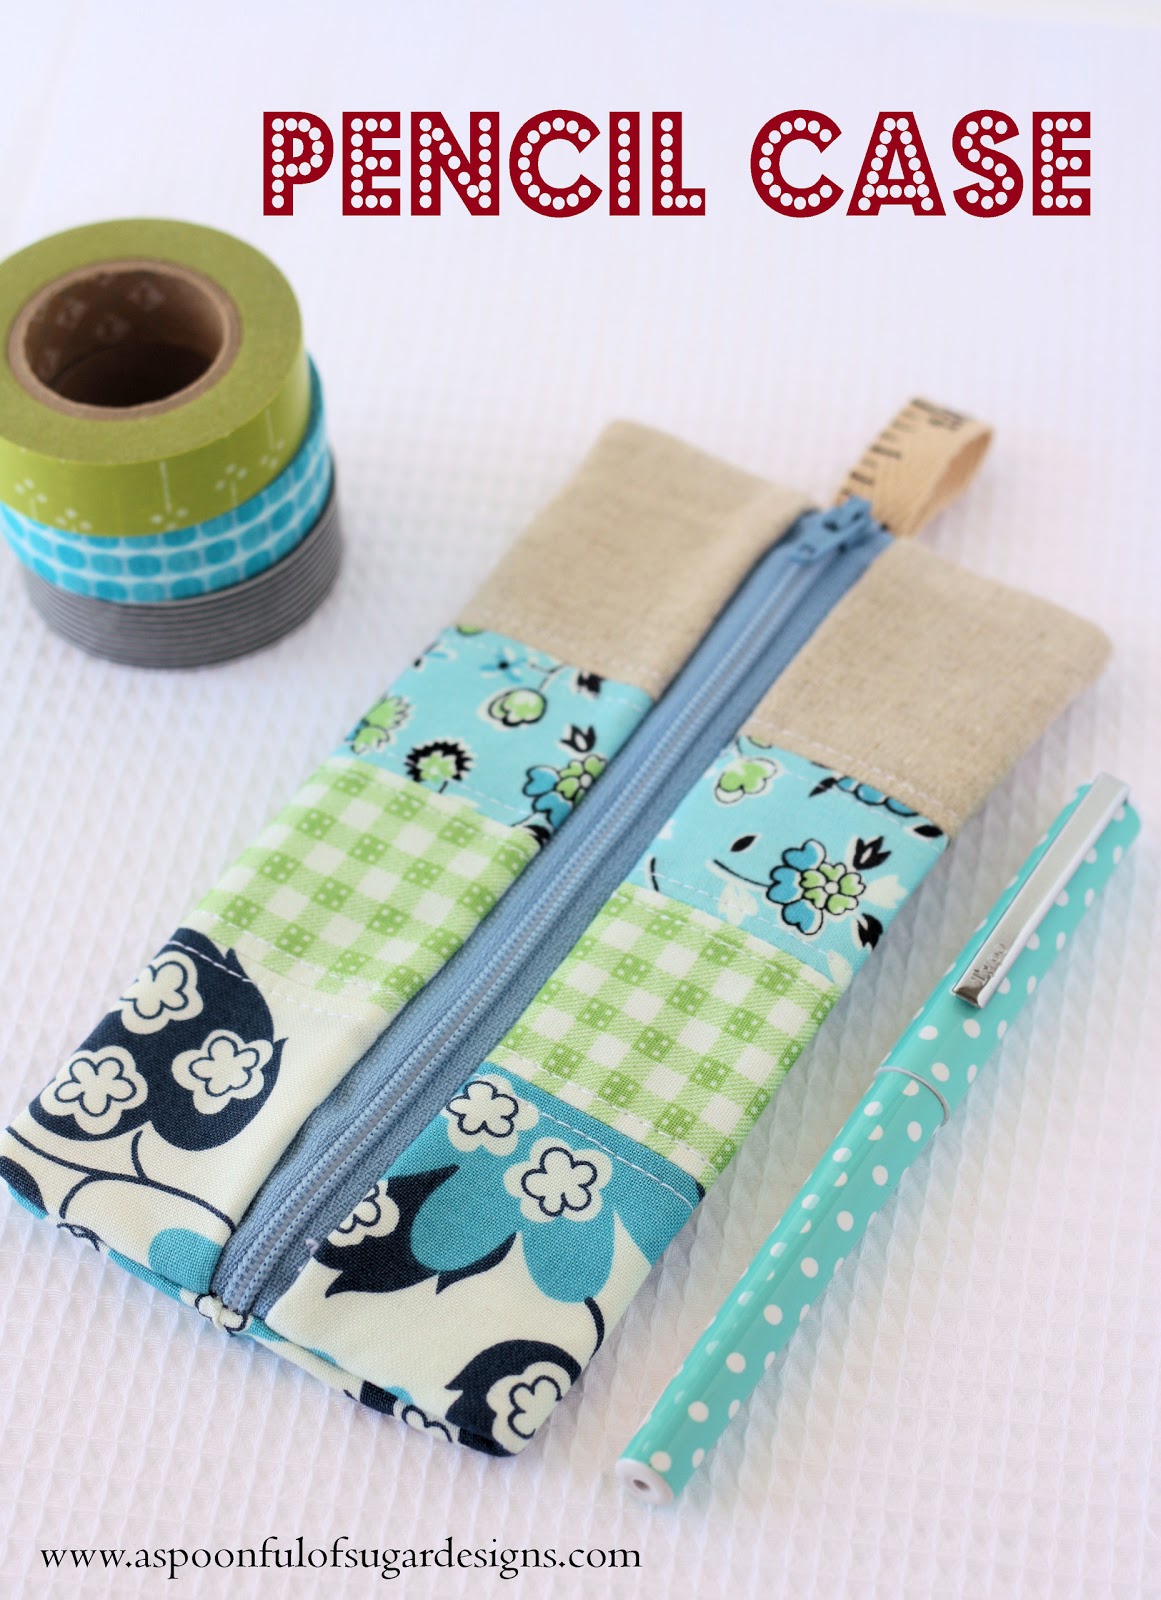
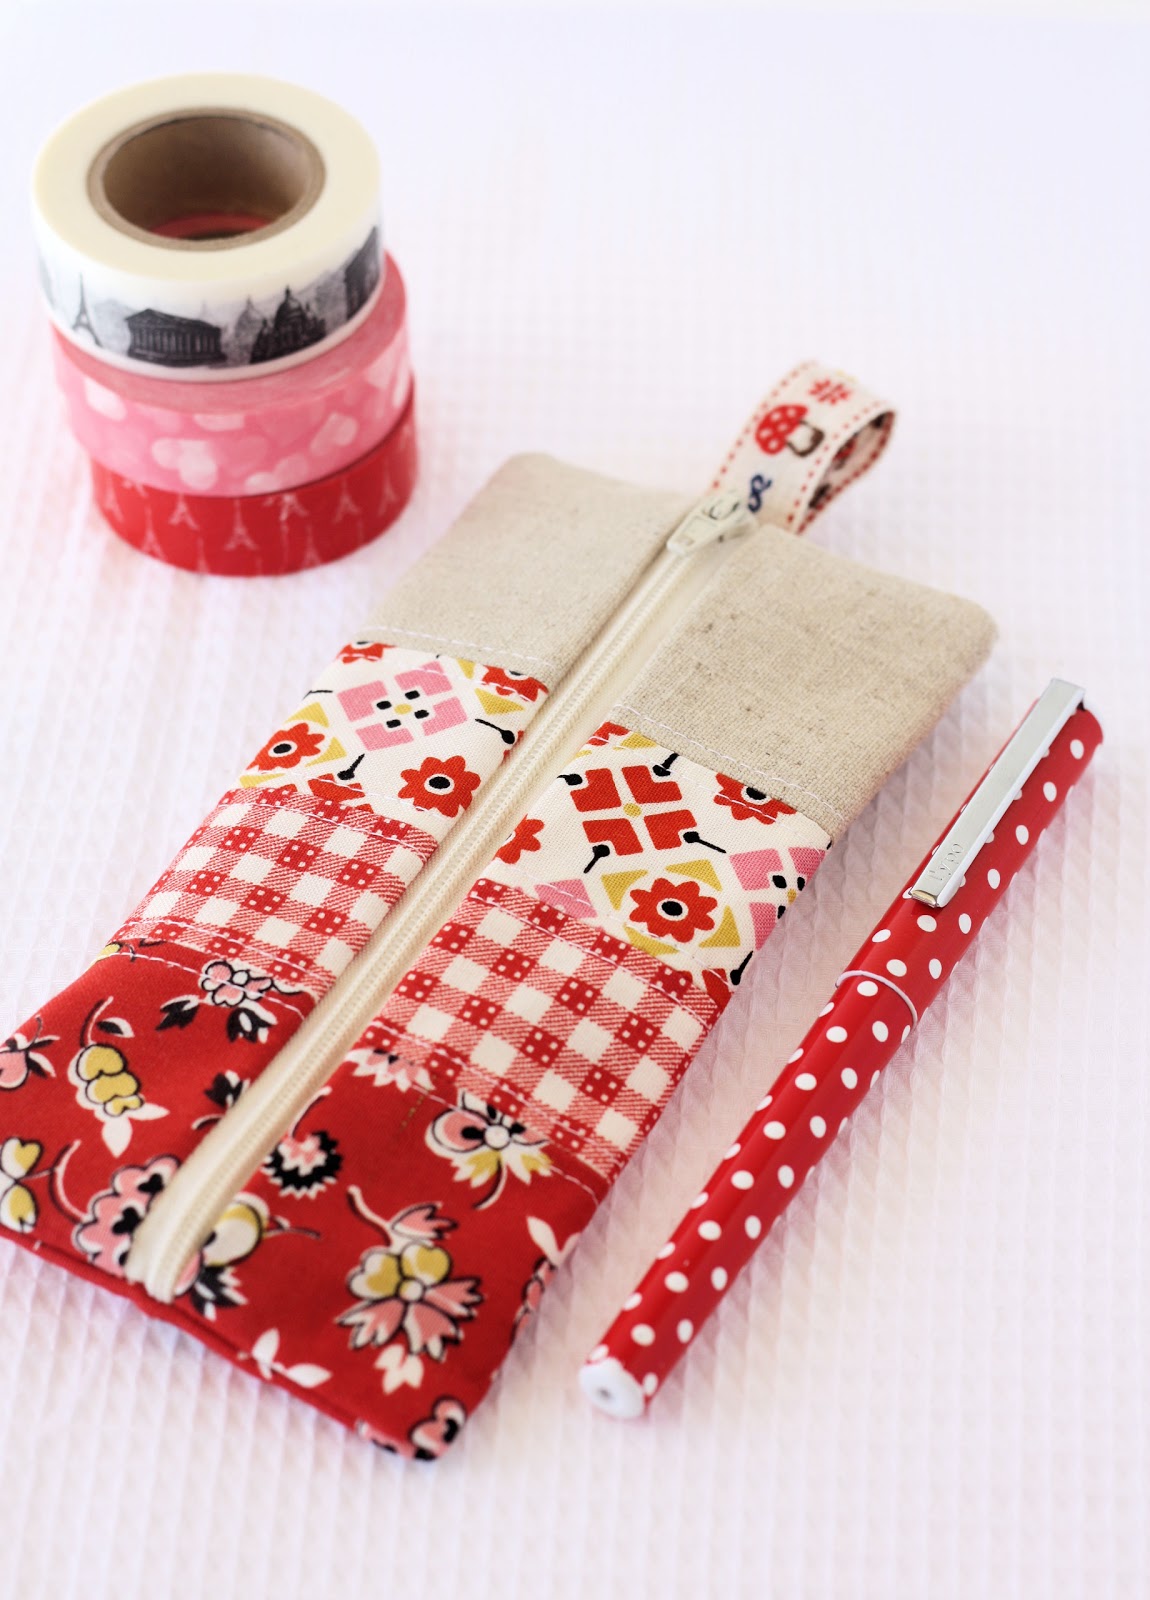
With the new school year nearly upon us in Australia, I am making up a few easy zippered patchwork pencil cases. This is a great scrap buster project. The little zippered pouches can be used for all manner of things. Mine was sized to fit approx 6 pens; or a small pack of tissues; or a small notebook and pen; or a few cosmetics.
How to Make a Pencil Case
Project Difficulty: Beginner/Intermediate
Time Required: 1 hour
Finished project measures: 3 1/2 x 6 3/4 inches (9 x 17 cm)
Materials:


- Linen measuring 7″ x 2 3/4″
- Fabric 1 measuring 7″ x 1 3/4″
- Fabric 2 measuring 7″ x 2″
- Fabric 3 measuring 7″ x 2 1/4″
- Fabric 4 measuring 7″ x 7 1/4 (lining)
- Flannel measuring 7″ x 7 1/4″ (batting)
- zipper measuring at least 7″
- Ribbon/tape measuring 3″
Note: Please read all instructions before commencing the project. Careful and accurate cutting and sewing are essential to ensure success with this project. A seam allowance of 1/4in is included throughout.
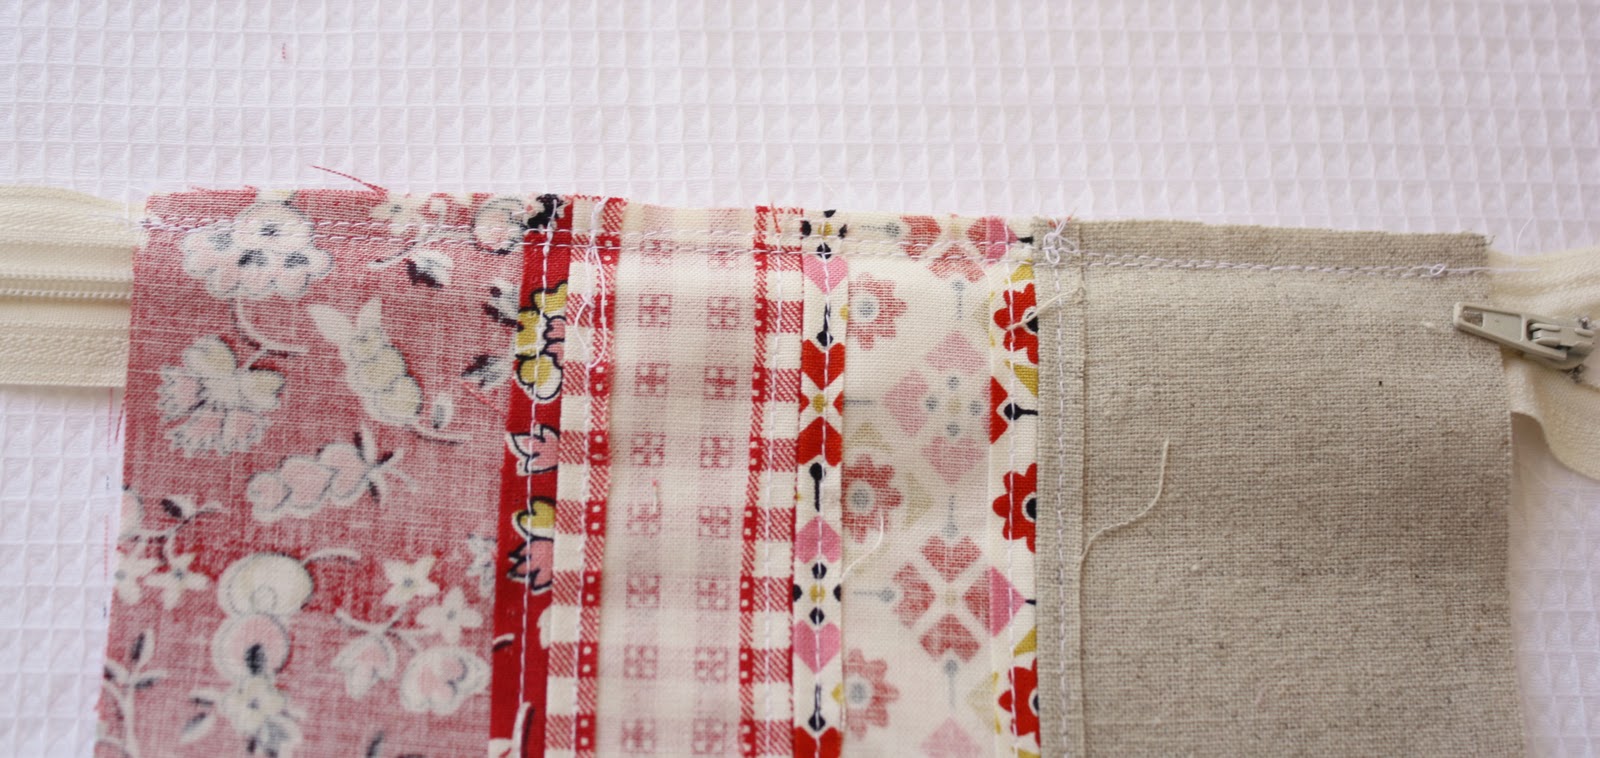
1. To assemble the exterior of the pencil case, stitch the linen strip, to Fabrics 1, 2 and 3 (as shown in photograph). Press the seams open. Topstitch 1/8 ” on both sides of each seam.
2. Position the lining on top of the flannel rectangle. Pin the layers together, and quilt together through both layers in straight lines approx 1/2 ” apart.

3. Position your lining facing up on your work surface. Position your zipper so that it is face up with the zipper pull on the right side and the edge of the zipper is aligned with the long edge of the lining. Position the patchwork rectangle so that the right side is facing down, and the linen strip is on the right hand side. Pin in place. Using your sewing machine and the zipper foot, stitch in place through all layers. Refer to photo.
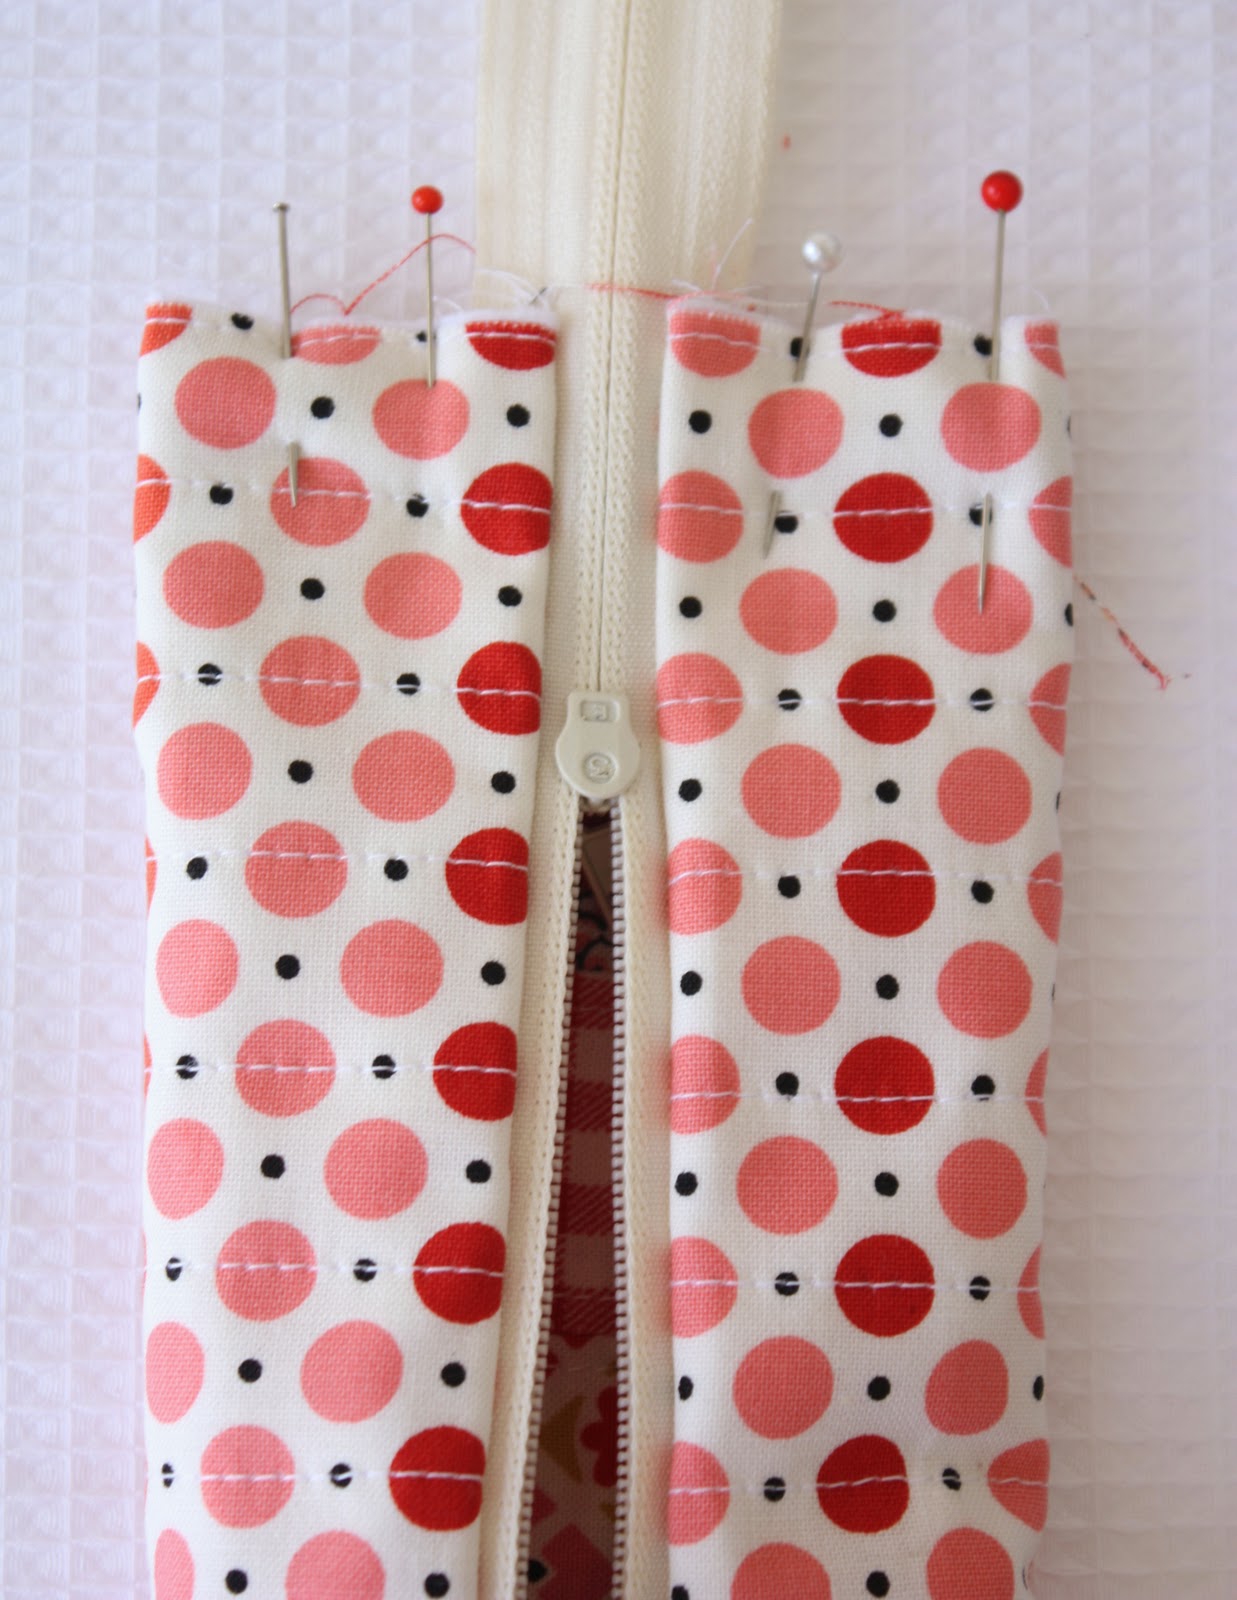
4. Align the other long edge of the patchwork pencil case exterior, with the other side of the zipper and pin in place so that the right sides are facing. Take the other edge of the lining, fold under the zipper, and pin this to the other edge of the zipper. Refer to the photo for placement, and stitch in place. It will appear that you have two separate channels, but once it is sewn in place and turned out the right way it will look like a pencil case!


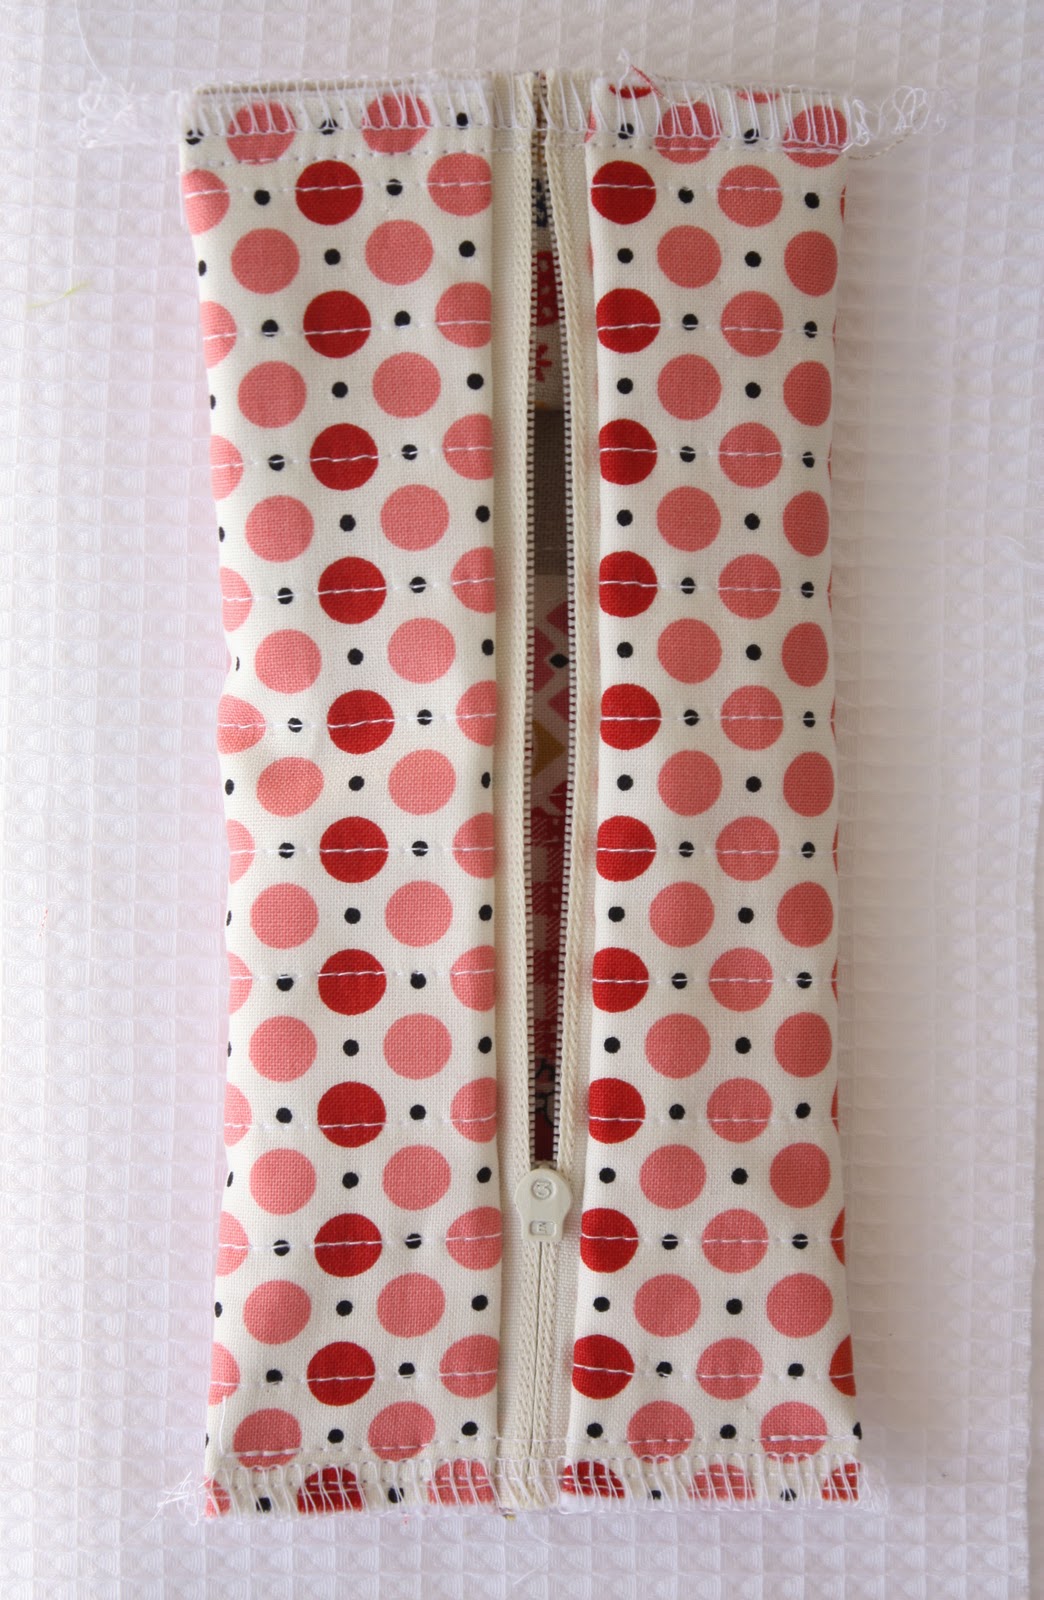
5. Open the zipper and turn the pencil case so that the lining is on the outside and it is tubular in shape. With a pin, mark the midpoint of each side. Position the zipper so that it is in the centre of each side, and pin in place. (Refer to photo). Fold the piece of ribbon/tape in half, and position it in the middle of the pouch (linen end). Stitch along each side. Then zigzag or overlock/serge to secure. Trim ends of zipper, Turn right side out and press.
There you have it, a useful little pencil case or pouch to pop in your handbag.
Have you Subscribed to our newsletter? First issue coming out in February.


Very, very nice, thanks for this tutorial;-)
Karin
Lovely and not too difficult. I will give it a try! Thanks for the tutorial.
Very cute. Kxxx
Absolutely adorable and such a great tutorial. Thanks bunches.
Very cute pencil pouch! I’m addicted to pencil pouches so I love it. Great tutorial!
This is so pretty!!! On my list ‘to make’. And I don’t think it will be just one …
Have a happy weekend.
Very cute!
LOVE the DS fabrics and spotted pens. I may have to give it a go…even though zippers give me hives. :o) Thank you for sharing.
Can’t wait to give these a try, would be great to have a few in the ‘present’ box! Thanks as always for sharing!
So cute and a great tutorial. Love the fabrics!
Veramente bello e semplice. Grazie!
Very nice pencil pouch 🙂
Looks great – nice idea. Greetings, Elvira
great tutorial, thank you! I am sure I will do it.
I make these all the time but are always different sizes because I never write the measurements down ! Thanks for this, now I can make them all the same size and yours is beautiful as always ! 🙂
It`s adorable.Thanks for sharing the great tutorial!
oh I like the idea of making them for tissues…would be a great idea for little gifts for the girls at work come Christmas time. Even with a cute little notebook and pen.
Great tutorial! You’ve been featured on the Quality Sewing Tutorials blog.
We hand select only the best free tutorials and patterns for home sewers.
Cute pencil holder and I’ll have to put this in my file for the grandbabies. Thank you.
Oh, what a cute little case! Love the tutorial, and the fabric is just gorgeous.
Les tissus sont beaux, les explications sont claires… Merci
This is such a great tutorial!! Thanks!!
I love it! It’s great! Thanks a lot for the tutorial!
wonderful tutorial!
Great tutorial and love your bright, funky choice of fabrics, big kids and little kids will love these.
Great tutorial and very pretty pencil case.
These are so gorgeous but I think I’d be better off making an iPad or laptop case! Unfortunately, I don’t use pencils very often anymore 🙂
They’re beautiful Lisa! I can think of a ton of uses for little pouches that size – very clever!
oooooh, i just LOVE this! i have been wondering where i can get a gorgeous little pouch that isn’t expensive. and i have found it! i am delighted. thank you for this stunning tutorial :o)
I am absolutely swooning over the red one! Thanks for the tutorial, I am pinning it! 🙂
I’ve signed up!
What delightful pouches!
Very good tutorial and very nice presented
Thanks for sharing
Thanks for the great tutorial. I pinned it when I first saw it and now I have made two and blogged…
http://withthreadinhand.blogspot.com/2012/01/it-might-be-working.html
A link back to you…
extra!!
zapraszam do siebie, nowy post http://elisabeth-secret.blogspot.com/
Thanks for this tutorial, is very nice!!
Hugs, Carola.
Looks great girls but not big enough for all the things I take to work 🙂
I love this style of pencil case with the zip opening up the middle like that! Thanks heaps for the excellent tutorial 🙂
One more wonderful work dear Lisa!!!!
Thanks for sharing this!!!!
Love, Bela
Looks great and such a clear tutorial
This is a very useful case!
~Judy
Its a big WOWWW Dear L & S …
What a cute and nice gift for kids and how perfectly you stitched and such an easy tutorial very nice… really love it …I am going to pin it…
From
http://craftaworld.blogspot.com/
Hope you would like to visit me
With love
Farah
Now if only I have not been snafooed by zippers my entire life :}
This is so cute! I know DD would love one.
Oh WOW – I like these! And once again you make them look so easy to do!!!!!
Might have to just go to Spotlight today to buy some zippers to make a couple of these!
Thanks for sharing this – and the step by step instructions too.
I am 12 years old and have a passion for sewing. I have been looking for a pencil case for a long time and now I have found the perfect one! It’s great in school and my friends are now asking me for ones as birthday presents! The tutorial was great thank you!
Simply adorable! And I feel confident enough to try after seeing it all 🙂
Thanks so much!
this tutorial is very helpful&useful for me, love it..hugs rita 🙂
from Indonesia http://www.thumb2felt.com
The only thing I’ve ever sewed was a pillow. Do you think I could manage this one as well as a beginner?
Have a nice day!
http://paperdollsquared.blogspot.com/
Ciao, ho visto le tue bellissime creazioni e mi sono aggiunta ai tuoi followers ^_^
Se vuoi passare dal mio blog è nuovo nuovo… http://iltempodiely.blogspot.it
Complimeti!!!
Thank you for this great tutorial! I loved making mine…
http://wp.me/pK2DW-BS
Thanks for the fun tutorial; and I love the fabrics you used, too! 🙂 God Bless!
very beutiful pencil case
very beutiful and nice pencil case!!!!!!!
Thanks for this tutorial. I’ve made four pencil cases!
found your tutorial on Pinterest. Genius! I have to know though – WHERE did you get those polka dot PENS! OMG, I *NEED* some of those! Not ‘want’, but NEED! hehe 🙂
So darling! This seems a little short for pencils. Would it work if I added a couple inches to the length?
These are so cute !!!! Love them I just need to make 3 of them in boy teen colors !!!! Thanks for the tut!!!!!!!
What a fabulous little pencil case! So zakka! Will bookmark it and come back soon to sew some for a charity project. Thank you!
This is so adorable! i may have to make a couple for my niece who’s finally in school.
http://goinggreenwiththegrizls.com
i got to say, i have seen many instructions on how to make pencil cases. However, this one looks much more appealing as well as easy!
THANKS AnD KEEP UP THE GOOD WORK
wowowowow.
very hard to see home made pencilcases look a million dollars
KEEP THE GOOD WORK UP!
Sure I will be makeing this for my 4years old. she goes to school now and likes her own pencil and eraser.
Nice gift to make aswell
I really adore this tutorial, but my problem is that I cannot get your steps from 3-5, I do not understand what you do and how you came to pickture 5.. 🙁 Please help me
Thanks for the beautiful tutorial. Stunning.
amazing they look wonderful i think i might give it go. my two daughters would adore them.
super niice!i will give it a try!!!<3
Lovely!!!
Beautiful!!
a really nice pattern!
I linked to your tutorial on my blog – thanks for sharing!
♥, doro von Hand zu Hand
Hi Lisa and Sarah, I have used your tutorial and made heaps of these cute pencil cases. Thank you so much for sharing! I have linked to your tutorial on my blog with pictures!
Thanks for the tutorial. I made a few: http://effiemaakt.blogspot.nl/2013/06/pennenzakjes.html
It is so beautiful!!!! I would like to make it!! Thanks for your nice tutorial!!!! 🙂
I made some here http://ajsantics.blogspot.com.au/2013/11/blogtoberfest13-31-pencil-cases.html linked back to you
Thanks Sue! They are fun to put together 🙂
Such a great project! My 9 year old and I just finished our first one (sans stripes) and she was over the moon with it!! Thanks for such a great tutorial!!
This may be a stupid question: It looks like washi tape in the picture with the pencil pouch, but there is no mention of it in the directions. Did I miss something or is it just for the photos? Thanks and plan to make a couple of boy versions for my two grandsons!
Hi Lisa – the washi tape was just used as a styling prop for the photos. I have a growing collection and it is one of my favourite stationery products. I keep some in my pencil case but it was not used in its construction at all.
thanks. This is the best tutorial I’ve seen. I love how you show how to line the pouch with out having an ugly raw edge on the inside (using one piece rather than 2), with clean hidden zipper edges, and no hand sewing. It is not that complicated, but somehow I could not figure this out on my own… (Obviously I’m not the only one, because many of the other people making tutorials have not figured this out either) Looking forward to making a bunch of these…. maybe taking it one step further, making some a boxy shape. Wonderful blog. What a blessing to have as mother and daughter!
Thanks Steph! It works well as a box style pouch as well. Thanks so much for stopping by 🙂
I just must be dense, but I don’t get the instructions very well. When you do the zipper the first go round, I get the sandwich between parts, but is the lining fabric felt up or fabric up? And then when you are sewing the 2nd zipper piece, the lining fabric is being sewn to the zipper, but on which side (the same side as the outside fabric?) I’m really confused! Tried it both ways, and still can’t get it to turn out correctly.
Hi Jamie – Sorry I am not exactly sure what you mean. When you sew the lining, it will be on the bottom side of the zipper (which is the opposite side of the zipper that the front of the pouch is sewn too). The photos in the tutorial show the assembly method. Good luck!
Hello.
When i made this item i had an issue with my needle jamming on the zipper with i sewed the ends. Can guidance how i can prevent this?
Hi Liz – you just have to make sure you avoid sewing on the metal parts of the zipper as that will break your needle or cause your machine to jam. You just have to position the zipper so that this doesn’t occur. Alternatively use a slightly longer zipper and shorten it so that there are no metal components at the base of the zipper. (If you google “how to shorten a zipper” there are lots of excellent tutorials with photos to guide you through). Hope this helps.
Such a beautiful pencil case and easy tutorial .. thank u so much .. 😀
Thanks for stopping by Rose! Best wishes for a wonderful Christmas.
Qué lindas las telas y qué lindo trabajo, gracias por el tutorial.
🙂 Monica
Love the pencil case but had trouble with the instructions when it said to put the ribbon on the one area & sew along each side, when it should have said sew each end area. I know I am probably the only person out there who didn’t understand what was meant but clearer directions would be great. It’s a darling project though.!
Thanks for your feedback Shelley. I try and be clear in my free tutorials with lots of photos to highlight each step. I am sorry you had trouble following the instructions.
No matter how I sew my little pouches, the little tabs at the end of the zippers always come out bulky and not so nice. Not sure why. I’ve tried pushing them toward the outer fabric, then towards the inner fabric. Either way, it looks pinched. I even trimmed the bulk of the zippers a little but that didn’t help either. Any ideas? Thanks!
very nice i like this i wiil make this surely
Nice pencil case. Can this be topstitched along the zipper?
Certainly Barbra! Topstitching can always be added if desired.
Precioso .
Felicitzciones desde España.