A Spoonful of Sugar

Make. Bake. Create.

Menu
  • Home
  • About
    • About Us
    • Press
    • FAQ
    • Disclosure Policy
    • Contact Us
  • Crafts
    • Crochet
    • DIY
    • Embroidery/Cross stitch
    • Gift Wrapping
    • Knitting
    • Miscellaneous
    • Paper Crafts
  • Holidays
    • New Year’s
    • Australia Day
    • Back to School
    • Valentines Day
    • Easter
    • ANZAC Day
    • Mother’s Day
    • Father’s Day
    • Halloween
    • Christmas
  • Recipes
    • Appetizers
    • Bars & Slices
    • Bread & Pastries
    • Cakes
    • Cookies
    • Confectionery
    • Cupcakes & Muffins
    • Desserts
    • Drinks
    • Ice Cream
    • Jams/Preserves
    • Main Meals
  • Sewing
    • Sewing Tutorials
    • Quilting
    • Sewing & Quilting Patterns
  • Family
    • Back to School
    • Family Fun
    • Our Home
    • Parenting
    • Travel
  • Shop
    • Pattern Store
    • Etsy Store

Halloween Cupcakes

October 12, 2013 By A Spoonful of Sugar - 4 Comments

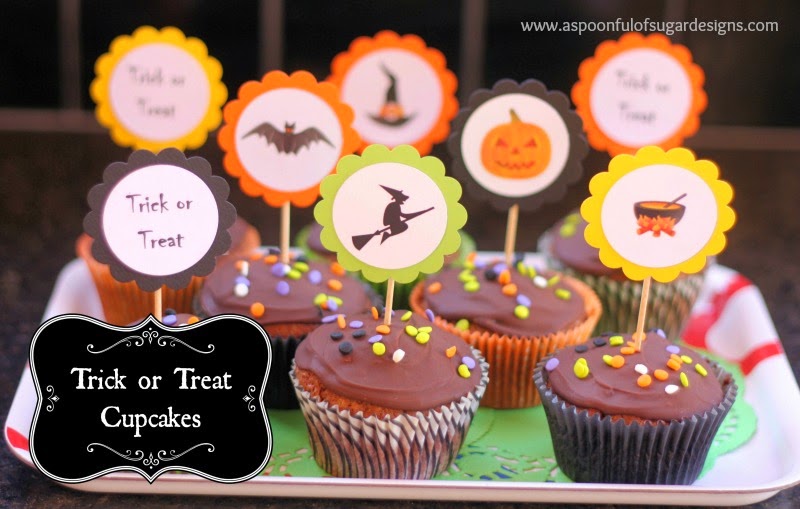
If you are hosting a Halloween party, these Trick or Treat Chocolate Fudge Cupcakes are really popular. Simply bake up a batch of your favourite cupcake recipe (we have included ours below), and decorate with chocolate ganache, sprinkles, and Halloween Cupcake Flags. Baking with kids is such a fun activity and they will enjoy making some cupcake toppers to decorate their cupcakes while the cakes are baking.

To make the cupcake flags, punch out a scalloped circle from coloured card. Print some Halloween images on white card or use some Halloween stickers. Use a smaller circle punch to punch out the images, and then glue them into the larger scalloped circle. Tape a toothpick to the back and pop them in your cupcakes.
Chocolate Fudge Cupcakes

50g unsalted butter, softened

1 large eggs, lightly beaten

125g caster sugar

50g dark chocolate, melted

140g plain flour

1/2 tsp bicarbonate of soda

1 tbsp cocoa powder

125ml milk

(Makes 12 Cupcakes)

Preheat the oven to 180°c and place cupcake liners into your cupcake tray.

Combine butter, egg, sugar and melted chocolate in a large bowl.

Sift flour, bicarbonate of soda and cocoa into the mix.

Pour milk into the mixture and beat for 1-2 minutes.

Spoon the batter into the trays and bake for 18-20 minutes.

Chocolate Ganache

50g unsalted butter

125g dark chocolate, coarsely chopped

Put the butter and the chopped chocolates into a bowl and heat it in the microwave in intervals of 15-20 seconds and stir each time. Do this until chocolate has melted and butter is combined.

Spread a spoonful of  ganache on top of the cupcakes and add some Halloween sprinkles. When the ganache has set, add a cupcake topper.

Filed Under: Cupcakes & Muffins, Halloween Tagged With: Chocolate

« {Book Reviews} Christmas Craft Titles
Folded Star Mat »

Comments

  1. Chantal Vandenberg says

    October 13, 2013 at 12:01 am

    These are brilliant!!!! Love how these turned out!!!

    Reply
  2. Heather says

    October 13, 2013 at 1:38 am

    I love those cupcake cases, just great for halloween. Cakes look very yummy.

    Reply
  3. em's scrapbag says

    October 13, 2013 at 11:50 am

    I’m sharing this fun idea with my DD. She loves to make cupcakes and Halloween is her favorite holiday.

    Reply
  4. Laura Maffe says

    October 24, 2013 at 12:43 pm

    Soooooo cute, I love them! You’re brilliant!
    A big hug from Italy 😉

    Reply

Leave a Reply Cancel reply

Your email address will not be published. Required fields are marked *

  • Email
  • Facebook
  • Instagram
  • Pinterest
  • Threads
  • TikTok
SUBSCRIBE TO NEWSLETTER
×

Categories

Archives

PURCHASE PDF PATTERNS

We offer over 100 affordable PDF sewing patterns available for download from our store website or Etsy store. Each pattern includes detailed instructions, numerous photos, and templates.

WEB STORE ETSY STORE

Instagram

If you love foundation paper piecing, you’re going If you love foundation paper piecing, you’re going to enjoy this one — a bundle of four woven‑style FPP quilt blocks, each with its own beautiful twist. These blocks look intricate, but the FPP method makes them wonderfully achievable, even if you’re still building your skills.They’re perfect for using up scraps, experimenting with colour, or creating striking mini quilts, cushions, bags, or table decor. Each block has that satisfying “woven” illusion that always gets a second look.Whether you prefer bold brights, soft pastels, or a monochromatic palette, these designs shine in every colourway. And the best part? You get all four blocks together in one bundle.If you’d like the pattern set, comment WOVEN and I’ll send the link straight to you. Woven bundle is available in our Pattern Store.#SewingInspiration #FPP #FoundationPaperPiecing #QuiltBlocks #WovenQuiltBlock
If you love quick, practical sewing projects, the  If you love quick, practical sewing projects, the Baker’s Buddy Mitt is such a fun one to make. It’s scrap‑friendly, gift‑ready, and perfect for anyone who loves to bake.The Bakers Buddy Mitt is 25% off this week only. Comment BAKER and I’ll send you the link to the pattern.  #SewingProject #ScrapFriendlySewing #KitchenSewing #SewingGifts #SewingCommunity
Adding a handmade label is one of my favourite way Adding a handmade label is one of my favourite ways to personalise a project — and these little fabric + felt labels are so quick and satisfying to make.For this Ribbon Pouch, I used the Liberty Gifts from the Garden collection, which has the sweetest fruit motifs. They make perfect tiny labels for pouches, bags, and gifts.Here’s how to make your own:Press a piece of double‑sided fusible web to the back of your fabric.Cut around your chosen motif.Peel off the paper backing.Press the motif onto wool felt.Trim the felt with scalloped scissors.Sew the label onto the front of your pouch.Such a simple detail, but it adds so much charm. Fabric kindly gifted by @regent_street_fabrics — thank you!If you’d like to sew the Ribbon Pouch (3 sizes), comment RIBBON and I’ll send the pattern link straight to you.#SewingInspiration #FabricLabels #DIYLabels #LibertyFabric #LibertyGiftsFromTheGarden
A lot can change in 10 years ❤️ It’s been fun look A lot can change in 10 years ❤️ It’s been fun looking back at where I was in 2016 and how far life has come since then. Swipe for a little trip down memory lane.Back in 2016, my priorities were firmly centred around family. I was working full‑time, sewing in the guest room, sharing tutorials on my blog, and slowly dipping my toes into selling a handful of patterns on Etsy. It was a busy, full season — and creativity was something I fitted in around everything else.  Fast forward to 2026… I’m now retired and living the creative life I once dreamed of. My kids have grown up and are living in their own homes nearby. My husband and I are free to travel, explore, and enjoy this stage of life. And I get to spend my days designing, sewing, and connecting with this beautiful community.Life looks different now — in the best possible way.Were you following me back then, or what has changed for you over the past 10 years? I’d love to hear your story too.Tagging the lovely makers of my quilt: @arabesquescissors @ministryoffabric @belloquacity @alittlepatchwork @sameliasmum coleandtaffy @quiltymamaof4 @shequiltsalot @downgrapevinelane @lizzierosesews @lovethatfabric @sew_mimi.k #2026isthenew2016 #10yeartransformation #sewingjourney #sewingcommunity #aspoonfulofsugardesigns
Fall in love with sewing all over again ❤️I’ve Fall in love with sewing all over again ❤️I’ve rounded up 10 heart‑themed makes — from quick gifts to charming quilt blocks — perfect for weekend stitching or using up your favourite scraps. Whether you’re sewing for Valentine’s Day, birthdays, or just because, there’s something sweet for every maker.Comment HEART and I’ll send you a link to my Heart Pattern Collection.#sewingproject #heartsewing #quiltblock #scrapsewing #easytosew
Raw edge appliqué doesn’t have to feel fiddly or i Raw edge appliqué doesn’t have to feel fiddly or intimidating. With a few simple techniques, you can create neat, crisp shapes — even tiny details like penguin beaks and hearts.I’ve put together My Top 5 Secrets for Raw Edge Appliqué to help you feel confident, whether you’re brand new to appliqué or looking to refine your finish. Save this for your next sewing session.If you’d love a quick, beginner‑friendly project to practise these tips, my Penguin Love Mugrug is the sweetest Valentine’s make — scrap‑friendly, gift‑ready, and such fun to sew.Comment PENGUIN and I’ll send you the link to the pattern. Available now in our Pattern Store and Etsy shop.  #rawedgeapplique #appliquetips #sewingtipsandtricks #mugrugpattern #penguinlove
Follow on Instagram

Featured Pattern

Travel Sewing Kit Pattern

Featured Tutorial

Retro Drawstring Bag

Featured Recipe

Lemon Pound Cake

Connect

  • Email
  • Facebook
  • Instagram
  • Pinterest
  • Threads
  • TikTok
SUBSCRIBE TO NEWSLETTER
×

Popular Posts

  • Charm Square Fabric Tray
  • Merry Little Christmas Sewing Projects
  • {Back to School} Tissue Cover
  • Hexagon Fabric Tray
  • Raw Edge Applique Tips
  • Sewing Gifts 101: Easy and Affordable Ideas for Your Crafty Friends
  • Finding More Time to Sew

Copyright © 2026 Lisa. K. Cox - A Spoonful of Sugar