A Spoonful of Sugar

Make. Bake. Create.

Menu
  • Home
  • About
    • About Us
    • Press
    • FAQ
    • Disclosure Policy
    • Contact Us
  • Crafts
    • Crochet
    • DIY
    • Embroidery/Cross stitch
    • Gift Wrapping
    • Knitting
    • Miscellaneous
    • Paper Crafts
  • Holidays
    • New Year’s
    • Australia Day
    • Back to School
    • Valentines Day
    • Easter
    • ANZAC Day
    • Mother’s Day
    • Father’s Day
    • Halloween
    • Christmas
  • Recipes
    • Appetizers
    • Bars & Slices
    • Bread & Pastries
    • Cakes
    • Cookies
    • Confectionery
    • Cupcakes & Muffins
    • Desserts
    • Drinks
    • Ice Cream
    • Jams/Preserves
    • Main Meals
  • Sewing
    • Sewing Tutorials
    • Quilting
    • Sewing & Quilting Patterns
  • Family
    • Back to School
    • Family Fun
    • Our Home
    • Parenting
    • Travel
  • Shop
    • Pattern Store
    • Etsy Store

Guest Towel with Crochet Trim

October 29, 2013 By A Spoonful of Sugar - 15 Comments

If you are like us, you are probably starting to think about gifts you can make for Christmas. Giving something handmade is really in keeping with the true spirit of Christmas.

A Guest Towel that is trimmed with some pretty fabric and a crocheted edging is the perfect gift for Grandma, a teacher, or a special friend. You can team it with some hand cream or body products. Or you can simply make a pretty guest towel to add some Christmas cheer to your powder room, when you are entertaining over the holidays.

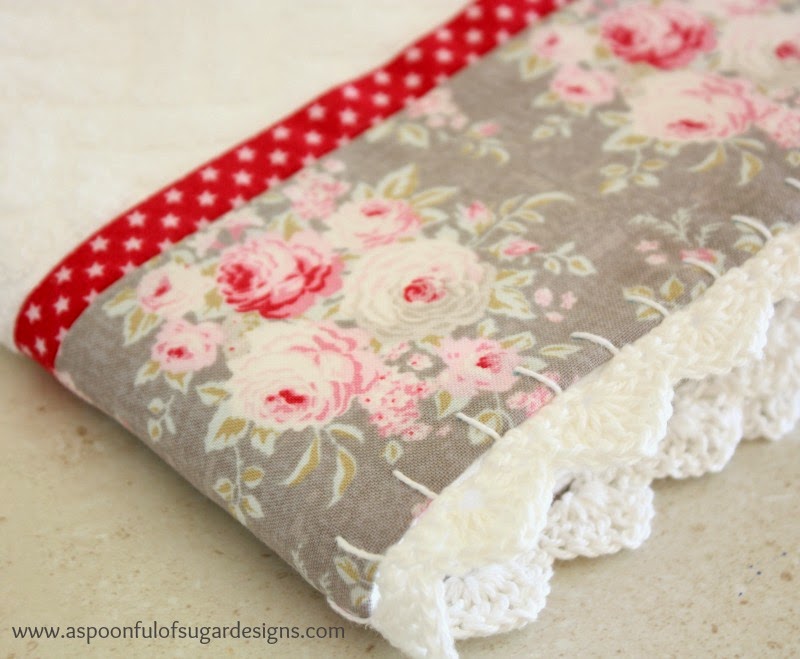
We trimmed out Guest Towel with some pretty Tilda fabric, from the Sweet Christmas range.  What we love about this Christmas fabric is that it has a vintage appeal, and could be used throughout the year.

If you would like to make your own, you will need:

  • white guest towel
  • 2 fat quarters of quilting cotton (Tilda Sweet Christmas)
  • white crochet cotton – 3 ply
  • size 2.50 mm crochet hook

Cut fabric:

Floral Print – 3 3/4 inches x (width of hand towel plus 1 inch)
Star Print – 1 1/2 inches x (width of hand towel plus 1 inch)
Fold the star print in half lengthwise with the wrong sides facing, and press. Pin this strip to the top edge of the floral print, and stitch in place using a 1/4 inch seam.
Press under 1/4 inch along the bottom edge of the floral print, and press under 1/2 inch on both sides of the floral print.
Pin the fabric strip to the bottom of the guest towel so that the bottom edges and sides are aligned. Machine stitch along the top of the fabric strip, where the star and floral print join. Hand stitch the sides and bottom of the floral print to the towel.
Cut a length of crochet cotton that is approx 3 times the width of the hand towel. Blanket stitch along the bottom of the hand towel so that the stitches are 1/2 inch apart and 1/4 inch deep. This will form the foundation for the crochet trim.
Crochet Edging:
Row 1: Crochet 3 sc into each blanket stitch.
Row 2: Single crochet in first stitch, skip next 2 stitches, * 3 double crochet, 1 chain, 3 double crochet all in the next stitch (shell stitch made), skip next 2 stitches, single crochet in next stitch, skip next 2 stitches **, repeat from * to ** as many times as needed.
Check out other ways for decorating a towel:
Christmas Towel
Golf Towel
BBQ Mitt and Towel

Filed Under: Crochet, Sewing, Sewing Tutorials Tagged With: gifts

« Folded Star Ornament
German Apple Cake »

Comments

  1. Katherine says

    October 29, 2013 at 8:15 pm

    Sew pretty! What a wonderful idea for gift giving or as a way to pamper guests. Thank you for sharing the beauty you create and inspiring us, Lisa and Sarah.

    Reply
  2. Bernie says

    October 29, 2013 at 9:39 pm

    Thank you for the tutorial! Do you prewash the towel, in case of shrinkage?

    Bernie

    Reply
  3. Ольга Т. says

    October 29, 2013 at 9:47 pm

    Прекрасное украшение и сложное! Изысканно.

    Reply
  4. Kate says

    October 30, 2013 at 5:06 am

    Beautiful guest towel – thanks so much for your how-to.

    Reply
  5. Amy Morinaka says

    October 30, 2013 at 8:53 am

    Oh so lovely!! I love combining sewing + crocheting and this will be just perfect to work on for the holidays! Thanks so much for sharing! You continue to impress and inspire us with fabulous projects and ideas that keep us coming back to your blog with excitement! Never a dull moment from you, Lisa and Sarah! With lots of love from California, Amy 😉

    Reply
  6. Megan says

    October 30, 2013 at 11:30 am

    pretty! 🙂

    Reply
  7. Alejandra says

    October 30, 2013 at 11:57 am

    beautiful!!! 🙂

    Reply
  8. Rubyred says

    October 31, 2013 at 3:08 am

    So pretty! It would make a gorgeous gift!

    Reply
  9. lindag1947 says

    November 12, 2013 at 6:36 pm

    Love this. How big was your towel? Was it a big hand towel? Linda gerig

    Reply
  10. Joan says

    November 18, 2013 at 7:30 am

    Beautiful guest towel! Thanks for sharing.

    Reply
  11. Gram D says

    November 18, 2013 at 10:59 am

    I’ve done a similar idea but do a pocket trim on the bottom so both sides of the towel are the same.
    Gram D

    Reply
  12. Cindy says

    November 18, 2013 at 12:09 pm

    Love it! Wish you had a download button though!

    Reply
  13. Dianna says

    January 6, 2020 at 3:49 am

    I love this and am always looking for gift ideas.

    Reply
  14. Caroline says

    December 30, 2021 at 12:44 am

    I realize this is an old post but has anyone tried the crochet trim? Is sc in each blanket stitch correct? I’m having difficulty with it. Thanks in advance

    Reply

Leave a Reply Cancel reply

Your email address will not be published. Required fields are marked *

  • Email
  • Facebook
  • Instagram
  • Pinterest
  • Threads
  • TikTok
SUBSCRIBE TO NEWSLETTER
×

Categories

Archives

PURCHASE PDF PATTERNS

We offer over 100 affordable PDF sewing patterns available for download from our store website or Etsy store. Each pattern includes detailed instructions, numerous photos, and templates.

WEB STORE ETSY STORE

Instagram

A lot can change in 10 years ❤️ It’s been fun look A lot can change in 10 years ❤️ It’s been fun looking back at where I was in 2016 and how far life has come since then. Swipe for a little trip down memory lane.Back in 2016, my priorities were firmly centred around family. I was working full‑time, sewing in the guest room, sharing tutorials on my blog, and slowly dipping my toes into selling a handful of patterns on Etsy. It was a busy, full season — and creativity was something I fitted in around everything else.  Fast forward to 2026… I’m now retired and living the creative life I once dreamed of. My kids have grown up and are living in their own homes nearby. My husband and I are free to travel, explore, and enjoy this stage of life. And I get to spend my days designing, sewing, and connecting with this beautiful community.Life looks different now — in the best possible way.Were you following me back then, or what has changed for you over the past 10 years? I’d love to hear your story too.Tagging the lovely makers of my quilt: @arabesquescissors @ministryoffabric @belloquacity @alittlepatchwork @sameliasmum coleandtaffy @quiltymamaof4 @shequiltsalot @downgrapevinelane @lizzierosesews @lovethatfabric @sew_mimi.k #2026isthenew2016 #10yeartransformation #sewingjourney #sewingcommunity #aspoonfulofsugardesigns
Fall in love with sewing all over again ❤️I’ve Fall in love with sewing all over again ❤️I’ve rounded up 10 heart‑themed makes — from quick gifts to charming quilt blocks — perfect for weekend stitching or using up your favourite scraps. Whether you’re sewing for Valentine’s Day, birthdays, or just because, there’s something sweet for every maker.Comment HEART and I’ll send you a link to my Heart Pattern Collection.#sewingproject #heartsewing #quiltblock #scrapsewing #easytosew
Raw edge appliqué doesn’t have to feel fiddly or i Raw edge appliqué doesn’t have to feel fiddly or intimidating. With a few simple techniques, you can create neat, crisp shapes — even tiny details like penguin beaks and hearts.I’ve put together My Top 5 Secrets for Raw Edge Appliqué to help you feel confident, whether you’re brand new to appliqué or looking to refine your finish. Save this for your next sewing session.If you’d love a quick, beginner‑friendly project to practise these tips, my Penguin Love Mugrug is the sweetest Valentine’s make — scrap‑friendly, gift‑ready, and such fun to sew.Comment PENGUIN and I’ll send you the link to the pattern. Available now in our Pattern Store and Etsy shop.  #rawedgeapplique #appliquetips #sewingtipsandtricks #mugrugpattern #penguinlove
If you’ve ever wanted to add eyelets or grommets t If you’ve ever wanted to add eyelets or grommets to your sewing projects, here’s a quick look at how I install them using my DK93 snap press. It’s the same tool I use for snaps — and it makes installing eyelets beautifully quick and consistent.For this Ribbon Pouch, I used the Liberty Gifts from the Garden collection (printed on Lasenby cotton and released in January 2026). The colours and motifs pair so well with the little ribbon tie detail.Here’s how to install the eyelets:Punch out the four holes using a hole‑cutting die.Place the eyelet into the hole.Press it into place using the snap press.That’s it — easy peasy, and it gives the pouch such an elevated, professional finish. I love how clean and sturdy the result is.Fabric is Gifts from the Garden by Liberty - kindly provided by @regent_street_fabrics — thank you!If you’d like the Ribbon Pouch pattern (it comes in 3 sizes), comment RIBBON and I’ll send the link straight to you.Ribbon Pouch Sewing Pattern: available in our Pattern Store and Etsy shop ( links in profile).#SewingInspiration #SewingProjects #Eyelets #Grommets #SnapPress
The Twirling Treasures Hot Pad & Placemat Set show The Twirling Treasures Hot Pad & Placemat Set showcases one of my favourite FPP designs — a stunning kaleidoscope‑style block that always turns out beautifully. Kaleidoscope blocks are some of my most popular FPP patterns, and this set is such a fun way to use them.  This set includes six sizes, making it incredibly versatile: use them as hot pads, trivets, placemats, or simply as a way to add a pop of colour to your kitchen.For these samples, I went with a monochromatic scrap‑busting approach, pairing fabrics from the same colour family with a low‑volume background. The black‑and‑white striped binding adds such a crisp, modern finish. It’s a wonderful project for building your FPP confidence — and a fantastic way to use up those treasured scraps.The Twirling Treasures Hot Pad set is our Pattern of the Week. It is currently 25% off this week in our Pattern Store and Etsy Shop.If you’d like to sew your own set, comment TWIRL and I’ll send the pattern link straight to you.Happy sewing! Lisa 🌸#FoundationPaperPiecing #Quilting #HotPads #ScrapBuster #KitchenSewing
The Ribbon Pouch is one of those little makes that The Ribbon Pouch is one of those little makes that feels special from the very first stitch. I made this sweet trio in the Liberty Gifts from the Garden collection, and the colours couldn’t be more perfect for gifting, organising, or adding a little beauty to your everyday.Each pouch features: 🌼 A simple ribbon tie closure 🎀 Optional sew‑in tags or DIY felt/fabric labels 🧵 Three practical sizes — perfect for notions, treats, or small gifts ✨ A quick, beginner‑friendly sewIf you’d like to make your own, comment RIBBON and I’ll send the pattern link straight to your inbox. Save this for your next weekend project — it’s such a satisfying little sew. Pattern is available in our Pattern Store.Thanks to @regent_street_fabric for the Gifts from the Garden fabric collection. (released Jan 2026)#SewingInspiration #SewingProjects #LibertyFabric #SewingPatterns #BeginnerSewing
Follow on Instagram

Featured Pattern

Travel Sewing Kit Pattern

Featured Tutorial

Retro Drawstring Bag

Featured Recipe

Lemon Pound Cake

Connect

  • Email
  • Facebook
  • Instagram
  • Pinterest
  • Threads
  • TikTok
SUBSCRIBE TO NEWSLETTER
×

Popular Posts

  • Charm Square Fabric Tray
  • Merry Little Christmas Sewing Projects
  • {Back to School} Tissue Cover
  • Raw Edge Applique Tips
  • Sewing Gifts 101: Easy and Affordable Ideas for Your Crafty Friends
  • Fabric Gift Pouch
  • Free Holiday Sewing Tutorials

Copyright © 2026 Lisa. K. Cox - A Spoonful of Sugar