A Spoonful of Sugar

Make. Bake. Create.

Menu
  • Home
  • About
    • About Us
    • Press
    • FAQ
    • Disclosure Policy
    • Contact Us
  • Crafts
    • Crochet
    • DIY
    • Embroidery/Cross stitch
    • Gift Wrapping
    • Knitting
    • Miscellaneous
    • Paper Crafts
  • Holidays
    • New Year’s
    • Australia Day
    • Back to School
    • Valentines Day
    • Easter
    • ANZAC Day
    • Mother’s Day
    • Father’s Day
    • Halloween
    • Christmas
  • Recipes
    • Appetizers
    • Bars & Slices
    • Bread & Pastries
    • Cakes
    • Cookies
    • Confectionery
    • Cupcakes & Muffins
    • Desserts
    • Drinks
    • Ice Cream
    • Jams/Preserves
    • Main Meals
  • Sewing
    • Sewing Tutorials
    • Quilting
    • Sewing & Quilting Patterns
  • Family
    • Back to School
    • Family Fun
    • Our Home
    • Parenting
    • Travel
  • Shop
    • Pattern Store
    • Etsy Store

Folded Star Ornament

October 26, 2013 By A Spoonful of Sugar - 13 Comments

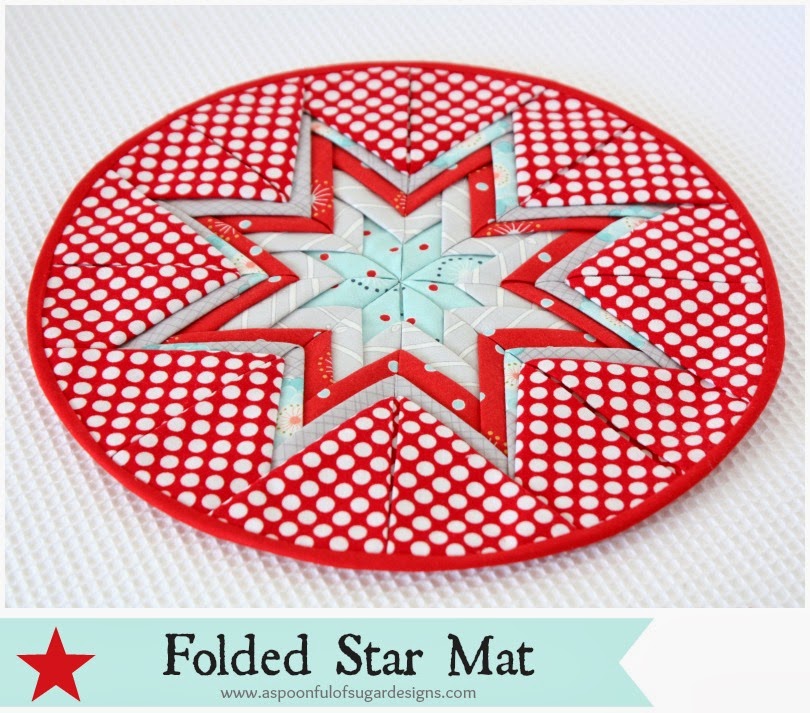
After making our Folded Star Mat, we wanted to use the same fabric technique to make a Christmas Folded Star Ornament. These are fun Christmas ornaments to make and there are lots of colourful examples of Folded Star Ornaments on pinterest. All it takes is folding and pressing the fabric pieces, and then pinning them into place on a polystyrene ball. There is no sewing involved.

Materials:

  • polystyrene ball (7 inch circumference, approx 3 inch in height)
  • fat 1/8th of three fabrics – dark, medium, and light.
  • sequin pins
  • ribbon
  • fabric glue pen

Method for Folded Star Ornament:

Prepare the fabric by cutting:
  • Medium fabric (blue) – cut 10 squares measuring 2 1/2 inches
  • Light Fabric (grey) – cut 16 square measuring 2 1/2 inches
  • Dark Fabric (red) – cut 16 squares measuring 2 1/2 inches
Refer to our tutorial on the Folded Star Mat to see how to press the fabric pieces prior to pinning them in place. Press all the fabric squares into triangles.
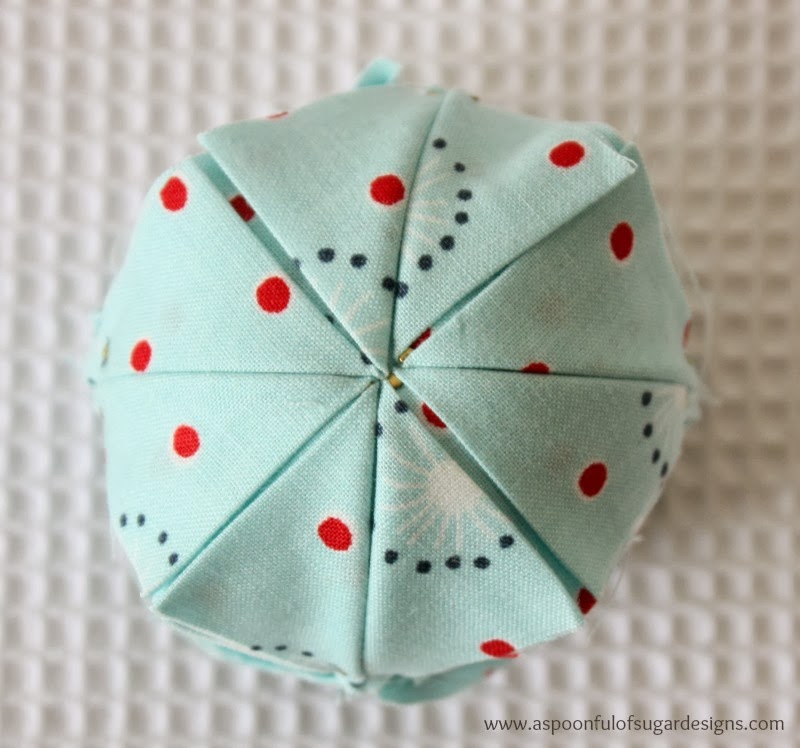
Open up a piece of medium fabric (blue) and pin in place on the ball. Position four of the triangle of the same colour in place on top of the square to form the inner star. Turn the ball over and repeat for the other side of the ball.
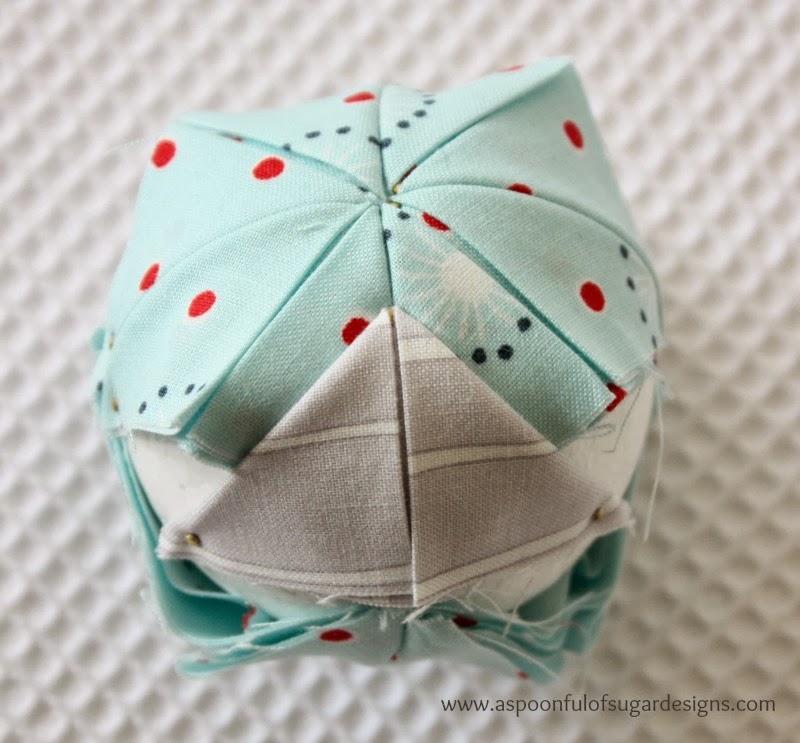
Pin the grey fabric triangles in place, positioning them approx 1/2 inch from the centre point of the blue star. Repeat for both sides of the ball.
Pin the red triangles in place for the final round.
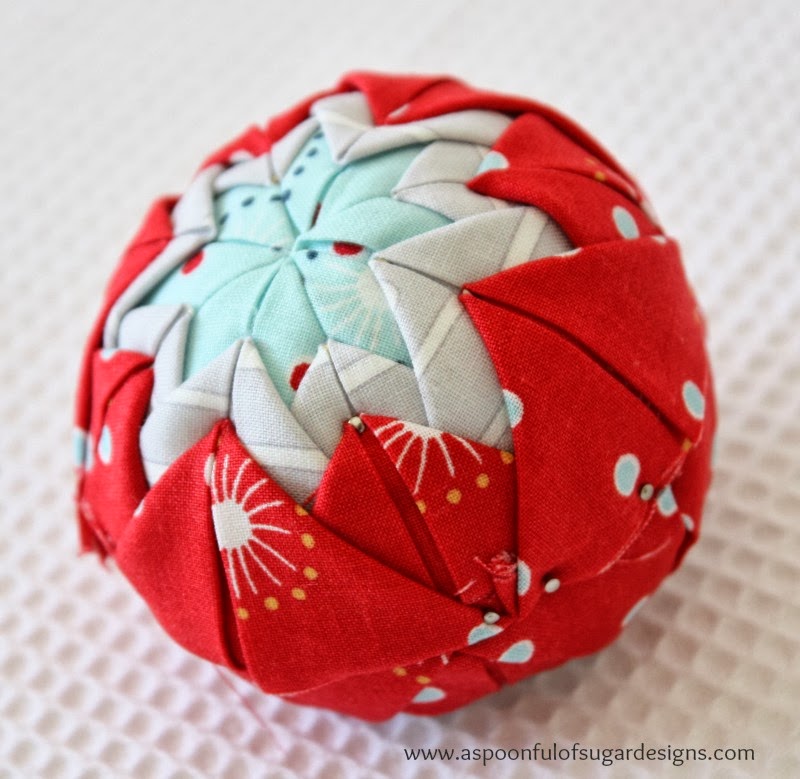
Use fabric glue to glue some ribbon around the centre of the ornament, covering up the raw edges of the fabric. Allow to dry. Pin a small piece of ribbon to the top of the ornament to create a hanging loop.
The Folded Star Ornament is a fun technique and would be a suitable project for older children to make for Christmas. Experiment with different fabric colour combinations to make some original decorations for your Christmas tree. You don’t need to use Christmas fabric, any patterned fabric in Christmas colours will work well, so it is a great stash buster project to use up little fabric scraps.
If you like this folded star patchwork technique, check out our Folded Star Mat Tutorial.

Filed Under: Christmas, Sewing Tutorials Tagged With: patchwork

« {Book Reviews} Crochet Titles
Guest Towel with Crochet Trim »

Comments

  1. Junebug613 says

    October 26, 2013 at 6:38 pm

    This is fantastic!! Thank you for sharing this wonderful tutorial!

    Reply
  2. Nastenka Nastasja says

    October 26, 2013 at 7:19 pm

    Amazing tutorial! Thank you for this magic Christmas idea! 🙂

    Reply
  3. Sandie @ crazy'boutquilts says

    October 26, 2013 at 8:41 pm

    LOL I was thinking about these when I saw the mat too. Just adorable!

    Reply
  4. Allie and Me design says

    October 26, 2013 at 11:25 pm

    Oh, how beautiful!
    each tree will be proud of it …
    many dear greetings
    Gesine

    Reply
  5. Barbara says

    October 27, 2013 at 12:01 am

    Beautiful, what a great idea!

    Reply
  6. Alejandra says

    October 30, 2013 at 11:55 am

    It is so beautiful! Thank you very much!!!!

    Reply
  7. Junebug613 says

    November 17, 2013 at 8:18 pm

    I made one of these yesterday, but the 3inch ball is too large. I had at least a half inch gap between the two halves. I am going to see if I can find smaller balls, or I may try cutting the fabric squares larger. I should have checked the math first. A ball with a 7inch circumference is closer to 2.25 inches tall.

    Reply
  8. Junebug613 says

    November 18, 2013 at 11:16 pm

    I tried this on a 2 1/2 inch ball and it was just right. The three inch ball was too large, unless you use a wide ribbon to go around, or cut larger squares(there was a 1/2 inch space between).

    Reply
  9. Supernan Sue says

    November 22, 2013 at 12:00 pm

    Thank you Lisa & Sarah for this fabulous tutorial for the star mat, I know what I shall be having a go at this weekend, I have plenty of festive material, and now I have a use for it. Thanks for the inspiration
    Sue

    Reply
  10. Linda Reinhardt says

    December 10, 2013 at 7:22 pm

    Thank you for sharing these beautiful gifts. I have made several as christmas gifts,Ty, Linda

    Reply

Leave a Reply Cancel reply

Your email address will not be published. Required fields are marked *

  • Email
  • Facebook
  • Instagram
  • Pinterest
  • Threads
  • TikTok
SUBSCRIBE TO NEWSLETTER
×

Categories

Archives

PURCHASE PDF PATTERNS

We offer over 100 affordable PDF sewing patterns available for download from our store website or Etsy store. Each pattern includes detailed instructions, numerous photos, and templates.

WEB STORE ETSY STORE

Instagram

Turning Songbird fabric into something sweet. This Turning Songbird fabric into something sweet. This Mini Drawstring Treat Pouch is beginner‑friendly, quick to sew, and the perfect little gift for someone who loves handmade touches. It’s a lovely way to use your favourite leftovers — and such a satisfying make from start to finish.Comment TREAT for a link to the pattern in our pattern store. Fabric: Songbird by Tilda. Thank you to @tilda_australia for the fabric support.#tildasongbird #scrapfriendlysewing #quicksewingproject #handmadegiftidea #aspoonfulofsugardesigns
The Handy Drawstring Pouch has been having a big m The Handy Drawstring Pouch has been having a big moment this week — and it’s no surprise why. Makers love a project that’s beginner‑friendly, scrap‑friendly, quick to sew, and gift‑ready… and this little pouch ticks every box.From sewing rooms to travel bags to handmade gifts, it’s one of our most popular patterns ever, and I’ve loved seeing all the beautiful versions you’ve been stitching.Swipe through to see why makers keep coming back to this sweet, clever design — and why it’s the perfect weekend make if you’re looking for something fun and satisfying.The pattern is available in my Pattern Store and Etsy shop. Comment HANDY and I’ll send the link straight to you.The cover fabric is the newly released Tilda Songbird.#handydrawstringpouch #easypouchpattern
#scrapfriendlysewing #beginnersewingproject #quicksewingmake @tilda_australia
A sweet little make for Valentine’s Day ❤️ This Lo A sweet little make for Valentine’s Day ❤️ This Love Tag is stitched from felt, fabric and ribbon scraps — quick, beginner‑friendly, and such a lovely way to personalise a gift.This version features the beautiful Liberty Gifts from the Garden florals, and I’ll show you the simple steps from cutting to finishing.If you’d like the free pattern, comment TAG and I’ll send it straight to you.#sewingproject #scrapbusting #valentinesewing #libertyfabric #sewingtutorial @regent_street_fabrics
A colourful little project that’s as practical as A colourful little project that’s as practical as it is pretty. The Dresden Needlebook is beginner friendly, scrap friendly, and wonderfully quick to sew — the perfect little gift‑ready make. It keeps your needles, pins, scissors, and notions organised with a felt page, two pockets, and a secure snap closure. Ideal for sewing on the go or adding a sweet handmade touch to a friend’s sewing kit.Pattern of the Week — 25% off. Comment NEEDLEBOOK for a link to the pattern. #sewingonthego #scrapfriendlysewing #quicksewingproject #handmadegiftsideas  #dresdenneedlebook
The sweetest little duo ✨ Two tiny pouches that ar The sweetest little duo ✨ Two tiny pouches that are beginner‑friendly, quick to sew, and perfect for using up your favourite fabric scraps. They make the loveliest handmade gifts, and now you can sew both with the Handy Drawstring Pouch + Mini Treat Pouch bundle.You also save 25% when you buy the bundle - a little thank you for buying our most popular pouch patterns.Tell me… which one would you sew first?Patterns linked in bio. Comment BAGDUO for the bundle link.Fabric Credit: Tilda Songbird collection. Thanks to @tilda_australia#tildasongbird #ilovetilda #beginnersewingpatterns #sewingcommunity #makersgonnamake
Turning pretty fabric scraps into something sweet Turning pretty fabric scraps into something sweet — this Handy Drawstring Pouch is such a joy to sew. It’s beginner‑friendly, quick to make, and the perfect little gift for anyone who loves handmade touches. Comment HANDY for the pattern link. Made in the beautiful Tilda Songbird collection. Pattern available in our Pattern store.Shown with our free pattern for the Threaded Tokens.Thanks to @Tilda_Australia for the fabric gift. #tildasongbird #tildafabric #sewingpattern #beginnersew #stashfriendly
Follow on Instagram

Featured Pattern

Travel Sewing Kit Pattern

Featured Tutorial

Retro Drawstring Bag

Featured Recipe

Lemon Pound Cake

Connect

  • Email
  • Facebook
  • Instagram
  • Pinterest
  • Threads
  • TikTok
SUBSCRIBE TO NEWSLETTER
×

Popular Posts

  • Charm Square Fabric Tray
  • Merry Little Christmas Sewing Projects
  • Hexagon Fabric Tray
  • Sew-In Tags: Your Complete Guide
  • Retro Drawstring Bag
  • Valentines Matchbook Needle Holder
  • Love Notes

Copyright © 2026 Lisa. K. Cox - A Spoonful of Sugar