A Spoonful of Sugar

Make. Bake. Create.

Menu
  • Home
  • About
    • About Us
    • Press
    • FAQ
    • Disclosure Policy
    • Contact Us
  • Crafts
    • Crochet
    • DIY
    • Embroidery/Cross stitch
    • Gift Wrapping
    • Knitting
    • Miscellaneous
    • Paper Crafts
  • Holidays
    • New Year’s
    • Australia Day
    • Back to School
    • Valentines Day
    • Easter
    • ANZAC Day
    • Mother’s Day
    • Father’s Day
    • Halloween
    • Christmas
  • Recipes
    • Appetizers
    • Bars & Slices
    • Bread & Pastries
    • Cakes
    • Cookies
    • Confectionery
    • Cupcakes & Muffins
    • Desserts
    • Drinks
    • Ice Cream
    • Jams/Preserves
    • Main Meals
  • Sewing
    • Sewing Tutorials
    • Quilting
    • Sewing & Quilting Patterns
  • Family
    • Back to School
    • Family Fun
    • Our Home
    • Parenting
    • Travel
  • Shop
    • Pattern Store
    • Etsy Store

Gathered Round Basket – 3 Sizes

March 19, 2013 By Spoonful of Sugar - 41 Comments

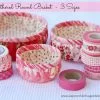
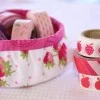
One of our most popular sewing tutorials, is our Gathered Round Basket. The little fabric basket is a fun scrap buster project. The baskets can be used for all sorts of  things – for holding supplies in the craft room; storing items in a bathroom or bedroom;  holding stationery supplies; and for packaging gifts.

We have had a number of requests to make the Gathered Round Basket in different sizes. Here it is in three sizes – they nest inside each other when not in use.

For each basket you need three circles, consisting of:

  • outer fabric
  • fusible wadding, such as parlan or pellon
  • lining fabric
plus a rectangular strip for binding, that is 2 1/4 inches in width. See below for the cutting instructions.


Small Basket – cut the circles with a 6 inch diameter; binding strip 2 1/4 inches x 12 inches.
Medium Basket – cut the circles with an 8 inch diameter; binding strip 2 1/4 inches x 14 inches.
Large Basket – cut the circles with a 10 inch diameter; binding strip 2 1/4 inches x 18 inches.

To construct the baskets, follow the instructions in our original tutorial .
 
When gathering up the basket, the small basket should have a circumference of 10 inches (i.e. all around the outside of the basket); the medium basket a circumference of 12 inches; and the large basket a circumference of 16 inches.


The little baskets are fun to make and are so useful. With Easter around the corner, they would look great filled with chocolate eggs.

For complete instructions, follow our Gathered Round Basket Tutorial.


Hello! Are you new here?    If so, be sure to sign up for our newsletter here and receive a bonus sewing pattern and welcome discount. Our newsletter includes free tutorials, articles, and new patterns. Welcome to the world of sewing enthusiasts.

Filed Under: Sewing, Sewing Tutorials Tagged With: fat quarter, scrap buster

« Craft Tree
Tea Card »

Comments

  1. Rosa says

    March 19, 2013 at 7:34 am

    It`s very cute!

    Reply
  2. CityGirl says

    March 19, 2013 at 7:35 am

    Wow!! I clicked on your blog and was blown away with these baskets. I am impressed 🙂

    Reply
  3. Nanette Merrill says

    March 19, 2013 at 7:49 am

    I could not love them more. I think this will be a good project for me to do with my sisters. Love your projects.

    Reply
  4. Learning to Sew Mama says

    March 19, 2013 at 8:00 am

    I love this project! thanks for sharing.

    Reply
  5. Lori Holt says

    March 19, 2013 at 8:10 am

    I love these! I think they are a perfect project for gifts and I can use my Circle Rulers to make them!

    Reply
  6. Erica at Sew So Crafty says

    March 19, 2013 at 11:35 am

    These are gorgeous … want to make them … just need another 24hrs in a day to get through all the things /i want to make though 🙁

    Reply
  7. Jo's Corner says

    March 19, 2013 at 1:03 pm

    Lovely in every way! I love the color combos. Can you share where you bought the pretty washi tapes?

    Reply
  8. Lucineide Cantinho do Fuxico says

    March 19, 2013 at 10:04 pm

    Oi! Essas cestinhas são muito úteis. Obrigada pelo tutorial. Dá uma olhada no meu blog, fiz elas mimiatura para lembranças de nascimento. Ficou uma graça! A página è essa: http://luluzinhaatelie.blogspot.com.br/2012/10/lembrancinhas-para-valentina_27.html?m=1. Me fala depois o que achou.
    Beijos,
    Lu

    Reply
  9. Samelias Mum says

    March 19, 2013 at 10:06 pm

    Love these little baskets. Super cute and useful.

    Reply
  10. Tatkis says

    March 21, 2013 at 5:07 am

    Wonderful baskets! Thank you so much for the tutorial!

    Hugs,
    Tatyana

    Reply
  11. Mandy Ferry says

    March 21, 2013 at 5:46 pm

    now they are cute.

    Reply
  12. Kim Walus says

    March 22, 2013 at 8:56 am

    I love these sweet little baskets and there are so many uses for them! Thanks for sharing your amazing talents with us.

    Reply
  13. KaHolly says

    March 23, 2013 at 6:15 pm

    These lovely baskets look so simple, yet are so adorable. Might just have to clear the work table and make one in the morning!! Thanks for sharing this again, esp. with the additional sizes.

    Reply
  14. LynCC says

    March 24, 2013 at 7:23 am

    Thank you so much! These will be great for some gifts.

    Reply
  15. Simone de Klerk says

    March 24, 2013 at 8:03 am

    Love them, Lisa. Thank you for sharing (:

    Reply
  16. KaHolly says

    March 27, 2013 at 1:54 pm

    Very sweet and easy. I made the 6 inch circle basket. Wasn’t the easiest thing I’ve ever tried to manipulate under the needle, but with a little patience, I was greatly rewarded!! Plan to make the other two sizes in coordinating fabrics to give as a gift. Thanks so much for sharing!!

    Reply
  17. Sandy Aird says

    March 28, 2013 at 1:15 am

    I’ve just finished making one of these gorgeous baskets for an Easter gift. I added a little handle and filled it with eggs and its perfect! We’ll be making some more for sure! Thank you for the tutorial.

    Reply
  18. charlotte says

    April 14, 2013 at 5:53 pm

    Found you through Why Not Sew? blog. She made your sweet little basket/bowl. I loved it so much I made all 3 sizes this afternoon. I am sure I will make more. Lovely project and very easy to do. Thank you so much!

    Reply
  19. debbie says

    April 21, 2013 at 8:23 pm

    I have made many of the “fabric boxes” that another blogger posted years ago. I like your idea to do them in a round shape as well. Thanks! xx debbie

    Reply
  20. Bellezebabe says

    June 15, 2013 at 10:33 pm

    Sooo cute!! Love these!! & I LOVE the washi tape you featured. Would you be so kind as to please advise where you got them? My email is bellezebabe at gmail dot com. I look forward to your reply. Thanks so much & keep up the great work!! 🙂

    Reply
  21. Vera de Jorge says

    August 12, 2013 at 3:50 pm

    Cute !!and very easy thank you

    Reply
  22. Stitchgirl says

    September 17, 2013 at 1:17 pm

    Thank you for your easy to follow tutorials. You have some great ideas. Thanks for passing them on!

    Reply
  23. G. Sur says

    September 20, 2013 at 2:02 pm

    How deep is the biggest basket?

    Reply
  24. Maria says

    November 28, 2013 at 8:52 pm

    Love these! Thank you so much for the tutorial. Made one this morning and I’m really thrilled with it.

    Reply
  25. Vicky P says

    February 1, 2014 at 10:47 pm

    Just found you blog and would love to do these. When I push on the link it says it is not found. Is it still available? Great idea.

    Reply
    • A Spoonful of Sugar says

      February 1, 2014 at 11:35 pm

      Hi Vicky

      You can find the tutorial here:
      http://aspoonfulofsugardesigns.com/2013/03/gathered-round-basket-3-sizes/

      and here:
      http://aspoonfulofsugardesigns.com/2011/03/tutorial-gathered-round-basket/

      Our domain changed yesterday which might have caused the error. Let me know if you still can’t access it.

      thanks

      Lisa

      Reply
  26. MaryNell says

    March 14, 2014 at 10:58 pm

    I love your baskets and want to link it to my blog spot. They are simple adorable! Thank you so much. MaryNell http://sewingandquiltingintheozarks.blogspot.com/

    Reply
    • A Spoonful of Sugar says

      March 16, 2014 at 5:10 pm

      Thanks Mary! We would be thrilled if you link to us.

      Reply
  27. mary says

    April 21, 2014 at 11:52 pm

    je trouve c est corbeilles magnifique et surtout l association on peut faire des modèle différend a chaque saison c es très beau merci douce soirée amicalement

    Reply
    • A Spoonful of Sugar says

      April 23, 2014 at 6:13 pm

      Vous êtes les bienvenus Mary. merci…

      Reply
  28. Elke says

    March 21, 2015 at 3:04 am

    Thank you so much for this tutorial. I like it and try the small size this year for easter.

    Reply
  29. Brenda Ranos says

    August 14, 2015 at 7:56 am

    These are so adorable!! I just made the medium size for myself!! Love it!! Thank you! I’m so happy to have found your blog and your Etsy shop!! I too have an Etsy Shop. A Quilt is Born. ❤️S for your shop! One of my favs!! Now I have a super cute basket to hold all my sewing goodies!! Thank you thank you from Los Angeles, Ca!

    Reply
    • A Spoonful of Sugar says

      August 14, 2015 at 8:10 am

      Thanks Brenda for stopping by ! Have a great weekend and happy sewing!

      Reply
  30. Cleone Booterbaugh says

    February 3, 2016 at 9:01 am

    I would like to send this pattern to a friend, she loves to make new things.
    Where can I order a pattern to send to her?

    Thank you.

    This pattern is the Best!

    Reply
    • A Spoonful of Sugar says

      February 3, 2016 at 8:00 pm

      Hi Cleone – This pattern is a free tutorial – the step by step instructions are hwew:
      http://aspoonfulofsugardesigns.com/2011/03/tutorial-gathered-round-basket/
      This post gives the dimensions to make the three different sizes.

      Happy sewing, Lisa

      Reply
  31. Diana says

    March 26, 2019 at 10:25 am

    I’m moving into our new home soon and these cute baskets will fit right in with my kitchen decor! I’m using white, yellow and blue and thought that if I made them a little bigger, they would be perfect to hold fresh fruit on the counter like bananas, apples, etc….So many uses…thanks for the post! Diana

    Reply
  32. Georgette Straw says

    March 26, 2019 at 8:33 pm

    I wish that I could download this pattern. I am out of ink right now and I have to wait until next month to get it. If I could download this pattern, then I could print it next month.

    Reply
  33. Debbie says

    March 26, 2023 at 7:21 pm

    Can you please give a link / name to a specific product that works for the fusible wadding? I’m unsure what to use.

    Reply
    • A Spoonful of Sugar says

      March 31, 2023 at 6:21 am

      Debbie – it is also known as fusible fleece such as Pellon or Parlan.

      Reply

Leave a Reply Cancel reply

Your email address will not be published. Required fields are marked *

  • Email
  • Facebook
  • Instagram
  • Pinterest
  • Threads
  • TikTok
SUBSCRIBE TO NEWSLETTER
×

Categories

Archives

PURCHASE PDF PATTERNS

We offer over 100 affordable PDF sewing patterns available for download from our store website or Etsy store. Each pattern includes detailed instructions, numerous photos, and templates.

WEB STORE ETSY STORE

Instagram

A lot can change in 10 years ❤️ It’s been fun look A lot can change in 10 years ❤️ It’s been fun looking back at where I was in 2016 and how far life has come since then. Swipe for a little trip down memory lane.Back in 2016, my priorities were firmly centred around family. I was working full‑time, sewing in the guest room, sharing tutorials on my blog, and slowly dipping my toes into selling a handful of patterns on Etsy. It was a busy, full season — and creativity was something I fitted in around everything else.  Fast forward to 2026… I’m now retired and living the creative life I once dreamed of. My kids have grown up and are living in their own homes nearby. My husband and I are free to travel, explore, and enjoy this stage of life. And I get to spend my days designing, sewing, and connecting with this beautiful community.Life looks different now — in the best possible way.Were you following me back then, or what has changed for you over the past 10 years? I’d love to hear your story too.Tagging the lovely makers of my quilt: @arabesquescissors @ministryoffabric @belloquacity @alittlepatchwork @sameliasmum coleandtaffy @quiltymamaof4 @shequiltsalot @downgrapevinelane @lizzierosesews @lovethatfabric @sew_mimi.k #2026isthenew2016 #10yeartransformation #sewingjourney #sewingcommunity #aspoonfulofsugardesigns
Fall in love with sewing all over again ❤️I’ve Fall in love with sewing all over again ❤️I’ve rounded up 10 heart‑themed makes — from quick gifts to charming quilt blocks — perfect for weekend stitching or using up your favourite scraps. Whether you’re sewing for Valentine’s Day, birthdays, or just because, there’s something sweet for every maker.Comment HEART and I’ll send you a link to my Heart Pattern Collection.#sewingproject #heartsewing #quiltblock #scrapsewing #easytosew
Raw edge appliqué doesn’t have to feel fiddly or i Raw edge appliqué doesn’t have to feel fiddly or intimidating. With a few simple techniques, you can create neat, crisp shapes — even tiny details like penguin beaks and hearts.I’ve put together My Top 5 Secrets for Raw Edge Appliqué to help you feel confident, whether you’re brand new to appliqué or looking to refine your finish. Save this for your next sewing session.If you’d love a quick, beginner‑friendly project to practise these tips, my Penguin Love Mugrug is the sweetest Valentine’s make — scrap‑friendly, gift‑ready, and such fun to sew.Comment PENGUIN and I’ll send you the link to the pattern. Available now in our Pattern Store and Etsy shop.  #rawedgeapplique #appliquetips #sewingtipsandtricks #mugrugpattern #penguinlove
If you’ve ever wanted to add eyelets or grommets t If you’ve ever wanted to add eyelets or grommets to your sewing projects, here’s a quick look at how I install them using my DK93 snap press. It’s the same tool I use for snaps — and it makes installing eyelets beautifully quick and consistent.For this Ribbon Pouch, I used the Liberty Gifts from the Garden collection (printed on Lasenby cotton and released in January 2026). The colours and motifs pair so well with the little ribbon tie detail.Here’s how to install the eyelets:Punch out the four holes using a hole‑cutting die.Place the eyelet into the hole.Press it into place using the snap press.That’s it — easy peasy, and it gives the pouch such an elevated, professional finish. I love how clean and sturdy the result is.Fabric is Gifts from the Garden by Liberty - kindly provided by @regent_street_fabrics — thank you!If you’d like the Ribbon Pouch pattern (it comes in 3 sizes), comment RIBBON and I’ll send the link straight to you.Ribbon Pouch Sewing Pattern: available in our Pattern Store and Etsy shop ( links in profile).#SewingInspiration #SewingProjects #Eyelets #Grommets #SnapPress
The Twirling Treasures Hot Pad & Placemat Set show The Twirling Treasures Hot Pad & Placemat Set showcases one of my favourite FPP designs — a stunning kaleidoscope‑style block that always turns out beautifully. Kaleidoscope blocks are some of my most popular FPP patterns, and this set is such a fun way to use them.  This set includes six sizes, making it incredibly versatile: use them as hot pads, trivets, placemats, or simply as a way to add a pop of colour to your kitchen.For these samples, I went with a monochromatic scrap‑busting approach, pairing fabrics from the same colour family with a low‑volume background. The black‑and‑white striped binding adds such a crisp, modern finish. It’s a wonderful project for building your FPP confidence — and a fantastic way to use up those treasured scraps.The Twirling Treasures Hot Pad set is our Pattern of the Week. It is currently 25% off this week in our Pattern Store and Etsy Shop.If you’d like to sew your own set, comment TWIRL and I’ll send the pattern link straight to you.Happy sewing! Lisa 🌸#FoundationPaperPiecing #Quilting #HotPads #ScrapBuster #KitchenSewing
The Ribbon Pouch is one of those little makes that The Ribbon Pouch is one of those little makes that feels special from the very first stitch. I made this sweet trio in the Liberty Gifts from the Garden collection, and the colours couldn’t be more perfect for gifting, organising, or adding a little beauty to your everyday.Each pouch features: 🌼 A simple ribbon tie closure 🎀 Optional sew‑in tags or DIY felt/fabric labels 🧵 Three practical sizes — perfect for notions, treats, or small gifts ✨ A quick, beginner‑friendly sewIf you’d like to make your own, comment RIBBON and I’ll send the pattern link straight to your inbox. Save this for your next weekend project — it’s such a satisfying little sew. Pattern is available in our Pattern Store.Thanks to @regent_street_fabric for the Gifts from the Garden fabric collection. (released Jan 2026)#SewingInspiration #SewingProjects #LibertyFabric #SewingPatterns #BeginnerSewing
Follow on Instagram

Featured Pattern

Travel Sewing Kit Pattern

Featured Tutorial

Retro Drawstring Bag

Featured Recipe

Lemon Pound Cake

Connect

  • Email
  • Facebook
  • Instagram
  • Pinterest
  • Threads
  • TikTok
SUBSCRIBE TO NEWSLETTER
×

Popular Posts

  • Charm Square Fabric Tray
  • Merry Little Christmas Sewing Projects
  • {Back to School} Tissue Cover
  • Raw Edge Applique Tips
  • Sewing Gifts 101: Easy and Affordable Ideas for Your Crafty Friends
  • Fabric Gift Pouch
  • Free Holiday Sewing Tutorials

Copyright © 2026 Lisa. K. Cox - A Spoonful of Sugar