A Spoonful of Sugar

Make. Bake. Create.

Menu
  • Home
  • About
    • About Us
    • Press
    • FAQ
    • Disclosure Policy
    • Contact Us
  • Crafts
    • Crochet
    • DIY
    • Embroidery/Cross stitch
    • Gift Wrapping
    • Knitting
    • Miscellaneous
    • Paper Crafts
  • Holidays
    • New Year’s
    • Australia Day
    • Back to School
    • Valentines Day
    • Easter
    • ANZAC Day
    • Mother’s Day
    • Father’s Day
    • Halloween
    • Christmas
  • Recipes
    • Appetizers
    • Bars & Slices
    • Bread & Pastries
    • Cakes
    • Cookies
    • Confectionery
    • Cupcakes & Muffins
    • Desserts
    • Drinks
    • Ice Cream
    • Jams/Preserves
    • Main Meals
  • Sewing
    • Sewing Tutorials
    • Quilting
    • Sewing & Quilting Patterns
  • Family
    • Back to School
    • Family Fun
    • Our Home
    • Parenting
    • Travel
  • Shop
    • Pattern Store
    • Etsy Store

Christmas Place Cards

December 12, 2012 By A Spoonful of Sugar - 12 Comments

As Christmas is getting closer, we are starting to work on some of the little details to make our day extra special. Creating a lovely Christmas Table is one of the things we love most about Christmas. Setting the table with our wedding China, silver cutlery, and nice glassware makes it special. We also love to make Christmas Place Cards to add to the elegance of the occasion.

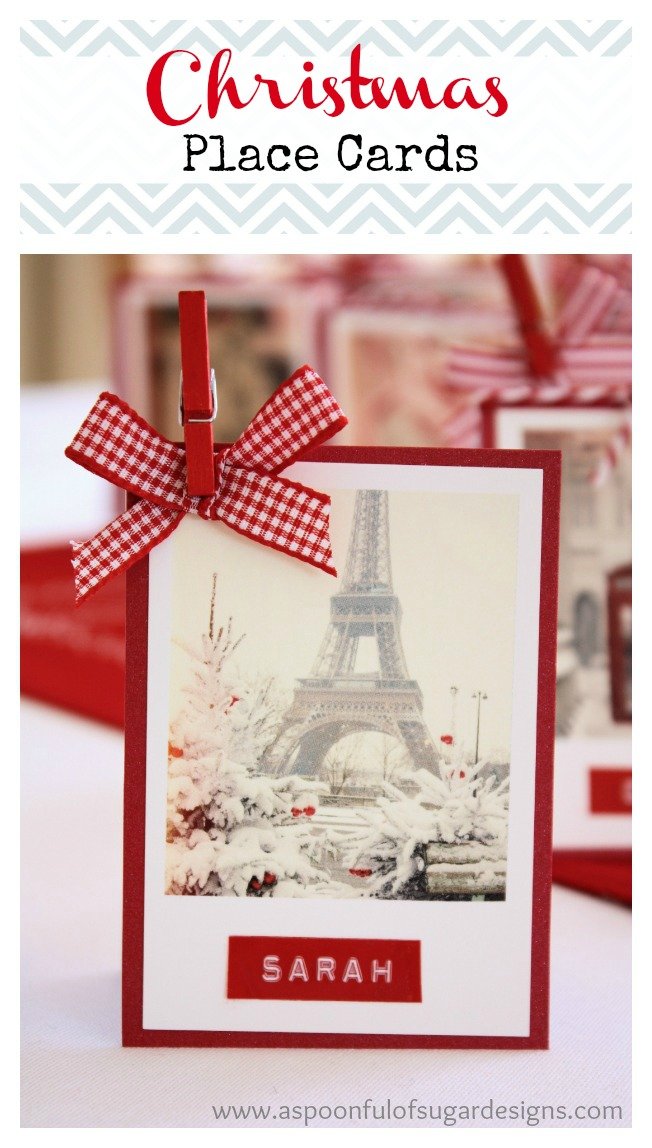
When we spotted the French Mini Polaroid Gift Tags at Typo a few weeks ago, we knew they would be perfect for our Christmas Place Cards. If you are after some mini Polaroids to get a similar effect, check out Pic Monkey (free online photo editing) which has a Polaroid frame you can add to photos.
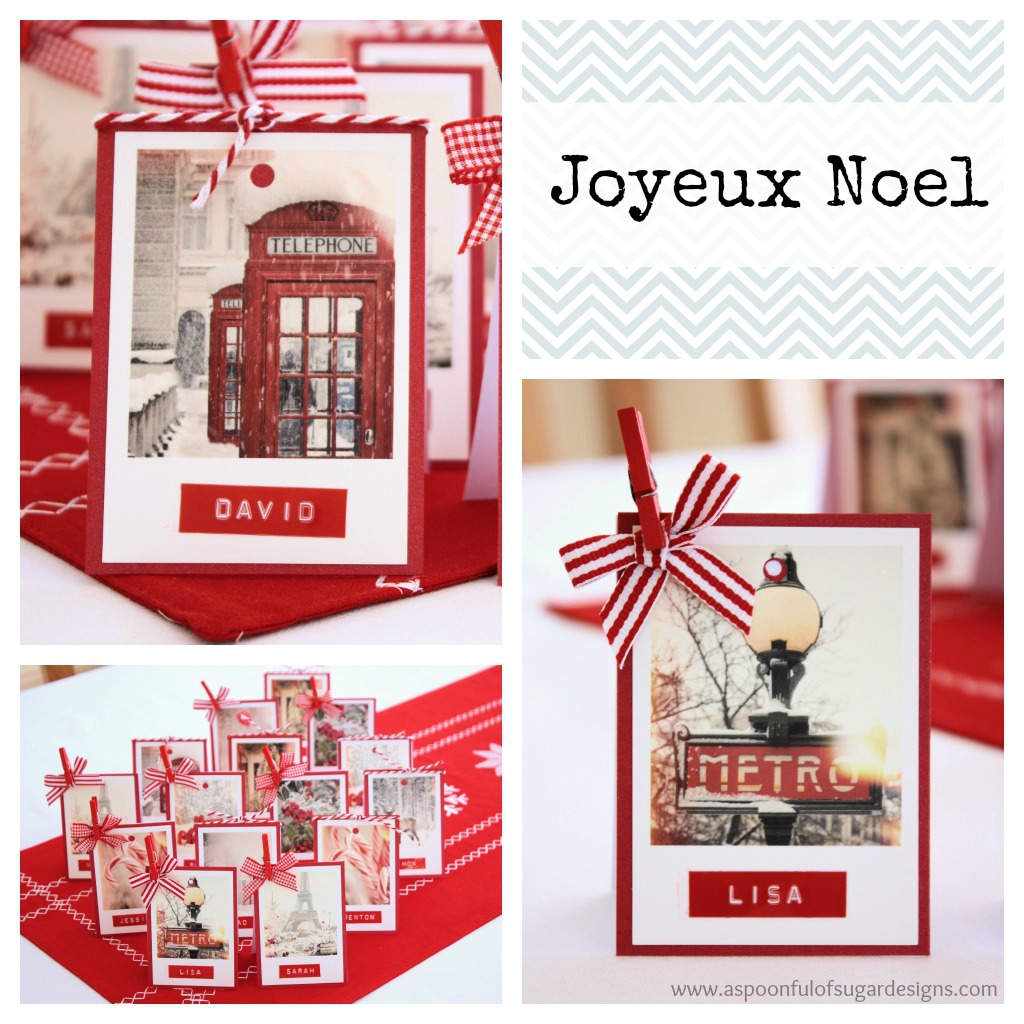
To make the Place Cards, we punched out all the guests’ names on a Dymo Embossing Label Maker. We adhered the label to the Polaroid, then mounted the Polaroid on some red card stock. This was then mounted on some white card stock that was folded in half. For the boys place cards we added some red bakers twine, and for the girls we added a small bow that was held in place with a little red peg (clothespin).

We love how they turned out and they fit our French Christmas theme perfectly!

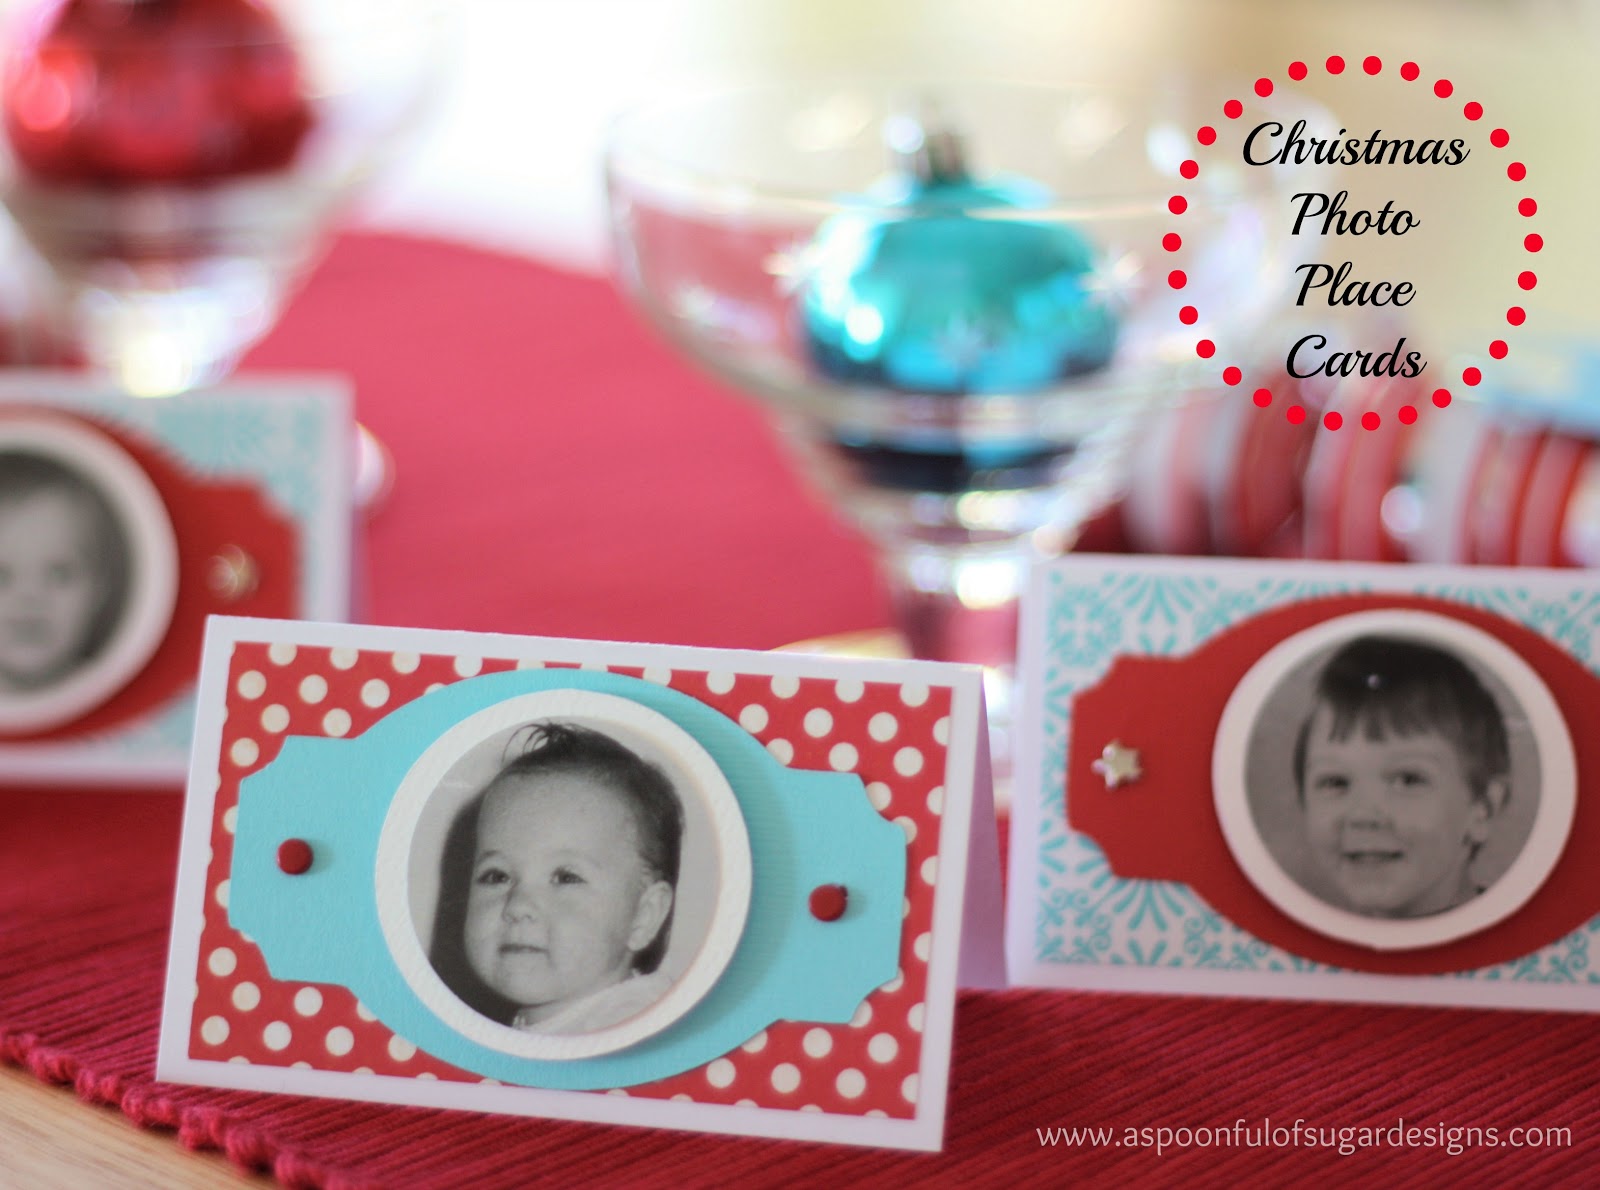
If you are after other ideas for Christmas Place Cards, check out our baby Photo Christmas Place Cards from 2011.
For your daily sugar fix you can subscribe or you can follow us on facebook, twitter, and google plus
Filed Under: Christmas, Paper Crafts Tagged With: table setting

« {Book Reviews} 4 New Crafty Titles
Sarah’s Kitchen »

Comments

  1. thesnailgarden says

    December 12, 2012 at 5:35 am

    Such a great idea! Best wishes, Pj x

    Reply
  2. haggiz says

    December 12, 2012 at 5:58 am

    Beautiful, you make me want to go back to Paris x

    Reply
  3. Mary Beth|cupcakes and crinoline says

    December 12, 2012 at 7:47 am

    These are absolutely stunning….love the theme and the color combinations….perfect!

    Reply
  4. ~ko says

    December 12, 2012 at 8:43 am

    Everything is so bright and cheery! I love it!

    Reply
  5. VintageBettys says

    December 12, 2012 at 8:57 am

    Very cool! Love the theme 🙂

    Reply
  6. Suzie says

    December 12, 2012 at 9:22 am

    Everything is so pretty, red and white are my faves for Christmas too, no wonder I love your French Christmas Place cards.

    Reply
  7. Ruby Jean says

    December 12, 2012 at 9:33 am

    Oh my goodness!!! So very LOVELY 🙂 I do believe I see one with my name on it 🙂 Your table is sure to be Stunning.
    Angelina

    Reply
  8. Wedding Invitations says

    December 12, 2012 at 10:25 pm

    These are fabulous. Love the Eiffel Tower, the phone booth and all the other photographs. It’s just so chic! Love love love it! The pegs and the bows are just too cute too!

    Reply
  9. Samelias Mum says

    December 13, 2012 at 3:28 am

    I love this idea. I’m definitely planning a themed Christmas next year. Thanks for the inspiration.

    Reply
  10. anenglishmum says

    December 14, 2012 at 4:55 pm

    They are absolutely gorgeous, but… (whispers in a very small voice) red phone boxes are very, very typically English, not French! However (shouts loudly) I do love them anyway! 🙂

    Reply

Leave a Reply Cancel reply

Your email address will not be published. Required fields are marked *

  • Email
  • Facebook
  • Instagram
  • Pinterest
  • Threads
  • TikTok
SUBSCRIBE TO NEWSLETTER
×

Categories

Archives

PURCHASE PDF PATTERNS

We offer over 100 affordable PDF sewing patterns available for download from our store website or Etsy store. Each pattern includes detailed instructions, numerous photos, and templates.

WEB STORE ETSY STORE

Instagram

Meet the sweetest little project you can sew in mi Meet the sweetest little project you can sew in minutes — the Pyramid Weight. Use it as a pattern weight, scented sachet, or even a book weight… all from one triangle of fabric. Comment PYRAMID for the free pattern.Fabric is Something Blue by Tilda, releasing 1 June 2026 — with thanks to @tilda_australia.#tildasomethingblue #tildafabric #freepattern #sewingtutorial #sewinglove
The Scrappy Strips Pouch is one of my favourite wa The Scrappy Strips Pouch is one of my favourite ways to use up leftover fabric strings. Today’s version is made from patchwork strips — a fun, relaxing sew that turns scraps into something beautiful and practical.The Scrappy Strips Pouch pattern has two versions - patchwork strings and selvedges - and two sizes. Comment SELVEDGE (or SELVAGE) for a link to the pattern.Pattern Details: Scrappy Strips Pouch Sewing Pattern is in our Pattern Store and Etsy Shop.#ScrappyStripsPouch #ScrapBustingSewing #PatchworkPouch #StringQuilting #SewingProjects
If you’ve ever wanted to add eyelets or grommets t If you’ve ever wanted to add eyelets or grommets to your sewing projects, here’s a quick look at how I install them using my DK93 snap press. It’s the same tool I use for snaps — and it makes installing eyelets beautifully quick and consistent.Here’s how I install the eyelets:Punch out the four holes using a hole‑cutting die.Place the eyelet into the hole.Press it into place using the snap press.That’s it — simple, sturdy, and it gives the Ribbon Pouch such an elevated, professional finish. I love how clean and secure the result is.Fabric shown: Tilda Something Blue, releasing June 1 — thank you @tilda_australia for the beautiful fabric.✨ If you’d like the Ribbon Pouch pattern (3 sizes), comment RIBBON and I’ll send the link straight to you.Ribbon Pouch Sewing Pattern: available in my Pattern Store and Etsy Shop (links in profile).#tildasomethingblue #tildafabric #sewingtips #handmadeeveryday #sewingtools
The Ribbon Pouch is one of my favourite quick‑to‑s The Ribbon Pouch is one of my favourite quick‑to‑sew gift bags, and I couldn’t resist making a light and dark version using the new Tilda Something Blue collection. Both pouches use the same print in different colourways — such a pretty way to show how fabric choice changes the whole mood.They’re finished with satin ribbon threaded through grommets, and topped with a tiny star tag. The boxed base helps them stand beautifully, and the ribbon closure makes them perfect for birthdays, thank‑you gifts, treats, or little treasures.This is a beginner‑friendly, scrap‑friendly, quick project you’ll want to sew again and again. Pattern includes 3 sizes.If you’d like the pattern, comment RIBBON and I’ll send the link straight to you.Pattern Details: Ribbon Pouch (3 Sizes) available in my Pattern Store and Etsy Shop.Fabric Details: Tilda Something Blue - releasing on 1 June 2026. Thanks to @tilda_australia#TildaSomethingBlue #TildaFabric #SewingPattern #BeginnerSewingProject #QuickSewingProject   
Sewing with scraps is one of my favourite ways to Sewing with scraps is one of my favourite ways to get creative — small pieces, leftover corners, charm‑square offcuts… they all have so much potential.Here are 10 scrap‑friendly projects that use small pieces beautifully. They’re quick to sew, beginner‑friendly, and perfect for gifting ✂️✨Save this for the next time you want to turn your scraps into something pretty.Which one would you sew first?  Tell me in the comments — I love seeing what you’re making.Patterns are available in my pattern store (link in profile) or comment PATTERNS and I will send you the link. #scrapsewing #scrapbusting #scrapfriendly #sewinginspiration #sewingideas
I save every selvedge (or selvage) — the colour do I save every selvedge (or selvage) — the colour dots, the tiny prints, the designer names… they’re too pretty to throw away.Here’s how I turn them into something useful:
• lay them diagonally on a square of fusible interfacing
• overlap slightly
• stitch close to the printed edge
• keep building until you have a panelIt’s such a fun way to use scraps and create something totally unique ✂️✨If you’d like the Scrappy Strips Pouch pattern, comment SELVEDGE or SELVAGE and I’ll send you the link.Pattern Details: Scrappy Strips Pouch Pattern is available in my Pattern Store and Etsy Shop.#scrappystripspouch #selvage #scrapbuster #sewingcommunity #sewingtip
Follow on Instagram

Featured Pattern

Travel Sewing Kit Pattern

Featured Tutorial

Retro Drawstring Bag

Featured Recipe

Lemon Pound Cake

Connect

  • Email
  • Facebook
  • Instagram
  • Pinterest
  • Threads
  • TikTok
SUBSCRIBE TO NEWSLETTER
×

Popular Posts

  • Cord Cosy
  • Tips for Threading a Needle
  • Travel Accessories to Sew
  • Liberty Tissue Cover
  • Charm Square Fabric Tray
  • Happy Scrappy Cards
  • Life Lessons from Sewing and Quilting

Copyright © 2026 Lisa. K. Cox - A Spoonful of Sugar