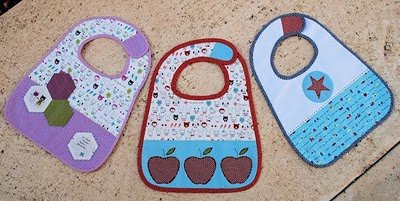
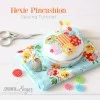
Here is a set of Baby Bibs – each featuring a different applique design, and all made from fun Japanese Kokka and Minny Muu prints. They are made with an inner flannel layer for extra absorbency and a velcro closure for easy removal.
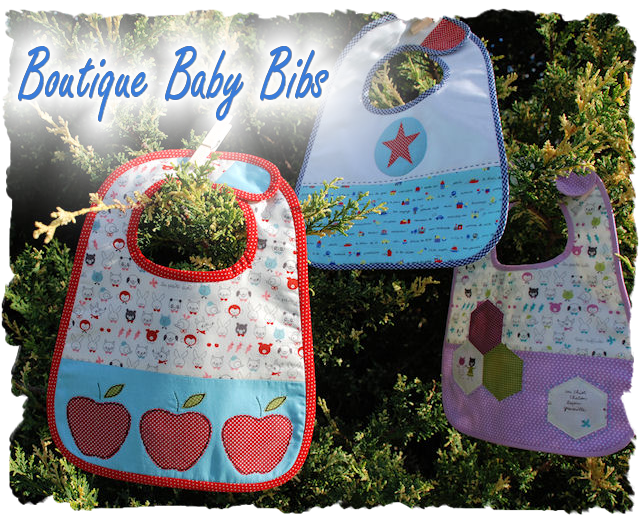
They are a good project if you want to practice some hexagons
or some applique.
Scroll down for the free tutorial. I got all my cute fabric from Quilt Fabric Delights.
Tutorial
Project Description:
Baby will look super cute wearing these bibs. The basic bib pattern can be customised with appliqué, hexagons, and decorative stitching to suit the baby in your life. The bibs are made from sweet Japanese printed cotton, with an absorbent layer of soft flannel in the middle. They are finished with a bias trim and have a Velcro closure for easy removal.
Please read all instructions before commencing the project. Careful and accurate cutting and sewing is essential to ensure success with this project. It is recommended that fabric be 100% cotton, pre-washed and well ironed. Requirements are based on fabric 112 cm wide (44 in). A seam allowance of ¼ inch has been used in this project.
Materials (per bib):
3 fat quarters of quilting cotton
0.35 m white flannelette/flannel
1 package of bias trim (width 12-20 mm)
Fabric scraps for appliqué
Small piece of sew in Velcro
Fusible appliqué webbing (such as steam a seam).
Supplies:
Sewing machine
Scissors
Pins
Co-ordinating cotton thread
Hand sewing needles
Applique templates
Card
Clear Monofilament thread (such as sulky)
Embroidery thread
Spray on starch
Bib Template – pattern pieces 1, 2, 3 and 4
Appliqué template – Apple, Star, Hexagon
(refer to end of tutorial for link to templates)
Finished size: 32 cm x 25 cm
Method:
Cut Fabrics
Using bib templates – cut out
Fabric 1 – Cut one Pattern Piece 1 (Front Upper) adding ¼ inch to lower edge
Fabric 2 – Cut one Pattern Piece 2 (Front Lower) adding ¼ inch to upper edge; Cut two Pattern Piece 4 (Tab)
Fabric 3 – Cut one Pattern Piece 3 (Backing). Pattern piece 3 is made by taping together Pattern Piece 1 and 2 (without the ¼ inch seam allowances). Ensure pattern piece 3 is cut on the wrong side of the fabric so that when the bib is assembled the tabs are facing in the same direction.
Flannel – Cut one Pattern Piece 3; Cut one Pattern Piece 4
Pin the front upper and front lower pieces together with the right sides facing, and stitch together. Press the seam allowance open.
Stitch the tab piece to the front of the bib where indicated on the pattern (match up the X’s). Press the seam allowance open.
Stitch the tab piece to the backing of the bib where indicated. Press seam allowances open.
Stitch the tab piece to the flannel layer of the bib. Press seam allowance open.
Pin the bib front to the flannel layer.
Embellish
Embellish your bib following one of the styles below:

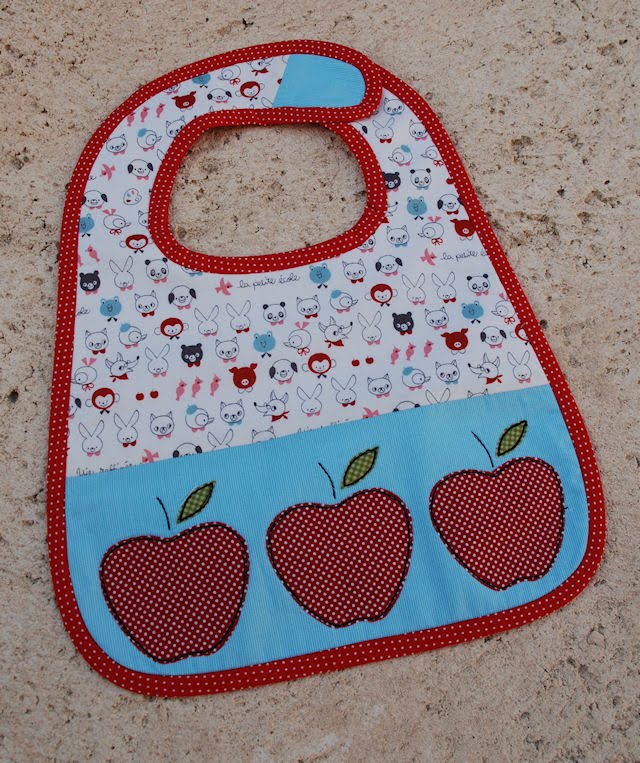
Apples:
Trace the apple design onto the paper side of the fusible webbing three times. Cut around the design leaving approx 0.5 cm clearance. Position the apples onto the wrong side of some red polka dot fabric and press in place with an iron following the manufacturer’s directions. Cut out the apples and remove the paper backing.
Trace the three leaves onto the paper side of the fusible webbing. Cut around the design leaving 0.5 cm clearance. Position the leaves onto the wrong side of some green checked fabric and press in place with an iron following the manufacturers directions. Cut out the leaves and remove the paper backing.
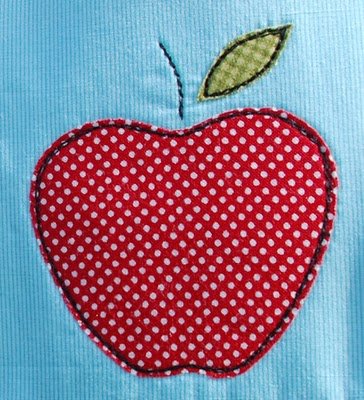
Position the apples and leaves on the lower half of the bib as shown in the photo and press in place. Stitch around each shape with black thread using free motion embroidery, close to the edge. Stitch around each shape three times to secure and stitch through to the flannel layer. Stitch a stem on each apple. Pull threads to the back, tie them off and trim.
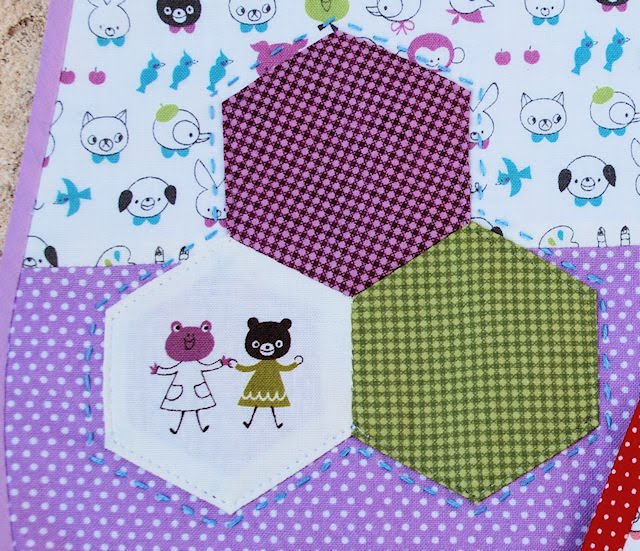
Hexagons:
Trace the hexagon shape onto card, and cut out 4 hexagon templates. Pin the card hexagon to the wrong side of the fabric. Cut fabric at least ¼ inch larger than the paper piece. Fold the ¼ inch seal allowance over the paper piece and baste into position using large basting stitches. To make a block of three hexagons, place right sides together and overcast pieces together using small whip stitches, just catching the edges of the fabric. When the three hexagons are attached, press the pieces lightly. Remove the basting and take out the card template. Pin the hexagons to the bib front as desired. Stitch around the outside of the hexagons using a scant seam allowance and monofilament thread to secure. Stitch a decorative running stitch around the hexagons using three strands of embroidery thread.

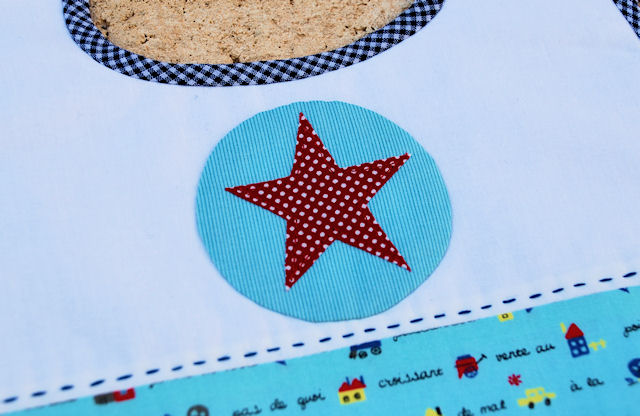
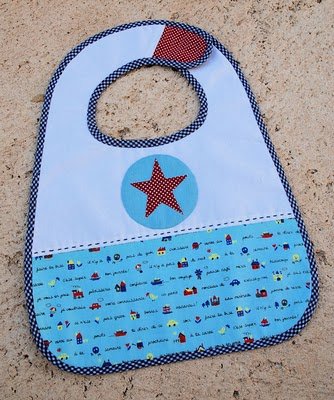
Star:
Trace the star design onto the paper side of the fusible webbing. Cut around the design leaving 0.5 cm seam allowance. Position the star on the wrong side of the red polka dot fabric, and press in place with an iron. Cut out the star and peel off the paper backing.
Trace the circle onto card and cut out. Pin the circle template to the wrong side of the pale blue stripe fabric. Cut out a fabric circle that is at least ¼ inch larger than the circle template. Moisten the edges of the fabric circle with spray on starch. Position the circle with the wrong side facing upwards on the ironing board. Centre the card circle on top. Press the seam allowance over the card to make a circle with the seam allowance pressed underneath. Position the star in the centre of the circle and press in place. Stitch around the star using a scant seam allowance or use a buttonhole stitch.
Position the circle on the front of the bib as desired. Slip stitch in place to secure. Using three strands of embroidery thread and a running stitch, stitch a line 1/4 inch from the seam line.
Assemble Bib
Layer the embellished bib front on top of the bib backing with the wrong sides facing and the flannel layer sandwiched in the middle. Baste around the outside of the bib using a scant seam allowance to hold all layers together. Trim the edges so they meet exactly.
Pin the bias tape around the outside of the front of the bib, mitring the corners of the opening, and stitch in place. Where the beginning and ending of the bias tape meet, stitch together with a mitred join. Fold the bias tape over to the back of the bib and secure in place with a slip stitch.


Cut small piece of Velcro that is approximately 3 cm x 2 cm. Stitch the hook Velcro on the top side of the squared part of the tab (facing away from baby’s skin), and stitch the loop Velcro facing downward on the underside of the rounded tab.

If you would like to make sure you don’t miss our new tutorials, you can subscribe to our monthly newsletter here:
Subscribe to our newsletter
Subscribe to our newsletter


So sweet. I love the printed fabric. The apples are wonderful. Look like very practical little baby gifts.
Dogwood
Oh Lisa, these are divine! I would love to send some down to my sister for my new little niece! Wanna do a swap for a set for some owl pins?
Very cute Lisa!
Lisa these are adorable! I especially love the star one…so perfect for baby boys.
Those hexagon papers have come in very handy, I am quite fond of the apple design 🙂
Those are absolutely beautiful!
oxoxo
Denalee
How very cute!!!
They are adorable bibs! I love the apples in a row.
Oh Lisa so cute, what great gifts.
Sew cute!
They are so cute. I hope you have got good home for them.
I just love your new pattern. Just perfect for a friend’s baby. However, I’m having difficulties downloading the pattern pieces. They are enormous, and I can’t seem to get them to the right size. Am I doing something wrong?
these are gorgeous Lisa much too cute to get food on!!!
Very cute doll! Great work.
lm.x
Hi, Lisa!! They are really cute and no doubt useful!!! Thanks for the post and have a great day! Brazilian hugs, Bela.
divino me encanta todo lo que haces un saludo…
very cute , love the apples.
Wonderful bibs for some lucky babies! Splendid way to practice some new techniques too.
Gorgeous! Designer bibs for designer bubs 🙂 One day we’ll have grandchildren… one day…
Have to make some and put them in the hope chest
Cheryl x
very nice, love the apples x
love them! you really out did yourself.
these are just way too cute. love em!
love me 🙂
gorgeous and clever and lovely
They are all so sweet! My friend Tanya is getting her first baby in September and I think I could sew some bibs.
Hola, felicidades por el blog está entre mis favoritos,lo seguiré mirando todo poquito a poco. Un abrazo fuerte.
These baby bibs are just so cute! I really love the designs especially the hexagons. Thanks for sharing. I do appreciate your work. 😉
look more better than the boutique ones
thank you for the tutorial. I think my daughter might need some for our granddaughter.
These are really nice baby bibs, time to get busy:-)) Thanks for the tutorial and pattern. I’ll link you!
I wonder what I’m doing wrong….? I clicked on the link to take me to the Bib Pattern but I went straight to the page with the tutorial and directions for using the pattern. I’ve downloaded patterns before so I don’t think it’s my computer. Can you Email me a link?
neilsonr1037@gmail.com Thanks. Rosemary
I am having the same problem, I don’t see the pattern for the bibs???? What am I doing wrong?
Thank you
Jean
Hi Lisa and Sarah! I am a new subscriber, and just love your site. I would love to make a couple of your bibs, and was wondering if you purchase your bias tape, or make it. I have trouble sewing with bias tape, but this really looks cute!
Hermosos y sobre todo muy muy útiles! Gracias!!!
The hexagon one looks so amazing! I like it so much. Thank you for sharing this with us!