A Spoonful of Sugar

Make. Bake. Create.

Menu
  • Home
  • About
    • About Us
    • Press
    • FAQ
    • Disclosure Policy
    • Contact Us
  • Crafts
    • Crochet
    • DIY
    • Embroidery/Cross stitch
    • Gift Wrapping
    • Knitting
    • Miscellaneous
    • Paper Crafts
  • Holidays
    • New Year’s
    • Australia Day
    • Back to School
    • Valentines Day
    • Easter
    • ANZAC Day
    • Mother’s Day
    • Father’s Day
    • Halloween
    • Christmas
  • Recipes
    • Appetizers
    • Bars & Slices
    • Bread & Pastries
    • Cakes
    • Cookies
    • Confectionery
    • Cupcakes & Muffins
    • Desserts
    • Drinks
    • Ice Cream
    • Jams/Preserves
    • Main Meals
  • Sewing
    • Sewing Tutorials
    • Quilting
    • Sewing & Quilting Patterns
  • Family
    • Back to School
    • Family Fun
    • Our Home
    • Parenting
    • Travel
  • Shop
    • Pattern Store
    • Etsy Store

Almond Cake

March 26, 2013 By A Spoonful of Sugar - 5 Comments

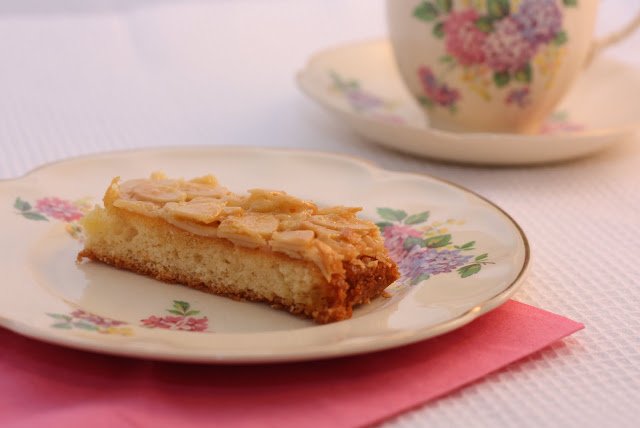
If you are after a lovely cake for an afternoon tea, you can’t go past Almond Cake. It is a light, buttery cake, with an almond topping, and goes perfectly with a cup of tea.What we love about this cake is that the Almond Topping is baked on in the final stage of cooking so there is no need for further decoration.

Almond Cake

Ingredients:

3 large eggs
¾ cup (150g) sugar (granulated sugar)
2 teaspoons vanilla extract
1 cup + 1 tablespoon (150g) plain (all purpose) flour
1 ½ teaspoons baking powder
pinch of salt
3 tablespoons milk
1/3 cup (75g) unsalted butter, melted

Topping:
50g unsalted butter
100g flaked almonds
¼ cup (50g) granulated sugar
2 teaspoons plain (all purpose) flour
3 tablespoons thickened cream (heavy cream)
1 teaspoon vanilla extract

Preheat the oven to 180°C/350°F. Butter and flour a 23cm (9in) springform or loose-bottomed cake pan.

In the large bowl of an electric mixer, whisk together the eggs and the sugar for 5-7 minutes, or until thick and creamy. Beat in the vanilla. Sift in the flour, baking powder and salt and pour in the milk and melted butter, then gently fold until combined. Transfer the batter to the prepared pan and bake for 30-35 minutes, or until a skewer inserted into the centre of the cake comes out moist but not totally clean, as the mixture will still need another 10 minutes of cooking. Increase the heat to 200°C/400°F.

Topping:

Just before the 30-35 minutes are up, make the topping. Place the butter in a saucepan over a medium heat. When it has melted, add the remaining ingredients and bring to the boil, allowing the mixture to bubble away for 1 minute.
After the cake has been cooking for the first 30-35 minutes, remove it from the oven and spoon the almond mixture evenly over the top. Place it back in the oven and bake for about 10-15 minutes or until the topping is golden.
Leave to cool in the pan for 10 minutes before placing the cake on a wire rack to cool completely.


Sarah was inspired to bake an Almond Cake by Technicolour Kitchen.

The Almond Cake is really similar in taste to our  Almond Cream Slice (pictured below). Almond Cream Slice is a family favourite and you can find our recipe here.

For your daily sugar fix you can subscribe or follow us on facebook, twitter, google plus and pinterest.

Filed Under: Cakes, Recipes Tagged With: nuts

« Lollipop Centrepiece
How To Freeze Basil »

Comments

  1. Strickilotti says

    March 27, 2013 at 12:02 am

    It looks great and delicious. Thank you!

    Reply
  2. Angelina- JoJo & Eloise says

    March 27, 2013 at 8:40 am

    We LOVE Almonds!!! And this looks amazing!! Not to mention that ADORABLE little polka dotted spoon makes you just want to pick it up and take a BITE 🙂
    xo
    Angelina

    Reply
  3. Angelina- JoJo & Eloise says

    March 27, 2013 at 8:40 am

    We LOVE Almonds!!! And this looks amazing!! Not to mention that ADORABLE little polka dotted spoon makes you just want to pick it up and take a BITE 🙂
    xo
    Angelina

    Reply
  4. Pamela says

    March 27, 2013 at 8:45 am

    I think I could smell this cake from my chair! One of my favorite scents. Your lavender set makes me smile.

    Reply
  5. Coffeebean's Dailies says

    April 6, 2013 at 9:34 pm

    Hi. Are your measurements using Australian cups and spoons? I live in the Middle East and a friend brought me a set. I have the American sets and scales as it is very international here and I love to eat and cook!!! Is it possible for you to drop me a line at umali666@yahoo.com? I also love almonds and it sounds like a perfect item to bake for my friends when they come around to sew!! Thank you!!

    Reply

Leave a Reply Cancel reply

Your email address will not be published. Required fields are marked *

  • Email
  • Facebook
  • Instagram
  • Pinterest
  • Threads
  • TikTok
SUBSCRIBE TO NEWSLETTER
×

Categories

Archives

PURCHASE PDF PATTERNS

We offer over 100 affordable PDF sewing patterns available for download from our store website or Etsy store. Each pattern includes detailed instructions, numerous photos, and templates.

WEB STORE ETSY STORE

Instagram

Meet the sweetest little project you can sew in mi Meet the sweetest little project you can sew in minutes — the Pyramid Weight. Use it as a pattern weight, scented sachet, or even a book weight… all from one triangle of fabric. Comment PYRAMID for the free pattern.Fabric is Something Blue by Tilda, releasing 1 June 2026 — with thanks to @tilda_australia.#tildasomethingblue #tildafabric #freepattern #sewingtutorial #sewinglove
The Scrappy Strips Pouch is one of my favourite wa The Scrappy Strips Pouch is one of my favourite ways to use up leftover fabric strings. Today’s version is made from patchwork strips — a fun, relaxing sew that turns scraps into something beautiful and practical.The Scrappy Strips Pouch pattern has two versions - patchwork strings and selvedges - and two sizes. Comment SELVEDGE (or SELVAGE) for a link to the pattern.Pattern Details: Scrappy Strips Pouch Sewing Pattern is in our Pattern Store and Etsy Shop.#ScrappyStripsPouch #ScrapBustingSewing #PatchworkPouch #StringQuilting #SewingProjects
If you’ve ever wanted to add eyelets or grommets t If you’ve ever wanted to add eyelets or grommets to your sewing projects, here’s a quick look at how I install them using my DK93 snap press. It’s the same tool I use for snaps — and it makes installing eyelets beautifully quick and consistent.Here’s how I install the eyelets:Punch out the four holes using a hole‑cutting die.Place the eyelet into the hole.Press it into place using the snap press.That’s it — simple, sturdy, and it gives the Ribbon Pouch such an elevated, professional finish. I love how clean and secure the result is.Fabric shown: Tilda Something Blue, releasing June 1 — thank you @tilda_australia for the beautiful fabric.✨ If you’d like the Ribbon Pouch pattern (3 sizes), comment RIBBON and I’ll send the link straight to you.Ribbon Pouch Sewing Pattern: available in my Pattern Store and Etsy Shop (links in profile).#tildasomethingblue #tildafabric #sewingtips #handmadeeveryday #sewingtools
The Ribbon Pouch is one of my favourite quick‑to‑s The Ribbon Pouch is one of my favourite quick‑to‑sew gift bags, and I couldn’t resist making a light and dark version using the new Tilda Something Blue collection. Both pouches use the same print in different colourways — such a pretty way to show how fabric choice changes the whole mood.They’re finished with satin ribbon threaded through grommets, and topped with a tiny star tag. The boxed base helps them stand beautifully, and the ribbon closure makes them perfect for birthdays, thank‑you gifts, treats, or little treasures.This is a beginner‑friendly, scrap‑friendly, quick project you’ll want to sew again and again. Pattern includes 3 sizes.If you’d like the pattern, comment RIBBON and I’ll send the link straight to you.Pattern Details: Ribbon Pouch (3 Sizes) available in my Pattern Store and Etsy Shop.Fabric Details: Tilda Something Blue - releasing on 1 June 2026. Thanks to @tilda_australia#TildaSomethingBlue #TildaFabric #SewingPattern #BeginnerSewingProject #QuickSewingProject   
Sewing with scraps is one of my favourite ways to Sewing with scraps is one of my favourite ways to get creative — small pieces, leftover corners, charm‑square offcuts… they all have so much potential.Here are 10 scrap‑friendly projects that use small pieces beautifully. They’re quick to sew, beginner‑friendly, and perfect for gifting ✂️✨Save this for the next time you want to turn your scraps into something pretty.Which one would you sew first?  Tell me in the comments — I love seeing what you’re making.Patterns are available in my pattern store (link in profile) or comment PATTERNS and I will send you the link. #scrapsewing #scrapbusting #scrapfriendly #sewinginspiration #sewingideas
I save every selvedge (or selvage) — the colour do I save every selvedge (or selvage) — the colour dots, the tiny prints, the designer names… they’re too pretty to throw away.Here’s how I turn them into something useful:
• lay them diagonally on a square of fusible interfacing
• overlap slightly
• stitch close to the printed edge
• keep building until you have a panelIt’s such a fun way to use scraps and create something totally unique ✂️✨If you’d like the Scrappy Strips Pouch pattern, comment SELVEDGE or SELVAGE and I’ll send you the link.Pattern Details: Scrappy Strips Pouch Pattern is available in my Pattern Store and Etsy Shop.#scrappystripspouch #selvage #scrapbuster #sewingcommunity #sewingtip
Follow on Instagram

Featured Pattern

Travel Sewing Kit Pattern

Featured Tutorial

Retro Drawstring Bag

Featured Recipe

Lemon Pound Cake

Connect

  • Email
  • Facebook
  • Instagram
  • Pinterest
  • Threads
  • TikTok
SUBSCRIBE TO NEWSLETTER
×

Popular Posts

  • Cord Cosy
  • Tips for Threading a Needle
  • Travel Accessories to Sew
  • Liberty Tissue Cover
  • Charm Square Fabric Tray
  • Happy Scrappy Cards
  • Life Lessons from Sewing and Quilting

Copyright © 2026 Lisa. K. Cox - A Spoonful of Sugar