A Spoonful of Sugar

Make. Bake. Create.

Menu
  • Home
  • About
    • About Us
    • Press
    • FAQ
    • Disclosure Policy
    • Contact Us
  • Crafts
    • Crochet
    • DIY
    • Embroidery/Cross stitch
    • Gift Wrapping
    • Knitting
    • Miscellaneous
    • Paper Crafts
  • Holidays
    • New Year’s
    • Australia Day
    • Back to School
    • Valentines Day
    • Easter
    • ANZAC Day
    • Mother’s Day
    • Father’s Day
    • Halloween
    • Christmas
  • Recipes
    • Appetizers
    • Bars & Slices
    • Bread & Pastries
    • Cakes
    • Cookies
    • Confectionery
    • Cupcakes & Muffins
    • Desserts
    • Drinks
    • Ice Cream
    • Jams/Preserves
    • Main Meals
  • Sewing
    • Sewing Tutorials
    • Quilting
    • Sewing & Quilting Patterns
  • Family
    • Back to School
    • Family Fun
    • Our Home
    • Parenting
    • Travel
  • Shop
    • Pattern Store
    • Etsy Store

Face Washer Bunny

March 1, 2013 By Spoonful of Sugar - 18 Comments

When my teens were small, I tried to limit their intake of chocolates and sweets. This was always challenging at Easter time. To get around this, the Easter Bunny always left them a book and mini chocolate eggs to hunt for. They used to love getting a special book for Easter – initially they received Peter Rabbit and other books featuring bunnies. Over time it progressed to chapter books. We kept this up all through their primary school years.

One year, my Grandmother made them little bunnies using Face Washers. She had made one for me when I was a child. If you are after a sweet Easter gift for a baby, a child, a Grandmother, make up an Easter Bunny using a Face washer. They can be teamed with bath toys, or some nice soap and lotion,  to make a lovely gift.

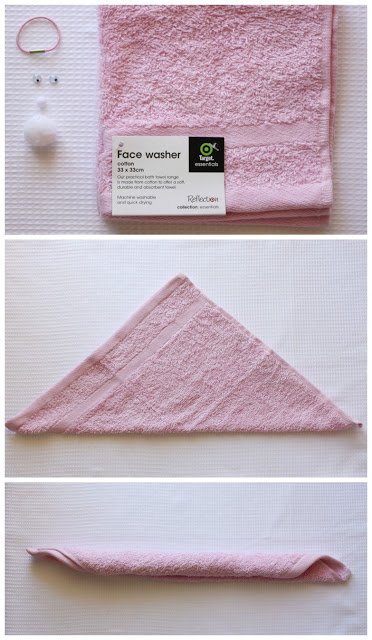
If you would like to make your own bunny you will need:

  • face  washer or face cloth measuring approx 33 x 33 cm (13 x 13 inches).
  • 2 googly eyes (stitch on variety)
  • 1 hair elastic or rubber band
  • one small pompom (nose)
  • one large pompom (tail)
  • ribbon


Face Washer Bunny

 
 Fold the face washer in half diagonally. Starting from the point, roll the face washer into a long roll.

Fold the roll in half. Fold the pointy ends up towards the rounded part of the roll, and secure with an elastic band (as pictured).

To make the bunny’s face, stitch on the googly eyes and small pompom. Add the larger pompom to the rounded end, and stitch in place. Tie a ribbon around the neck for decoration.

The bunny can be easily taken apart and used as a face washer.

For other Easter ideas, check out:

  • Easter Baskets to Make
  • Easter Sewing Projects 
  • Easter Sewing Ideas


Filed Under: Easter Tagged With: baby, gifts

« Brown Butter and Coconut Madeleines
Vacation PJ’s »

Comments

  1. Lisa Walsh says

    March 1, 2013 at 6:06 am

    This is adorable! Thank you so much for the tutorial!

    Reply
  2. pocieszna says

    March 1, 2013 at 7:13 am

    loveeeeeeeeeeeeeeee

    Reply
  3. margot says

    March 1, 2013 at 9:48 am

    When my kids were little we called these “Boo-boo Bunnies”. You left them assembled, nestled a couple of ice cubes into the center and held it on “boo-boo’s” to make them feel better. 🙂

    Reply
  4. Cheryl says

    March 1, 2013 at 12:40 pm

    This is so, so, so cute!!!! Definitely going on my to do list. Thanks so much for sharing.

    Reply
  5. Angelina- JoJo & Eloise says

    March 1, 2013 at 4:22 pm

    OKAY!! This is OVER the top CUTE!!! Love, Love, Love it!!
    xo
    Angelina

    Reply
  6. Angelina- JoJo & Eloise says

    March 1, 2013 at 4:22 pm

    OKAY!! This is OVER the top CUTE!!! Love, Love, Love it!!
    xo
    Angelina

    Reply
  7. JG says

    March 2, 2013 at 3:36 pm

    Ohhh, how adorable!!! I’ll definitely be making one!
    ~Judy

    Reply
  8. Nadja says

    March 4, 2013 at 12:04 am

    What a nice baby, thank you!

    Reply
  9. חתולי8 says

    March 7, 2013 at 3:07 am

    soooooo cute!!!!!!!
    Lior 🙂

    Reply
  10. Sherrie says

    March 25, 2013 at 1:28 am

    Thank you my little grand daughters will love this 🙂 Even an un crafty granny like me can make these …..lol

    Reply
  11. Bron says

    March 31, 2013 at 6:39 pm

    Thank you for this fun tutorial…they went down a treat with some volunteers/friends I gifted them to this Easter. xxx

    Reply
  12. Lisa Moores says

    May 30, 2013 at 5:35 am

    My girls had this too! We called it a ‘boo boo’ bunny. Any sore noggin’, knee or chin — put an ice cube in it and it made everything better. No leaking bag and something special that dried up tears when asked — should I get the boo boo bunny? 😉

    Reply
  13. Trudy says

    February 6, 2016 at 11:37 pm

    I have made a lot of these, we called them “Boo Boo Bunnies”. Our youth group made them to help fund their mission trip a couple of years ago. Recently I made some for our woman’s group to give to the pregnancy center. They are such a loved item and they never get old, there are always young children that need a “Boo Boo Bunny” and a smile from the one giving it.

    Reply
    • A Spoonful of Sugar says

      February 7, 2016 at 9:43 am

      Hi Trudy – Love the name “boo boo bunnies” – super cute! Great idea for fundraising and for a pregnancy centre. Have a wonderful weekend! Lisa

      Reply
  14. Deborah Trammell says

    March 24, 2024 at 6:15 pm

    I love this idea! Thank you so much for the tutorial!

    Reply

Leave a Reply Cancel reply

Your email address will not be published. Required fields are marked *

  • Email
  • Facebook
  • Instagram
  • Pinterest
  • Threads
  • TikTok
SUBSCRIBE TO NEWSLETTER
×

Categories

Archives

PURCHASE PDF PATTERNS

We offer over 100 affordable PDF sewing patterns available for download from our store website or Etsy store. Each pattern includes detailed instructions, numerous photos, and templates.

WEB STORE ETSY STORE

Instagram

💡 No tricky binding, no stress! This Hexagon Tr 💡 No tricky binding, no stress! This Hexagon Trivet is the ultimate beginner friendly sewing project, and the best part? The raw edges are neatly enclosed INSIDE - just turn it right side out,  press and you're done! 🎉🌟 You can use 10 inch precut squares- perfect for those leftover fabrics in your stash. Whether you're sewing for yourself or gifting homemade kitchen decor, this pattern is a gamechanger.Comment TRIVET and I'll send you the pattern link.#handmadehome #precutfabric #easysewing #sewingforbeginners #handmade #easyhexagontrivetandcoaster #quiltingcotton
🎉 Beginner Quilters, This One is for You! 🎉 🎉 Beginner Quilters, This One is for You! 🎉Want to sew a colourful Hexagon Trivet with just straight line quilting? This easy sewing project is perfect for beginners. No tricky binding to sew and you get a neat professional finish.Plus you can use 10 inch precut squares for a quick and satisfying make. Perfect for adding a handmade touch to your kitchen or gifting to a friend.Comment TRIVET and I'll send you the link.#easysewing #precutfabric #quiltlover #sewingforbeginners #handmadehome #handmadegifts #simplesewing
🏡💜 Home is where your heart is ❤️🏡I 🏡💜 Home is where your heart is ❤️🏡Introducing the Heart House Foundation Paper Piecing Quilt Block - a cosy design  that brings the warmth of home to every stitch. Available in 5 sizes (2  inch, 3 inch, 4 inch, 5 inch, and 6 inch) this sweet block is perfect for quilts, pillows, pouches and more!Because family is the heart of the home, and every home deserves a little love.Want the pattern? Comment HEART below, and I'll send you the link.#hearthousequiltblock #foundationpaperpiecing #quiltlove #homesweethome #sewingcommunity #sewinglove
✂️ Tip of the Week! ✂️Sewing with Libert ✂️ Tip of the Week! ✂️Sewing with Liberty Tana Lawn? 🌸✨ This stunning fabric deserves the best treatment! A fine needle is key to smooth, snag-free stitches—size 70/10 or 60/8 works like magic, gliding through the delicate weave effortlessly. Pair it with a sharp, fresh needle for crisp, professional results that let those gorgeous Liberty prints shine!Want more sewing tips delivered straight to you? Comment "NEWSLETTER" and I'll send you the link to sign up! 💌💬 What’s your go-to tip for sewing with Liberty fabric? Let’s swap ideas!#LibertyFabric #TanaLawn #SewingTips #FabricLover #QuiltingCommunity #SewingForFun #HandmadeSewing #TextileArt #DIYSewing #SewingInspiration
Turn your fabric scraps into something beautiful! Turn your fabric scraps into something beautiful! These Happy Scrappy Cards are the perfect DIY project - quick, beginner friendly, and fun to create with kids. Plus, they make a thoughtful Mothers Day card!✨️ Want the free tutorial? Comment CARDS and I'll send you the link!#scrapbuster #DIYcards #mothersdaycraft #sewingforfun #handmadegift #makerslife
Sewing isn't just stitches - it's life lessons. Wa Sewing isn't just stitches - it's life lessons. Want to see all 12 lessons? Comment LESSON and I'll send you the link to our free blog article.Quilting is more than just a creative pastime- it's a journey filled with valuable  life lessons. Whether you're a beginner or an experienced quilter, the process teaches persistence, patience, problem solving and self-expression.Read our article to discover all the lessons you can learn. What has quilting taught you? Share your most important lesson in the comments.Love the pillow designs in this post? Find my sewing patterns in my Pattern Store - link in profile.#sewingpatterns #DIYhomedecor #quiltedpillow #handmadehome #sewingproject #scrapbuster #sewingforfun #beginnersewing
Follow on Instagram

Featured Pattern

Travel Sewing Kit Pattern

Featured Tutorial

Retro Drawstring Bag

Featured Recipe

Lemon Pound Cake

Connect

  • Email
  • Facebook
  • Instagram
  • Pinterest
  • Threads
  • TikTok
SUBSCRIBE TO NEWSLETTER
×

Popular Posts

  • Liberty Tissue Cover
  • Pretty Liberty Drawstring Pouch
  • Sewing with Liberty Fabric
  • {Back to School} Tissue Cover
  • 10 Gifts to Sew for Mother’s Day
  • Pin Perfection: Everything you Need to Know about Sewing Pins
  • Charm Square Fabric Tray

Copyright © 2025 Lisa. K. Cox - A Spoonful of Sugar