A Spoonful of Sugar

Make. Bake. Create.

Menu
  • Home
  • About
    • About Us
    • Press
    • FAQ
    • Disclosure Policy
    • Contact Us
  • Crafts
    • Crochet
    • DIY
    • Embroidery/Cross stitch
    • Gift Wrapping
    • Knitting
    • Miscellaneous
    • Paper Crafts
  • Holidays
    • New Year’s
    • Australia Day
    • Back to School
    • Valentines Day
    • Easter
    • ANZAC Day
    • Mother’s Day
    • Father’s Day
    • Halloween
    • Christmas
  • Recipes
    • Appetizers
    • Bars & Slices
    • Bread & Pastries
    • Cakes
    • Cookies
    • Confectionery
    • Cupcakes & Muffins
    • Desserts
    • Drinks
    • Ice Cream
    • Jams/Preserves
    • Main Meals
  • Sewing
    • Sewing Tutorials
    • Quilting
    • Sewing & Quilting Patterns
  • Family
    • Back to School
    • Family Fun
    • Our Home
    • Parenting
    • Travel
  • Shop
    • Pattern Store
    • Etsy Store

50th Wedding Anniversary

May 20, 2011 By A Spoonful of Sugar - 35 Comments

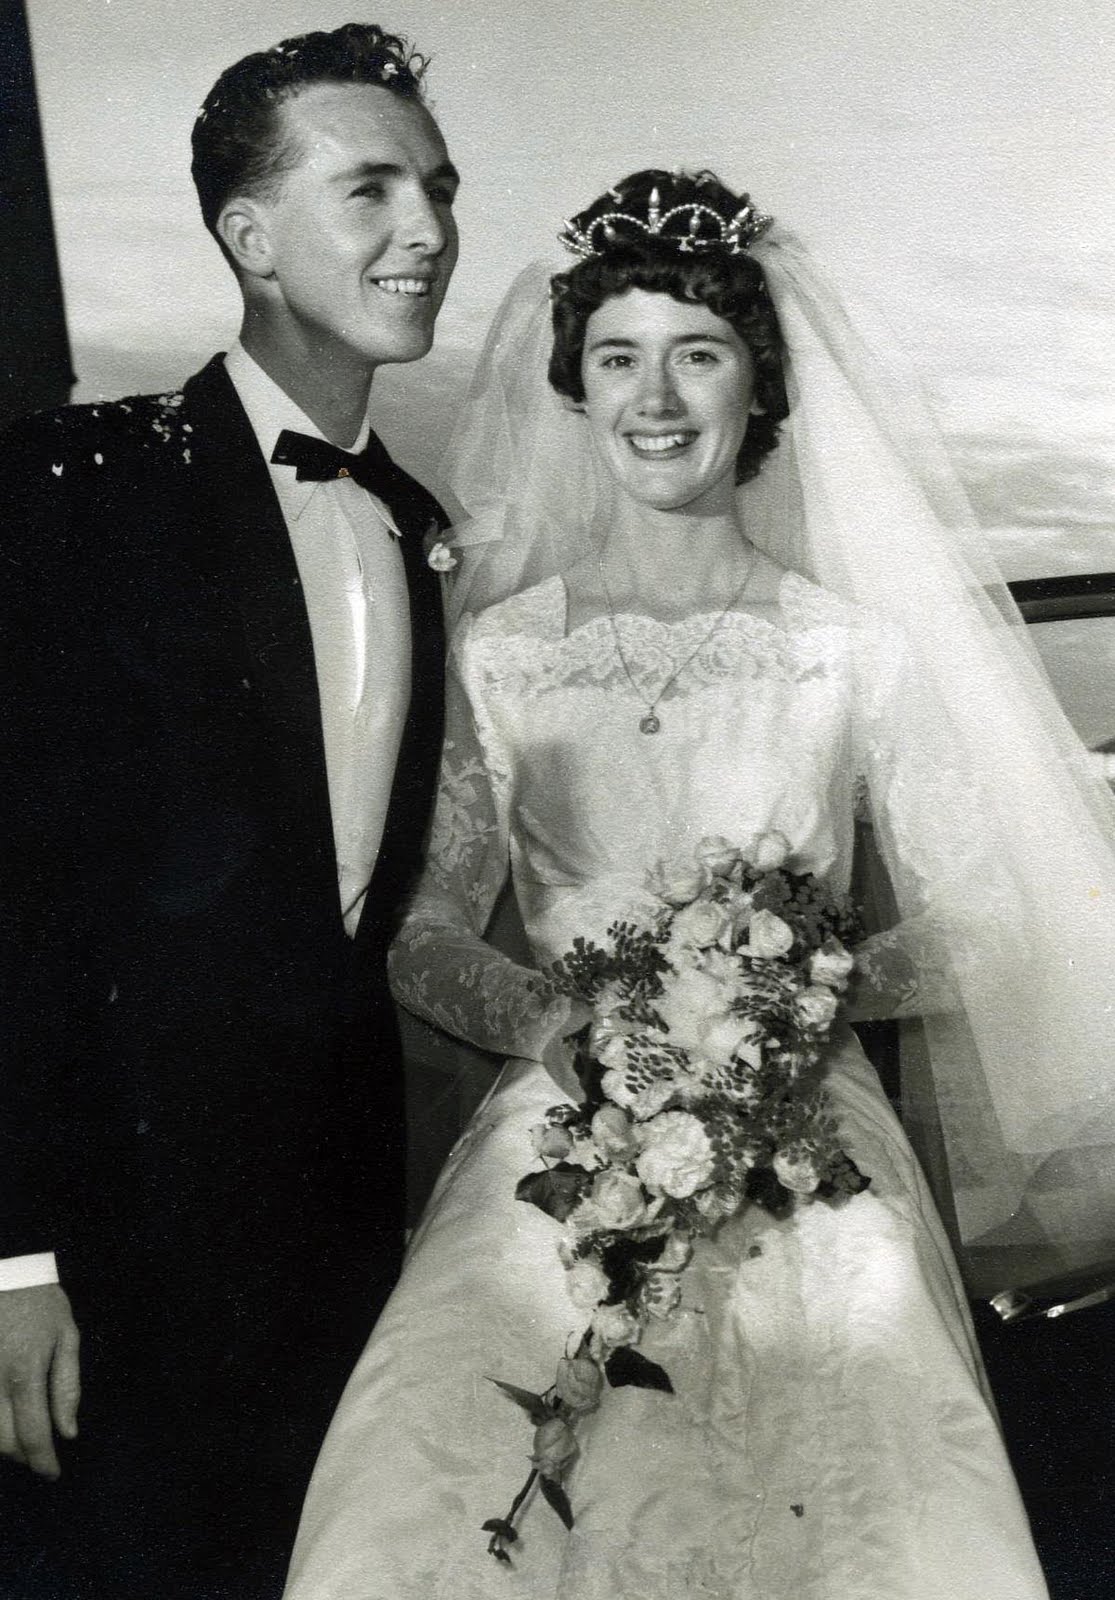
Last week, my parents celebrated their 50th Wedding Anniversary.

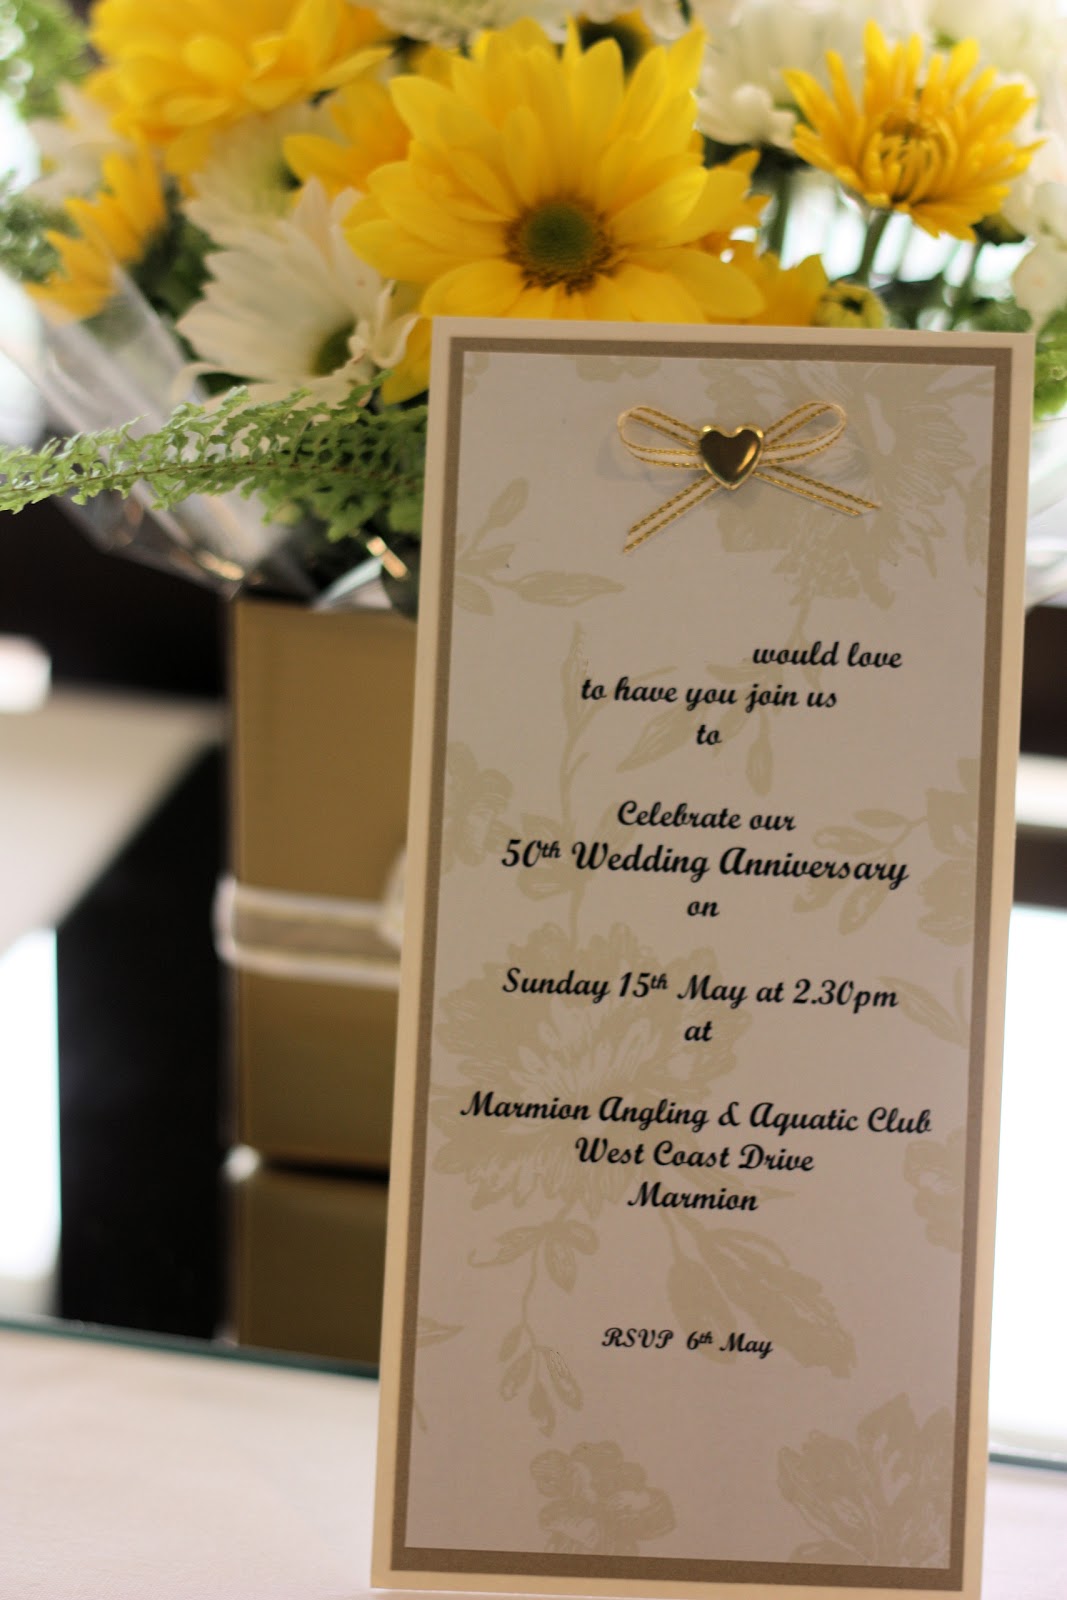
We celebrated the happy occasion with a lovely cocktail party last weekend with family and friends. As it was their golden anniversary, the theme was gold. 
Mum and I made the invitations….
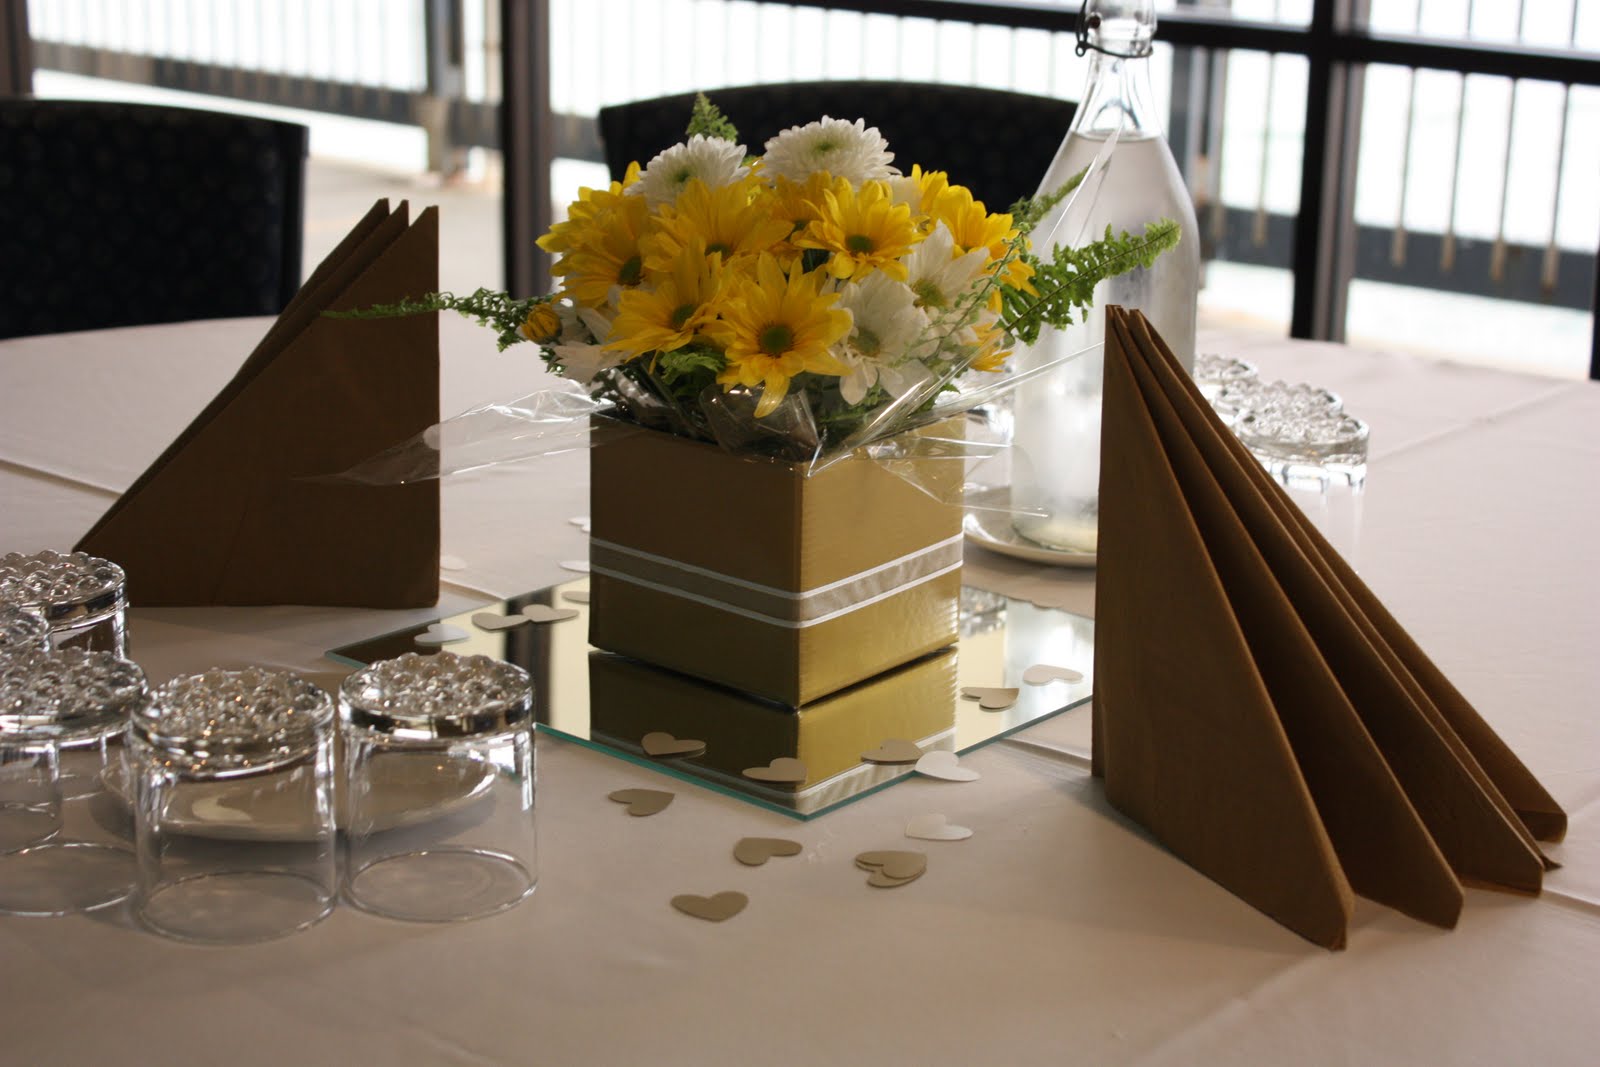
and Mum made all the flower centrepieces, which were arranged on mirror tiles, with some scattered gold and white hearts on the tables.
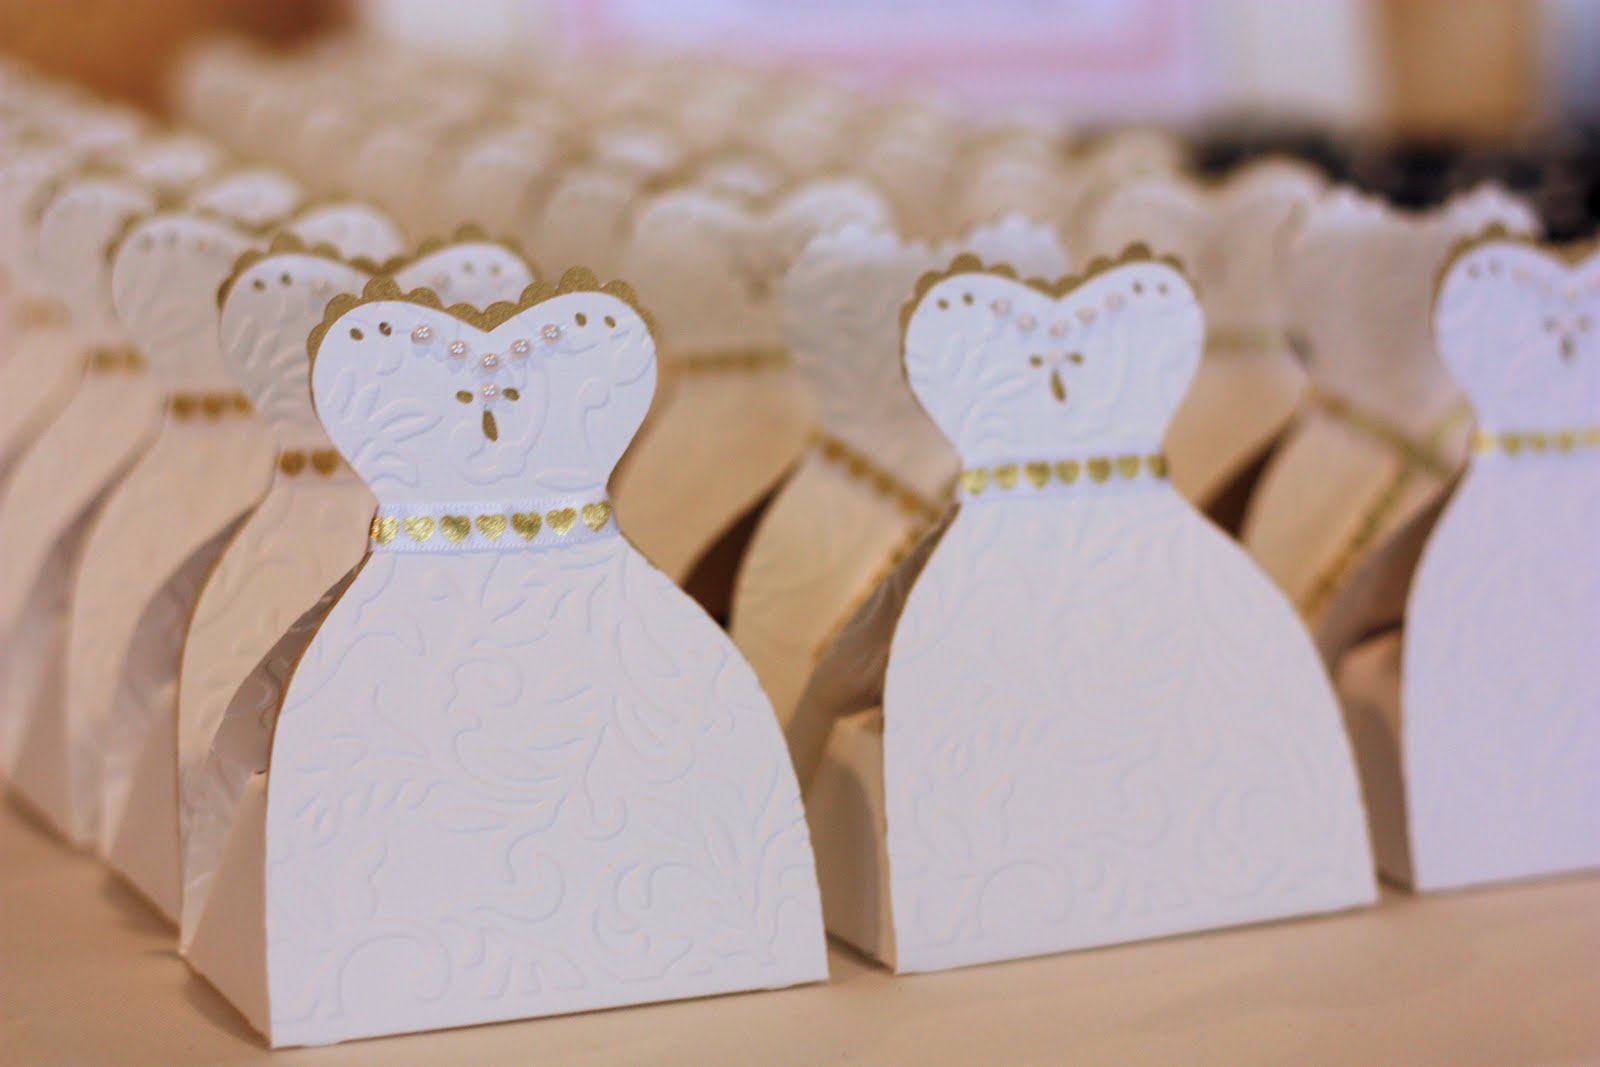
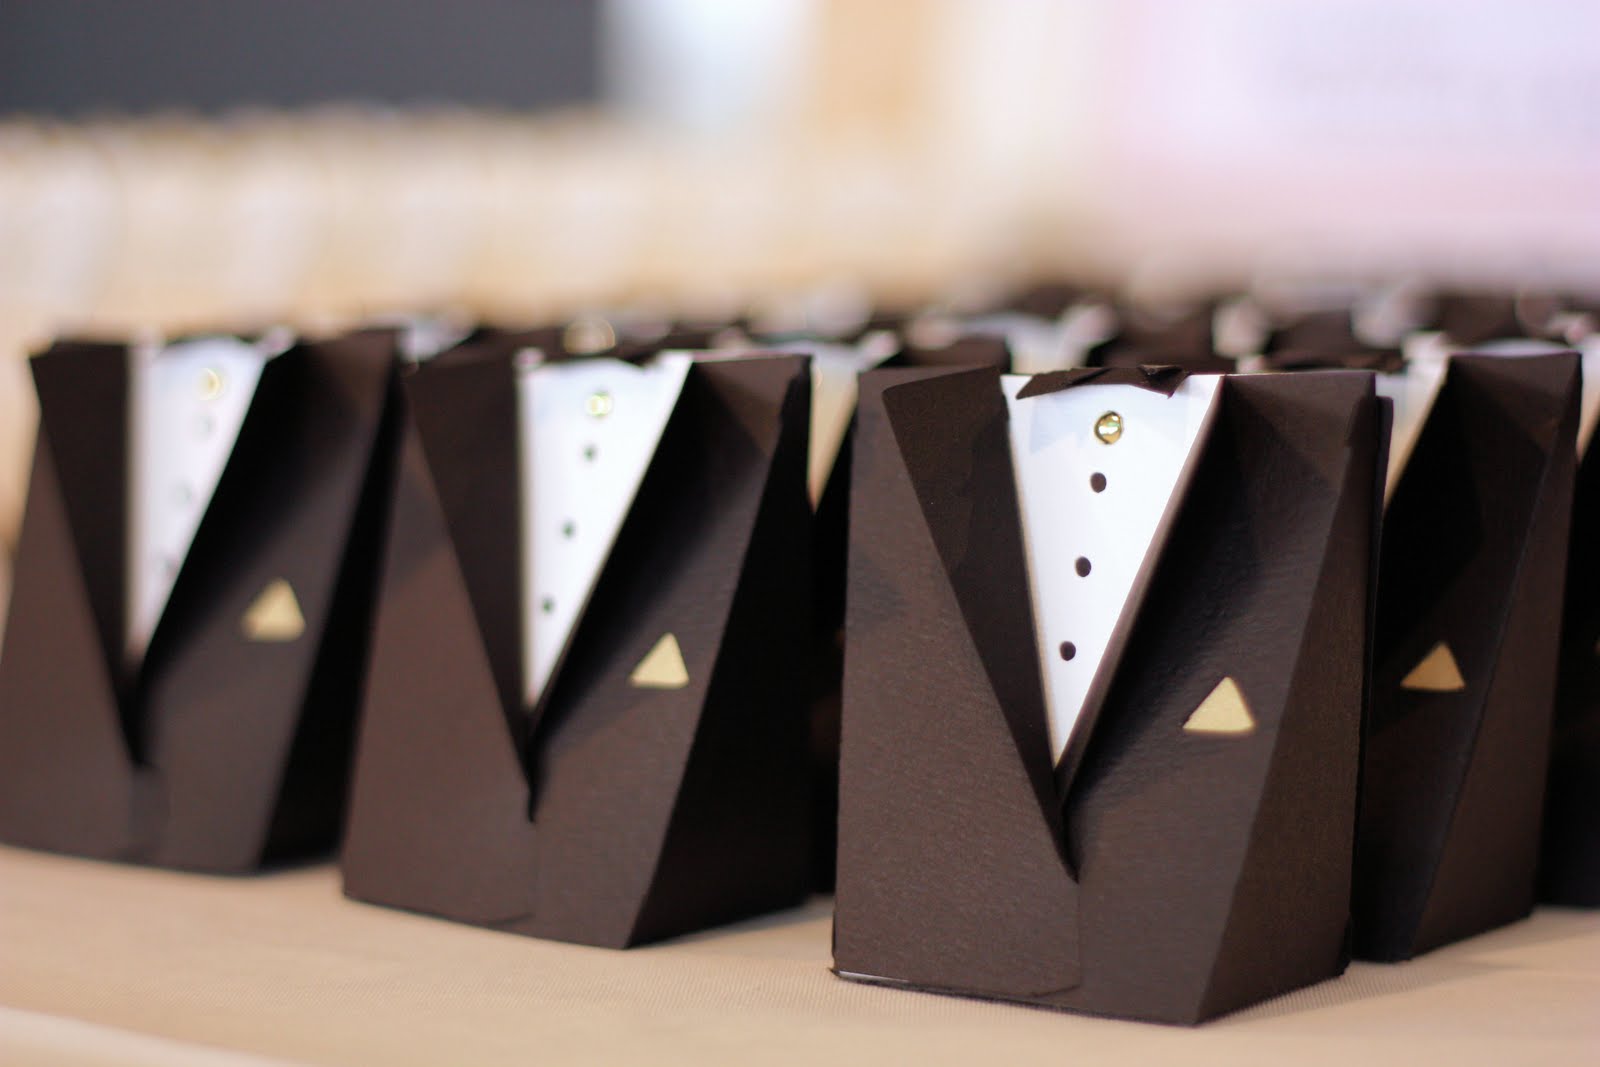
We made up chocolate Bride and Groom boxes as party favours. I used the Cricut Tie the Knot cartridge for the boxes, and then embossed the dresses with the Cuttlebug. Mum assembled all the boxes and added the ribbon and pearls.
Mum ordered the cake from Sugar and Spice. They printed one of their wedding photos on a layer of fondant for the top of the cake (white chocolate mud cake) – it was delicious. 
Mum’s wedding dress was on display. My sister and I used to love trying her dress on when we were kids. 
 
It was a wonderful party and we all thoroughly enjoyed helping them celebrate such a special milestone.

Congratulations Mum and Dad – you are truly an inspiration to all the family.

Filed Under: Uncategorized

« "The Craft Room"
Queen Anne’s Lace »

Comments

  1. thea says

    May 20, 2011 at 9:34 pm

    What a wonderful celebration!!

    Reply
  2. Dawn says

    May 20, 2011 at 10:43 pm

    This is so VERY WONDERFUL!!!!!
    You never find marriages like this anymore…so glad you got to help in the celebration…looks Delightful!!
    Congratulations…. to all of you!:)

    Reply
  3. Jo-anne "Blossy" says

    May 20, 2011 at 10:56 pm

    Congratulations to your parents. What a wonderful way to celebrate their anniversary.

    Reply
  4. Maaike says

    May 20, 2011 at 11:53 pm

    wow, I love the look of all the details and how you created them together… Special moments to keep in your memory forever!
    Have a lovely weekend,
    Maaike

    Reply
  5. Tine says

    May 21, 2011 at 1:25 am

    what a wonderful pary that must have been. I love all the decorations, and I love that your moms dress was on display! That is a brilliant idea 🙂

    Reply
  6. Handmade in Israel says

    May 21, 2011 at 1:29 am

    How wonderful! It looks like you all had an amazing time and the attention to detail was of course perfect! Congratulations!

    Reply
  7. shez says

    May 21, 2011 at 2:19 am

    whow what a buzz it would have been for them,everything had a special touch just magic

    Reply
  8. Handmade says

    May 21, 2011 at 5:34 pm

    That’s amazing – all beautiful – congratulations!

    Reply
  9. Simone de Klerk says

    May 21, 2011 at 3:05 am

    Thank you for sharing the lovely things you made for the oh so special day!

    Reply
  10. Anne Heidi says

    May 21, 2011 at 3:47 am

    Congratulations on your parents’ 50th anniversary! The cake looks delicious, and the tables are so pretty!
    My parents are celebrating their 40th wedding anniversary next month, and you gave me some great ideas here- thank you!

    Reply
  11. Linda says

    May 21, 2011 at 3:52 am

    Happy Anniversary to your mum and dad Lisa, what a great milestone. Everything looked divine and those wedding dress favour boxes are eye catching.
    xx

    Reply
  12. yuli-prezent says

    May 21, 2011 at 4:54 am

    Everything looks gorgeous! My best congratulations))))

    Reply
  13. erica says

    May 21, 2011 at 5:41 am

    the little bride and groom boxes are adorable (and your mom’s wedding dress is beautiful!)

    Reply
  14. Farah Muzaffar says

    May 21, 2011 at 8:06 am

    So lovely to read and see all this … And the celebration is great… Love and best wishes for your Mom and Dad… Lisa…
    Hope you like to visit and love to feel the beauty and fragrance of flowers at
    http://craftaworld.blogspot.com/
    Love
    Farah

    Reply
  15. summerfete says

    May 21, 2011 at 11:19 am

    Hi we celebrated my inlaws 50th on the 14th!
    Congrats looks very stylish!

    Clare

    Reply
  16. Jenny of Elefantz says

    May 21, 2011 at 2:40 pm

    Lisa, I am always left in awe of the gift you have to create ‘from anything’ and ‘for anything’!
    God bless your mum and dad!!! Happy 50th indeed!!! \o/
    Hugs
    Jenny

    Reply
  17. Happy Cottage Quilter says

    May 21, 2011 at 7:04 pm

    What a beautiful celebration. We’d love to see a picture of your parents from the party.

    Reply
  18. Sew Useful Designs says

    May 21, 2011 at 7:48 pm

    Absolutely beautiful Lisa! Bit choked up actually – what an amazing milestone and such beautiful cake/invitations/favors… I love that your Mum’s dress was on display! Congratulations to your parents!

    Warm wishes, Vikki 🙂

    Reply
  19. Sara says

    May 21, 2011 at 7:49 pm

    Truly spectacular!! Happy Anniversary to your parents!

    Reply
  20. Christine M says

    May 21, 2011 at 9:40 pm

    Congratulations to your parents on this very special occasion. My parents will be celebrating their 50th next year!

    Reply
  21. Janellybelly says

    May 21, 2011 at 9:40 pm

    Oh WOW, it all looks so breathtakingly beautiful. Please wish your folks a Happy Anniversary from me 🙂

    Reply
  22. Kirsty@Bonjour says

    May 22, 2011 at 1:33 am

    Looks wonderful! What an amazing milestone to reach, wishing them many more happy years together!

    Reply
  23. The Lass says

    May 22, 2011 at 8:05 am

    Oh, how beautiful!! The occasion as well as the execution of the event. Marvelous!!

    Reply
  24. Dmarie says

    May 22, 2011 at 11:41 am

    wow, all those thoughtful little touches added up to a wonderful celebration. well done!

    Reply
  25. Thimbleanna says

    May 23, 2011 at 9:24 am

    Oooh, it looks like a wonderful party Lisa. You always make the cutest stuff!

    Reply
  26. Rumi says

    May 23, 2011 at 10:36 am

    Congratulations to your parents! Looks like it was a very lovely celebration indeed!

    Reply
  27. Fash Boulevard says

    May 23, 2011 at 11:19 am

    so beautiful. beyond glad I found your blog. I’m a new follower, I hope you will as well. I started my blog a little over 2 months ago. It’s all about celebrity fashion from the point of view of an LA stylist. Stop by to see multiple post a day on all the latest celebrity fashion news. Would love your support. xoxo

    http://www.fashboulevard.blogspot.com

    Reply
  28. Tina says

    May 23, 2011 at 12:18 pm

    Nice photos and must have been anice party. Today it´s not every day that couples are so long together. Very nice!

    Reply
  29. Chocolate Cat says

    May 23, 2011 at 3:29 pm

    What a wonderful occassion to celebrate. I love all the details for the party especially the chocolate boxes. What a great idea displaying the wedding dress.

    Reply
  30. Kylie says

    May 23, 2011 at 10:46 pm

    Happy Anniversay to your parents.

    Reply
  31. Talin's Corner says

    May 26, 2011 at 4:57 pm

    Wow, 50 years…that is such a milestone these days. Congrats to your parents.

    Reply
  32. Shannon says

    May 29, 2011 at 10:17 pm

    Congratulations to your parents! I see where you and your daughter got your creativity. 🙂

    Reply
  33. Julie says

    June 1, 2011 at 4:28 am

    Certainly looks like a gorgeous celebration. I love how you had the dress on display. I hope they had a special day.

    Reply
  34. Julie says

    June 1, 2011 at 4:28 am

    Certainly looks like a gorgeous celebration. I love how you had the dress on display. I hope they had a special day.

    Reply
  35. Contagiously Crafty says

    August 14, 2011 at 7:30 am

    Nice job! Love how you embossed the dress favor and the neat gold accents on the groom favor. Your mom and dad are certainly blessed by you!

    Reply

Leave a Reply Cancel reply

Your email address will not be published. Required fields are marked *

  • Email
  • Facebook
  • Instagram
  • Pinterest
  • Threads
  • TikTok
SUBSCRIBE TO NEWSLETTER
×

Categories

Archives

PURCHASE PDF PATTERNS

We offer over 100 affordable PDF sewing patterns available for download from our store website or Etsy store. Each pattern includes detailed instructions, numerous photos, and templates.

WEB STORE ETSY STORE

Instagram

Adding a handmade label is one of my favourite way Adding a handmade label is one of my favourite ways to personalise a project — and these little fabric + felt labels are so quick and satisfying to make.For this Ribbon Pouch, I used the Liberty Gifts from the Garden collection, which has the sweetest fruit motifs. They make perfect tiny labels for pouches, bags, and gifts.Here’s how to make your own:Press a piece of double‑sided fusible web to the back of your fabric.Cut around your chosen motif.Peel off the paper backing.Press the motif onto wool felt.Trim the felt with scalloped scissors.Sew the label onto the front of your pouch.Such a simple detail, but it adds so much charm. Fabric kindly gifted by @regent_street_fabrics — thank you!If you’d like to sew the Ribbon Pouch (3 sizes), comment RIBBON and I’ll send the pattern link straight to you.#SewingInspiration #FabricLabels #DIYLabels #LibertyFabric #LibertyGiftsFromTheGarden
A lot can change in 10 years ❤️ It’s been fun look A lot can change in 10 years ❤️ It’s been fun looking back at where I was in 2016 and how far life has come since then. Swipe for a little trip down memory lane.Back in 2016, my priorities were firmly centred around family. I was working full‑time, sewing in the guest room, sharing tutorials on my blog, and slowly dipping my toes into selling a handful of patterns on Etsy. It was a busy, full season — and creativity was something I fitted in around everything else.  Fast forward to 2026… I’m now retired and living the creative life I once dreamed of. My kids have grown up and are living in their own homes nearby. My husband and I are free to travel, explore, and enjoy this stage of life. And I get to spend my days designing, sewing, and connecting with this beautiful community.Life looks different now — in the best possible way.Were you following me back then, or what has changed for you over the past 10 years? I’d love to hear your story too.Tagging the lovely makers of my quilt: @arabesquescissors @ministryoffabric @belloquacity @alittlepatchwork @sameliasmum coleandtaffy @quiltymamaof4 @shequiltsalot @downgrapevinelane @lizzierosesews @lovethatfabric @sew_mimi.k #2026isthenew2016 #10yeartransformation #sewingjourney #sewingcommunity #aspoonfulofsugardesigns
Fall in love with sewing all over again ❤️I’ve Fall in love with sewing all over again ❤️I’ve rounded up 10 heart‑themed makes — from quick gifts to charming quilt blocks — perfect for weekend stitching or using up your favourite scraps. Whether you’re sewing for Valentine’s Day, birthdays, or just because, there’s something sweet for every maker.Comment HEART and I’ll send you a link to my Heart Pattern Collection.#sewingproject #heartsewing #quiltblock #scrapsewing #easytosew
Raw edge appliqué doesn’t have to feel fiddly or i Raw edge appliqué doesn’t have to feel fiddly or intimidating. With a few simple techniques, you can create neat, crisp shapes — even tiny details like penguin beaks and hearts.I’ve put together My Top 5 Secrets for Raw Edge Appliqué to help you feel confident, whether you’re brand new to appliqué or looking to refine your finish. Save this for your next sewing session.If you’d love a quick, beginner‑friendly project to practise these tips, my Penguin Love Mugrug is the sweetest Valentine’s make — scrap‑friendly, gift‑ready, and such fun to sew.Comment PENGUIN and I’ll send you the link to the pattern. Available now in our Pattern Store and Etsy shop.  #rawedgeapplique #appliquetips #sewingtipsandtricks #mugrugpattern #penguinlove
If you’ve ever wanted to add eyelets or grommets t If you’ve ever wanted to add eyelets or grommets to your sewing projects, here’s a quick look at how I install them using my DK93 snap press. It’s the same tool I use for snaps — and it makes installing eyelets beautifully quick and consistent.For this Ribbon Pouch, I used the Liberty Gifts from the Garden collection (printed on Lasenby cotton and released in January 2026). The colours and motifs pair so well with the little ribbon tie detail.Here’s how to install the eyelets:Punch out the four holes using a hole‑cutting die.Place the eyelet into the hole.Press it into place using the snap press.That’s it — easy peasy, and it gives the pouch such an elevated, professional finish. I love how clean and sturdy the result is.Fabric is Gifts from the Garden by Liberty - kindly provided by @regent_street_fabrics — thank you!If you’d like the Ribbon Pouch pattern (it comes in 3 sizes), comment RIBBON and I’ll send the link straight to you.Ribbon Pouch Sewing Pattern: available in our Pattern Store and Etsy shop ( links in profile).#SewingInspiration #SewingProjects #Eyelets #Grommets #SnapPress
The Twirling Treasures Hot Pad & Placemat Set show The Twirling Treasures Hot Pad & Placemat Set showcases one of my favourite FPP designs — a stunning kaleidoscope‑style block that always turns out beautifully. Kaleidoscope blocks are some of my most popular FPP patterns, and this set is such a fun way to use them.  This set includes six sizes, making it incredibly versatile: use them as hot pads, trivets, placemats, or simply as a way to add a pop of colour to your kitchen.For these samples, I went with a monochromatic scrap‑busting approach, pairing fabrics from the same colour family with a low‑volume background. The black‑and‑white striped binding adds such a crisp, modern finish. It’s a wonderful project for building your FPP confidence — and a fantastic way to use up those treasured scraps.The Twirling Treasures Hot Pad set is our Pattern of the Week. It is currently 25% off this week in our Pattern Store and Etsy Shop.If you’d like to sew your own set, comment TWIRL and I’ll send the pattern link straight to you.Happy sewing! Lisa 🌸#FoundationPaperPiecing #Quilting #HotPads #ScrapBuster #KitchenSewing
Follow on Instagram

Featured Pattern

Travel Sewing Kit Pattern

Featured Tutorial

Retro Drawstring Bag

Featured Recipe

Lemon Pound Cake

Connect

  • Email
  • Facebook
  • Instagram
  • Pinterest
  • Threads
  • TikTok
SUBSCRIBE TO NEWSLETTER
×

Popular Posts

  • Charm Square Fabric Tray
  • Merry Little Christmas Sewing Projects
  • {Back to School} Tissue Cover
  • Hexagon Fabric Tray
  • Raw Edge Applique Tips
  • Sewing Gifts 101: Easy and Affordable Ideas for Your Crafty Friends
  • Fabric Gift Pouch

Copyright © 2026 Lisa. K. Cox - A Spoonful of Sugar