A Spoonful of Sugar

Make. Bake. Create.

Menu
  • Home
  • About
    • About Us
    • Press
    • FAQ
    • Disclosure Policy
    • Contact Us
  • Crafts
    • Crochet
    • DIY
    • Embroidery/Cross stitch
    • Gift Wrapping
    • Knitting
    • Miscellaneous
    • Paper Crafts
  • Holidays
    • New Year’s
    • Australia Day
    • Back to School
    • Valentines Day
    • Easter
    • ANZAC Day
    • Mother’s Day
    • Father’s Day
    • Halloween
    • Christmas
  • Recipes
    • Appetizers
    • Bars & Slices
    • Bread & Pastries
    • Cakes
    • Cookies
    • Confectionery
    • Cupcakes & Muffins
    • Desserts
    • Drinks
    • Ice Cream
    • Jams/Preserves
    • Main Meals
  • Sewing
    • Sewing Tutorials
    • Quilting
    • Sewing & Quilting Patterns
  • Family
    • Back to School
    • Family Fun
    • Our Home
    • Parenting
    • Travel
  • Shop
    • Pattern Store
    • Etsy Store

Patchwork Triangle Pouch

February 21, 2015 By A Spoonful of Sugar - 19 Comments

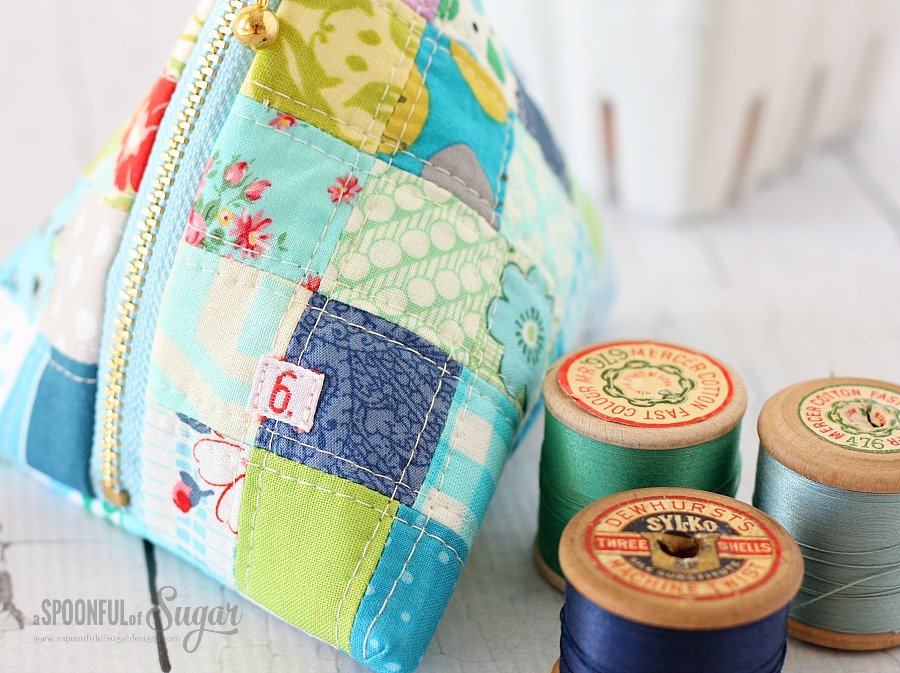
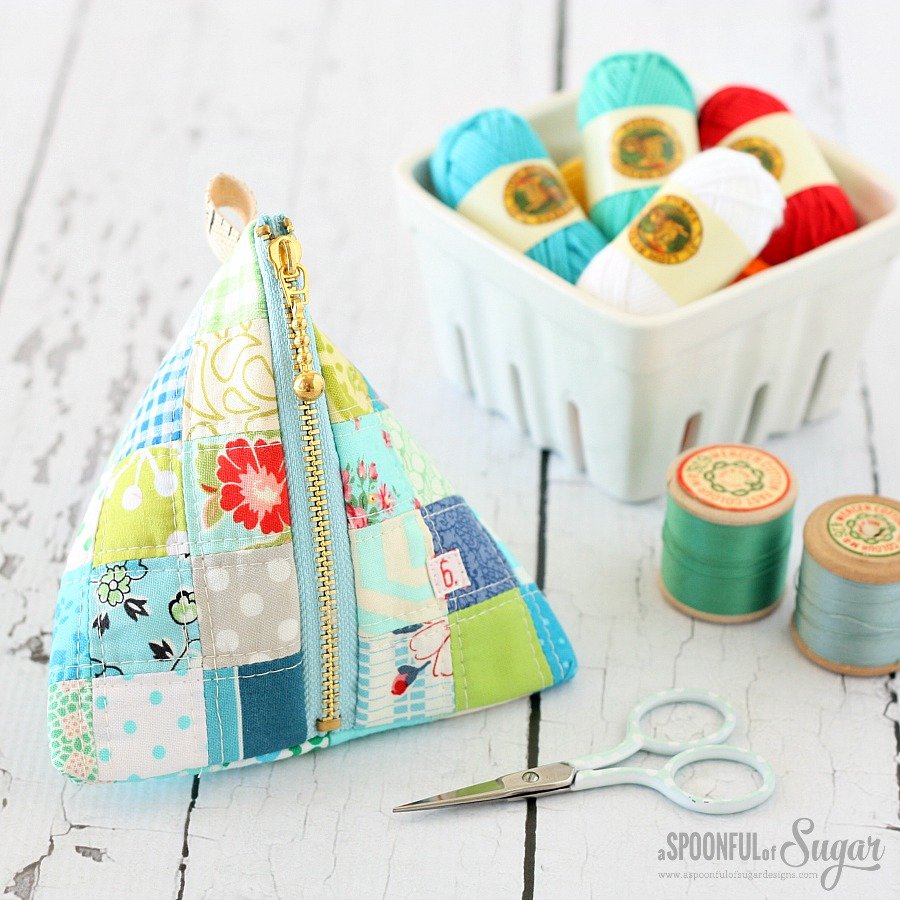
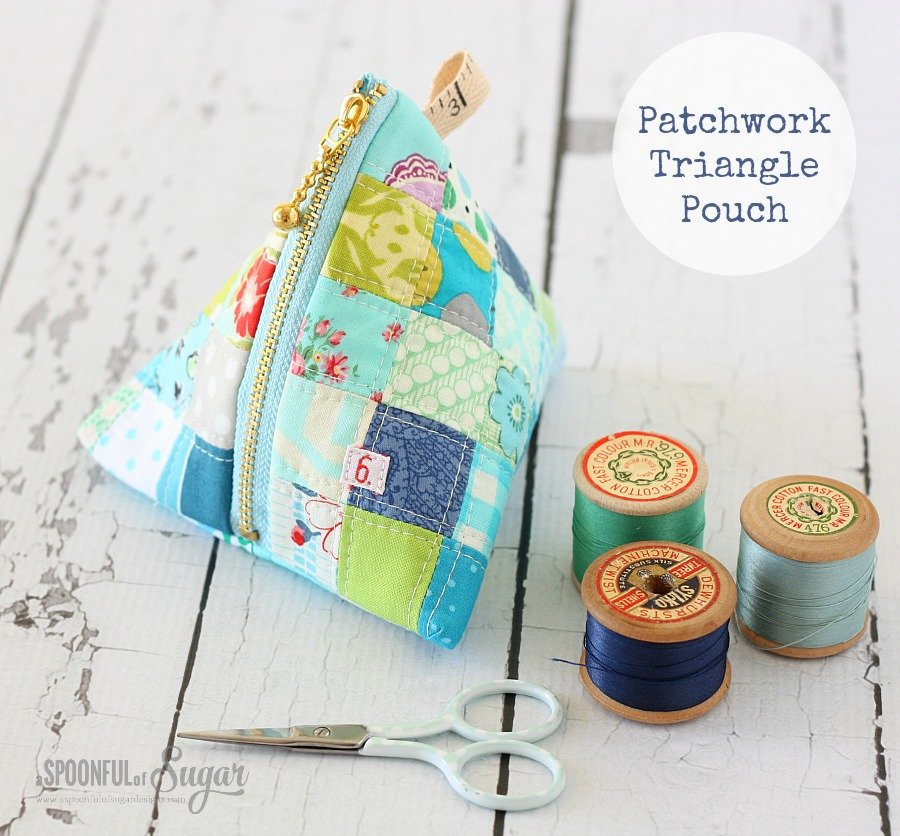
Patchwork Triangle Pouch Sewing Tutorial by A Spoonful of Sugar

The Patchwork Triangle Pouch is a quick and satisfying scrap‑friendly project that’s perfect for using leftover strips, charm squares, or favourite tiny prints. This clever little pouch comes together with simple patchwork and a short zipper, and its unique triangular shape makes it ideal for storing sewing notions, earbuds, coins, or small gifts. It’s a fun weekend make and a great way to showcase a mix of coordinating fabrics.

This tutorial is a an alternate version of our original Triangle Pouch which can be found here. 

Patchwork Triangle Pouch Sewing Tutorial by A Spoonful of Sugar


Materials:

  • Assorted fabric scraps (eight small pieces for the patchwork panel)

  • Lining fabric

  • Lightweight fusible interfacing

  • 6–8 inch zipper (you can shorten a longer one)

  • Matching thread

  • Basic sewing supplies


Notes Before You Begin

  • Play with colour placement — alternating light and dark prints gives the pouch a crisp, modern look.

  • If your zipper is longer than required, simply trim it and stitch a new fabric tab at the end.

  • Press well between each step for a neat, structured finish.

Method:

1. Position 25 squares into 5 rows, each containing 5 squares. Stitch the squares together into 5 rows. Stitch the 5 rows together so that you have a patchwork square measuring 5 1/2 x 5 1/2 inches. Position the patchwork square on top of the batting square and secure with safety pins. Quilt as desired. Repeat for the remaining fabric squares.

Triangle Pouch Construction

Complete the pouch using the instructions detailed in the original Triangle Pouch tutorial.
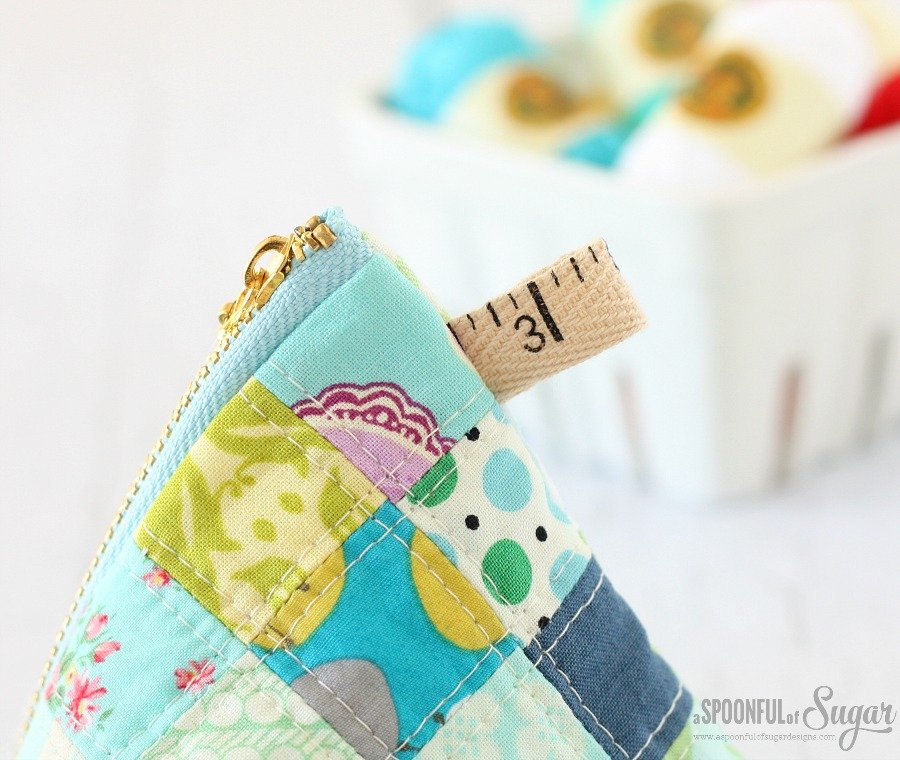
Patchwork Triangle Pouch Sewing Tutorial by A Spoonful of Sugar

Patchwork Triangle Pouch Sewing Tutorial by A Spoonful of Sugar

Here is a comparison of our original pouch with the larger pouch.

Patchwork Triangle Pouch tutorial from A Spoonful of Sugar

Patchwork Triangle Pouch Sewing Tutorial by A Spoonful of Sugar


Bonbons

Triangle pouches are a wonderful way to use your favourite scraps and make thoughtful handmade gifts. If you stitch one, we’d love to see your version — share a photo on Instagram and tag @aspoonfulofsugardesigns so we can admire your patchwork creations.
Filed Under: Sewing, Sewing Tutorials Tagged With: free tutorial, patchwork, patchwork project, pouch, scrap buster, triangle pouch, tutorial, zipper

« Taking a Short Break
Banana Bread »

Comments

  1. Nell Ward says

    February 21, 2015 at 5:00 pm

    Ooh these are so cute. I think I might be making these tomorrow (it is a stinking 40 degrees here so a good day to be inside sewing!) Thanks for the inspiration!

    Reply
    • A Spoonful of Sugar says

      February 22, 2015 at 9:46 am

      Stay cool Nell! Sewing is the perfect activity n a hot day.

      Reply
  2. Sigi G says

    February 22, 2015 at 8:31 am

    Found these beautiful zippers priced very reasonably at Lens Mill Fabric Store – in Canada. They are a treasure trove for quilting supplies. Thank you for this pouch tutorial in two sizes. Yours are so beautiful!!

    Reply
    • A Spoonful of Sugar says

      February 22, 2015 at 9:45 am

      Thanks Sigi – glad you enjoyed the tutorial. Thanks for the info on your zipper supplier. Nice zips make all the difference to this simple pouch.

      Reply
  3. Elvira says

    February 22, 2015 at 9:07 pm

    Wow, they really look great! Marvellous. Greetings, Elvira

    Reply
    • A Spoonful of Sugar says

      March 2, 2015 at 8:05 pm

      Thanks heaps Elvira!

      Reply
  4. Abigail Smycken says

    February 22, 2015 at 10:45 pm

    These are so cute! I love how colorful they are and they seem fun to make.

    Reply
    • A Spoonful of Sugar says

      March 2, 2015 at 8:06 pm

      They are really fun to sew Abigail and a great way to use up those precious scraps. Lisa

      Reply
  5. Kindred Stitches Magazine says

    February 23, 2015 at 6:36 am

    This little pouch is so sweet, just love it!

    Reply
  6. Natashalh says

    February 27, 2015 at 12:26 am

    I have those same cute balls of yarn! I saw them at Michael’s and bought them because there isn’t a location near me and I figured I’d find use for them later. =)

    Super cute project! I love the tape measure tag, too. Pinning to my sewing board.

    Reply
    • A Spoonful of Sugar says

      March 2, 2015 at 8:09 pm

      Thanks Natashalh 🙂

      Reply
  7. Jordan says

    February 28, 2015 at 5:56 am

    These are so cute! Perfect little coin purses. Can’t wait to try this out.

    Reply
  8. babette says

    March 1, 2015 at 12:00 am

    wahou super mignones vos petites pochettes triangulaires bravo

    Reply
    • A Spoonful of Sugar says

      March 2, 2015 at 8:10 pm

      Merci Babette! Lisa

      Reply
  9. Sandi King says

    March 5, 2015 at 7:54 am

    love these little triangles. how much of a seam allowance do you use ? i’ m a quilter so i automatically go for the 1/4 inch. by the way, i love your tutorials. i can “shop around” on your site for hours at a time.

    Reply
    • A Spoonful of Sugar says

      March 7, 2015 at 7:39 am

      Hi Sandi – We use a 1/4 inch seam allowance as standard in all our tutorials. Thanks for your lovely feedback – glad you enjoy visiting us 🙂

      Reply

Leave a Reply Cancel reply

Your email address will not be published. Required fields are marked *

  • Email
  • Facebook
  • Instagram
  • Pinterest
  • Threads
  • TikTok
SUBSCRIBE TO NEWSLETTER
×

Categories

Archives

PURCHASE PDF PATTERNS

We offer over 100 affordable PDF sewing patterns available for download from our store website or Etsy store. Each pattern includes detailed instructions, numerous photos, and templates.

WEB STORE ETSY STORE

Instagram

The Hexie Placemat Series ✂️ Six designs and endl The Hexie Placemat Series ✂️Six designs and endless ways to make your table feel special. From festive holiday colours to cosy autumn tones, these placemats are quick to sew, scrap‑friendly, and perfect for gifting or decorating your home.Featuring:
• Hexie Holiday – a Christmas favourite
• Hexie House – the newest addition
• Hexie Heart – sweet and sentimental
• Hexie Star – crisp and modern
• Hexie Pumpkin – warm autumn vibes
• Hexie Bunny – playful for springSwipe to see all the looks — each one has its own personality and is fun to customise with your favourite fabrics.Comment HEXIE and I’ll send you the link to the full series (available in my Pattern Store + Etsy Shop).#sewingprojects #quiltedplacemat #scrapfriendlysewing #pdfsewingpattern #sewingcommunity
The Easiest Oven Mitt You’ll Sew ✂️✨ The Baker’s The Easiest Oven Mitt You’ll Sew ✂️✨The Baker’s Buddy Mitt is one of those projects that never leaves my sewing table — smooth curves, no fiddly binding, and a construction that’s genuinely beginner‑friendly. It comes together fast, looks
beautifully shaped, and is one of my most‑gifted makes because it actually gets used in the kitchen.Here’s why makers love it:
• No binding (yes, really!)
• Modern silhouette that works with any stash fabric
• Insul‑Brite + batting layers for hand protection
• Quick, practical, and gift‑readyIf you’re after a satisfying project that looks impressive and is useful, this is the one.Comment BAKER and I’ll send you the pattern link (available in my Pattern Store and Etsy Shop).#sewinggifts #beginnersewing #quicksewingproject #scrapfriendlysewing
#bakersbuddy
Meet the Hexie House Placemat — a sweet, two‑size Meet the Hexie House Placemat — a sweet, two‑size project stitched here in Tilda Village Life. It’s beginner‑friendly, quick to sew, and perfect for adding a little handmade charm to your table.Want the link? Comment HEXIE and I'll send you the link to the Hexie House Placemat plus the other placemats in the series.Save this reel for your weekend sewing and tag me if you make one —I'd love to see your version. 🏡Pattern Details: Hexie House Placemat (2 Sizes) Sewing Pattern - Available in our Pattern Store and Etsy ShopFabric Credit: Tilda Village Life (releasing on 1 October), with thanks to @tilda_australia#hexiehouseplacemat #hexieplacemat  #fppsewing #tildafabric #tildavillagelife
The Handy Drawstring Pouch is one of those project The Handy Drawstring Pouch is one of those projects you’ll sew again and again — quick, scrap‑friendly, and endlessly useful. It opens wide, cinches neatly, and makes the sweetest little gift bag or everyday organiser. In this version I’m using Tilda Songbird, which gives it such a soft, pretty finish.If you’re looking for a fast weekend sew or a stash‑friendly project, this one is always a favourite.💬 Comment HANDY and I’ll send you the pattern link.Pattern: Handy Drawstring Pouch (3 Sizes) — available in our Pattern Store and Etsy Shop.Fabric: Tilda Songbird — thanks to @tilda_australia#handydrawstringpouch #tildasongbird #tildafabrics #sewingpattern #scrapfriendlysewing
The Luma Bucket is such a sweet and practical proj The Luma Bucket is such a sweet and practical project — perfect for storing threads, notions, yarn, and all the little things that brighten your sewing space.In this reel I’m sharing the two sizes made without the star block, starting with them nested and then showing the structure, base, and handles. I’ve filled the small bucket with perle cotton balls so you can see how much it holds.It’s a quick, satisfying sew and a lovely way to use favourite fabrics or scraps. Make one for your sewing room or as a thoughtful handmade gift.💬 Comment LUMA and I’ll send you the pattern link.
Available in our Pattern Store and Etsy Shop.#lumabucket #scrapfriendlysewing #sewingpattern #makersgonnamake
#sewingroomorganisation
The Fall Sewing Pattern Bundle is available this w The Fall Sewing Pattern Bundle is available this week only 🍁Four cosy autumn favourites — Mushroom House Pouch, Patchwork Acorn Coaster, Falling Leaves Mugrugs, and the Hexie Pumpkin Placemat.Perfect for seasonal sewing, gifting, and using your favourite scraps.Comment FALLBUNDLE and I’ll send you the bundle link. Available in our Pattern Store.#fallsewing #sewingpattern #autumnmakes #sewingcommunity #gifttosew
Follow on Instagram

Featured Pattern

Travel Sewing Kit Pattern

Featured Tutorial

Retro Drawstring Bag

Featured Recipe

Lemon Pound Cake

Connect

  • Email
  • Facebook
  • Instagram
  • Pinterest
  • Threads
  • TikTok
SUBSCRIBE TO NEWSLETTER
×

Popular Posts

  • Rediscovering Your Fabric Stash: Hidden Treasures, Changing Tastes, and Fresh Inspiration
  • Apple Crumble Slice
  • Liberty Scrap Gift Tags – A Quick, Pretty Project for Using Tiny Fabric Offcuts
  • Lavender Sachets
  • Patchwork Fabric Tray
  • Charm Square Fabric Tray
  • 10 Beginner Friendly Sewing Projects for Kids Going Back to School

Copyright © 2026 Lisa. K. Cox - A Spoonful of Sugar