A Spoonful of Sugar

Make. Bake. Create.

Menu
  • Home
  • About
    • About Us
    • Press
    • FAQ
    • Disclosure Policy
    • Contact Us
  • Crafts
    • Crochet
    • DIY
    • Embroidery/Cross stitch
    • Gift Wrapping
    • Knitting
    • Miscellaneous
    • Paper Crafts
  • Holidays
    • New Year’s
    • Australia Day
    • Back to School
    • Valentines Day
    • Easter
    • ANZAC Day
    • Mother’s Day
    • Father’s Day
    • Halloween
    • Christmas
  • Recipes
    • Appetizers
    • Bars & Slices
    • Bread & Pastries
    • Cakes
    • Cookies
    • Confectionery
    • Cupcakes & Muffins
    • Desserts
    • Drinks
    • Ice Cream
    • Jams/Preserves
    • Main Meals
  • Sewing
    • Sewing Tutorials
    • Quilting
    • Sewing & Quilting Patterns
  • Family
    • Back to School
    • Family Fun
    • Our Home
    • Parenting
    • Travel
  • Shop
    • Pattern Store
    • Etsy Store

How To Make a Knitting and Crochet Pouch

October 3, 2013 By A Spoonful of Sugar - 22 Comments

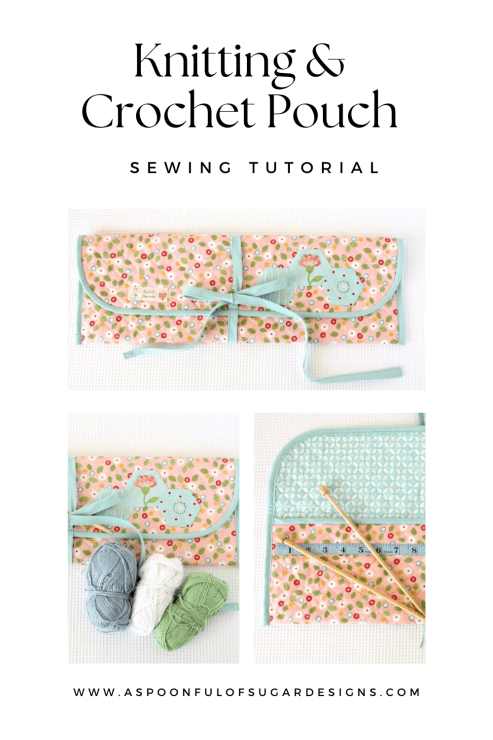
When I have a knitting or crochet project on the go, I often store it in a plastic bag so it is easy to grab when I am heading out the door. When you have teens you are always spending time in the car waiting for them and it is good to have a portable project to keep you busy.

This handy knitting and crochet project pouch is the perfect size for crafter’s on the go. Stow your latest knitting or crochet project in style. It is easily constructed from three fat quarters of co-ordinating quilter’s cotton. This knitting and crochet project pouch would make a great gift for a crafty type.


Fabric
3 Fat Quarters of quilters cotton (for pouch, lining, and binding).
1 fat quarter of quilt batting (such as Warm and Natural)
Scraps of co-ordinating fabric (for hexagons)
 
 
Other supplies
Masking tape, 1 inch wide
Co-ordinating sewing thread
Tape measure
Printed label
Hexagon Papers (1 1/4 inch on each side)
 
Equipment
Sewing machine
Rotary cutter, cutting mat, acrylic ruler
Iron
Pins
Scissors
Safety pins
 
Finished Size
19 x 6 1/2 inches
 
Note
All seam allowances are ¼ inch unless otherwise specified.


Knitting and Crochet Project Pouch
 
  • Layer the lining fabric with the wrong side facing upwards, then the batting, and then the exterior fabric on top with the right side facing upwards. Pin the layers together using safety pins. Using the 45 degree angle mark on the ruler, mark a 45 degree angle using masking tape. Stitch along the angle using the masking tape as a guide. Reposition the masking tape at 1 inch intervals until the fabric has been quilted in one direction. Using masking tape, position it at right angles to the stitched quilting and quilt in this direction until the piece of fabric is quilted in a cross hatch design.
 
Quilt Fabric
 
 
  • Trim the fabric to 19 x 17 1/2 inches.
 
Binding
 
  • Cut 6 bias strips (cut at a 45 degree angle) that are 2 ¼ inches wide starting at the middle of the fat quarter of binding fabric and working outwards.
  • Stitch two bias strips together and press the seams open (approx length 44 inches)  and trim to required length.
  • Stitch two strips together and press seam open ( approx length 48 inches) and trim to required length.
  • Trim one strip to 20 inches.
  • Take the 20 inch strip and the 44 inch strip and press them in half lengthwise.
  • Pin the 20 inch strip to the bottom edge of the quilted square, matching up the raw edges. Stitch it in place, and trim the ends.
  • Fold the binding over to the lining side so it is covering the stitching line and pin in place. Turn the fabric over to the right side, and stitch in the ditch close to the edge of the binding so that it secures the binding on the lining side.
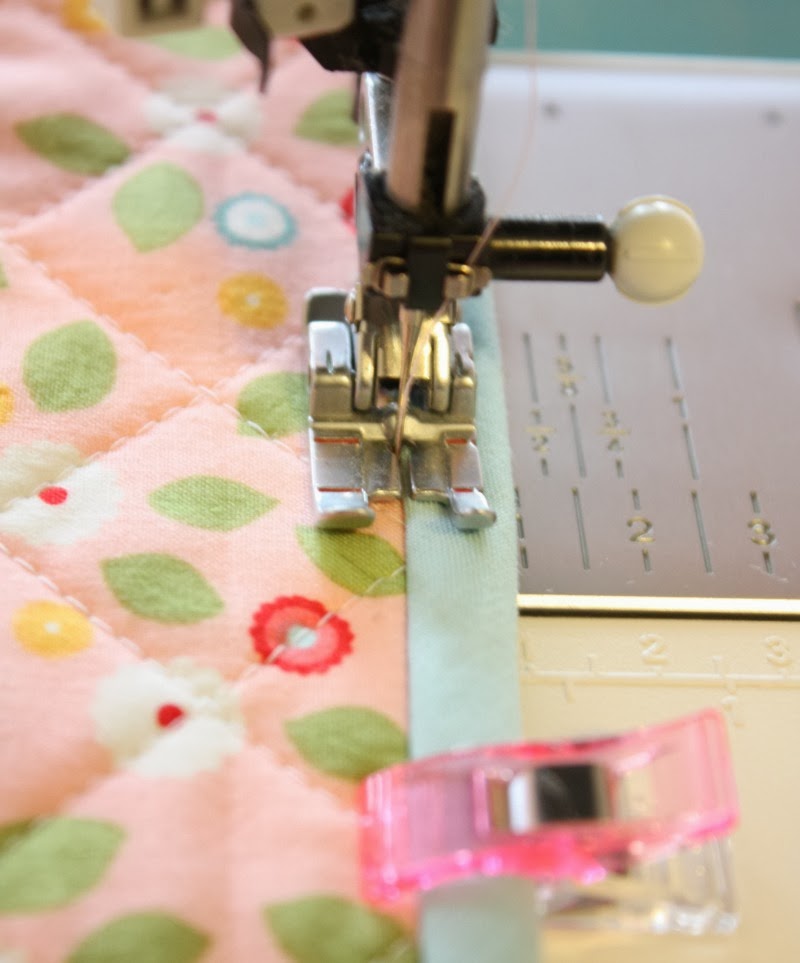
Stitch Binding in Place


Pouch Construction

 
  •  Remove the metal clip from the end of the tape measure. Cut the tape measure to 18 inches. Position the tape measure 1 1/2 inches down from the bound edge and stitch in place using a jeans needle.
Stitch Tape Measure in Place
 
  • Using a saucer as a template, round the top two corners of the pouch. The rounded part will become the flap.
Round Corners
 
  • With the lining side facing upwards, fold the straight bound bottom edge up 6 inches. Pin in place and base using a scant seam allowance through both layers.
 
Baste sides of Pouch
 
  • Take the 44 inch bias strip. With the outside of the pouch facing upwards, pin the binding to the pouch, going from one corner, around the curved flap, and over to the other corner. There should be approx 1 inch overhand at each end. Match up the raw edges, and stitch in place using a ¼ inch seam allowance.


Bind Outside of Pouch


  • Tuck in the overhanging edges, and fold the binding over to the inside so that it is covering the stitching line and pin in place. Turn the pouch so that the exterior fabric is facing upwards and sew in the ditch next to the binding so that it catches the binding on the other side
  • Take the 48 inch long bias strip, fold in half lengthwise and press. Open it up and fold both long edges into the centre crease line and press. Fold in half again so that you have a long strip that is 5/8 inch wide. Tuck in the ends, and stitch along the open edge.  Stitch the bias strip to the mid point of the flap so that 16 inches is above the stitch line, and 28 inches is below the stitch line. This will form the pouch tie.
Pouch Tie
 
 
  •  (Optional) Stitch a label to the left hand side of the pouch. Hand stitch 3 hexagons to the right side of the pouch.


Filed Under: Crochet, Knitting, Sewing, Sewing Tutorials Tagged With: bag

« Eiffel Tower Heat Bag
Make Your Own Petit Ecolier Biscuits »

Comments

  1. Sue Niven says

    October 3, 2013 at 7:52 pm

    delightful.

    Reply
    • Michelle says

      July 17, 2023 at 12:10 am

      What a clever idea with the measuring tape!

      Reply
  2. Patchwork and Play says

    October 3, 2013 at 9:52 pm

    This is DEFINITELY going on my Christmas gift list! And I know exactly who I am making it for! Thank you for sharing this Lisa!

    Reply
  3. Zuzana Mikolajova says

    October 3, 2013 at 10:45 pm

    beautifull and so cute

    Reply
  4. sewsensational says

    October 4, 2013 at 2:37 am

    This is SUCH a good idea! I normally carry my knitting around in a carrier bag but this is much more glamorous. I’ll be making one this weekend!

    Reply
  5. kim leavens says

    October 4, 2013 at 4:18 am

    This is wonderful and so cute!!! Thank you for the tute 🙂

    Reply
  6. Me Model says

    October 4, 2013 at 5:19 am

    I love the pastel colors of the pouch!

    Reply
  7. Amy Morinaka says

    October 4, 2013 at 9:05 am

    Oh Lisa, how lovely and practical this pouch is! I have been searching for a good place to store my knitting needles and you just gave me the solution!! Thanks so much for sharing! I truly admire your work and enjoy your blog, as always. Enjoy your weekend!!

    Reply
  8. Joan says

    October 4, 2013 at 11:48 am

    This is so lovely. I could use one of these pouches. Thank you for sharing.

    Reply
  9. Denise SA says

    October 14, 2013 at 1:24 pm

    Beautiful just what I need. Thank you for sharing the tutorial

    Reply
  10. Chiara Meneghesso says

    October 15, 2013 at 12:57 am

    Son d’accordo con te e anch’io quando porto in giro mia figlia e devo aspettare tanto tempo, mi porto il lavoro. Con questa busta che hai fatto tu è tutto più pratico e piacevole da vedere.

    Reply
  11. Tanya says

    October 16, 2013 at 2:20 pm

    This is such a great (and easy to follow) tutorial! Thank you for sharing.

    Reply
  12. Julie Kemmerer says

    November 8, 2013 at 5:21 pm

    Great idea. I think you do beautiful work! Your binding is beautifully done, mine is always snagged in a few places. Thank you for this – I will be making one.

    Reply
  13. Potpourri says

    November 16, 2013 at 11:45 am

    Perfect.

    Reply
  14. Peg says

    April 6, 2016 at 11:17 am

    This is so pretty, and so much nicer than some I’ve seen online to purchase! Definitely going to make a couple of these….one for my crochet hooks, and one for other small items I like to keep in my bag(s) that tend to get lost in the crowd! Great tutorial — thank you!

    Reply

Leave a Reply Cancel reply

Your email address will not be published. Required fields are marked *

  • Email
  • Facebook
  • Instagram
  • Pinterest
  • Threads
  • TikTok
SUBSCRIBE TO NEWSLETTER
×

Categories

Archives

PURCHASE PDF PATTERNS

We offer over 100 affordable PDF sewing patterns available for download from our store website or Etsy store. Each pattern includes detailed instructions, numerous photos, and templates.

WEB STORE ETSY STORE

Instagram

Meet the Luma Bucket ✨  A modern fabric organiser Meet the Luma Bucket ✨ A modern fabric organiser in two sizes — perfect for sewing rooms, desks, and handmade gifting. Featuring a crisp contrast base and a sparkling woven star panel, it’s a quick, joyful sew you’ll use every day. Pattern now available in our Pattern Store and Etsy Shop. Comment LUMA for the link.  #lumabucket #fppsewing #fabricbasket #modernsewing #quiltingprojects handmadegifts
Two bestselling pouches, one beautiful matching se Two bestselling pouches, one beautiful matching set The Handy Drawstring Pouch + Mini Treat Pouch remain two of my most‑loved patterns — quick to sew, beginner‑friendly, and perfect for using up favourite fabric scraps. They’re sweet individually, but together they make the loveliest coordinated duo for gifting, organising, or adding a handmade touch to your sewing space.This Tilda version has been a community favourite, and it’s easy to see why — the colours, the structure, the way the two designs complement each other. If you’ve been wanting a satisfying weekend project, this pair is such a joy to stitch.You also save 25% when you buy the bundle — a thank you for supporting two of my most popular pouch patterns.Comment BAGDUO and I’ll send the bundle link straight to you.Available in my Pattern Store and Etsy Shop ✂️🧵Fabric: Tilda Songbird collection — thank you @tilda_australia#tildafabrics #scrapfriendlysewing #sewingpattern #weekendsewingproject #sewistsofinstagram handmadegifts
✨ New Travel Sewing Kits These two fresh versions ✨ New Travel Sewing Kits These two fresh versions match a Bitsy Basket, and I love how sweet they look as a little set. The Travel Sewing Kit opens flat so you can see everything at a glance, then folds back into a neat, portable shape — perfect for sewing on the go, gifting, or keeping your favourite tools organised.It’s beginner‑friendly, scrap‑friendly, and one of my most‑used makes.Comment TRAVEL and I’ll send the pattern link straight to you. Available in my Pattern Store and Etsy Shop ✂️🧵#travelsewingkit #sewingreels #scrapfriendlysewing #sewingpattern #handmadegifts
✨ Colour Crush: Orange 10 scrappy, cheerful proje ✨ Colour Crush: Orange
10 scrappy, cheerful projects to stitch as we head toward fall 🍊There’s something about orange that feels cosy, warm, and full of creative energy — perfect for small makes, gifts, and weekend sewing. If you’re starting to plan your fall projects, this palette is such a fun place to begin.Comment PATTERNS for a link to our pattern store.Happy sewing, friends ✂️🧵#colourcrushseries #orangeprojects #scrapfriendlysewing #fallsewingideas #aspoonfulofsugardesigns
Sharing this Tilda scrappy Quadra Pouch - the mix Sharing this Tilda scrappy Quadra Pouch - the mix of blenders looks so beautiful in the large size. Eight fabrics in total — four Bellflower prints for the exterior and four Stella prints for the lining — each corner showing off a different print.The clever panel construction gives the pouch its neat, structured base without boxed corners, making it practical, beautifully shaped, and perfect for using up favourite scraps.Comment QUADRA and I’ll send the pattern link straight to you. Pattern available in the Pattern Store and Etsy Shop ✨Fabric: Bellflower + Stella blenders from Tilda, with thanks to @tilda_australia#quadrapouch #tildafabrics #scrapfriendlysewing #pouchpattern #sewingproject
✨ Bitsy Basket Our Pattern of the Week — 25% off ✨ Bitsy Basket Our Pattern of the Week — 25% offThe Bitsy Basket is one of those tiny projects that’s endlessly useful — perfect for gifting, organising, or adding a sweet handmade touch to your space. The clever cord lock gives the top such a neat, polished finish.It’s beginner‑friendly, scrap‑friendly, and quick to sew — all my favourite things.Comment BASKET and I’ll send the pattern link straight to you. Pattern is available in the Pattern Store and Etsy Shop ✨Fabric Details: Tilda Songbird - thanks to @tilda_Australia#bitsybasket #scrapfriendlysewing #gifttosew #beginnerfriendlysewing #tildasongbird
Follow on Instagram

Featured Pattern

Travel Sewing Kit Pattern

Featured Tutorial

Retro Drawstring Bag

Featured Recipe

Lemon Pound Cake

Connect

  • Email
  • Facebook
  • Instagram
  • Pinterest
  • Threads
  • TikTok
SUBSCRIBE TO NEWSLETTER
×

Popular Posts

  • Sewing Projects for Cat and Dog Lovers
  • Patchwork Triangle Pouch
  • Charm Square Fabric Tray
  • Easy Baby Blanket
  • Teen Craft: Monogrammed Notebooks
  • Triangle Pouch
  • Apple Crumble Slice

Copyright © 2026 Lisa. K. Cox - A Spoonful of Sugar