A Spoonful of Sugar

Make. Bake. Create.

Menu
  • Home
  • About
    • About Us
    • Press
    • FAQ
    • Disclosure Policy
    • Contact Us
  • Crafts
    • Crochet
    • DIY
    • Embroidery/Cross stitch
    • Gift Wrapping
    • Knitting
    • Miscellaneous
    • Paper Crafts
  • Holidays
    • New Year’s
    • Australia Day
    • Back to School
    • Valentines Day
    • Easter
    • ANZAC Day
    • Mother’s Day
    • Father’s Day
    • Halloween
    • Christmas
  • Recipes
    • Appetizers
    • Bars & Slices
    • Bread & Pastries
    • Cakes
    • Cookies
    • Confectionery
    • Cupcakes & Muffins
    • Desserts
    • Drinks
    • Ice Cream
    • Jams/Preserves
    • Main Meals
  • Sewing
    • Sewing Tutorials
    • Quilting
    • Sewing & Quilting Patterns
  • Family
    • Back to School
    • Family Fun
    • Our Home
    • Parenting
    • Travel
  • Shop
    • Pattern Store
    • Etsy Store

Tutorial: Handbag Gift Card Holder

May 30, 2009 By Spoonful of Sugar - 24 Comments

With a few birthdays coming up,  I needed a way to give money or gift cards.  We had some paint chips left over from last years craft, so I used those to make some handbag gift card holders. 

Materials:

  • Paint Chips (I used Taubmans)
  • Double-sided sticky tape
  • embellishment
  • ribbon

Firstly, I stuck two paint chips together around three sides to make the handbag. The paint chips I used had a rounded base. If you don’t have Taubmans paint chips,  shape the base of the handbag by rounding the corners on the paint chips.  Then I attached  a smaller paint chip on the back of the handbag and folded it over to the front to make a flap. Then I attached the ribbon to make the handle of the handbag and added an embellishment to the flap to finish.
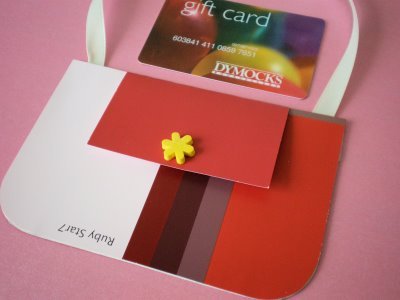
Posted by Sarah

Filed Under: Gift Wrapping, Miscellaneous, Paper Crafts Tagged With: gift tag, paint chip

« Autumn Activities
Productivity Plus »

Comments

  1. Christy says

    May 30, 2009 at 11:03 pm

    What a stylish way to present gift cards. I love it!

    Reply
  2. suzitee says

    May 30, 2009 at 11:12 pm

    What a great idea Sarah! They look fantastic…I never would have thought of that 😉

    Reply
  3. AJ says

    May 31, 2009 at 2:46 pm

    That is so creative and looks awesome!

    Reply
  4. Sandra @ Pepperberry and Co. says

    May 31, 2009 at 12:35 am

    Gorgeous as always, ladies!

    Reply
  5. Jodie says

    May 31, 2009 at 12:39 am

    You are the queen of the paint chip – maybe you need to gather all your paint chip crafts into one section on the sidebar.

    Reply
  6. Jelly Wares says

    May 31, 2009 at 1:03 am

    What a super cute idea!!! thanks for sharing…

    Take Care
    Jodie 🙂

    Reply
  7. Jenni says

    May 31, 2009 at 1:17 am

    That looks fantastic. I like that idea.

    Reply
  8. Kerry says

    May 31, 2009 at 1:53 am

    What an inventive person you are. I had to let you know that I tried out your passionfruit slice and it was yummy! And very easy to make too!

    Reply
  9. Sandrine says

    May 31, 2009 at 2:10 am

    YOu are so clever again! I have a load of these cards…I find a use for them now;)

    Reply
  10. Sandy Shirley says

    May 31, 2009 at 4:18 am

    That is ingenious! Can’t wait to make several of these!

    Reply
  11. Martys Fiber Musings says

    May 31, 2009 at 4:31 am

    What a great idea to sass up a gifted gift card. Love it and thanks for sharing.

    Reply
  12. Tania says

    May 31, 2009 at 5:02 am

    OK. Now you have been officially crowned Queen of Lateral Thinking. I’m still catching up with the security envelope thing. (I much prefer looking at the nice graphic patterns than the bill thingies).

    Reply
  13. Stephanie says

    May 31, 2009 at 5:07 am

    How absolutely clever and cute.

    Reply
  14. Renee says

    May 31, 2009 at 5:48 am

    Do you know how to make a giraffe bow?

    Just wondering because you know how to do everything else really well.

    Love Renee xoxoo

    Reply
  15. Terriaw says

    May 31, 2009 at 6:14 am

    Adorable! I just love the creative ways you come up with using paint chips! This handbag is just perfect.

    Reply
  16. Feedsack Fantasy says

    May 31, 2009 at 8:48 am

    Cheerful, creative, clever …
    cute as a button.
    TTFN ~ Marydon

    Reply
  17. Kim says

    May 31, 2009 at 8:50 am

    What a fun idea! I was thinking that you could add a strip of paper to cover up the paint name with a greeting of choice like, Happy Birthday, Congrats, Thinking of You, Just because, I LOVE You!, etc.

    Thanks for sharing your wonderful ideas with us.

    Reply
  18. A World in a PAN says

    May 31, 2009 at 9:47 am

    I bought today sidewalk chalk for the grand-daughter of a friend of mine. Do you ever use them?

    Reply
  19. Natasha says

    May 31, 2009 at 2:11 pm

    What a super cute idea! Love it!

    Reply
  20. The Quilt Buddy says

    May 31, 2009 at 5:19 pm

    Cute way to recycle the paint chips!

    Reply
  21. Handmade in Israel says

    May 31, 2009 at 11:22 pm

    Really lovely!

    Reply
  22. Annie says

    June 1, 2009 at 2:50 am

    You’re a crafty little reycler aren’t you!

    Reply
  23. Shannon says

    June 2, 2009 at 10:13 am

    This is just the best idea – I am off to get some paint chips for the graduation gift cards I need to give!

    Reply
  24. Caroline says

    June 6, 2009 at 12:36 pm

    Added to my blog as I absolutely LOVE this idea! Tres chic for a teacher end of the year gift!

    Love your blog!

    Reply

Leave a Reply Cancel reply

Your email address will not be published. Required fields are marked *

  • Email
  • Facebook
  • Instagram
  • Pinterest
  • Threads
  • TikTok
SUBSCRIBE TO NEWSLETTER
×

Categories

Archives

PURCHASE PDF PATTERNS

We offer over 100 affordable PDF sewing patterns available for download from our store website or Etsy store. Each pattern includes detailed instructions, numerous photos, and templates.

WEB STORE ETSY STORE

Instagram

If you love foundation paper piecing, you’re going If you love foundation paper piecing, you’re going to enjoy this one — a bundle of four woven‑style FPP quilt blocks, each with its own beautiful twist. These blocks look intricate, but the FPP method makes them wonderfully achievable, even if you’re still building your skills.They’re perfect for using up scraps, experimenting with colour, or creating striking mini quilts, cushions, bags, or table decor. Each block has that satisfying “woven” illusion that always gets a second look.Whether you prefer bold brights, soft pastels, or a monochromatic palette, these designs shine in every colourway. And the best part? You get all four blocks together in one bundle.If you’d like the pattern set, comment WOVEN and I’ll send the link straight to you. Woven bundle is available in our Pattern Store.#SewingInspiration #FPP #FoundationPaperPiecing #QuiltBlocks #WovenQuiltBlock
If you love quick, practical sewing projects, the  If you love quick, practical sewing projects, the Baker’s Buddy Mitt is such a fun one to make. It’s scrap‑friendly, gift‑ready, and perfect for anyone who loves to bake.The Bakers Buddy Mitt is 25% off this week only. Comment BAKER and I’ll send you the link to the pattern.  #SewingProject #ScrapFriendlySewing #KitchenSewing #SewingGifts #SewingCommunity
Adding a handmade label is one of my favourite way Adding a handmade label is one of my favourite ways to personalise a project — and these little fabric + felt labels are so quick and satisfying to make.For this Ribbon Pouch, I used the Liberty Gifts from the Garden collection, which has the sweetest fruit motifs. They make perfect tiny labels for pouches, bags, and gifts.Here’s how to make your own:Press a piece of double‑sided fusible web to the back of your fabric.Cut around your chosen motif.Peel off the paper backing.Press the motif onto wool felt.Trim the felt with scalloped scissors.Sew the label onto the front of your pouch.Such a simple detail, but it adds so much charm. Fabric kindly gifted by @regent_street_fabrics — thank you!If you’d like to sew the Ribbon Pouch (3 sizes), comment RIBBON and I’ll send the pattern link straight to you.#SewingInspiration #FabricLabels #DIYLabels #LibertyFabric #LibertyGiftsFromTheGarden
A lot can change in 10 years ❤️ It’s been fun look A lot can change in 10 years ❤️ It’s been fun looking back at where I was in 2016 and how far life has come since then. Swipe for a little trip down memory lane.Back in 2016, my priorities were firmly centred around family. I was working full‑time, sewing in the guest room, sharing tutorials on my blog, and slowly dipping my toes into selling a handful of patterns on Etsy. It was a busy, full season — and creativity was something I fitted in around everything else.  Fast forward to 2026… I’m now retired and living the creative life I once dreamed of. My kids have grown up and are living in their own homes nearby. My husband and I are free to travel, explore, and enjoy this stage of life. And I get to spend my days designing, sewing, and connecting with this beautiful community.Life looks different now — in the best possible way.Were you following me back then, or what has changed for you over the past 10 years? I’d love to hear your story too.Tagging the lovely makers of my quilt: @arabesquescissors @ministryoffabric @belloquacity @alittlepatchwork @sameliasmum coleandtaffy @quiltymamaof4 @shequiltsalot @downgrapevinelane @lizzierosesews @lovethatfabric @sew_mimi.k #2026isthenew2016 #10yeartransformation #sewingjourney #sewingcommunity #aspoonfulofsugardesigns
Fall in love with sewing all over again ❤️I’ve Fall in love with sewing all over again ❤️I’ve rounded up 10 heart‑themed makes — from quick gifts to charming quilt blocks — perfect for weekend stitching or using up your favourite scraps. Whether you’re sewing for Valentine’s Day, birthdays, or just because, there’s something sweet for every maker.Comment HEART and I’ll send you a link to my Heart Pattern Collection.#sewingproject #heartsewing #quiltblock #scrapsewing #easytosew
Raw edge appliqué doesn’t have to feel fiddly or i Raw edge appliqué doesn’t have to feel fiddly or intimidating. With a few simple techniques, you can create neat, crisp shapes — even tiny details like penguin beaks and hearts.I’ve put together My Top 5 Secrets for Raw Edge Appliqué to help you feel confident, whether you’re brand new to appliqué or looking to refine your finish. Save this for your next sewing session.If you’d love a quick, beginner‑friendly project to practise these tips, my Penguin Love Mugrug is the sweetest Valentine’s make — scrap‑friendly, gift‑ready, and such fun to sew.Comment PENGUIN and I’ll send you the link to the pattern. Available now in our Pattern Store and Etsy shop.  #rawedgeapplique #appliquetips #sewingtipsandtricks #mugrugpattern #penguinlove
Follow on Instagram

Featured Pattern

Travel Sewing Kit Pattern

Featured Tutorial

Retro Drawstring Bag

Featured Recipe

Lemon Pound Cake

Connect

  • Email
  • Facebook
  • Instagram
  • Pinterest
  • Threads
  • TikTok
SUBSCRIBE TO NEWSLETTER
×

Popular Posts

  • Charm Square Fabric Tray
  • Merry Little Christmas Sewing Projects
  • {Back to School} Tissue Cover
  • Hexagon Fabric Tray
  • Raw Edge Applique Tips
  • Sewing Gifts 101: Easy and Affordable Ideas for Your Crafty Friends
  • Finding More Time to Sew

Copyright © 2026 Lisa. K. Cox - A Spoonful of Sugar