A Spoonful of Sugar

Make. Bake. Create.

Menu
  • Home
  • About
    • About Us
    • Press
    • FAQ
    • Disclosure Policy
    • Contact Us
  • Crafts
    • Crochet
    • DIY
    • Embroidery/Cross stitch
    • Gift Wrapping
    • Knitting
    • Miscellaneous
    • Paper Crafts
  • Holidays
    • New Year’s
    • Australia Day
    • Back to School
    • Valentines Day
    • Easter
    • ANZAC Day
    • Mother’s Day
    • Father’s Day
    • Halloween
    • Christmas
  • Recipes
    • Appetizers
    • Bars & Slices
    • Bread & Pastries
    • Cakes
    • Cookies
    • Confectionery
    • Cupcakes & Muffins
    • Desserts
    • Drinks
    • Ice Cream
    • Jams/Preserves
    • Main Meals
  • Sewing
    • Sewing Tutorials
    • Quilting
    • Sewing & Quilting Patterns
  • Family
    • Back to School
    • Family Fun
    • Our Home
    • Parenting
    • Travel
  • Shop
    • Pattern Store
    • Etsy Store

Spring Tea Towel

March 11, 2017 By A Spoonful of Sugar - 5 Comments

Spring Tea Towel - sewing tutorial by A Spoonful of Sugar

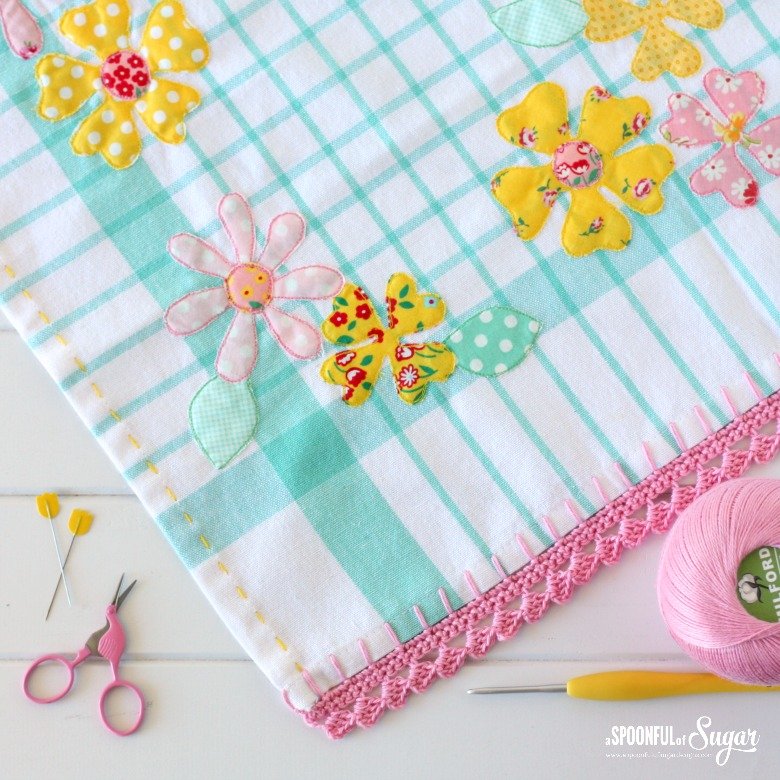
With Easter fast approaching, I wanted to make a Spring inspired tea towel that featured pretty flowers rather than using traditional Easter motifs (like bunnies and eggs).  The Spring Tea Towel features assorted flowers in pink and yellow that are raw edged appliqued onto a ready made tea towel. Embroidered details and crocheted edging were added. This is such a fun, quick project, that really adds a pop of colour to your Easter table. I have shown a few peeks over on instagram over the past week and was asked to provide some directions.

Spring Tea Towel - sewing tutorial by A Spoonful of Sugar

I won’t be actually be using the tea towel  to dry dishes (it is way too pretty for that!), but it is perfect to line a breakfast tray; wrap up some fresh scones or hot cross buns; or simply to bring some colour into your kitchen. The spring inspired tea towel would make a sweet hostess gift, and would be ideal to include with a gift from your kitchen. If you don’t know how to crochet, consider adding a pompom trim, large ricrac, or even a fabric ruffle to the bottom edge of the tea towel.

Spring Tea Towel - sewing tutorial by A Spoonful of Sugar

If you would like to make your own Spring Tea Towel, here are some general instructions.

You will need the following materials:

  • scraps of fabric in pink, yellow, aqua, and green for the floral appliques
  • Tea Towel
  • fusible web (such as Steam a Seam or Vliesofix)
  • embroidery thread in yellow
  • crochet cotton, 3 ply, in pink

*Note on Fabrics: I used Old New 30’s 2017 by Atsuko Matsuyama for Lecien Fabrics; and Dots and Ginghams by Lecien Fabrics. Florals, ginghams, and polka dots work so well together.

* Note on Tea Towels: I often stock up on tea towels that would make great applique foundations – checks, polka dots, stripes or low volume patterns work well. I prefer tea towels that are 100% cotton and it is best to pre-wash as they can shrink.  Mine came from Target, but check out Amazon for some great designs.

Instructions:

  1. Draw nine flowers (small, medium, and large) and six leaves on the paper backing of the fusible web. Cut around the design, leaving at least 1/4 inch around the design. Fuse onto the back of the fabric scraps following manufacturers directions. Cut out each flower and leaf.  I used 5 yellow flowers and 4 pink flowers. Refer to the top photo in this post for suggested layout. I gave some of the flowers a coloured centre for added interest. Fuse in place on the tea towel.

Spring Tea Towel - sewing tutorial by A Spoonful of Sugar

2. Set your stitch length to 1.5 – 2.0. Slowly and carefully stitch around each shape two or three times to secure. An open toe sewing foot makes this easier to see where you are sewing. Sew close to the edge. I matched the thread colours to the fabric, but you can use a darker colour for added contrast.

Spring Tea Towel - sewing tutorial by A Spoonful of Sugar

3. Using three strands of embroidery thread, stitch a running stitch along both long sides, and the top of the tea towel. I stitched on the existing stitching line on the tea towel.

Spring Tea Towel - sewing tutorial by A Spoonful of Sugar

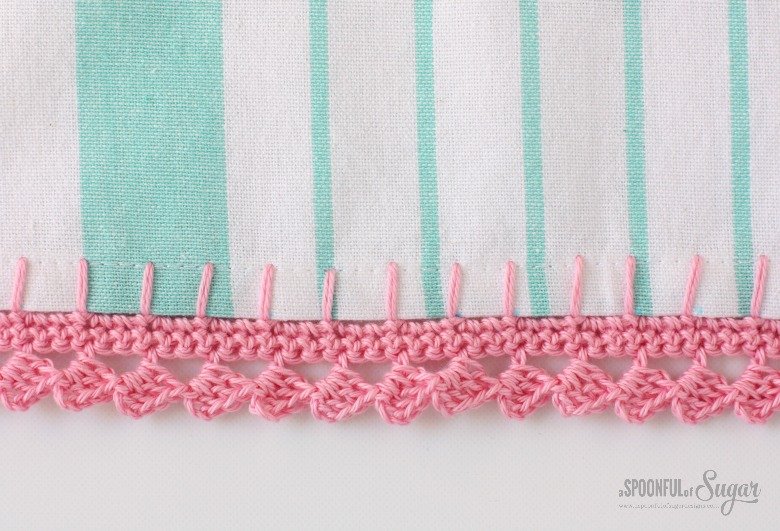
4. Cut a length of 3 ply crochet cotton that is four times the width of the tea towel. Thread the yarn onto a wool needle. Tie both ends together. You will blanket stitch along the bottom of the tea towel to form the foundation for the crochet.Using a water soluble pen, mark dots around the edge of the tea towel at ½ inch intervals. Starting at one corner, bring the needle inside the tea towel and blanket stitch along the edge using stitches that are 3/8 inch in length, and spaced ½ inch apart where marked.

5. Using a 2.75 mm crochet hook, crochet the edging as follows:

  • Row 1: crochet 3 single crochets into the bottom of each blanket stitch.
  • Row 2: crochet a single crochet into each SC of row 1.
  • Row 3:  Ch 3, skip first 2 stitches, *1 DC in next st, Ch 3, 3 DC around the post of the DC, skip next 2 stitches; Rep from * to last 3 stitches, Ch 3, slst in last stitch of previous row.
  • Spring Tea Towel - sewing tutorial by A Spoonful of Sugar

The Spring Tea Towel was such a fun project and great way to use some of your favourite fabric scraps. Our Guest Towel with Fabric Trim shows another way of decorating ready made towels.

Check out more of our Easter inspired craft projects here.

Disclaimer: Thanks to Lecien Fabrics for providing the fabric used in this project. This post contains affiliate links. All opinions are our own.

Filed Under: Crochet, Easter, Sewing Tutorials Tagged With: applique, crochet, Easter, embroidery, spring

« Fabric Covered Berry Box
Easter Sewing and Crafts »

Comments

  1. Carole @ From My Carolina Home says

    March 11, 2017 at 11:27 pm

    Very sweet. I love the way you style your pictures, your blog is always a pleasure to see!

    Reply
    • A Spoonful of Sugar says

      March 12, 2017 at 8:09 am

      Thanks so much Carole – I have a lot of fun taking the photos 🙂 It gives me a good excuse to “play” with my vintage haberdashery.

      Reply
  2. Chris Smith says

    March 12, 2017 at 2:01 am

    Peta, this is so pretty! I am very inspired to try this. Thank you for sharing!

    Reply
    • A Spoonful of Sugar says

      March 12, 2017 at 8:08 am

      You are welcome Chris – glad you feel inspired. They are so much fun to make!

      Reply
  3. Ayda-cafenohut says

    March 13, 2017 at 2:19 pm

    Ohh! Looks so sweet. I really love so much your all works…

    Reply

Leave a Reply Cancel reply

Your email address will not be published. Required fields are marked *

  • Email
  • Facebook
  • Instagram
  • Pinterest
  • Threads
  • TikTok
SUBSCRIBE TO NEWSLETTER
×

Categories

Archives

PURCHASE PDF PATTERNS

We offer over 100 affordable PDF sewing patterns available for download from our store website or Etsy store. Each pattern includes detailed instructions, numerous photos, and templates.

WEB STORE ETSY STORE

Instagram

A lot can change in 10 years ❤️ It’s been fun look A lot can change in 10 years ❤️ It’s been fun looking back at where I was in 2016 and how far life has come since then. Swipe for a little trip down memory lane.Back in 2016, my priorities were firmly centred around family. I was working full‑time, sewing in the guest room, sharing tutorials on my blog, and slowly dipping my toes into selling a handful of patterns on Etsy. It was a busy, full season — and creativity was something I fitted in around everything else.  Fast forward to 2026… I’m now retired and living the creative life I once dreamed of. My kids have grown up and are living in their own homes nearby. My husband and I are free to travel, explore, and enjoy this stage of life. And I get to spend my days designing, sewing, and connecting with this beautiful community.Life looks different now — in the best possible way.Were you following me back then, or what has changed for you over the past 10 years? I’d love to hear your story too.Tagging the lovely makers of my quilt: @arabesquescissors @ministryoffabric @belloquacity @alittlepatchwork @sameliasmum coleandtaffy @quiltymamaof4 @shequiltsalot @downgrapevinelane @lizzierosesews @lovethatfabric @sew_mimi.k #2026isthenew2016 #10yeartransformation #sewingjourney #sewingcommunity #aspoonfulofsugardesigns
Fall in love with sewing all over again ❤️I’ve Fall in love with sewing all over again ❤️I’ve rounded up 10 heart‑themed makes — from quick gifts to charming quilt blocks — perfect for weekend stitching or using up your favourite scraps. Whether you’re sewing for Valentine’s Day, birthdays, or just because, there’s something sweet for every maker.Comment HEART and I’ll send you a link to my Heart Pattern Collection.#sewingproject #heartsewing #quiltblock #scrapsewing #easytosew
Raw edge appliqué doesn’t have to feel fiddly or i Raw edge appliqué doesn’t have to feel fiddly or intimidating. With a few simple techniques, you can create neat, crisp shapes — even tiny details like penguin beaks and hearts.I’ve put together My Top 5 Secrets for Raw Edge Appliqué to help you feel confident, whether you’re brand new to appliqué or looking to refine your finish. Save this for your next sewing session.If you’d love a quick, beginner‑friendly project to practise these tips, my Penguin Love Mugrug is the sweetest Valentine’s make — scrap‑friendly, gift‑ready, and such fun to sew.Comment PENGUIN and I’ll send you the link to the pattern. Available now in our Pattern Store and Etsy shop.  #rawedgeapplique #appliquetips #sewingtipsandtricks #mugrugpattern #penguinlove
If you’ve ever wanted to add eyelets or grommets t If you’ve ever wanted to add eyelets or grommets to your sewing projects, here’s a quick look at how I install them using my DK93 snap press. It’s the same tool I use for snaps — and it makes installing eyelets beautifully quick and consistent.For this Ribbon Pouch, I used the Liberty Gifts from the Garden collection (printed on Lasenby cotton and released in January 2026). The colours and motifs pair so well with the little ribbon tie detail.Here’s how to install the eyelets:Punch out the four holes using a hole‑cutting die.Place the eyelet into the hole.Press it into place using the snap press.That’s it — easy peasy, and it gives the pouch such an elevated, professional finish. I love how clean and sturdy the result is.Fabric is Gifts from the Garden by Liberty - kindly provided by @regent_street_fabrics — thank you!If you’d like the Ribbon Pouch pattern (it comes in 3 sizes), comment RIBBON and I’ll send the link straight to you.Ribbon Pouch Sewing Pattern: available in our Pattern Store and Etsy shop ( links in profile).#SewingInspiration #SewingProjects #Eyelets #Grommets #SnapPress
The Twirling Treasures Hot Pad & Placemat Set show The Twirling Treasures Hot Pad & Placemat Set showcases one of my favourite FPP designs — a stunning kaleidoscope‑style block that always turns out beautifully. Kaleidoscope blocks are some of my most popular FPP patterns, and this set is such a fun way to use them.  This set includes six sizes, making it incredibly versatile: use them as hot pads, trivets, placemats, or simply as a way to add a pop of colour to your kitchen.For these samples, I went with a monochromatic scrap‑busting approach, pairing fabrics from the same colour family with a low‑volume background. The black‑and‑white striped binding adds such a crisp, modern finish. It’s a wonderful project for building your FPP confidence — and a fantastic way to use up those treasured scraps.The Twirling Treasures Hot Pad set is our Pattern of the Week. It is currently 25% off this week in our Pattern Store and Etsy Shop.If you’d like to sew your own set, comment TWIRL and I’ll send the pattern link straight to you.Happy sewing! Lisa 🌸#FoundationPaperPiecing #Quilting #HotPads #ScrapBuster #KitchenSewing
The Ribbon Pouch is one of those little makes that The Ribbon Pouch is one of those little makes that feels special from the very first stitch. I made this sweet trio in the Liberty Gifts from the Garden collection, and the colours couldn’t be more perfect for gifting, organising, or adding a little beauty to your everyday.Each pouch features: 🌼 A simple ribbon tie closure 🎀 Optional sew‑in tags or DIY felt/fabric labels 🧵 Three practical sizes — perfect for notions, treats, or small gifts ✨ A quick, beginner‑friendly sewIf you’d like to make your own, comment RIBBON and I’ll send the pattern link straight to your inbox. Save this for your next weekend project — it’s such a satisfying little sew. Pattern is available in our Pattern Store.Thanks to @regent_street_fabric for the Gifts from the Garden fabric collection. (released Jan 2026)#SewingInspiration #SewingProjects #LibertyFabric #SewingPatterns #BeginnerSewing
Follow on Instagram

Featured Pattern

Travel Sewing Kit Pattern

Featured Tutorial

Retro Drawstring Bag

Featured Recipe

Lemon Pound Cake

Connect

  • Email
  • Facebook
  • Instagram
  • Pinterest
  • Threads
  • TikTok
SUBSCRIBE TO NEWSLETTER
×

Popular Posts

  • Charm Square Fabric Tray
  • Merry Little Christmas Sewing Projects
  • {Back to School} Tissue Cover
  • Raw Edge Applique Tips
  • Sewing Gifts 101: Easy and Affordable Ideas for Your Crafty Friends
  • Fabric Gift Pouch
  • Free Holiday Sewing Tutorials

Copyright © 2026 Lisa. K. Cox - A Spoonful of Sugar