A Spoonful of Sugar

Make. Bake. Create.

Menu
  • Home
  • About
    • About Us
    • Press
    • FAQ
    • Disclosure Policy
    • Contact Us
  • Crafts
    • Crochet
    • DIY
    • Embroidery/Cross stitch
    • Gift Wrapping
    • Knitting
    • Miscellaneous
    • Paper Crafts
  • Holidays
    • New Year’s
    • Australia Day
    • Back to School
    • Valentines Day
    • Easter
    • ANZAC Day
    • Mother’s Day
    • Father’s Day
    • Halloween
    • Christmas
  • Recipes
    • Appetizers
    • Bars & Slices
    • Bread & Pastries
    • Cakes
    • Cookies
    • Confectionery
    • Cupcakes & Muffins
    • Desserts
    • Drinks
    • Ice Cream
    • Jams/Preserves
    • Main Meals
  • Sewing
    • Sewing Tutorials
    • Quilting
    • Sewing & Quilting Patterns
  • Family
    • Back to School
    • Family Fun
    • Our Home
    • Parenting
    • Travel
  • Shop
    • Pattern Store
    • Etsy Store

Quick Valentine Garland

February 7, 2009 By Spoonful of Sugar - 47 Comments

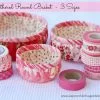
This Valentine’s garland is a quick and effective project! Simply punch out hearts in red and pink card stock, sew together and then use them to embellish a gift or drape them over an ornament or picture frame for some Valentine decor!

Posted by Lisa

Filed Under: Sewing

« Silver Craft
Sewing Time »

Comments

  1. Erin says

    February 7, 2009 at 11:02 am

    Lisa,

    I love the little garland hearts. I especially love the little pouch that you made in the first picture. Very adorable. Ahhh – you guys are so talented.

    Erin

    Reply
  2. Dancin' Puffin says

    February 7, 2009 at 3:59 pm

    Simple yet very effective. I thought they were in felt to start with. Pretty.

    Reply
  3. Stephanie says

    February 7, 2009 at 5:58 am

    So pretty and I love how you have them draped over that gorgeous tree. I remember it from aChristmas posting.

    Reply
  4. Michelle says

    February 7, 2009 at 6:16 am

    oh so sweet…you could do lots with this…a little set of dolls would be cute?…

    Reply
  5. Hi ! I'm Cindy says

    February 7, 2009 at 7:18 am

    What a simple easy project that gives a lot of impact! Love it!

    ~ Cindy

    Reply
  6. Sheri Howard says

    February 7, 2009 at 7:59 am

    Cute garland idea, and CONGRATS on your magazine article…I am fairly new to your blog and I am really enjoying it! Thanks for all your great ideas…I too will make a Passport holder!

    Reply
  7. Thimbleanna says

    February 7, 2009 at 8:07 am

    Well, how cute is that? You could drape your whole house in hearts!!!

    Reply
  8. Tatty Mum says

    February 7, 2009 at 8:37 am

    oh so cute… my little girl would love some of them in her bedroom.

    Joanne x

    Reply
  9. Stephanie says

    February 7, 2009 at 9:29 am

    So cute!

    Reply
  10. Valoo from France says

    February 7, 2009 at 10:39 am

    first time here for me ; thanks for this idea with multiple (even unlimited) possible uses …

    Reply
  11. Chocolate Cat says

    February 7, 2009 at 11:26 am

    Another great and easily achievable idea!! I am working in the boarding house on Saturday so am planning on taking in heart shaped cupcakes!!

    Reply
  12. Terriaw says

    February 7, 2009 at 11:28 am

    I love your idea of making this garland with heart shapes rather than just circles. So adorable!

    Reply
  13. Natasha says

    February 7, 2009 at 12:30 pm

    Love the garland – very quick and effective. There are all sorts of possibilities!

    Reply
  14. Sarah-Jo says

    February 7, 2009 at 1:33 pm

    oh how delightful I have that freedom tree so will definately whip up this super sweet V Day garland…brillant idea 🙂

    Reply
  15. Christy A. says

    February 7, 2009 at 3:52 pm

    Lovely idea Lisa! It’s super sweet!

    Reply
  16. Kate says

    February 7, 2009 at 4:04 pm

    Love this idea!

    Reply
  17. Annie Pazoo says

    February 7, 2009 at 4:38 pm

    What a fantastic idea! Love it!

    Reply
  18. raining sheep says

    February 7, 2009 at 10:04 pm

    I so love that… even I can sew that. What an awesome idea.

    Reply
  19. Tinniegirl says

    February 8, 2009 at 2:03 am

    What a gorgeous idea. You are so full of fab craft ideas.

    Reply
  20. Melanie says

    February 8, 2009 at 6:23 pm

    Hi I’m popping in (nosing around) fellow Time For Tea Swappers.

    What a lovely idea!

    Reply
  21. Kirsty says

    February 8, 2009 at 3:56 am

    Super cute – it looks great around the little box.

    Reply
  22. Rustic Tarts says

    February 8, 2009 at 9:28 pm

    Hi Lisa
    Thanks for linking to my blog, I have been enjoying visits from lots of your friends!

    Reply
  23. Angel.Pearls says

    February 8, 2009 at 9:59 am

    Lovely projects! Thanks for your visit! Nice week//Eva

    Reply
  24. Jessica says

    February 8, 2009 at 1:23 pm

    That’s so festive…I need a little bit of red around here.

    Reply
  25. Rachel@oneprettything.com says

    February 8, 2009 at 3:48 pm

    That’s beautiful! And I loved how you used it to decorate the pillow box, very creative. I’ll be linking.

    Reply
  26. Leanne says

    February 8, 2009 at 3:58 pm

    How cute and simple but effect.

    Reply
  27. Jacoline (Lien) says

    February 8, 2009 at 4:57 pm

    In one word: Great!!!

    Reply
  28. Lulabell says

    February 8, 2009 at 7:47 pm

    So pretty. Love that tree as well!

    Reply
  29. Selina says

    February 8, 2009 at 8:33 pm

    Beautiful idea, so easy!
    I have tagged you for 6 x 6, check out my blog.

    Reply
  30. The Faerie Queen says

    February 9, 2009 at 4:30 pm

    What a beautiful idea. xxx

    Reply
  31. clare says

    February 9, 2009 at 2:28 am

    Fantastic , I love it !
    clares craftroom

    Reply
  32. Tracy says

    February 9, 2009 at 5:03 am

    Very sweet…I love this idea! You think of the best things you girls! And the sight of this cheery garland really lifted my spirits…as you know, where we are we’re just trying to keep warm and keep going…too, too much snow–LOL! Happy Days to you all :o) ((HUGS))

    Reply
  33. lesley says

    February 9, 2009 at 6:43 am

    What a lovely garland, thanks for sharing. Hugs xx

    Reply
  34. Katherine says

    February 9, 2009 at 2:26 pm

    Simple, yet oh-so-sweet! Lovely.

    Reply
  35. LollyChops says

    February 9, 2009 at 3:51 pm

    Really lovely girls!

    Reply
  36. zoesquid says

    February 9, 2009 at 5:07 pm

    very gorgeous indeed

    Reply
  37. Knit and Sew City Girl says

    February 10, 2009 at 5:05 am

    This is so pretty!

    Also congratulations on getting your tutorials onto the magazine (re your last blog post).

    Mary

    Reply
  38. upstateLisa says

    February 10, 2009 at 5:23 am

    very pretty!

    Reply
  39. LissyLou says

    February 10, 2009 at 9:16 am

    How simple? but soo lovely!! x

    Reply
  40. Annie says

    February 10, 2009 at 12:32 pm

    How wonderful! We’ve been invited over to my in-laws house for a Valentine’s Day dinner, and I think this will be the perfect embellishment to our hostess gift. Thanks!!

    I just found your blog, and I love love love all that I’ve read so far. I’m excited to become an active reader! 🙂

    Reply
  41. corry says

    February 10, 2009 at 1:21 pm

    Fabulous idea!

    Reply
  42. Liz says

    February 10, 2009 at 6:58 pm

    So cute and yet so simple. Thanks.

    Reply
  43. The Vintage Rose says

    February 11, 2009 at 3:09 am

    lovely idea! did you sew them together with a machine or by hand? and what type of needle did you use?

    Reply
  44. Yarni Gras! says

    February 12, 2009 at 6:03 am

    lovely……..

    Reply
  45. Pamela says

    February 13, 2009 at 12:17 am

    i love, love garlands…they make everything so festive and that much better. I have to make these to enjoy for the rest of the February! thanks pamela http://www.frenchknots.blogspot.com

    Reply
  46. Valerie says

    January 5, 2010 at 10:22 pm

    great idea! i have filed it at thecraftersfilebox.com.

    thanks for sharing!

    Reply

Leave a Reply Cancel reply

Your email address will not be published. Required fields are marked *

  • Email
  • Facebook
  • Instagram
  • Pinterest
  • Threads
  • TikTok
SUBSCRIBE TO NEWSLETTER
×

Categories

Archives

PURCHASE PDF PATTERNS

We offer over 100 affordable PDF sewing patterns available for download from our store website or Etsy store. Each pattern includes detailed instructions, numerous photos, and templates.

WEB STORE ETSY STORE

Instagram

Adding a handmade label is one of my favourite way Adding a handmade label is one of my favourite ways to personalise a project — and these little fabric + felt labels are so quick and satisfying to make.For this Ribbon Pouch, I used the Liberty Gifts from the Garden collection, which has the sweetest fruit motifs. They make perfect tiny labels for pouches, bags, and gifts.Here’s how to make your own:Press a piece of double‑sided fusible web to the back of your fabric.Cut around your chosen motif.Peel off the paper backing.Press the motif onto wool felt.Trim the felt with scalloped scissors.Sew the label onto the front of your pouch.Such a simple detail, but it adds so much charm. Fabric kindly gifted by @regent_street_fabrics — thank you!If you’d like to sew the Ribbon Pouch (3 sizes), comment RIBBON and I’ll send the pattern link straight to you.#SewingInspiration #FabricLabels #DIYLabels #LibertyFabric #LibertyGiftsFromTheGarden
A lot can change in 10 years ❤️ It’s been fun look A lot can change in 10 years ❤️ It’s been fun looking back at where I was in 2016 and how far life has come since then. Swipe for a little trip down memory lane.Back in 2016, my priorities were firmly centred around family. I was working full‑time, sewing in the guest room, sharing tutorials on my blog, and slowly dipping my toes into selling a handful of patterns on Etsy. It was a busy, full season — and creativity was something I fitted in around everything else.  Fast forward to 2026… I’m now retired and living the creative life I once dreamed of. My kids have grown up and are living in their own homes nearby. My husband and I are free to travel, explore, and enjoy this stage of life. And I get to spend my days designing, sewing, and connecting with this beautiful community.Life looks different now — in the best possible way.Were you following me back then, or what has changed for you over the past 10 years? I’d love to hear your story too.Tagging the lovely makers of my quilt: @arabesquescissors @ministryoffabric @belloquacity @alittlepatchwork @sameliasmum coleandtaffy @quiltymamaof4 @shequiltsalot @downgrapevinelane @lizzierosesews @lovethatfabric @sew_mimi.k #2026isthenew2016 #10yeartransformation #sewingjourney #sewingcommunity #aspoonfulofsugardesigns
Fall in love with sewing all over again ❤️I’ve Fall in love with sewing all over again ❤️I’ve rounded up 10 heart‑themed makes — from quick gifts to charming quilt blocks — perfect for weekend stitching or using up your favourite scraps. Whether you’re sewing for Valentine’s Day, birthdays, or just because, there’s something sweet for every maker.Comment HEART and I’ll send you a link to my Heart Pattern Collection.#sewingproject #heartsewing #quiltblock #scrapsewing #easytosew
Raw edge appliqué doesn’t have to feel fiddly or i Raw edge appliqué doesn’t have to feel fiddly or intimidating. With a few simple techniques, you can create neat, crisp shapes — even tiny details like penguin beaks and hearts.I’ve put together My Top 5 Secrets for Raw Edge Appliqué to help you feel confident, whether you’re brand new to appliqué or looking to refine your finish. Save this for your next sewing session.If you’d love a quick, beginner‑friendly project to practise these tips, my Penguin Love Mugrug is the sweetest Valentine’s make — scrap‑friendly, gift‑ready, and such fun to sew.Comment PENGUIN and I’ll send you the link to the pattern. Available now in our Pattern Store and Etsy shop.  #rawedgeapplique #appliquetips #sewingtipsandtricks #mugrugpattern #penguinlove
If you’ve ever wanted to add eyelets or grommets t If you’ve ever wanted to add eyelets or grommets to your sewing projects, here’s a quick look at how I install them using my DK93 snap press. It’s the same tool I use for snaps — and it makes installing eyelets beautifully quick and consistent.For this Ribbon Pouch, I used the Liberty Gifts from the Garden collection (printed on Lasenby cotton and released in January 2026). The colours and motifs pair so well with the little ribbon tie detail.Here’s how to install the eyelets:Punch out the four holes using a hole‑cutting die.Place the eyelet into the hole.Press it into place using the snap press.That’s it — easy peasy, and it gives the pouch such an elevated, professional finish. I love how clean and sturdy the result is.Fabric is Gifts from the Garden by Liberty - kindly provided by @regent_street_fabrics — thank you!If you’d like the Ribbon Pouch pattern (it comes in 3 sizes), comment RIBBON and I’ll send the link straight to you.Ribbon Pouch Sewing Pattern: available in our Pattern Store and Etsy shop ( links in profile).#SewingInspiration #SewingProjects #Eyelets #Grommets #SnapPress
The Twirling Treasures Hot Pad & Placemat Set show The Twirling Treasures Hot Pad & Placemat Set showcases one of my favourite FPP designs — a stunning kaleidoscope‑style block that always turns out beautifully. Kaleidoscope blocks are some of my most popular FPP patterns, and this set is such a fun way to use them.  This set includes six sizes, making it incredibly versatile: use them as hot pads, trivets, placemats, or simply as a way to add a pop of colour to your kitchen.For these samples, I went with a monochromatic scrap‑busting approach, pairing fabrics from the same colour family with a low‑volume background. The black‑and‑white striped binding adds such a crisp, modern finish. It’s a wonderful project for building your FPP confidence — and a fantastic way to use up those treasured scraps.The Twirling Treasures Hot Pad set is our Pattern of the Week. It is currently 25% off this week in our Pattern Store and Etsy Shop.If you’d like to sew your own set, comment TWIRL and I’ll send the pattern link straight to you.Happy sewing! Lisa 🌸#FoundationPaperPiecing #Quilting #HotPads #ScrapBuster #KitchenSewing
Follow on Instagram

Featured Pattern

Travel Sewing Kit Pattern

Featured Tutorial

Retro Drawstring Bag

Featured Recipe

Lemon Pound Cake

Connect

  • Email
  • Facebook
  • Instagram
  • Pinterest
  • Threads
  • TikTok
SUBSCRIBE TO NEWSLETTER
×

Popular Posts

  • Charm Square Fabric Tray
  • Merry Little Christmas Sewing Projects
  • {Back to School} Tissue Cover
  • Raw Edge Applique Tips
  • Hexagon Fabric Tray
  • Sewing Gifts 101: Easy and Affordable Ideas for Your Crafty Friends
  • Fabric Gift Pouch

Copyright © 2026 Lisa. K. Cox - A Spoonful of Sugar