A Spoonful of Sugar

Make. Bake. Create.

Menu
  • Home
  • About
    • About Us
    • Press
    • FAQ
    • Disclosure Policy
    • Contact Us
  • Crafts
    • Crochet
    • DIY
    • Embroidery/Cross stitch
    • Gift Wrapping
    • Knitting
    • Miscellaneous
    • Paper Crafts
  • Holidays
    • New Year’s
    • Australia Day
    • Back to School
    • Valentines Day
    • Easter
    • ANZAC Day
    • Mother’s Day
    • Father’s Day
    • Halloween
    • Christmas
  • Recipes
    • Appetizers
    • Bars & Slices
    • Bread & Pastries
    • Cakes
    • Cookies
    • Confectionery
    • Cupcakes & Muffins
    • Desserts
    • Drinks
    • Ice Cream
    • Jams/Preserves
    • Main Meals
  • Sewing
    • Sewing Tutorials
    • Quilting
    • Sewing & Quilting Patterns
  • Family
    • Back to School
    • Family Fun
    • Our Home
    • Parenting
    • Travel
  • Shop
    • Pattern Store
    • Etsy Store

Quick Clips

June 6, 2008 By Spoonful of Sugar - 26 Comments

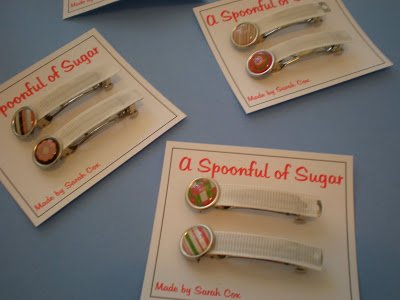
This afternoon I have been busy making hair clips. I made them using scrapbooking brads and plain hair clips.

To make them, you need to put the brad through the hole of the clip and use pliars to squeeze it down. Then add a bit of glue to secure it in place. You can also put ribbon on the front to cover up the metal clip. I then designed and printed a cardboard sheet to attach pairs of clips to.

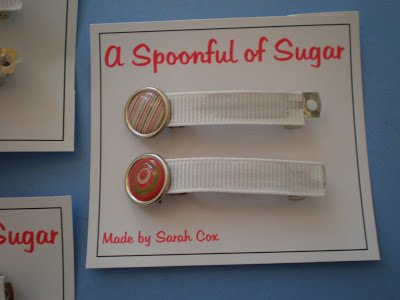
I got my insparation from  Magnolias and Sunshine   and   Grace Violet .  This is a great project to do in a small amount of time. I am going to give them to my little cousin and other little girls I know.


Posted by Sarah

Filed Under: Uncategorized

« Miniatures and More
Lavender Crafts – Part 1 »

Comments

  1. Michelle says

    June 6, 2008 at 5:14 am

    very cute hair clips.
    i’m sure your friends will love them.
    great crafting idea.

    Reply
  2. asnipofgoodness says

    June 6, 2008 at 5:45 am

    Sooo cute, we love hair clips, and just might have to try these. We will have to search out those brads. thank you for sharing!!

    Reply
  3. Claire F says

    June 6, 2008 at 5:54 am

    These are really cute, I can see them going down really well, so unique.

    Reply
  4. Thimbleanna says

    June 6, 2008 at 5:55 am

    Brilliant Miss Sarah — those are adorable!

    Reply
  5. Ginger says

    June 6, 2008 at 6:41 am

    Sooo cute just adorable,Has a clean look about them.Love them!
    I posted your link to read about them today have a great day my friend .

    Reply
  6. periwinkle says

    June 6, 2008 at 6:43 am

    Great idea and very cute, I’m sure your friends will love them – tell your mam to stop eating biscuits too 🙂
    Lisa x

    Reply
  7. melissa s. says

    June 6, 2008 at 7:49 am

    adorable!

    Reply
  8. Arlene says

    June 6, 2008 at 7:54 am

    I love your blog. I’ll have to mark it as a favorite. You have great projects & fun ideas!

    Reply
  9. Ginger says

    June 6, 2008 at 9:32 am

    What are you using for the card board to print it out? Is there a templet you just add the names? Type ,print ?

    Reply
  10. Joanne Brown says

    June 6, 2008 at 10:39 am

    What a great idea! These would be so fun to do for a craft at a girl’s birthday party. Then the girls can take them home (instead of the usual party bags). They are really cute. Your friends will LOVE them 🙂

    Reply
  11. Tonya says

    June 6, 2008 at 11:12 am

    I love these, I need to get the stuff to make some. They are great for gifts. I love how you put them on the little cards and covered the clip with ribbon.

    Reply
  12. QuiltedSimple says

    June 6, 2008 at 1:52 pm

    What a great idea – great little filler present for birthdays and such.

    Reply
  13. méri says

    June 6, 2008 at 1:56 pm

    Pretty hair clips!
    You have a very very good idea!

    Reply
  14. Selina says

    June 6, 2008 at 3:02 pm

    The embellishments are great for hair clips. So many designs you can do using them.

    Reply
  15. Belinda says

    June 6, 2008 at 4:34 pm

    Awesome, you are so talented, I real through your old posts and congrats on your skills, you are to be clapped!!!!

    Reply
  16. dizzyjadey says

    June 6, 2008 at 4:37 pm

    These are gorgeous! Who would’ve thought of using scrapbooking brads? Fabulous! I’m sure they’ll be loved.

    Reply
  17. Erin says

    June 7, 2008 at 12:01 pm

    Sarah – these are so cute. I think I might try to make some. I love that you made your own card to put them on. Good job!

    Reply
  18. Erna says

    June 7, 2008 at 7:22 am

    looks wonderfull! lovely cards you made..looks very professional!!

    Reply
  19. vlijtig says

    June 7, 2008 at 12:59 pm

    Those are lovely! Where do you get the plain hairclips?

    Reply
  20. Alison Boon says

    June 7, 2008 at 11:42 pm

    I love the cards that you have designed to put them on.
    in our house hair clips are like the holy grail. We know they exist but exact location remains a mystery

    Reply
  21. Shirl says

    June 7, 2008 at 11:58 pm

    So simple and sweet; really pretty.

    Reply
  22. Kellie says

    June 8, 2008 at 12:27 am

    They are lovely Sarah! Don’t you just love those brads … now I know what to do with the ones I have collected for collecting sake :)!!!

    Reply
  23. Melanie Gray Augustin says

    June 8, 2008 at 6:39 pm

    They’re really cute! Well done. I love your cards that they’re on as well.

    Reply
  24. Wendy says

    June 8, 2008 at 8:06 pm

    They’re darling! You reminded me that I have some clips I’ve been meaning to cover for my girls for weeks now.

    Reply
  25. Ruth says

    June 9, 2008 at 1:53 am

    Oooh… they look so professional!
    Lovely!

    Reply
  26. Anonymous says

    September 3, 2008 at 1:49 pm

    Just be careful if you sell them that your packaging says ‘not suitable for children under 3’ because the brad could pose a choking hazard.

    Reply

Leave a Reply Cancel reply

Your email address will not be published. Required fields are marked *

  • Email
  • Facebook
  • Instagram
  • Pinterest
  • Threads
  • TikTok
SUBSCRIBE TO NEWSLETTER
×

Categories

Archives

PURCHASE PDF PATTERNS

We offer over 100 affordable PDF sewing patterns available for download from our store website or Etsy store. Each pattern includes detailed instructions, numerous photos, and templates.

WEB STORE ETSY STORE

Instagram

Adding a handmade label is one of my favourite way Adding a handmade label is one of my favourite ways to personalise a project — and these little fabric + felt labels are so quick and satisfying to make.For this Ribbon Pouch, I used the Liberty Gifts from the Garden collection, which has the sweetest fruit motifs. They make perfect tiny labels for pouches, bags, and gifts.Here’s how to make your own:Press a piece of double‑sided fusible web to the back of your fabric.Cut around your chosen motif.Peel off the paper backing.Press the motif onto wool felt.Trim the felt with scalloped scissors.Sew the label onto the front of your pouch.Such a simple detail, but it adds so much charm. Fabric kindly gifted by @regent_street_fabrics — thank you!If you’d like to sew the Ribbon Pouch (3 sizes), comment RIBBON and I’ll send the pattern link straight to you.#SewingInspiration #FabricLabels #DIYLabels #LibertyFabric #LibertyGiftsFromTheGarden
A lot can change in 10 years ❤️ It’s been fun look A lot can change in 10 years ❤️ It’s been fun looking back at where I was in 2016 and how far life has come since then. Swipe for a little trip down memory lane.Back in 2016, my priorities were firmly centred around family. I was working full‑time, sewing in the guest room, sharing tutorials on my blog, and slowly dipping my toes into selling a handful of patterns on Etsy. It was a busy, full season — and creativity was something I fitted in around everything else.  Fast forward to 2026… I’m now retired and living the creative life I once dreamed of. My kids have grown up and are living in their own homes nearby. My husband and I are free to travel, explore, and enjoy this stage of life. And I get to spend my days designing, sewing, and connecting with this beautiful community.Life looks different now — in the best possible way.Were you following me back then, or what has changed for you over the past 10 years? I’d love to hear your story too.Tagging the lovely makers of my quilt: @arabesquescissors @ministryoffabric @belloquacity @alittlepatchwork @sameliasmum coleandtaffy @quiltymamaof4 @shequiltsalot @downgrapevinelane @lizzierosesews @lovethatfabric @sew_mimi.k #2026isthenew2016 #10yeartransformation #sewingjourney #sewingcommunity #aspoonfulofsugardesigns
Fall in love with sewing all over again ❤️I’ve Fall in love with sewing all over again ❤️I’ve rounded up 10 heart‑themed makes — from quick gifts to charming quilt blocks — perfect for weekend stitching or using up your favourite scraps. Whether you’re sewing for Valentine’s Day, birthdays, or just because, there’s something sweet for every maker.Comment HEART and I’ll send you a link to my Heart Pattern Collection.#sewingproject #heartsewing #quiltblock #scrapsewing #easytosew
Raw edge appliqué doesn’t have to feel fiddly or i Raw edge appliqué doesn’t have to feel fiddly or intimidating. With a few simple techniques, you can create neat, crisp shapes — even tiny details like penguin beaks and hearts.I’ve put together My Top 5 Secrets for Raw Edge Appliqué to help you feel confident, whether you’re brand new to appliqué or looking to refine your finish. Save this for your next sewing session.If you’d love a quick, beginner‑friendly project to practise these tips, my Penguin Love Mugrug is the sweetest Valentine’s make — scrap‑friendly, gift‑ready, and such fun to sew.Comment PENGUIN and I’ll send you the link to the pattern. Available now in our Pattern Store and Etsy shop.  #rawedgeapplique #appliquetips #sewingtipsandtricks #mugrugpattern #penguinlove
If you’ve ever wanted to add eyelets or grommets t If you’ve ever wanted to add eyelets or grommets to your sewing projects, here’s a quick look at how I install them using my DK93 snap press. It’s the same tool I use for snaps — and it makes installing eyelets beautifully quick and consistent.For this Ribbon Pouch, I used the Liberty Gifts from the Garden collection (printed on Lasenby cotton and released in January 2026). The colours and motifs pair so well with the little ribbon tie detail.Here’s how to install the eyelets:Punch out the four holes using a hole‑cutting die.Place the eyelet into the hole.Press it into place using the snap press.That’s it — easy peasy, and it gives the pouch such an elevated, professional finish. I love how clean and sturdy the result is.Fabric is Gifts from the Garden by Liberty - kindly provided by @regent_street_fabrics — thank you!If you’d like the Ribbon Pouch pattern (it comes in 3 sizes), comment RIBBON and I’ll send the link straight to you.Ribbon Pouch Sewing Pattern: available in our Pattern Store and Etsy shop ( links in profile).#SewingInspiration #SewingProjects #Eyelets #Grommets #SnapPress
The Twirling Treasures Hot Pad & Placemat Set show The Twirling Treasures Hot Pad & Placemat Set showcases one of my favourite FPP designs — a stunning kaleidoscope‑style block that always turns out beautifully. Kaleidoscope blocks are some of my most popular FPP patterns, and this set is such a fun way to use them.  This set includes six sizes, making it incredibly versatile: use them as hot pads, trivets, placemats, or simply as a way to add a pop of colour to your kitchen.For these samples, I went with a monochromatic scrap‑busting approach, pairing fabrics from the same colour family with a low‑volume background. The black‑and‑white striped binding adds such a crisp, modern finish. It’s a wonderful project for building your FPP confidence — and a fantastic way to use up those treasured scraps.The Twirling Treasures Hot Pad set is our Pattern of the Week. It is currently 25% off this week in our Pattern Store and Etsy Shop.If you’d like to sew your own set, comment TWIRL and I’ll send the pattern link straight to you.Happy sewing! Lisa 🌸#FoundationPaperPiecing #Quilting #HotPads #ScrapBuster #KitchenSewing
Follow on Instagram

Featured Pattern

Travel Sewing Kit Pattern

Featured Tutorial

Retro Drawstring Bag

Featured Recipe

Lemon Pound Cake

Connect

  • Email
  • Facebook
  • Instagram
  • Pinterest
  • Threads
  • TikTok
SUBSCRIBE TO NEWSLETTER
×

Popular Posts

  • Charm Square Fabric Tray
  • Merry Little Christmas Sewing Projects
  • {Back to School} Tissue Cover
  • Hexagon Fabric Tray
  • Raw Edge Applique Tips
  • Sewing Gifts 101: Easy and Affordable Ideas for Your Crafty Friends
  • Finding More Time to Sew

Copyright © 2026 Lisa. K. Cox - A Spoonful of Sugar