A Spoonful of Sugar

Make. Bake. Create.

Menu
  • Home
  • About
    • About Us
    • Press
    • FAQ
    • Disclosure Policy
    • Contact Us
  • Crafts
    • Crochet
    • DIY
    • Embroidery/Cross stitch
    • Gift Wrapping
    • Knitting
    • Miscellaneous
    • Paper Crafts
  • Holidays
    • New Year’s
    • Australia Day
    • Back to School
    • Valentines Day
    • Easter
    • ANZAC Day
    • Mother’s Day
    • Father’s Day
    • Halloween
    • Christmas
  • Recipes
    • Appetizers
    • Bars & Slices
    • Bread & Pastries
    • Cakes
    • Cookies
    • Confectionery
    • Cupcakes & Muffins
    • Desserts
    • Drinks
    • Ice Cream
    • Jams/Preserves
    • Main Meals
  • Sewing
    • Sewing Tutorials
    • Quilting
    • Sewing & Quilting Patterns
  • Family
    • Back to School
    • Family Fun
    • Our Home
    • Parenting
    • Travel
  • Shop
    • Pattern Store
    • Etsy Store

Merry and Bright Napkins

December 6, 2019 By A Spoonful of Sugar - 1 Comment

I created a pair of Merry and Bright Christmas Napkins to add festive cheer to our table. Featuring lettering that is raw edged appliqued onto ready made napkins. This is a fun scrap busting project, and can be easily made in an afternoon.

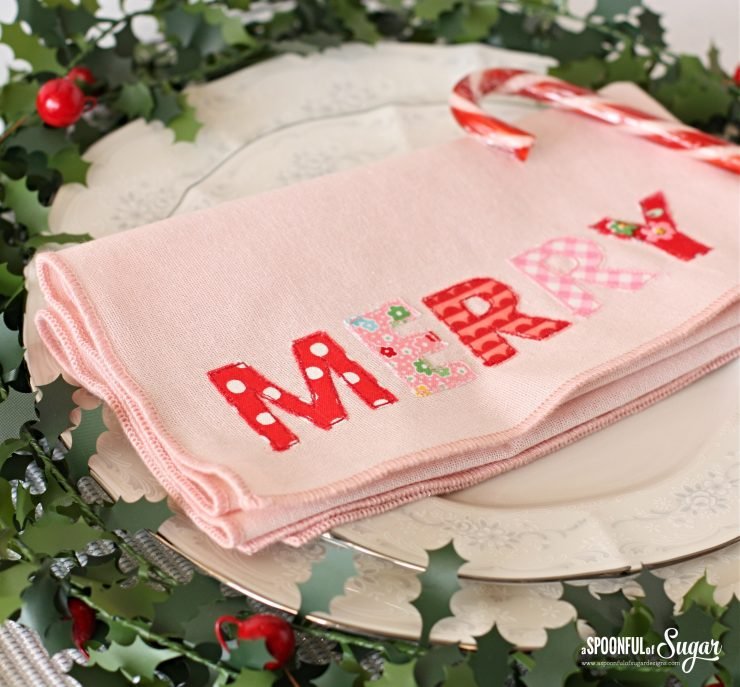
I used scraps of quilting cotton in shades of red and pink – including polka dots, gingham, stripes, and small scale florals. For a fun, scrappy look, combine a variety of fabrics.

You could mix up the lettering to include: Naughty and Nice; Santa and Mrs Claus; Merry and Bright; or even include the name of each person in your family. This way you can be eco-friendly with reusable napkins, as well as adding some Holiday cheer.

If you would like to make your own you will need:

  • Linen Napkins (I purchased these ones from Kmart ) or else you can make your own using this easy tutorial.
  • Fabric scraps in shades on pink and red
  • double sided fusible web such as Steam a Seam
  • coordinating threads
  • Computer and Printer (to print out the words)

Firstly, decide on the wording for your napkins and type it in Microsoft Word. I used Open Sans Extra Bold font in 140 size. Print the words out onto paper. Then trace the letters in reverse onto the back of the double sided fusible web as shown in the image below.

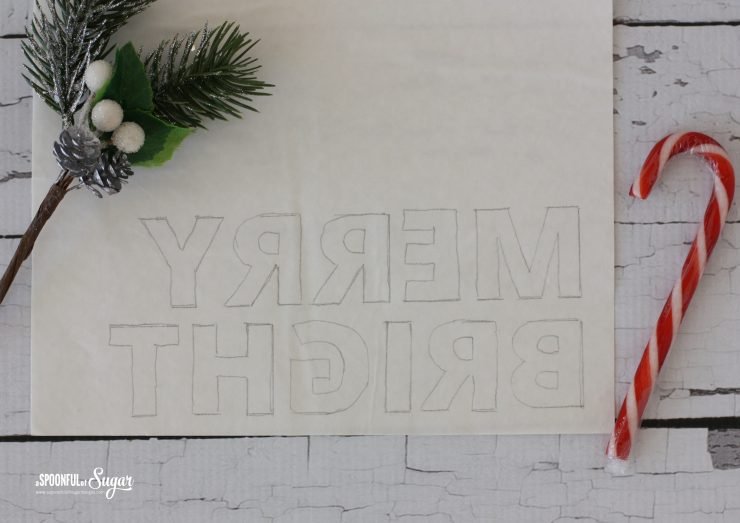
Cut out each letter and fuse it to the back of your fabric following manufacturers directions. Carefully cut out the letters using sharp embroidery scissors and position the letters on the napkins. When you are satisfied with the placement, peel off the backing paper and fuse in place with your iron.

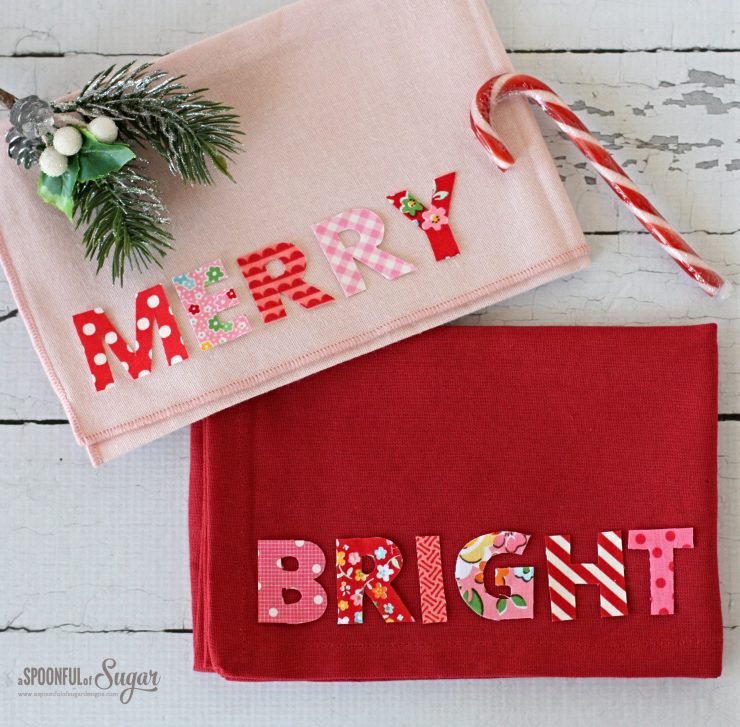
Using coordinating thread and small stitch length (I used 1.5) carefully stitch around each letter three times to anchor and outline the letter. Pull threads to the back and snip.

This is a fun afternoon project. I love adding a handmade touch to my Christmas decorating. You can find more of our Christmas tutorials here.

Check out some of our Christmas Projects in in our Etsy store:

  • Hexie Holiday Placemat
  • Scrappy Mini Stocking
  • Yuletide Cottages
  • Wine Waiter Cover

Filed Under: Christmas, Sewing, Sewing Tutorials Tagged With: Christmas, Christmas table, raw edge applique, scrap buster, sewing illustration

« Monogrammed Lavender Pillows
Christmas Pillowcase »

Comments

  1. Lorrie says

    December 9, 2019 at 9:24 am

    so pretty!

    Reply

Leave a Reply Cancel reply

Your email address will not be published. Required fields are marked *

  • Email
  • Facebook
  • Instagram
  • Pinterest
  • Threads
  • TikTok
SUBSCRIBE TO NEWSLETTER
×

Categories

Archives

PURCHASE PDF PATTERNS

We offer over 100 affordable PDF sewing patterns available for download from our store website or Etsy store. Each pattern includes detailed instructions, numerous photos, and templates.

WEB STORE ETSY STORE

Instagram

There’s something so lovely about putting together There’s something so lovely about putting together a bright, happy self‑care gift… especially when it’s handmade.  I stitched a colourful set using Ruby Star Society fabrics - a Relaxation Eye Pillow and a Heavenly Heatpack - and styled them into a complete gift bundle.To make it feel extra special, I lined a small bamboo tray with soft tissue, added the two calming makes, tied them with a pink ribbon, and tucked in a few thoughtful extras: a candle, a box of speciality tea, and a tiny plant. It’s simple, cheerful, and such a beautiful way to show someone you care.Both projects are scrap‑friendly, beginner‑friendly, and quick to sew - perfect for weekend making or last‑minute gifting.If you’d like to sew your own self‑care set, comment SELFCARE and I’ll send you the link to the bundle. You’ll also save 25% on these two gift‑ready patterns when you buy the bundle.#selfcaresewing #beginnersewingproject #scrapfriendysewing #handmadegiftideas #aspoonfulofsugardesigns
The Large Quadra Pouch in this bright orange colou The Large Quadra Pouch in this bright orange colourway shows off everything makers love about this pattern — it folds completely flat for storage, has a clever structured base, four coordinated fabrics, and cinches closed beautifully. It’s quick to sew, gift‑ready, and so satisfying to pop open and fill.If you’d like to sew your own, comment QUADRA and I’ll send you the pattern link.Pattern Details: Quadra Pouch Pattern - available in our Pattern Store and Etsy shop.#QuadraPouch #SewingPatternDesign #HandmadePouch #SewingProjects #ASpoonfulOfSugarDesigns
One of my favourite features of the Quadra Pouch i One of my favourite features of the Quadra Pouch is how it folds completely flat between uses — perfect for travel, storage, or keeping your sewing space tidy. A quick press and it pops back into shape, ready to fill with treats, notions, or gifts.This version uses eight Tilda blenders for a scrappy, pretty finish that shows off the crisp base and four neat corners.If you’d like to sew your own, comment QUADRA and I’ll send you the pattern link.Pattern Details: Quadra Pouch - available in our Pattern Store and Etsy Shop.#ilovetilda #drawstringpouch #sewingpattern #scrapsewing #sewingcommunity
@tilda_australia
Thank you so much for the wonderful reception to t Thank you so much for the wonderful reception to the Quadra Pouch launch last week — I’m thrilled you’re loving this pattern as much as I do.Today I’m sharing a brand new Tilda version, stitched in the large size and made entirely from blenders. I used four Bellflower prints from the Wallflower range for the exterior, and four Stella prints from the Songbird collection for the lining — eight fabrics in total, making it delightfully scrappy.I love how easily Tilda collections mix and match, and how each corner of the pouch showcases a different print. The clever panel construction gives the pouch a neat flat base without boxed corners, and the result is both practical and beautifully structured.If you’d like to sew your own, the Quadra Pouch pattern is available in both my Pattern Store and Etsy Shop.Comment QUADRA and I’ll send the link straight to you.Pattern Details: Quadra Pouch (3 Sizes) - available in our Pattern Store and Etsy ShopFabric: Bellflower blenders and Stella blenders from Tilda, with thanks to @tilda_australia#tildafabrics #quadrapouch #sewingproject #scrapfriendlysewing #pouchpattern
There’s something so soothing about sewing small, There’s something so soothing about sewing small, comforting projects… especially the ones that feel as lovely to gift as they do to keep.This week I’ve been stitching up a little calm with this Self‑Care Bundle — a relaxing eye pillow and a soft, weighted heatpack designed for quiet moments, tired shoulders, and anyone who needs a gentle pause.Both projects are beginner‑friendly, scrap‑friendly, and quick to sew… the kind of makes that feel thoughtful without taking all weekend. Perfect for someone special, or for adding a little comfort to your own daily routine.This set is sewn in the beautiful Tilda Creating Memories collection - thank you to @tilda_australia for the gorgeous fabrics.If you’d like to sew your own set, I’ve bundled both patterns together with a 25% saving. Use the code word SELFCARE in the comments and I’ll send the link straight to you.Here’s to stitching a little calm into the week ahead 🤍#sewingproject #tildafabrics #makersgonnamake #sewinglove #handmadegifts
Threading a needle doesn’t have to be fiddly — the Threading a needle doesn’t have to be fiddly — these 9 simple tips make it so much easier. Perfect for beginners, tired eyes, or late‑night sewing sessions.Here are tools I use in my own sewing room:Easy‑thread needles, beeswax + scissors from @sohmo_au
Table‑top needle threader from @clovermfg
Glasses for close work from @opsm
Thread from @aurifilthread
(Not sponsored — just products I genuinely use and love.)Save this for your next sewing project ✨ Comment NEWSLETTER to sign up for my weekly newsletter - I share sewing tips, free tutorials, articles, and studio news every Sunday.Everyone has their own little threading tricks - share yours below!  #sewingtips #sewingforbeginners #sewingtools #sewinghacks #sewingroom
Follow on Instagram

Featured Pattern

Travel Sewing Kit Pattern

Featured Tutorial

Retro Drawstring Bag

Featured Recipe

Lemon Pound Cake

Connect

  • Email
  • Facebook
  • Instagram
  • Pinterest
  • Threads
  • TikTok
SUBSCRIBE TO NEWSLETTER
×

Popular Posts

  • Tips for Threading a Needle
  • Charm Square Fabric Tray
  • Sell What You Sew
  • Triangle Pouch
  • Pretty Handmade Gifts for Women: 15 Lovely Projects to Sew
  • Tutorial: Emergency Zippered Pouch
  • Make your own linen napkins Make Your Own Linen Napkins

Copyright © 2026 Lisa. K. Cox - A Spoonful of Sugar