A Spoonful of Sugar

Make. Bake. Create.

Menu
  • Home
  • About
    • About Us
    • Press
    • FAQ
    • Disclosure Policy
    • Contact Us
  • Crafts
    • Crochet
    • DIY
    • Embroidery/Cross stitch
    • Gift Wrapping
    • Knitting
    • Miscellaneous
    • Paper Crafts
  • Holidays
    • New Year’s
    • Australia Day
    • Back to School
    • Valentines Day
    • Easter
    • ANZAC Day
    • Mother’s Day
    • Father’s Day
    • Halloween
    • Christmas
  • Recipes
    • Appetizers
    • Bars & Slices
    • Bread & Pastries
    • Cakes
    • Cookies
    • Confectionery
    • Cupcakes & Muffins
    • Desserts
    • Drinks
    • Ice Cream
    • Jams/Preserves
    • Main Meals
  • Sewing
    • Sewing Tutorials
    • Quilting
    • Sewing & Quilting Patterns
  • Family
    • Back to School
    • Family Fun
    • Our Home
    • Parenting
    • Travel
  • Shop
    • Pattern Store
    • Etsy Store

How to Sew Mugrugs like a Pro: Essential Tips and Tricks

March 22, 2025 By A Spoonful of Sugar - Leave a Comment

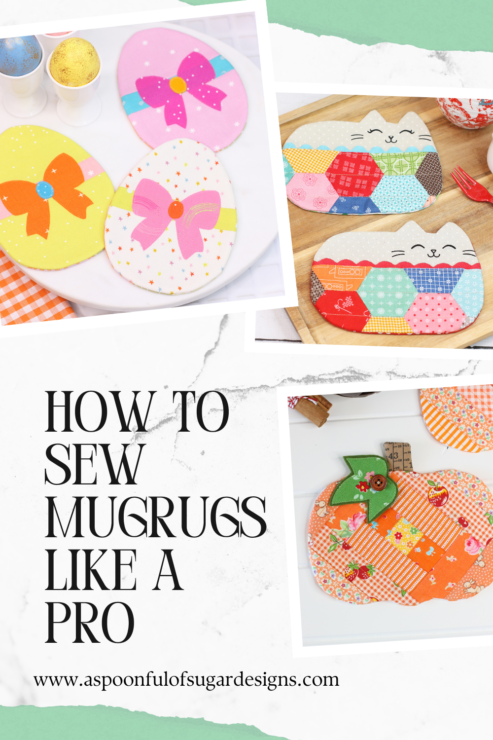
Mugrugs may be small, but they’re mighty when it comes to creativity and functionality! These versatile mini quilts are the perfect project to brighten up your home, use up fabric scraps, and explore new sewing techniques. Whether you’re making one for yourself or gifting them to loved ones, mastering the art of mugrug construction ensures a polished, professional finish every time. In this post, I’m sharing my top tips to help you achieve mugrug perfection, along with a few clever tricks that make the process easier—even for beginners. Let’s dive in!

Tips for Perfect Mugrug Construction

  1. Pinking Shears: Use Pinking shears to reduce bulk and prevent puckering.
  2. Short Stitch Length: Use a shorter stitch length (around 1.5–2.0) for smooth, even seams—especially on curves.
  3. Turning Tool or Chopstick: A chopstick or turning tool helps you neatly turn out edges for a polished look.
  4. Press Well: Pressing is key! A hot iron will flatten seams and curves, giving your mugrug a crisp, professional finish.
  5. Backing Fabric: Use two pieces of fabric for the backing, leaving a gap in the middle of the seam to turn it right-side out. This avoids the tricky task of hand-stitching the gap closed around a curve—perfect for beginners.
  6. Use a Walking Foot: If your mugrug includes quilting, a walking foot can help prevent shifting and puckering.
  7. Topstitch for Extra Polish: Add a row of topstitching around the edge of your mugrug. It reinforces the seams and provides a clean, professional finish.
  8. Experiment with Techniques: Mugrugs are a great way to try new sewing techniques like applique, piecing, foundation paper piecing (FPP), English Paper Piecing (EPP), or embroidery—have fun experimenting!
  9. Play with Color and Fabric: Don’t be afraid to mix bold colors, patterns, and textures to create a unique mugrug that reflects your style.
  10. Layer with Care: Ensure your layers (top fabric, batting, and backing) are well-aligned before sewing to avoid uneven edges.

With these tips in your sewing toolkit, you’re all set to create beautiful, professional-quality mugrugs that stand out. Whether you’re adding a pop of color to your table, trying out a new technique, or sewing for fun, mugrugs offer endless possibilities for creativity. So grab your fabric scraps, fire up your sewing machine, and let your imagination run wild! I’d love to see your mugrug creations—be sure to share them and tag me for a chance to be featured.

Read More:

  • Popular Mugrug and Coaster Patterns
  • Why Sewing Mugrugs is Perfect for Seasonal Projects

Filed Under: Sewing Tagged With: coaster, mini quilt, mugrug, sewing tips

« Dresden Needlebook
Flower in a Square Quilt Block »

Leave a Reply Cancel reply

Your email address will not be published. Required fields are marked *

  • Email
  • Facebook
  • Instagram
  • Pinterest
  • Threads
  • TikTok
SUBSCRIBE TO NEWSLETTER
×

Categories

Archives

PURCHASE PDF PATTERNS

We offer over 100 affordable PDF sewing patterns available for download from our store website or Etsy store. Each pattern includes detailed instructions, numerous photos, and templates.

WEB STORE ETSY STORE

Instagram

If you love quick, practical sewing projects, the  If you love quick, practical sewing projects, the Baker’s Buddy Mitt is such a fun one to make. It’s scrap‑friendly, gift‑ready, and perfect for anyone who loves to bake.The Bakers Buddy Mitt is 25% off this week only. Comment BAKER and I’ll send you the link to the pattern.  #SewingProject #ScrapFriendlySewing #KitchenSewing #SewingGifts #SewingCommunity
Adding a handmade label is one of my favourite way Adding a handmade label is one of my favourite ways to personalise a project — and these little fabric + felt labels are so quick and satisfying to make.For this Ribbon Pouch, I used the Liberty Gifts from the Garden collection, which has the sweetest fruit motifs. They make perfect tiny labels for pouches, bags, and gifts.Here’s how to make your own:Press a piece of double‑sided fusible web to the back of your fabric.Cut around your chosen motif.Peel off the paper backing.Press the motif onto wool felt.Trim the felt with scalloped scissors.Sew the label onto the front of your pouch.Such a simple detail, but it adds so much charm. Fabric kindly gifted by @regent_street_fabrics — thank you!If you’d like to sew the Ribbon Pouch (3 sizes), comment RIBBON and I’ll send the pattern link straight to you.#SewingInspiration #FabricLabels #DIYLabels #LibertyFabric #LibertyGiftsFromTheGarden
A lot can change in 10 years ❤️ It’s been fun look A lot can change in 10 years ❤️ It’s been fun looking back at where I was in 2016 and how far life has come since then. Swipe for a little trip down memory lane.Back in 2016, my priorities were firmly centred around family. I was working full‑time, sewing in the guest room, sharing tutorials on my blog, and slowly dipping my toes into selling a handful of patterns on Etsy. It was a busy, full season — and creativity was something I fitted in around everything else.  Fast forward to 2026… I’m now retired and living the creative life I once dreamed of. My kids have grown up and are living in their own homes nearby. My husband and I are free to travel, explore, and enjoy this stage of life. And I get to spend my days designing, sewing, and connecting with this beautiful community.Life looks different now — in the best possible way.Were you following me back then, or what has changed for you over the past 10 years? I’d love to hear your story too.Tagging the lovely makers of my quilt: @arabesquescissors @ministryoffabric @belloquacity @alittlepatchwork @sameliasmum coleandtaffy @quiltymamaof4 @shequiltsalot @downgrapevinelane @lizzierosesews @lovethatfabric @sew_mimi.k #2026isthenew2016 #10yeartransformation #sewingjourney #sewingcommunity #aspoonfulofsugardesigns
Fall in love with sewing all over again ❤️I’ve Fall in love with sewing all over again ❤️I’ve rounded up 10 heart‑themed makes — from quick gifts to charming quilt blocks — perfect for weekend stitching or using up your favourite scraps. Whether you’re sewing for Valentine’s Day, birthdays, or just because, there’s something sweet for every maker.Comment HEART and I’ll send you a link to my Heart Pattern Collection.#sewingproject #heartsewing #quiltblock #scrapsewing #easytosew
Raw edge appliqué doesn’t have to feel fiddly or i Raw edge appliqué doesn’t have to feel fiddly or intimidating. With a few simple techniques, you can create neat, crisp shapes — even tiny details like penguin beaks and hearts.I’ve put together My Top 5 Secrets for Raw Edge Appliqué to help you feel confident, whether you’re brand new to appliqué or looking to refine your finish. Save this for your next sewing session.If you’d love a quick, beginner‑friendly project to practise these tips, my Penguin Love Mugrug is the sweetest Valentine’s make — scrap‑friendly, gift‑ready, and such fun to sew.Comment PENGUIN and I’ll send you the link to the pattern. Available now in our Pattern Store and Etsy shop.  #rawedgeapplique #appliquetips #sewingtipsandtricks #mugrugpattern #penguinlove
If you’ve ever wanted to add eyelets or grommets t If you’ve ever wanted to add eyelets or grommets to your sewing projects, here’s a quick look at how I install them using my DK93 snap press. It’s the same tool I use for snaps — and it makes installing eyelets beautifully quick and consistent.For this Ribbon Pouch, I used the Liberty Gifts from the Garden collection (printed on Lasenby cotton and released in January 2026). The colours and motifs pair so well with the little ribbon tie detail.Here’s how to install the eyelets:Punch out the four holes using a hole‑cutting die.Place the eyelet into the hole.Press it into place using the snap press.That’s it — easy peasy, and it gives the pouch such an elevated, professional finish. I love how clean and sturdy the result is.Fabric is Gifts from the Garden by Liberty - kindly provided by @regent_street_fabrics — thank you!If you’d like the Ribbon Pouch pattern (it comes in 3 sizes), comment RIBBON and I’ll send the link straight to you.Ribbon Pouch Sewing Pattern: available in our Pattern Store and Etsy shop ( links in profile).#SewingInspiration #SewingProjects #Eyelets #Grommets #SnapPress
Follow on Instagram

Featured Pattern

Travel Sewing Kit Pattern

Featured Tutorial

Retro Drawstring Bag

Featured Recipe

Lemon Pound Cake

Connect

  • Email
  • Facebook
  • Instagram
  • Pinterest
  • Threads
  • TikTok
SUBSCRIBE TO NEWSLETTER
×

Popular Posts

  • Charm Square Fabric Tray
  • Merry Little Christmas Sewing Projects
  • {Back to School} Tissue Cover
  • Hexagon Fabric Tray
  • Raw Edge Applique Tips
  • Sewing Gifts 101: Easy and Affordable Ideas for Your Crafty Friends
  • Finding More Time to Sew

Copyright © 2026 Lisa. K. Cox - A Spoonful of Sugar