A Spoonful of Sugar

Make. Bake. Create.

Menu
  • Home
  • About
    • About Us
    • Press
    • FAQ
    • Disclosure Policy
    • Contact Us
  • Crafts
    • Crochet
    • DIY
    • Embroidery/Cross stitch
    • Gift Wrapping
    • Knitting
    • Miscellaneous
    • Paper Crafts
  • Holidays
    • New Year’s
    • Australia Day
    • Back to School
    • Valentines Day
    • Easter
    • ANZAC Day
    • Mother’s Day
    • Father’s Day
    • Halloween
    • Christmas
  • Recipes
    • Appetizers
    • Bars & Slices
    • Bread & Pastries
    • Cakes
    • Cookies
    • Confectionery
    • Cupcakes & Muffins
    • Desserts
    • Drinks
    • Ice Cream
    • Jams/Preserves
    • Main Meals
  • Sewing
    • Sewing Tutorials
    • Quilting
    • Sewing & Quilting Patterns
  • Family
    • Back to School
    • Family Fun
    • Our Home
    • Parenting
    • Travel
  • Shop
    • Pattern Store
    • Etsy Store

Folded Star Mat

October 15, 2013 By A Spoonful of Sugar - 37 Comments

Folded Star Patchwork is a bit like fabric origami. The pattern is created from folding and layering different fabrics. This technique was common in the 1980’s and is making a comeback. It is a very simple and effective technique and looks great using modern fabrics. It uses lots of fabric so it a great stash buster project!
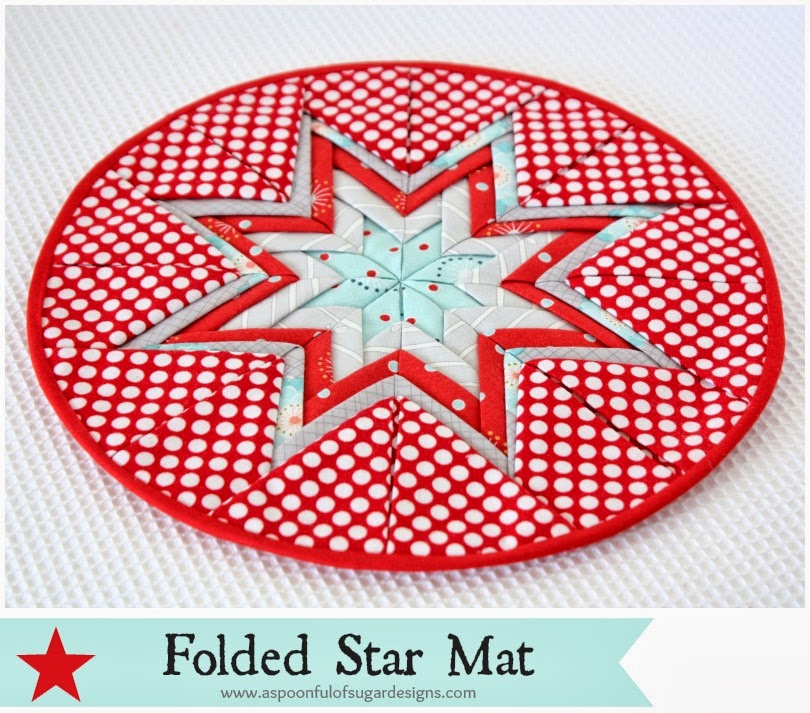
We think the star design looks very festive. It would be perfect for little table mats or placemats for your Christmas decorating.
If you would like to try this technique, we have written a few steps to guide you. Our Folded Star Mat measures 10 inches in diameter.
Fabrics and Materials:
5 Fat quarters of quilting cotton (inner layers of the star, backing)
1/2 yard (0.4 m) of quilting cotton (polka dot – outer layer of star)
1 yard (1 metre) bias binding
Firm fusible interfacing
Fabric Credit: We used 5 Fat Quarters from the Wallflowers range from Windham Fabrics for this project. 
Cut Fabrics
  • For the centre row, cut five 5 inch circles from Fabric 1
  • For the next three rows, cut eight 5 inch circles from each fabric.
  • For the outside row, cut eight 7 inch x 7 inch squares
  • Cut interfacing into a circle that measures 10 inches in diameter
Tip: I cut the 5 inch circles using the circle die on our Go Baby Fabric Cutter.
1. Fold the interfacing circle in half, then into quarters, and then into eighths. Use a marking pen to highlight the fold lines.
2. For the fabric circles. fold them all in half with the right side facing outwards, and press. Bring the outside points down to the centre and press. (Refer to Photo of grey circles)
3. For the fabric squares, fold in half, and press. Bring the outside points down to the centre front and press to form triangles. (Refer to Photo of Polka Dot Triangles).
4. Centre Row: Open up one of the circles and place it in the centre of the interfacing, matching up the fold lines. Place the remaining 4 triangles with the points meeting in the centre, lining up the guide lines. Tack the points together. Tack the outer edge in place.
5. Second Row: place the 8 triangles 3/4 inch from the centre points, being careful to line up with the fold lines on the interfacing. Tack the points and outer edge in place.
6. Third and Fourth Row: Repeat step 5 for next two rows but placing the points 1/2 inch from the previous row.

7. For the outside Row, repeat using the polka dot triangles.

8. Trim the outside of the mat so that it forms a circle that is 10 inches in diameter, using the interfacing as a guide. Turn the mat so that the interfacing is facing upwards. Layer a fat quarter over the interfacing with the right side facing upwards. Press in place so that it fuses to the interfacing. Trim the backing to the 10 inch circle. Stitch bias binding in place following manufacturer’s directions.
Folded Star Patchwork is a fun technique that can be adapted to different sizes. If you like this technique, check out our Folded Star Ornament. 
Folded Star Ornament
Disclosure: Thanks to Windham Fabrics for supplying the Wallflowers fabric that was used in this project. 
 
For other Stash Buster projects, check out our round-up of 15 Scrap Buster Tutorials.

Hello! Are you new here?

If so, be sure to sign up for our newsletter here and receive a bonus sewing pattern and welcome discount. Our newsletter includes free tutorials, articles, and new patterns. Welcome to the world of sewing enthusiasts.

Filed Under: Christmas, Sewing, Sewing Tutorials Tagged With: patchwork

« Halloween Cupcakes
Last Minute Halloween Ideas »

Comments

  1. Sherrill says

    October 15, 2013 at 8:03 pm

    Oh my gosh, my mom made a lot of these probably in the 80’s!! I may have to give these a whirl. Thank you for providing the directions.

    Reply
  2. Ольга Т. says

    October 15, 2013 at 9:26 pm

    Чудесный мат! Спасибо за подробный мастер-класс. Очень понятно.

    Reply
  3. Escargopotte bordados says

    October 16, 2013 at 12:36 am

    very nice ! I love it !

    Reply
  4. Jan says

    October 16, 2013 at 4:14 am

    thanks so much for the tutorial, Lisa and Sarah; I haven’t made one of these since the ’80s and had forgotten how lovely this design is. Must get cracking on one to brighten up my house for Christmas.

    Reply
  5. Allie and Me design says

    October 16, 2013 at 7:03 am

    Hello! This is so beautiful! May I invite you to my “Christmas magic link party”? I would be happy if you are there!
    many greetings, Gesine
    http://allie-and-me-design.blogspot.de/2013/10/weihnachtszauber.html

    Reply
  6. em's scrapbag says

    October 16, 2013 at 11:37 am

    My local quilt guild did this last month. I was unable to attend so I greatly appreciate your sharing a tute.

    Reply
  7. GardenOfDaisies says

    October 16, 2013 at 7:23 pm

    So pretty!!

    Reply
    • Eva Essa says

      February 6, 2014 at 4:35 pm

      It is really beautiful, can’t imagine it is that mauch easy – first i saw I thought very complicated job. but after seeing the pattern I felt how easy and amazing to do it right during the coming week-end.

      thanks dear all

      Reply
      • Eva Essa says

        February 6, 2014 at 4:38 pm

        Can we do similar with different colors and use it as a baby mat – I have a grand son 6 month old, don’t you thinkd this will be suitable for him?.

        Reply
        • A Spoonful of Sugar says

          February 6, 2014 at 4:52 pm

          You could make it as a baby mat – it would use up a lot of fabric though. You may need to stitch all the points down with a sewing machine to make it more robust for laundering.

          Reply
  8. Tine says

    October 21, 2013 at 2:12 am

    Wow, what a great idea. Thanks a lot for showing us this technique. I’m going to do one or two for Christmas.
    Tine from Bones&Needles

    Reply
  9. JG says

    October 22, 2013 at 7:55 am

    Looks so nice! Perfect gift for a special occasion. Thanks for the tutorial.
    ~Judy

    Reply
  10. Amy Morinaka says

    October 22, 2013 at 6:05 pm

    Wow this is fabulous! Love, love, love all your tutorials – they are truly the shining stars!

    Reply
  11. thesnailgarden says

    October 25, 2013 at 1:51 am

    Beautiful mat, would look great for Christmas time! Best wishes, Pj x

    Reply
  12. FiLuMas says

    November 13, 2013 at 1:21 am

    wow, it looks great!

    Liebe Grüße
    Christina

    Reply
  13. Ina says

    November 26, 2013 at 1:04 am

    It looks awesome!!!
    I´d like to invite you to my linkparty “Starlove” !
    http://immermalwasneues.blogspot.de/p/document.html
    I’d be proud, if your star would be there!
    Greatings Ina

    Reply
  14. Lauren Duffy says

    December 2, 2013 at 12:03 am

    It really is gorgeous! It’s such a shame that it wastes so much fabric to get that effect though. Decent fabric is expensive, far too expensive to waste 2 or more yards of it! Would be better to use a cheaper fabric rather than quilting cotton, but then again poly cotton burns if you iron it! Very beautiful though.

    Reply
  15. Heidee says

    February 18, 2014 at 8:52 pm

    This is beautiful! My mother in-law made a little ring cushion in this style when her son and I got married. It’s stunning and safely tucked away in a box for when my daughter gets married. I’m going to have to give this a try myself! x

    Reply
    • A Spoonful of Sugar says

      February 18, 2014 at 9:22 pm

      Thanks Heidee. How special that you are keeping the ring cushion for your daughter.

      Reply
  16. Stephanie Cook says

    March 9, 2014 at 2:59 pm

    Thank you so much for this tutorial, just made this in grey and pink and it looks adorable , I fact way too adorable to use! Thanks again from Tunbridge Wells in England. X

    Reply
    • A Spoonful of Sugar says

      March 9, 2014 at 9:36 pm

      You’re welcome Stephanie! Grey and Pink sounds like a pretty combination.

      Reply
  17. CrafTeeChic says

    April 2, 2014 at 6:10 am

    Was wondering if you could be more specific how and where you “tack” the pieces down for those of us like me that need more specific instructions. I’ve done some quilted ornaments, but I don’t understand how to do this. And what kind of fusible interfacing do you mean or recommend since there are so many. I’m more of a visual and do person then read and do person. Thank you.

    Reply
    • A Spoonful of Sugar says

      April 2, 2014 at 10:49 am

      Tack is the same as baste. At the point do a couple of little stitches to hold the point in place. Baste along the outer raw edges so that it stays in place and lies flat.

      Any light to medium weight fusible interfacing is good for this project. I don’t have a preference for any brand and just use what I have on hand.

      Reply
  18. Jenn says

    June 3, 2014 at 4:37 am

    I am new to sewing. Can you explain what you mean by “tack”? I understand how to place the fabric pieces but I don’t understand where to actually sew them. Thanks!

    Reply
    • A Spoonful of Sugar says

      June 3, 2014 at 4:21 pm

      Hi Jenn – Tack is to sew a few stitches in one spot, by hand or by machine sewing, to secure one item to another. You stitch the pieces at the rounded edge. Tackibng at the tip of each piece is optional, depending on whether you want to tips to be sewn down or left free. Hope that helps!

      Reply
  19. Julia Needham says

    July 31, 2014 at 11:37 am

    So if i want to make this star placemat a size 15 how would i do that

    Thanks, Julia

    Reply
    • A Spoonful of Sugar says

      August 3, 2014 at 5:54 pm

      Hi Julia

      I am not sure what a size 15 is exactly. If you want to make it larger, you just ad more rows. You will have to cut the fold fabric pieces larger as the mat gets bigger. I personally haven’t made any bigger than this one.

      Reply
  20. flo says

    August 23, 2014 at 9:59 am

    this is just adorable.to enlarge would you just add to each pattern as many inches as you want it to be enlarged to.

    Reply
  21. Sheryl says

    October 11, 2014 at 1:47 am

    Thanks for sharing… I found one that my Grandmother had made and was wondering how she did it… I’m excited to try a make a few – thanks again 🙂
    Sheryl K

    Reply
    • A Spoonful of Sugar says

      October 11, 2014 at 4:26 pm

      Thanks Sheryl – how lovely that you have one your grandmother made.

      Reply
  22. amy says

    October 11, 2014 at 9:59 am

    This is SO beautiful!! Thank you so much for posting this. My friend and I just saw one a couple of days ago and wondered how to make it. Then…I ran across your tut! Fortuitous! Thanks again!!!

    Reply
    • A Spoonful of Sugar says

      October 11, 2014 at 4:27 pm

      Thanks Amy – have making them – it is hard to stop at one!

      Reply
  23. anna says

    June 10, 2015 at 8:35 pm

    the design is absolutely fantastic, clearly written and with a little patience, nice in sewing. I just finished sewing the first mat. I made a mistake in choosing fabrics for sewing,but already planning the next mat.
    Thank you for sharing!
    If you would like to see my project, it will be a pleasure for me.
    Anna

    http://mamaniuni2.blogspot.ie/2015/06/podkadka-z-gwiazda.html

    Reply
  24. Lynda Cox says

    February 18, 2020 at 4:29 am

    I love your tutorial; very clear!
    Please tell me how to make my own Binding for this project.

    Thank you
    Lynda

    Reply
  25. Mary says

    October 27, 2025 at 4:19 am

    I have just discovered this tutorial and am so pleased. I used to make these in the past but had forgotten how to make them. 🤭
    Thank you for helping me get on track again.

    Mary :))

    Reply
    • A Spoonful of Sugar says

      November 3, 2025 at 3:22 pm

      You are so welcome Mary! Happy sewing.

      Reply

Leave a Reply Cancel reply

Your email address will not be published. Required fields are marked *

  • Email
  • Facebook
  • Instagram
  • Pinterest
  • Threads
  • TikTok
SUBSCRIBE TO NEWSLETTER
×

Categories

Archives

PURCHASE PDF PATTERNS

We offer over 100 affordable PDF sewing patterns available for download from our store website or Etsy store. Each pattern includes detailed instructions, numerous photos, and templates.

WEB STORE ETSY STORE

Instagram

A lot can change in 10 years ❤️ It’s been fun look A lot can change in 10 years ❤️ It’s been fun looking back at where I was in 2016 and how far life has come since then. Swipe for a little trip down memory lane.Back in 2016, my priorities were firmly centred around family. I was working full‑time, sewing in the guest room, sharing tutorials on my blog, and slowly dipping my toes into selling a handful of patterns on Etsy. It was a busy, full season — and creativity was something I fitted in around everything else.  Fast forward to 2026… I’m now retired and living the creative life I once dreamed of. My kids have grown up and are living in their own homes nearby. My husband and I are free to travel, explore, and enjoy this stage of life. And I get to spend my days designing, sewing, and connecting with this beautiful community.Life looks different now — in the best possible way.Were you following me back then, or what has changed for you over the past 10 years? I’d love to hear your story too.Tagging the lovely makers of my quilt: @arabesquescissors @ministryoffabric @belloquacity @alittlepatchwork @sameliasmum coleandtaffy @quiltymamaof4 @shequiltsalot @downgrapevinelane @lizzierosesews @lovethatfabric @sew_mimi.k #2026isthenew2016 #10yeartransformation #sewingjourney #sewingcommunity #aspoonfulofsugardesigns
Fall in love with sewing all over again ❤️I’ve Fall in love with sewing all over again ❤️I’ve rounded up 10 heart‑themed makes — from quick gifts to charming quilt blocks — perfect for weekend stitching or using up your favourite scraps. Whether you’re sewing for Valentine’s Day, birthdays, or just because, there’s something sweet for every maker.Comment HEART and I’ll send you a link to my Heart Pattern Collection.#sewingproject #heartsewing #quiltblock #scrapsewing #easytosew
Raw edge appliqué doesn’t have to feel fiddly or i Raw edge appliqué doesn’t have to feel fiddly or intimidating. With a few simple techniques, you can create neat, crisp shapes — even tiny details like penguin beaks and hearts.I’ve put together My Top 5 Secrets for Raw Edge Appliqué to help you feel confident, whether you’re brand new to appliqué or looking to refine your finish. Save this for your next sewing session.If you’d love a quick, beginner‑friendly project to practise these tips, my Penguin Love Mugrug is the sweetest Valentine’s make — scrap‑friendly, gift‑ready, and such fun to sew.Comment PENGUIN and I’ll send you the link to the pattern. Available now in our Pattern Store and Etsy shop.  #rawedgeapplique #appliquetips #sewingtipsandtricks #mugrugpattern #penguinlove
If you’ve ever wanted to add eyelets or grommets t If you’ve ever wanted to add eyelets or grommets to your sewing projects, here’s a quick look at how I install them using my DK93 snap press. It’s the same tool I use for snaps — and it makes installing eyelets beautifully quick and consistent.For this Ribbon Pouch, I used the Liberty Gifts from the Garden collection (printed on Lasenby cotton and released in January 2026). The colours and motifs pair so well with the little ribbon tie detail.Here’s how to install the eyelets:Punch out the four holes using a hole‑cutting die.Place the eyelet into the hole.Press it into place using the snap press.That’s it — easy peasy, and it gives the pouch such an elevated, professional finish. I love how clean and sturdy the result is.Fabric is Gifts from the Garden by Liberty - kindly provided by @regent_street_fabrics — thank you!If you’d like the Ribbon Pouch pattern (it comes in 3 sizes), comment RIBBON and I’ll send the link straight to you.Ribbon Pouch Sewing Pattern: available in our Pattern Store and Etsy shop ( links in profile).#SewingInspiration #SewingProjects #Eyelets #Grommets #SnapPress
The Twirling Treasures Hot Pad & Placemat Set show The Twirling Treasures Hot Pad & Placemat Set showcases one of my favourite FPP designs — a stunning kaleidoscope‑style block that always turns out beautifully. Kaleidoscope blocks are some of my most popular FPP patterns, and this set is such a fun way to use them.  This set includes six sizes, making it incredibly versatile: use them as hot pads, trivets, placemats, or simply as a way to add a pop of colour to your kitchen.For these samples, I went with a monochromatic scrap‑busting approach, pairing fabrics from the same colour family with a low‑volume background. The black‑and‑white striped binding adds such a crisp, modern finish. It’s a wonderful project for building your FPP confidence — and a fantastic way to use up those treasured scraps.The Twirling Treasures Hot Pad set is our Pattern of the Week. It is currently 25% off this week in our Pattern Store and Etsy Shop.If you’d like to sew your own set, comment TWIRL and I’ll send the pattern link straight to you.Happy sewing! Lisa 🌸#FoundationPaperPiecing #Quilting #HotPads #ScrapBuster #KitchenSewing
The Ribbon Pouch is one of those little makes that The Ribbon Pouch is one of those little makes that feels special from the very first stitch. I made this sweet trio in the Liberty Gifts from the Garden collection, and the colours couldn’t be more perfect for gifting, organising, or adding a little beauty to your everyday.Each pouch features: 🌼 A simple ribbon tie closure 🎀 Optional sew‑in tags or DIY felt/fabric labels 🧵 Three practical sizes — perfect for notions, treats, or small gifts ✨ A quick, beginner‑friendly sewIf you’d like to make your own, comment RIBBON and I’ll send the pattern link straight to your inbox. Save this for your next weekend project — it’s such a satisfying little sew. Pattern is available in our Pattern Store.Thanks to @regent_street_fabric for the Gifts from the Garden fabric collection. (released Jan 2026)#SewingInspiration #SewingProjects #LibertyFabric #SewingPatterns #BeginnerSewing
Follow on Instagram

Featured Pattern

Travel Sewing Kit Pattern

Featured Tutorial

Retro Drawstring Bag

Featured Recipe

Lemon Pound Cake

Connect

  • Email
  • Facebook
  • Instagram
  • Pinterest
  • Threads
  • TikTok
SUBSCRIBE TO NEWSLETTER
×

Popular Posts

  • Charm Square Fabric Tray
  • Merry Little Christmas Sewing Projects
  • {Back to School} Tissue Cover
  • Raw Edge Applique Tips
  • Sewing Gifts 101: Easy and Affordable Ideas for Your Crafty Friends
  • Fabric Gift Pouch
  • Free Holiday Sewing Tutorials

Copyright © 2026 Lisa. K. Cox - A Spoonful of Sugar