A Spoonful of Sugar

Make. Bake. Create.

Menu
  • Home
  • About
    • About Us
    • Press
    • FAQ
    • Disclosure Policy
    • Contact Us
  • Crafts
    • Crochet
    • DIY
    • Embroidery/Cross stitch
    • Gift Wrapping
    • Knitting
    • Miscellaneous
    • Paper Crafts
  • Holidays
    • New Year’s
    • Australia Day
    • Back to School
    • Valentines Day
    • Easter
    • ANZAC Day
    • Mother’s Day
    • Father’s Day
    • Halloween
    • Christmas
  • Recipes
    • Appetizers
    • Bars & Slices
    • Bread & Pastries
    • Cakes
    • Cookies
    • Confectionery
    • Cupcakes & Muffins
    • Desserts
    • Drinks
    • Ice Cream
    • Jams/Preserves
    • Main Meals
  • Sewing
    • Sewing Tutorials
    • Quilting
    • Sewing & Quilting Patterns
  • Family
    • Back to School
    • Family Fun
    • Our Home
    • Parenting
    • Travel
  • Shop
    • Pattern Store
    • Etsy Store

Edible Blooms

March 13, 2010 By A Spoonful of Sugar - 46 Comments

Sarah and I spent a very companionable morning today making up an Easter Centrepiece for our table. Sarah is the consummate professional when it comes to crafting and was insistent that we sample the “blooms” to ensure that they were of the highest quality. They were:)


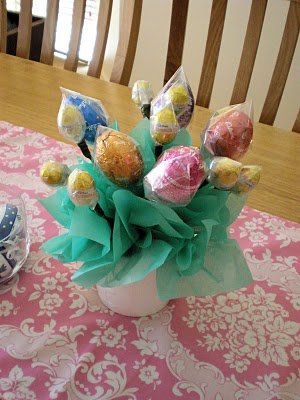
We had a number of requests for how to make these bouquets after we posted our Christmas version. We aren’t florists – and this is our own technique but we are happy to share.

You will need:

  • flower pot (we got ours from Ikea)
  • floristry foam
  • green floristry tape
  • green floristry wire
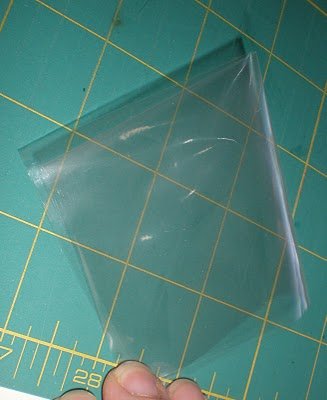
  • clear cellophane
  • green tissue paper
  • Easter eggs – small and medium
  • long nose pliers


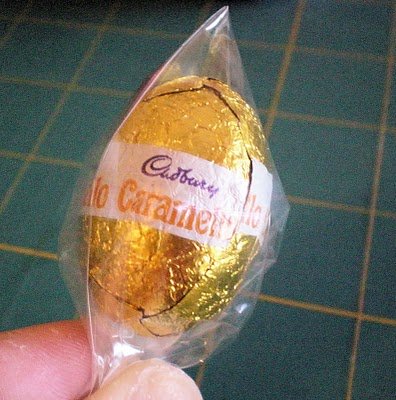
For the small buds, we cut a piece of clear cellophane into 5 inch square and folded it into four quarters. We inserted the small egg into the folded cellophane and scrunched up the cellophane around it. (By folding the cellophane first, it makes a little pointy top so the egg looks more like a little rose bud).


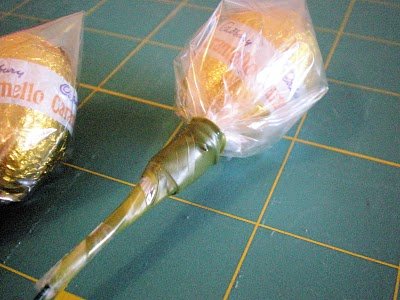
We wrapped some wire around the cellophane to secure, and then covered the top of the wire with floristy tape.

For the larger eggs we used a piece of cellophane cut into 8 inch square, and used the same technique.

We then cut a piece of florist foam to fit the flower pot, and inserted the stems into the foam. We then cut pieces of green tissue paper approx 6 inch square. We grabbed the middle of the tissue paper and scrunched it slightly, and then wrapped a length of wire around it. We poked these into the foam to hide all the flower stems.


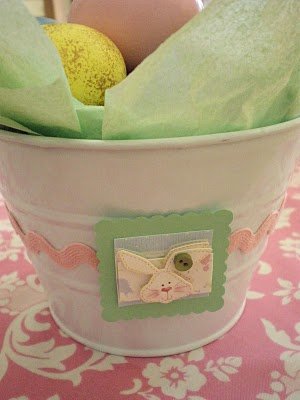
I found some of my Easter projects from last year when I cleaned out my craft cupboards yesterday. My Mum and I  painted some blown eggs with acrylic paints. They make a nice display in a decorated pail.


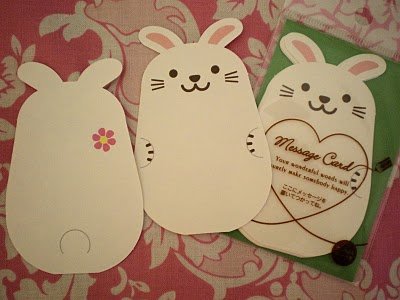
I found some sweet Rabbit message cards when I was in Japan – these will be perfect for Easter giving.

PS Check out our new header that my clever daughter designed 🙂


Posted by Lisa and Sarah

Filed Under: Easter

« Nectarines and Needlecraft
Snapshots of my week…. »

Comments

  1. suzitee says

    March 13, 2010 at 9:42 pm

    Cute header Sarah!
    You always make the BEST Easter projects…who could forget your carrots from last year? LOVED THEM! These egg bouquets are just gorgeous…might have to make one of these myself 😉
    Glad you are finding time to craft this weekend.

    Reply
  2. Cottage Cozy says

    March 13, 2010 at 9:51 pm

    Darling project and I love your header too…nice job, daughter!

    Reply
  3. Thimbleanna says

    March 13, 2010 at 10:00 pm

    Cute New Header!!! Love the buttons. You guys are so funny too — I’d have to sample my centerpiece too — you never know when you might have a bad bloom!

    Reply
  4. Sarah Lou says

    March 13, 2010 at 11:14 pm

    so cute, but they never would have made it in to the edible blooms around here! yumm!

    Reply
  5. LizzieJane says

    March 13, 2010 at 11:26 pm

    What a lovely project. I am afraid though that I would eat the craft supplies!
    x

    Reply
  6. Heleen says

    March 14, 2010 at 12:07 am

    Your easterproject is lovely! And I do love your new banner!

    Reply
  7. Samantha says

    March 14, 2010 at 12:12 am

    Great header.
    Don’t you just love working with chocolate in this heat and humidity.
    ; )

    Reply
  8. Margaret says

    March 14, 2010 at 1:09 am

    The maker should always try the product — h hmm we wouldn’t want anyone getting sick would we, perhaps I should try another before it is wrapped.

    Reply
  9. Janellybelly says

    March 14, 2010 at 1:24 am

    I don’t have a green thumb, but I could be willing to have a brown thumb making that gorgeous chocolate posy.
    Oooo, new blog header – Nice!

    Reply
  10. clare's craftroom says

    March 14, 2010 at 1:56 am

    Love the new header and of course the eggs !

    Reply
  11. Katharina says

    March 14, 2010 at 2:20 am

    Great idea. I love that little bunny on the flowerpot.

    Have a nice sunday.

    Katharina

    Reply
  12. Anita says

    March 14, 2010 at 2:41 am

    Those eggs look absolutely devine and they would not be safe near me. lol. Great work. Kind regards, Anita.

    Reply
  13. Fiona @ Dragonfly-Crafts says

    March 14, 2010 at 8:14 pm

    Great idea ladies…. Looks good enough to eat. LOL!

    Reply
  14. texmorg says

    March 14, 2010 at 5:45 am

    Very clever all round.Thanks for the tutorial.
    Linda

    Reply
  15. Stephanie says

    March 14, 2010 at 5:50 am

    Lots of talented ladies in your family and you’re always so kind to share. My daughter has the white pot…IKEA perhaps?

    Reply
  16. Laura in Paris says

    March 14, 2010 at 8:09 am

    thank you for reminding me of Easter. I will take my Easter decorations!I also love to change!

    Reply
  17. Simone de Klerk says

    March 14, 2010 at 8:37 am

    Such a clever idea to put those yummie Cadbury eggs on a stick! It looks very happy!
    Lovely header, Sarah!!!

    Reply
  18. Chocolate Cat says

    March 14, 2010 at 11:15 am

    Some great easter decorating ideas and those blooms would make a great gift. So glad Sarah was able to help out by being the ‘taste tester’!! Love the new header.

    Reply
  19. Rumi says

    March 14, 2010 at 2:37 pm

    Very lovely centerpiece. How long will it last, I wonder, before temptation takes over and nary a bloom remain!

    Reply
  20. Terriaw says

    March 14, 2010 at 2:39 pm

    How fun! It would be hard not to eat these while putting the pretty basket together. Makes me want to go out and buy some Easter candy now!

    Reply
  21. Cheryl says

    March 14, 2010 at 3:52 pm

    Great job on the header Sarah..love that centerpiece!! OMW Cadberry Eggs are the best!

    Reply
  22. Ally Johnston says

    March 14, 2010 at 6:19 pm

    Great way to pass the time and bond with your daughter..

    Reply
  23. Dogwood says

    March 14, 2010 at 6:19 pm

    Tell your creative daughter that she did an excellent job with your header!

    The Easter candy centerpiece is precious! I love it. So sweet and colorful.

    Have a nice evening…

    Reply
  24. Jill says

    March 14, 2010 at 7:30 pm

    A lovely simple idea to make a fabulous looking bouquet!!

    Reply
  25. Bev C says

    March 14, 2010 at 9:42 pm

    Hello Lisa and Sarah, I hope you have counted how many blooms you have there!!! Happy Monday to you both.
    Bev.

    Reply
  26. Jelly Wares says

    March 14, 2010 at 9:43 pm

    I love edible blooms!!! Thanks for the great ‘how-to’

    Hugs
    Jodie 🙂

    Reply
  27. Knit Sew City Girl says

    March 15, 2010 at 5:28 am

    Hi Sarah and Lisa!

    I like your new banner! A great design.

    The edible easter egg bloom is good idea, thanks for the inspiration. I must start preparing for Easter soon, better not leave it to the last minute like I always do.

    Mary

    Reply
  28. Jenn's Crafty World says

    March 15, 2010 at 1:12 pm

    Very nice ideas for Easter. I was just looking for something new to do…!

    Reply
  29. themsrevolution says

    March 15, 2010 at 1:14 pm

    mmmm… not sure that arrangement would last long in my house!

    Reply
  30. lillalotta says

    March 16, 2010 at 3:19 am

    So wonderful!

    Reply
  31. Handmade in Israel says

    March 16, 2010 at 4:13 am

    So much goodness! I love the egg arrangement – I don’t think I’d be able to resist the eggs though! The header is fab – well done Sarah – and I adore those rabbits message cards! So, so cute!

    Reply
  32. Jenni says

    March 16, 2010 at 9:20 am

    Very creative!

    Reply
  33. Carrie P. says

    March 16, 2010 at 9:47 am

    So cute and a very nice header too. Great job on both.

    Reply
  34. Vintage from the Village says

    March 16, 2010 at 1:19 pm

    That Easter egg tree is fab !!
    Sue x

    Reply
  35. K-Sue says

    March 16, 2010 at 2:36 pm

    I like the header – happy design. The candy egg arrangement is cute and, I’m sure, yummy. Hmmmm….Earthgirl and I may need to make one of those….Thank you for sharing the detailed how-to.

    Reply
  36. Journeying Five says

    March 16, 2010 at 10:00 pm

    positively adorable!

    Reply
  37. Tracy says

    March 17, 2010 at 4:51 am

    That is such a happy ideas–so pretty, and love how the pot is decorated too! Sadly, we don’t have children, so we tend not to do much fuss for Easter–but we could treat ourselves, hubby & I! Many thanks for your anniversary wishes to us–so sweet! :o) ((HUGS))

    Reply
  38. Sandra says

    March 17, 2010 at 12:55 pm

    Now this is perfect for me: A chocolate flower bouquet!! 😉
    Thank you for sharing this idea.

    Reply
  39. Corrie says

    March 17, 2010 at 5:31 pm

    oh my gosh I’m going to make this for my mum! thank you for sharing!!! you girls are so clever

    Reply
  40. AMIT says

    March 17, 2010 at 11:42 pm

    So sweet of you that you shared this here of how to make.Thanksss..

    home jobs india

    Reply
  41. electronics says

    March 18, 2010 at 12:15 am

    I admire your work.

    You are very clever,and then had a clever daughter 🙂

    Reply
  42. Shannon says

    March 18, 2010 at 11:11 am

    What a beautiful idea for a table centerpiece – and dessert is as easy as picking a flower! 🙂
    Love the header, too – “pinkalicious.”

    Reply
  43. sewtakeahike says

    March 18, 2010 at 2:42 pm

    very, very cute!! thanks for sharing how you two made it. I love the new header too!

    Reply
  44. Alison says

    April 28, 2010 at 9:49 pm

    What a fabulous idea!! I featured this tutorial on my blog today, highlighting 3 dozen flower tutorials. Here is the link:

    http://oopsey-daisy.blogspot.com/2010/04/wednesdays-wowzers-3-dozen-flower.html

    Thanks for the inspiration!!

    Reply
  45. Erin says

    May 20, 2010 at 8:39 am

    This is adorable!!!

    http://www.makingmemorieswithyourkids.blogspot.com

    Reply
  46. Laura Major (Learning Is Child's Play) says

    April 12, 2011 at 6:57 am

    This is such a great idea! I am going to share you and your idea with my FB peeps! We are a group of Moms,Dads, Grands, Teachers & Daycare Providers. This would be a great gift idea for all of the folks on our Easter lists! Here is my link:
    http://www.facebook.com/LearningIsChildsPlay
    I couldn’t find a link to a Facebook page on here…If I would have have I would have linked you up that way too! If you do have one, let me know because I know I’ll be back!
    Have a “Hoppy” Day!

    Reply

Leave a Reply Cancel reply

Your email address will not be published. Required fields are marked *

  • Email
  • Facebook
  • Instagram
  • Pinterest
  • Threads
  • TikTok
SUBSCRIBE TO NEWSLETTER
×

Categories

Archives

PURCHASE PDF PATTERNS

We offer over 100 affordable PDF sewing patterns available for download from our store website or Etsy store. Each pattern includes detailed instructions, numerous photos, and templates.

WEB STORE ETSY STORE

Instagram

Looking for a sweet, handmade way to wrap up a fes Looking for a sweet, handmade way to wrap up a festive gift?This Bitsy Basket is filled with cozy goodness—tea bags, a mug, biscuits, chocolates—and finished with a Threaded Token gift tag for that extra handmade touch 🎀It’s beginner-friendly, scrap-friendly, and perfect for gifting teachers, neighbours, or anyone who deserves a little joy.✂️ Pattern is available in our Pattern Store and Etsy Shop
🧵 Fabric: Tilda Merry Little Christmas
 🎁 Gift Tag: Threaded Token (free pattern—link in profile)Comment Basket and I’ll send you the pattern link!#bitsybasket #handmadegiftwrap #tildafabrics #scrapfriendlysewing #quicksewingproject #holidaysewing #giftideas #sewinggifts #beginnersewingproject #tildamerrylittlechristmas @tilda_australia
🎄 Say hello to the Elf Gift Tote! This sweet l 🎄 Say hello to the Elf Gift Tote! This sweet little tote is perfect for holiday gifting—fill it with treats, trinkets, or treasures. It folds flat for easy storage and comes together quickly using scrap or stash fabrics. Beginner-friendly and festive, it’s a joyful make that adds handmade charm to your celebrations.I love using mine for teacher gifts and to put under the Christmas tree.✨ Comment ELF for the pattern link! Available in our Pattern Store and Etsy Shop—link in profile.#elfgifttote #holidaysewingproject #scrapfriendlysewing #quicksewingproject #beginnersewingpattern #giftfriendlysewing #aspoonfulofsugardesigns #christmassewingideas #sewinggifts #handmadeholidaygifts #sewinginspiration #makersgiftguide  #festivesewingfun
Free Pattern: Add a little handmade cheer to your Free Pattern: Add a little handmade cheer to your holidays with the Holly Jolly Tree! 🎄 This sweet 3D ornament is made from two slotted panels and comes together in minutes. You’ll need four coordinating fabrics, felt, and double-sided fusible web—making it a perfect scrap-buster project. Whether you display it on your mantle, pop it into a gift basket, or use it as a festive table accent, it’s a joyful little make that adds charm to any space.I stitched mine in Tilda’s Merry Little Christmas fabric and love how nostalgic and cozy it feels 💕 ✨ Want the free pattern? Sign up via the link in bio or comment TREE and I’ll send it your way!#hollyjollytree #handmadeholidaydecor #scrapfriendlysewing #christmasornamentsewing #tildafabric #tildamerrylittlechristmas #beginnersewingproject #sewingforchristmas #holidaysewingideas #aspoonfulofsugardesigns #sewinginspiration #makersgiftguide #sewinggifts #australianmakers #quicksewingproject
Next up in our Makers Gift Guide series: Handmade Next up in our Makers Gift Guide series: Handmade Gifts for Teachers & Coaches 🎁✨ They’re mentors, motivators, and everyday heroes—so let’s celebrate them with something heartfelt and handmade. Whether it’s a fabric basket in team colours, a journal, or a pouch filled with treats, these projects are scrap-friendly, beginner-friendly, and full of meaning.💌 Comment TEACHER for the link to our guide
🧵 Includes sewing ideas + thoughtful extras to pair with your gift
🎄 Perfect for end-of-year, Christmas, or anytime appreciationLet’s make gratitude handmade this season 💕Check out our other guides too—just look for the Makers Gift Guide logo at the top of each post 🎁✨  #makersgiftguide #handmadeholiday #teacherthankyou #coachgiftideas #scrapfriendlysewing #beginnersewingprojects #giftfriendlysewing #sewingforothers #christmassewingideas
One festive pattern, three unique styles 🎄✨  One festive pattern, three unique styles 🎄✨ Whether you love monochrome magic, Tilda charm, or bright and cheery style, the Scrappy Mini Stocking is ready to match your holiday palette. It’s beginner-friendly, scrap-friendly, quick to sew, and perfect for gifting!🧵 Make one in around an hour  🎁 Use up your favourite fabric leftovers 🎄 Add handmade charm to your tree, table, or gift wrapComment STOCKING and I’ll send you the link to the pattern! Available in our Pattern Store and Etsy Shop.#scrappyministocking #christmassewing #handmadeholiday #scrapfriendlysewing #quicksewingproject #beginnersewingpattern #giftfriendlysewing #tildafabric #holidaycraftideas #aspoonfulofsugardesigns #australianmakers #sewingcarousel #christmasdiy
Add a handmade touch to your holidays with the Hol Add a handmade touch to your holidays with the Holly Jolly Tree 🎄✨ This cheerful 3D Christmas tree is one of our favourite festive makes—and it’s beginner-friendly, scrap-friendly, and quick to sew! Whether you’re decorating your mantle, gifting to a friend, or adding a pop of colour to your holiday table, these felt and fabric trees bring instant joy.🧵 You can make one in under 30 minutes using fabric scraps, felt, and a few simple stitches.
🎁 They’re perfect for ornaments and table decorations💡 Want to personalize it? Add a ribbon tag, embroidery, sequins, or a tiny star on top!The Holly Jolly Tree is a free sewing pattern available to our community. 📌 Comment TREE and I’ll send you the link to download it! Link is also in our profile.#hollyjollytree #handmadeholiday #christmassewing #freesewingpattern #scrapfriendlysewing #quicksewingproject #beginnersewingproject #giftfriendlysewing #feltornaments #holidaycraftideas #aspoonfulofsugardesigns #christmasdiy #sewingreel #australianmakers #sewingforchristmas
Follow on Instagram

Featured Pattern

Travel Sewing Kit Pattern

Featured Tutorial

Retro Drawstring Bag

Featured Recipe

Lemon Pound Cake

Connect

  • Email
  • Facebook
  • Instagram
  • Pinterest
  • Threads
  • TikTok
SUBSCRIBE TO NEWSLETTER
×

Popular Posts

  • Merry Little Christmas Sewing Projects
  • Folded Hexagon Ornament
  • Gifts to Sew for Sewists
  • Handmade Gifts for Teachers & Coaches
  • Folded Star Ornament
  • Handmade Gifts for Thoughtful Hosts
  • Folded Star Mat

Copyright © 2025 Lisa. K. Cox - A Spoonful of Sugar