A Spoonful of Sugar

Make. Bake. Create.

Menu
  • Home
  • About
    • About Us
    • Press
    • FAQ
    • Disclosure Policy
    • Contact Us
  • Crafts
    • Crochet
    • DIY
    • Embroidery/Cross stitch
    • Gift Wrapping
    • Knitting
    • Miscellaneous
    • Paper Crafts
  • Holidays
    • New Year’s
    • Australia Day
    • Back to School
    • Valentines Day
    • Easter
    • ANZAC Day
    • Mother’s Day
    • Father’s Day
    • Halloween
    • Christmas
  • Recipes
    • Appetizers
    • Bars & Slices
    • Bread & Pastries
    • Cakes
    • Cookies
    • Confectionery
    • Cupcakes & Muffins
    • Desserts
    • Drinks
    • Ice Cream
    • Jams/Preserves
    • Main Meals
  • Sewing
    • Sewing Tutorials
    • Quilting
    • Sewing & Quilting Patterns
  • Family
    • Back to School
    • Family Fun
    • Our Home
    • Parenting
    • Travel
  • Shop
    • Pattern Store
    • Etsy Store

Coat Hanger Cover {Tutorial}

April 14, 2013 By A Spoonful of Sugar - 19 Comments

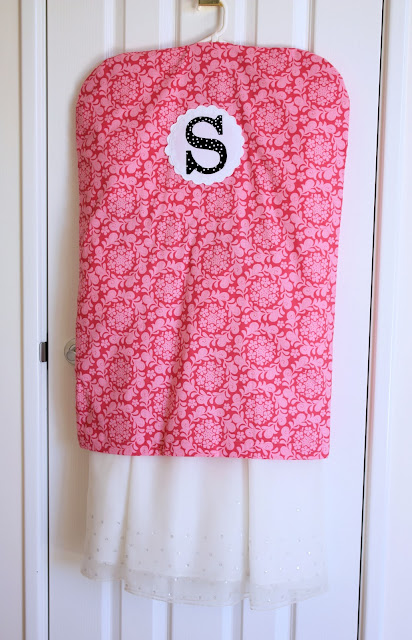
Coat Hanger Covers make a great home made gift and are perfect for hanging special garments in your wardrobe.

Plain wire coat hangers are functional but not very pretty. They seem to multiply in our home. They can be easily dressed up with some pretty fabric, broderie anglaise trim, and felt flowers. This is a fat quarter friendly project and is suitable for the beginner sewer.

We think these pretty coat hangers would make a lovely Mother’s Day gift. Make a lavender sachet to hang inside the cover to repel moths and freshen your ward robe.

You will need:

  • fat quarter of quilting fabric for the cover (20 x 22 inches; 50 x 56 cm)
  • scrap of coordinating fabric for the flower
  • 1 yard (1 metre) of broderie anglais trim, pompom trim, or similar
  • co-ordinating felt or ready cut felt flowers
  • small button
  • 6 inches (15 cm ) of plastic tubing
  • cardstock
  • spray starch

Method:

To cut the fabric for the cover, lay out the fabric and place the coat hanger on top. Cut around the coat hanger as shown in the photo. Leave 1/4 inch seam allowance on the sides and top of the cover, and leave 2 inches along the bottom of the cover. Cut two for the front and back of the cover.

Serge (Overlock) along the top and bottom edges on the front and back of the cover.

Pin the front and back of the cover together with right sides facing. Stitch together along the sides and angled sides of the cover, using a 1/4 inch seam allowance. Leave the top of the cover and the bottom of the cover open. Overlock the edges.


Turn the cover out the right way and press. Turn under 1/4 inch along the top opening, and press. Pin the trim along the bottom (open) edge as shown. Stitch in place. Press the trim so that it sits flat.


Trace a circle that measures 3 inches in diameter onto a piece of card. Cut a circle from the co-ordinating fabric that measures 3 3/4 inches in diameter. Moisten the edge of the fabric circle with spray starch. Using the card as a template, press the edge of the fabric over the card to create a circle with turned under edges for the appliqué.

Cut flower shapes from the felt. Layer the felt flowers and stitch onto the centre of the circle using a small button in the centre. Pin the flower appliqué to the centre of the coat hanger cover, and hand stitch in place.

Cut a length of plastic tubing and cover the top of the hanger.

If you enjoyed this project, you may be interested in our Dust Cover {Tutorial}. Check our more of our Gifts to Sew. 


Hello! Are you new here?

If so, be sure to sign up for our newsletter here and receive a bonus sewing pattern and welcome discount. Our newsletter includes free tutorials, articles, and new patterns. Welcome to the world of sewing enthusiasts.

Filed Under: Mother's Day, Sewing, Sewing Tutorials Tagged With: gifts

« Lemon Yoghurt Cake
How To Freeze Chives »

Comments

  1. Barbara Shepherd says

    April 14, 2013 at 4:43 pm

    this looks easy enough that I think even I can do it! Thanks for sharing all of your beautiful and inspiring projects, I may just drag out that sewing machine 😉

    Reply
  2. Алекса says

    April 14, 2013 at 10:13 pm

    Very gently!

    Reply
  3. Luisa says

    April 15, 2013 at 12:23 am

    Hola,
    gracias por la buena idea.
    un beso y feliz semana

    Reply
  4. Kjerstis Sysysler says

    April 15, 2013 at 2:57 am

    Beautiful .

    Reply
  5. AmieAnn says

    April 15, 2013 at 3:48 am

    This is beautiful… what a wonderful idea for a gift!
    xoxo
    Amie @ Pinkapotamus

    Reply
  6. Sarita Carneiro says

    April 15, 2013 at 4:11 am

    This comment has been removed by the author.

    Reply
  7. Sarita Carneiro says

    April 15, 2013 at 4:13 am

    I loved this idea!

    Reply
  8. Amy Morinaka says

    April 15, 2013 at 11:42 am

    What a lovely and practical project this is. I will definitely try this! Thanks for sharing and hope you’re enjoying your Paris holiday!

    Reply
  9. Lisa Walsh says

    April 15, 2013 at 11:54 am

    Thank you so much for the beautiful tutorial!

    Reply
  10. CityGirl says

    April 16, 2013 at 7:23 am

    I really like this hanger idea. I think it would be cute in a guest bedroom or my daughters’ room.

    Reply
  11. LILOU says

    April 30, 2014 at 11:23 pm

    Je recherche un patron pour habiller une theire, comme l’on
    trouve en Angleterre. Auriez-vous ce genre de modèle

    Merçi et bonne journée

    Reply
    • A Spoonful of Sugar says

      May 1, 2014 at 6:35 am

      Hi Lilou – we don’t sell dress patterns. Hope you find what you are looking for.

      Reply
  12. Amy says

    May 1, 2015 at 1:23 am

    Wouldn’t you need a larger piece of fabric? A fat quarter is 18″ x 22″.

    Reply
    • A Spoonful of Sugar says

      May 3, 2015 at 8:26 am

      Hi Amy – My coathanger was 16 inches wide so a fat quarter was wide enough to cover the hanger and include seam allowances. If you use a larger wire hanger you will need more fabric. Hope that helps!

      Reply
  13. Pat M. says

    July 28, 2015 at 6:29 pm

    What is the plastic tubing?

    Reply
    • A Spoonful of Sugar says

      July 28, 2015 at 6:46 pm

      Hi Pat – you place the place tubing over the metal hool of the coat hanger. It is an optional step but make it look nicer. Alternatively you can wrap a strip of fabric around the metal hook to cover it.

      Reply
  14. Maria del Gallego says

    April 27, 2025 at 8:06 pm

    Thank you for sharing all of your amazing and lovely gift ideas. I just love browsing through your site.

    Reply
    • A Spoonful of Sugar says

      April 28, 2025 at 9:08 am

      Thanks so much Maria – appreciate you taking the time to leave a comment. Have a wonderful week.

      Reply

Leave a Reply Cancel reply

Your email address will not be published. Required fields are marked *

  • Email
  • Facebook
  • Instagram
  • Pinterest
  • Threads
  • TikTok
SUBSCRIBE TO NEWSLETTER
×

Categories

Archives

PURCHASE PDF PATTERNS

We offer over 100 affordable PDF sewing patterns available for download from our store website or Etsy store. Each pattern includes detailed instructions, numerous photos, and templates.

WEB STORE ETSY STORE

Instagram

Sharing a closer look at the Handy Drawstring Pouc Sharing a closer look at the Handy Drawstring Pouch today — a sweet little project that’s as practical as it is pretty. I stitched this one in the blue and gold colourway of the Tilda Songbird collection and love how the soft watercolour florals shine in a small make. The pouch features cleverly shaped panels (with no boxed corners), stands tall when in use, and folds completely flat for storage. It’s also reversible, which makes it such a fun and versatile sew.   These little pouches are perfect for organising your sewing room, gifting to a friend, or popping into a project bag.The pattern includes three sizes, and you can find it in both my Pattern Store and Etsy shop. Comment HANDY and I’ll send the link straight to your inbox.A big thank you to @tilda_australia for gifting the beautiful fabric.#tildasongbird #drawstringbagpattern #aspoonfulofsugardesigns #tildafabrics #sewingproject
Why sewists love the Baker’s Buddy… Smooth curves, Why sewists love the Baker’s Buddy… Smooth curves, no fiddly binding, and a beginner‑friendly construction that comes together fast. It’s practical, gift‑friendly, and one of my most popular patterns because it actually gets used in the kitchen.If you’re looking for a quick win that looks impressive and is useful, this is the one. Comment BAKER and I’ll send you the link to the pattern (available in our Pattern Store and Etsy shop).#sewinggifts #beginnerfriendlysewing #smallquiltedgift #quicksewing #sewingcommunity
I’ve had so much fun sewing with the beautiful new I’ve had so much fun sewing with the beautiful new Tilda Songbird collection — soft pastels, tiny motifs, and so many sweet details. Here’s a look at the beginner‑friendly projects I’ve made so far, perfect for gifting or using up your favourite scraps.You’ll find the paid patterns in my shop, and both free patterns (Love Tag + Threaded Tokens) are linked in my profile. What project is your favourite?Thanks for following along with my Songbird projects this month. I can’t wait to share more. Thanks to @Tilda_Australia for the fabric.#tildasongbird #iloveTilda #smallsewingprojects #makersgonnamake #sewingpatterns
A tiny basket that’s endlessly useful and so much A tiny basket that’s endlessly useful and so much fun to sew. This Bitsy Basket is made in the beautiful Tilda Songbird collection and filled with a few sewing favourites — the perfect way to turn small scraps into something sweet and giftable.It comes together quickly, uses very little fabric, and looks adorable with a Threaded Token atrached (the Threaded Token pattern is free — you’ll find the link in my profile).Comment BASKET and I’ll send you the link to the Bitsy Basket pattern in my shop.Shown in the gorgeous Tilda Songbird range. Thanks to @tilda_australia . Styled with a few sewing goodies from @sohmo_au  
#sewingproject #sewinglove #quicksewingproject #scrapsewing #tildasongbird
A little Valentine’s stitching, penguin‑style. The A little Valentine’s stitching, penguin‑style. These sweet penguins always make people smile — which one would you sew first?Comment PENGUIN for the pattern link (available in our pattern store and Etsy shop).Pattern: Penguin Love Mugrug#penguinlove #valentinesewing #sewingproject #scrapfriendlysewing #makersgonnamake
A tiny sewing moment for today — threading the cor A tiny sewing moment for today — threading the cord through the Pocketful of Sunshine Bag using a bodkin. It’s such a simple step, but it gives the sweetest finish to this little drawstring bag. I’ve been loving making these in the Tilda Songbird range lately… the colours, the tiny motifs, the soft palette — everything works beautifully together.If you’d like to sew your own, comment SUNSHINE and I’ll send the pattern link straight to you. You’ll also find it in our pattern store and Etsy shop — links are in our profile.Shown in the gorgeous Tilda Songbird collection with thanks to @tilda_australia#ilovetilda #tildasongbird #beginnersewist #sewingtips #drawstringbag
Follow on Instagram

Featured Pattern

Travel Sewing Kit Pattern

Featured Tutorial

Retro Drawstring Bag

Featured Recipe

Lemon Pound Cake

Connect

  • Email
  • Facebook
  • Instagram
  • Pinterest
  • Threads
  • TikTok
SUBSCRIBE TO NEWSLETTER
×

Popular Posts

  • Charm Square Fabric Tray
  • Merry Little Christmas Sewing Projects
  • Hexagon Fabric Tray
  • Sew-In Tags: Your Complete Guide
  • Retro Drawstring Bag
  • Valentines Matchbook Needle Holder
  • Raw Edge Applique Tips

Copyright © 2026 Lisa. K. Cox - A Spoonful of Sugar