A Spoonful of Sugar

Make. Bake. Create.

Menu
  • Home
  • About
    • About Us
    • Press
    • FAQ
    • Disclosure Policy
    • Contact Us
  • Crafts
    • Crochet
    • DIY
    • Embroidery/Cross stitch
    • Gift Wrapping
    • Knitting
    • Miscellaneous
    • Paper Crafts
  • Holidays
    • New Year’s
    • Australia Day
    • Back to School
    • Valentines Day
    • Easter
    • ANZAC Day
    • Mother’s Day
    • Father’s Day
    • Halloween
    • Christmas
  • Recipes
    • Appetizers
    • Bars & Slices
    • Bread & Pastries
    • Cakes
    • Cookies
    • Confectionery
    • Cupcakes & Muffins
    • Desserts
    • Drinks
    • Ice Cream
    • Jams/Preserves
    • Main Meals
  • Sewing
    • Sewing Tutorials
    • Quilting
    • Sewing & Quilting Patterns
  • Family
    • Back to School
    • Family Fun
    • Our Home
    • Parenting
    • Travel
  • Shop
    • Pattern Store
    • Etsy Store

3D Christmas House Ornaments

November 26, 2014 By A Spoonful of Sugar - 3 Comments

Christmas Houses 2

Nothing inspires us to get crafting quite like Christmas. It is a great time to make decorations, gifts, and spend time baking. We don’t really care for all the mass produced Christmas decorations, and it is fun to make you own to suit your holiday theme. This year we are  having a Winter Wonderland theme and using lots of pink, aqua, lilac and mint. We are loving the softer palette this year – makes a nice change from our usual red.

3D Christmas House Ornament

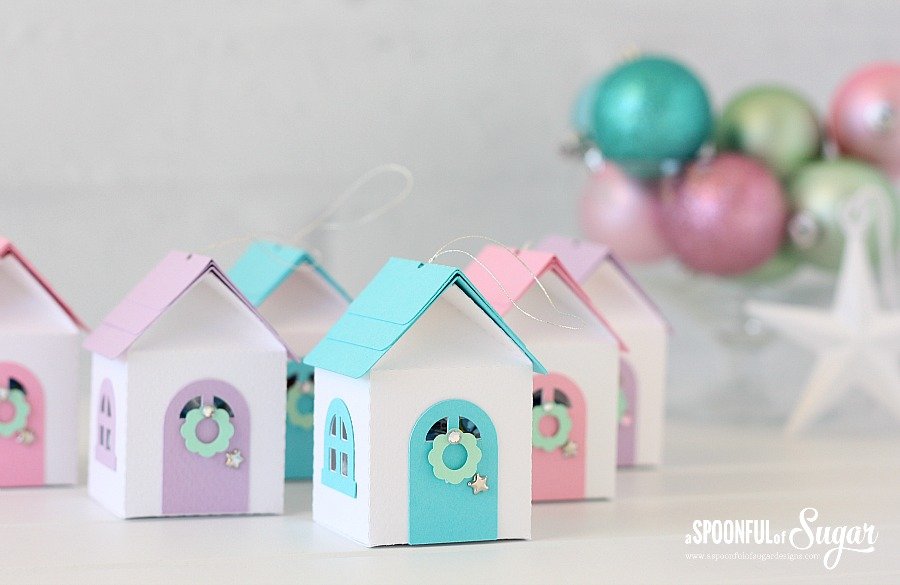
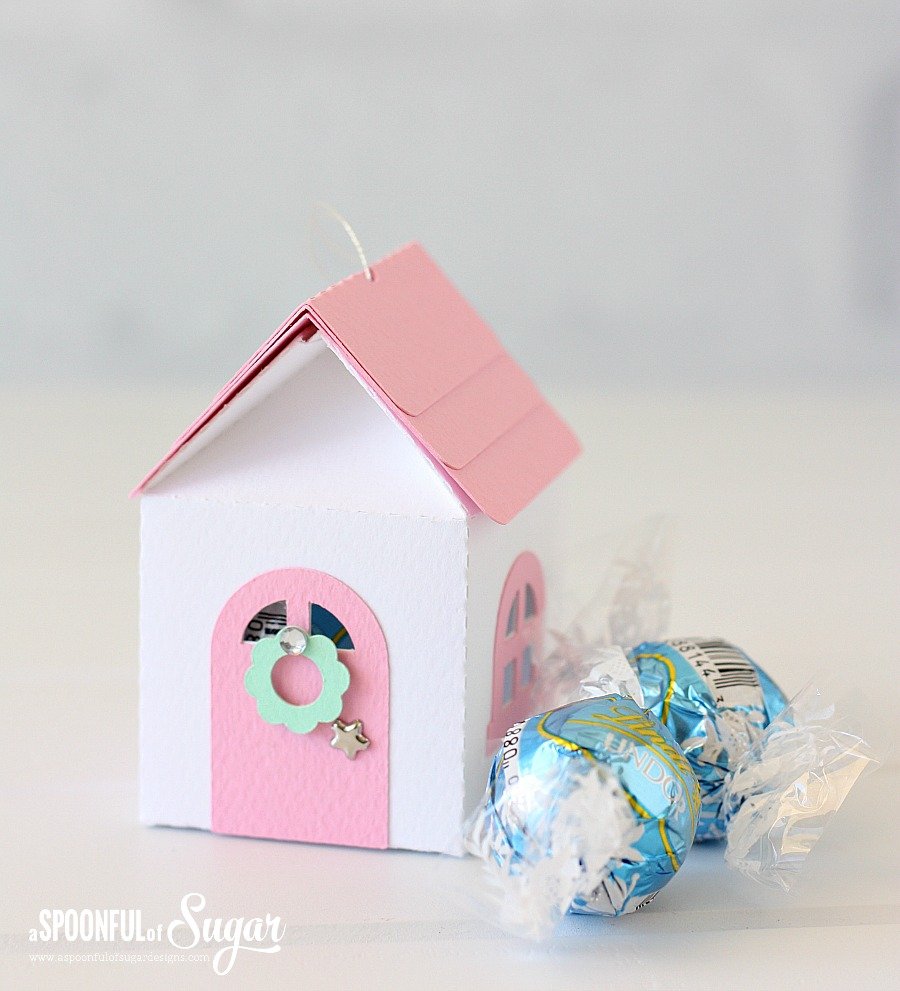
We spotted these sweet 3D House Christmas House  Ornaments  over on the Silhouette Design Store. Sized at 2 x 2 x 3 inches, they are designed as Christmas tree ornaments. They are the perfect size to hold two Lindt chocolates (love the new cookies and cream variety!).

Christmas Houses 5

We cut them  from textured card using our Silhouette Portrait machine, and then assembled them using glue tape.

silhouette

We added a small star brad as the door handle, and added a small rhinestone to the wreath for some added sparkle. They were very quick to make and will be perfect hanging on our tree and adding them to little gifts this year. They would also be a nice addition to each place setting on our Christmas table. You could also add a battery operated tea light to the house and make an illuminated village. So many possibilities ….

Silhouette 1

If you are not familiar with Silhouette Portrait, it is a small table top digital cutting machine. You connect it up to your computer, download the software, and then can cut images that are in the library or design your own images to cut. The machine even scores the folding lines which make items very easy to assemble. It is a very easy machine to operate. In addition to cutting paper and card, you can also use the Silhouette to cut vinyl and fabric.

Silhouette 3

You can purchase images from the Silhouette Design store. If you search for Christmas there are loads of designs available. We particularly love all the 3 D designs which are great as little gift boxes, ornaments etc.

3D Christmas House Ornaments Christmas Houses 8

Disclaimer: Thanks to Silhouette America for providing us with a Silhouette Portrait to use in the Christmas House Ornament project. All opinions are our own.

Filed Under: Christmas, Gift Wrapping, Paper Crafts Tagged With: gift wrapping, paper, Silhouette

« Just For You {Blog Hop + Book Giveaway}
Joy Christmas Gift Tags »

Comments

  1. Tess says

    December 12, 2014 at 1:11 am

    Hi there! These are SO cute and I love the colors! One questions, how did you get the top of the house to stay closed? Did you have to glue the roof to the top? I was just wondering how to get into the house to get the treat without tearing it apart. =/

    I appreciate your help!

    Tess

    Reply
    • A Spoonful of Sugar says

      December 12, 2014 at 7:04 pm

      Hi Tess. On the bottom of the house, I sealed the flap with some washi tape so it could be easily opened without ruining the house. The roof was attached with double sided tape.

      Reply
      • Tess says

        December 13, 2014 at 8:01 am

        And this is why I defer to the experts. That is so clever. Thank you!

        Reply

Leave a Reply Cancel reply

Your email address will not be published. Required fields are marked *

  • Email
  • Facebook
  • Instagram
  • Pinterest
  • Threads
  • TikTok
SUBSCRIBE TO NEWSLETTER
×

Categories

Archives

PURCHASE PDF PATTERNS

We offer over 100 affordable PDF sewing patterns available for download from our store website or Etsy store. Each pattern includes detailed instructions, numerous photos, and templates.

WEB STORE ETSY STORE

Instagram

Meet the sweetest little project you can sew in mi Meet the sweetest little project you can sew in minutes — the Pyramid Weight. Use it as a pattern weight, scented sachet, or even a book weight… all from one triangle of fabric. Comment PYRAMID for the free pattern.Fabric is Something Blue by Tilda, releasing 1 June 2026 — with thanks to @tilda_australia.#tildasomethingblue #tildafabric #freepattern #sewingtutorial #sewinglove
The Scrappy Strips Pouch is one of my favourite wa The Scrappy Strips Pouch is one of my favourite ways to use up leftover fabric strings. Today’s version is made from patchwork strips — a fun, relaxing sew that turns scraps into something beautiful and practical.The Scrappy Strips Pouch pattern has two versions - patchwork strings and selvedges - and two sizes. Comment SELVEDGE (or SELVAGE) for a link to the pattern.Pattern Details: Scrappy Strips Pouch Sewing Pattern is in our Pattern Store and Etsy Shop.#ScrappyStripsPouch #ScrapBustingSewing #PatchworkPouch #StringQuilting #SewingProjects
If you’ve ever wanted to add eyelets or grommets t If you’ve ever wanted to add eyelets or grommets to your sewing projects, here’s a quick look at how I install them using my DK93 snap press. It’s the same tool I use for snaps — and it makes installing eyelets beautifully quick and consistent.Here’s how I install the eyelets:Punch out the four holes using a hole‑cutting die.Place the eyelet into the hole.Press it into place using the snap press.That’s it — simple, sturdy, and it gives the Ribbon Pouch such an elevated, professional finish. I love how clean and secure the result is.Fabric shown: Tilda Something Blue, releasing June 1 — thank you @tilda_australia for the beautiful fabric.✨ If you’d like the Ribbon Pouch pattern (3 sizes), comment RIBBON and I’ll send the link straight to you.Ribbon Pouch Sewing Pattern: available in my Pattern Store and Etsy Shop (links in profile).#tildasomethingblue #tildafabric #sewingtips #handmadeeveryday #sewingtools
The Ribbon Pouch is one of my favourite quick‑to‑s The Ribbon Pouch is one of my favourite quick‑to‑sew gift bags, and I couldn’t resist making a light and dark version using the new Tilda Something Blue collection. Both pouches use the same print in different colourways — such a pretty way to show how fabric choice changes the whole mood.They’re finished with satin ribbon threaded through grommets, and topped with a tiny star tag. The boxed base helps them stand beautifully, and the ribbon closure makes them perfect for birthdays, thank‑you gifts, treats, or little treasures.This is a beginner‑friendly, scrap‑friendly, quick project you’ll want to sew again and again. Pattern includes 3 sizes.If you’d like the pattern, comment RIBBON and I’ll send the link straight to you.Pattern Details: Ribbon Pouch (3 Sizes) available in my Pattern Store and Etsy Shop.Fabric Details: Tilda Something Blue - releasing on 1 June 2026. Thanks to @tilda_australia#TildaSomethingBlue #TildaFabric #SewingPattern #BeginnerSewingProject #QuickSewingProject   
Sewing with scraps is one of my favourite ways to Sewing with scraps is one of my favourite ways to get creative — small pieces, leftover corners, charm‑square offcuts… they all have so much potential.Here are 10 scrap‑friendly projects that use small pieces beautifully. They’re quick to sew, beginner‑friendly, and perfect for gifting ✂️✨Save this for the next time you want to turn your scraps into something pretty.Which one would you sew first?  Tell me in the comments — I love seeing what you’re making.Patterns are available in my pattern store (link in profile) or comment PATTERNS and I will send you the link. #scrapsewing #scrapbusting #scrapfriendly #sewinginspiration #sewingideas
I save every selvedge (or selvage) — the colour do I save every selvedge (or selvage) — the colour dots, the tiny prints, the designer names… they’re too pretty to throw away.Here’s how I turn them into something useful:
• lay them diagonally on a square of fusible interfacing
• overlap slightly
• stitch close to the printed edge
• keep building until you have a panelIt’s such a fun way to use scraps and create something totally unique ✂️✨If you’d like the Scrappy Strips Pouch pattern, comment SELVEDGE or SELVAGE and I’ll send you the link.Pattern Details: Scrappy Strips Pouch Pattern is available in my Pattern Store and Etsy Shop.#scrappystripspouch #selvage #scrapbuster #sewingcommunity #sewingtip
Follow on Instagram

Featured Pattern

Travel Sewing Kit Pattern

Featured Tutorial

Retro Drawstring Bag

Featured Recipe

Lemon Pound Cake

Connect

  • Email
  • Facebook
  • Instagram
  • Pinterest
  • Threads
  • TikTok
SUBSCRIBE TO NEWSLETTER
×

Popular Posts

  • Cord Cosy
  • Tips for Threading a Needle
  • Travel Accessories to Sew
  • Liberty Tissue Cover
  • Charm Square Fabric Tray
  • Happy Scrappy Cards
  • Life Lessons from Sewing and Quilting

Copyright © 2026 Lisa. K. Cox - A Spoonful of Sugar