A Spoonful of Sugar

Make. Bake. Create.

Menu
  • Home
  • About
    • About Us
    • Press
    • FAQ
    • Disclosure Policy
    • Contact Us
  • Crafts
    • Crochet
    • DIY
    • Embroidery/Cross stitch
    • Gift Wrapping
    • Knitting
    • Miscellaneous
    • Paper Crafts
  • Holidays
    • New Year’s
    • Australia Day
    • Back to School
    • Valentines Day
    • Easter
    • ANZAC Day
    • Mother’s Day
    • Father’s Day
    • Halloween
    • Christmas
  • Recipes
    • Appetizers
    • Bars & Slices
    • Bread & Pastries
    • Cakes
    • Cookies
    • Confectionery
    • Cupcakes & Muffins
    • Desserts
    • Drinks
    • Ice Cream
    • Jams/Preserves
    • Main Meals
  • Sewing
    • Sewing Tutorials
    • Quilting
    • Sewing & Quilting Patterns
  • Family
    • Back to School
    • Family Fun
    • Our Home
    • Parenting
    • Travel
  • Shop
    • Pattern Store
    • Etsy Store

Hexie Pincushion {Free Sewing Tutorial}

April 23, 2016 By A Spoonful of Sugar - 24 Comments

Hexie Pincushion Sewing Tutorial by A Spoonful of Sugar

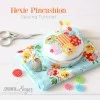
Free Project Tutorial: The Hexie Pincushion is a mini pincushion that is perfectly sized for stitching on the go. It features a mini hexagon flower, and it is positioned in a little aluminium tin. This is a quick little project and is lots of fun to make. It would be a sweet little gift to pop into a swap package or to give to a stitching friend. It would a great little item to sell at a Mother’s Day craft stall.

Hexie Pincushion Sewing Tutorial by A Spoonful of Sugar

To make the Hexie Pincushion, you will need:

  • small metal tin (approximately 3 inches in diameter)
    • I used a small aluminium tin I purchased from a craft store a few years ago. You could re-purpose a candy tin, or use a jar lid.
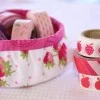
  • Small scrap of low volume fabric at least 9 x 4 inches for the background fabric
  • Small scraps of 7 colourful fabrics at least 2 inches x 2 inches (I used Backyard Roses by Nadra Ridgeway for Riley Blake Designs)
  • 7 hexagon papers with 1/2 inch sides
  • Coordinating thread
  • Polyester stuffing
  • Craft glue

Hexie Pincushion Sewing Tutorial by A Spoonful of Sugar

    1. Prepare the Hexagons – I used hexagons with 1/2 inch sides for my Hexagon Flower. Depending on the size of your tin, you may need to adjust the size of the hexagons. I used a Fiskars Easy Squeeze Hexagon Punch (size Medium) to cut out the 7 papers from lightweight card (I used a recycled envelope).  Using your hexagon template as a guide, cut the fabric so that it is approximately 1/4 inch larger on each side of the paper. Prepare your hexagons and then stitch them together. Remove the papers and press lightly. If you are new to English Paper Piecing, check out this comprehensive photo tutorial by Lori Holt from Bee in my Bonnet which guides you through the process of making Hexagon Flowers. They really are fun to make and perfect for using those treasured fabric scraps.
    2. Hexie Pincushion Sewing Tutorial by A Spoonful of SugarFrom the low volume background fabric, cut out a circle of fabric that measures 4 inches in diameter. For the back of the pincushion, cut out two half circles measuring 4 inches in diameter  – add an extra 1/4 inch seam allowance to the centre of the half circle. Refer to the photo above – in this image the seam allowance on the backing fabric has been pressed under.
    3.  Hand stitch the hexagon flower to the centre of the pincushion front.
    4. Place the two half circles of backing fabric and position them with the right sides facing. Stitch them together, leaving a two-inch gap in the centre for stuffing.Hexie Pincushion Sewing Tutorial by A Spoonful of Sugar
    5. Place the back of the pincushion on the front of the pincushion with the edges aligned (refer to photo above), and stitch together around the edge using a 3/8 inch seam allowance. Clip the curves or use pinking shears to trim the seam allowance. Turn the pincushion out the right way through the gap in the back. Press lightly. Stuff firmly with the stuffing of your choice, and then hand stitch the gap in the backing closed.
    6. Position the pincushion in the tin and then glue to secure

      The Hexie Pincushion is such a fun project to showcase your favourite fabrics.

Hexie Pincushion Sewing Tutorial by A Spoonful of Sugar

In this project, I have used pretty Backyard Roses fabric, designed by Nadra Ridgeway for Riley Blake Fabric (released in 2016). Backyard Roses Fabric by Nadra Ridgeway for Riley Blake Designs.

Hexie Pincushion Sewing Tutorial by A Spoonful of Sugar

Filed Under: Sewing Tutorials Tagged With: EPP, hexagon, hexies, sewing, tutorial

« A Spoonful of Sugar Book Tour
A Spoonful of Sugar Blog Tour {Part 1} »

Comments

  1. ulrikes smaating says

    April 24, 2016 at 6:54 am

    this is a wonderful tutorial, i have just begun with making hexies – and i love it :0) thanks! greetings from denmark Ulrike :0)

    Reply
    • A Spoonful of Sugar says

      April 24, 2016 at 9:51 am

      Thanks so much Ulrikes – once you start making hexies it is hard to stop 🙂

      Reply
  2. Kay says

    April 24, 2016 at 2:23 pm

    Thank you for a sweet tutorial. x

    Reply
  3. Ann says

    April 24, 2016 at 6:10 pm

    Love it! Book on order – hooray!

    Reply
  4. Kelli says

    April 25, 2016 at 9:35 am

    Great tutorial! Your choice of fabric is adorable too! I have never sewn with hexies before and this small project may be a good place to start. 🙂

    Reply
    • A Spoonful of Sugar says

      May 1, 2016 at 9:34 pm

      This is a great project to be introduced to hexies as it doesn’t take that long to construct. Happy sewing!

      Reply
  5. Kez says

    April 25, 2016 at 1:56 pm

    I love the colours you have used, it looks so cute!

    Kez | acaciasdreams.com

    Reply
  6. Karla @SmallTownRambler says

    April 26, 2016 at 12:55 am

    This is adorable! My daughter is just becoming interested in sewing and would love to try this. Thanks for sharing!

    Reply
    • A Spoonful of Sugar says

      May 1, 2016 at 9:34 pm

      Hope your daughter enjoys sewing with you!

      Reply
  7. Kristine Curtis says

    April 26, 2016 at 2:09 pm

    When you say “low volume” fabric do you mean the density of the fabric (Kona cotton vs Minkee or Corduroy)? Or are you referring to volume as in dark, medium, or light in color?

    Thanks for the cute pattern!

    Kris

    Reply
    • A Spoonful of Sugar says

      May 1, 2016 at 9:33 pm

      Low Volume refers to a fabric print that is usually light in colour with low contrast colours. They are good to use as backgrounds so that the other fabrics shine. Sorry for the confusion.

      Reply
  8. Doris says

    April 27, 2016 at 1:43 am

    What a delightful pincushion! Great tutorial, making it easy 🙂

    Reply
  9. Virginia O says

    April 28, 2016 at 9:29 am

    Is very nice!!! I love
    Virginia O

    Reply
  10. apple blossom says

    May 1, 2016 at 9:33 am

    Thanks for the awesome tutorial you book looks and sounds absolutely lovely

    Reply
  11. Raquel Yopán Costa says

    August 10, 2016 at 10:42 am

    I’m from Brazil and just found your blog and felt in love…

    Reply
    • A Spoonful of Sugar says

      August 15, 2016 at 6:36 am

      Welcome Raquel – glad you found us!

      Reply
  12. Helen White says

    September 15, 2016 at 12:22 am

    Spoonful of Sugar:
    You have done it again. I am a little late seeing this adorable pincushion. It is just precious and so are you.

    Thank you. I really appreciate you e-mails.

    Bless you both.

    Helen

    Reply
    • A Spoonful of Sugar says

      September 15, 2016 at 7:05 am

      Thanks Helen for your sweet message! Have a wonderful day.

      Reply
  13. SUSAN M GARDNER says

    January 9, 2022 at 7:21 am

    Cute pincushion design, thanks
    Can you give information about the little tin you used? It looks like it might have a special ring to put the top onto.

    Reply

Leave a Reply Cancel reply

Your email address will not be published. Required fields are marked *

  • Email
  • Facebook
  • Instagram
  • Pinterest
  • Threads
  • TikTok
SUBSCRIBE TO NEWSLETTER
×

Categories

Archives

PURCHASE PDF PATTERNS

We offer over 100 affordable PDF sewing patterns available for download from our store website or Etsy store. Each pattern includes detailed instructions, numerous photos, and templates.

WEB STORE ETSY STORE

Instagram

If you love foundation paper piecing, you’re going If you love foundation paper piecing, you’re going to enjoy this one — a bundle of four woven‑style FPP quilt blocks, each with its own beautiful twist. These blocks look intricate, but the FPP method makes them wonderfully achievable, even if you’re still building your skills.They’re perfect for using up scraps, experimenting with colour, or creating striking mini quilts, cushions, bags, or table decor. Each block has that satisfying “woven” illusion that always gets a second look.Whether you prefer bold brights, soft pastels, or a monochromatic palette, these designs shine in every colourway. And the best part? You get all four blocks together in one bundle.If you’d like the pattern set, comment WOVEN and I’ll send the link straight to you. Woven bundle is available in our Pattern Store.#SewingInspiration #FPP #FoundationPaperPiecing #QuiltBlocks #WovenQuiltBlock
If you love quick, practical sewing projects, the  If you love quick, practical sewing projects, the Baker’s Buddy Mitt is such a fun one to make. It’s scrap‑friendly, gift‑ready, and perfect for anyone who loves to bake.The Bakers Buddy Mitt is 25% off this week only. Comment BAKER and I’ll send you the link to the pattern.  #SewingProject #ScrapFriendlySewing #KitchenSewing #SewingGifts #SewingCommunity
Adding a handmade label is one of my favourite way Adding a handmade label is one of my favourite ways to personalise a project — and these little fabric + felt labels are so quick and satisfying to make.For this Ribbon Pouch, I used the Liberty Gifts from the Garden collection, which has the sweetest fruit motifs. They make perfect tiny labels for pouches, bags, and gifts.Here’s how to make your own:Press a piece of double‑sided fusible web to the back of your fabric.Cut around your chosen motif.Peel off the paper backing.Press the motif onto wool felt.Trim the felt with scalloped scissors.Sew the label onto the front of your pouch.Such a simple detail, but it adds so much charm. Fabric kindly gifted by @regent_street_fabrics — thank you!If you’d like to sew the Ribbon Pouch (3 sizes), comment RIBBON and I’ll send the pattern link straight to you.#SewingInspiration #FabricLabels #DIYLabels #LibertyFabric #LibertyGiftsFromTheGarden
A lot can change in 10 years ❤️ It’s been fun look A lot can change in 10 years ❤️ It’s been fun looking back at where I was in 2016 and how far life has come since then. Swipe for a little trip down memory lane.Back in 2016, my priorities were firmly centred around family. I was working full‑time, sewing in the guest room, sharing tutorials on my blog, and slowly dipping my toes into selling a handful of patterns on Etsy. It was a busy, full season — and creativity was something I fitted in around everything else.  Fast forward to 2026… I’m now retired and living the creative life I once dreamed of. My kids have grown up and are living in their own homes nearby. My husband and I are free to travel, explore, and enjoy this stage of life. And I get to spend my days designing, sewing, and connecting with this beautiful community.Life looks different now — in the best possible way.Were you following me back then, or what has changed for you over the past 10 years? I’d love to hear your story too.Tagging the lovely makers of my quilt: @arabesquescissors @ministryoffabric @belloquacity @alittlepatchwork @sameliasmum coleandtaffy @quiltymamaof4 @shequiltsalot @downgrapevinelane @lizzierosesews @lovethatfabric @sew_mimi.k #2026isthenew2016 #10yeartransformation #sewingjourney #sewingcommunity #aspoonfulofsugardesigns
Fall in love with sewing all over again ❤️I’ve Fall in love with sewing all over again ❤️I’ve rounded up 10 heart‑themed makes — from quick gifts to charming quilt blocks — perfect for weekend stitching or using up your favourite scraps. Whether you’re sewing for Valentine’s Day, birthdays, or just because, there’s something sweet for every maker.Comment HEART and I’ll send you a link to my Heart Pattern Collection.#sewingproject #heartsewing #quiltblock #scrapsewing #easytosew
Raw edge appliqué doesn’t have to feel fiddly or i Raw edge appliqué doesn’t have to feel fiddly or intimidating. With a few simple techniques, you can create neat, crisp shapes — even tiny details like penguin beaks and hearts.I’ve put together My Top 5 Secrets for Raw Edge Appliqué to help you feel confident, whether you’re brand new to appliqué or looking to refine your finish. Save this for your next sewing session.If you’d love a quick, beginner‑friendly project to practise these tips, my Penguin Love Mugrug is the sweetest Valentine’s make — scrap‑friendly, gift‑ready, and such fun to sew.Comment PENGUIN and I’ll send you the link to the pattern. Available now in our Pattern Store and Etsy shop.  #rawedgeapplique #appliquetips #sewingtipsandtricks #mugrugpattern #penguinlove
Follow on Instagram

Featured Pattern

Travel Sewing Kit Pattern

Featured Tutorial

Retro Drawstring Bag

Featured Recipe

Lemon Pound Cake

Connect

  • Email
  • Facebook
  • Instagram
  • Pinterest
  • Threads
  • TikTok
SUBSCRIBE TO NEWSLETTER
×

Popular Posts

  • Charm Square Fabric Tray
  • Merry Little Christmas Sewing Projects
  • {Back to School} Tissue Cover
  • Hexagon Fabric Tray
  • Raw Edge Applique Tips
  • Sewing Gifts 101: Easy and Affordable Ideas for Your Crafty Friends
  • Finding More Time to Sew

Copyright © 2026 Lisa. K. Cox - A Spoonful of Sugar