A Spoonful of Sugar

Make. Bake. Create.

Menu
  • Home
  • About
    • About Us
    • Press
    • FAQ
    • Disclosure Policy
    • Contact Us
  • Crafts
    • Crochet
    • DIY
    • Embroidery/Cross stitch
    • Gift Wrapping
    • Knitting
    • Miscellaneous
    • Paper Crafts
  • Holidays
    • New Year’s
    • Australia Day
    • Back to School
    • Valentines Day
    • Easter
    • ANZAC Day
    • Mother’s Day
    • Father’s Day
    • Halloween
    • Christmas
  • Recipes
    • Appetizers
    • Bars & Slices
    • Bread & Pastries
    • Cakes
    • Cookies
    • Confectionery
    • Cupcakes & Muffins
    • Desserts
    • Drinks
    • Ice Cream
    • Jams/Preserves
    • Main Meals
  • Sewing
    • Sewing Tutorials
    • Quilting
    • Sewing & Quilting Patterns
  • Family
    • Back to School
    • Family Fun
    • Our Home
    • Parenting
    • Travel
  • Shop
    • Pattern Store
    • Etsy Store

Folded Star Mat

October 15, 2013 By A Spoonful of Sugar - 37 Comments

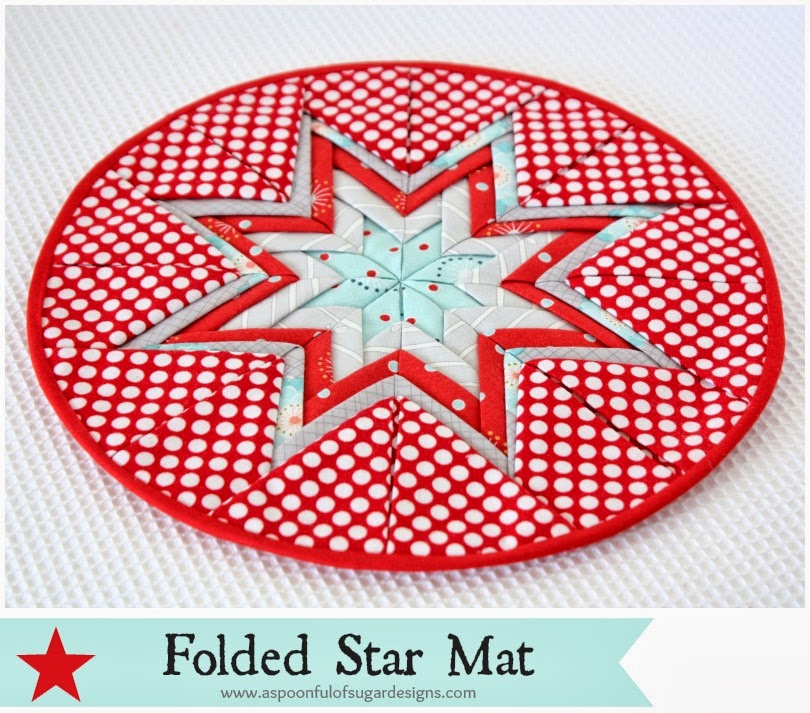
Folded Star Patchwork is a bit like fabric origami. The pattern is created from folding and layering different fabrics. This technique was common in the 1980’s and is making a comeback. It is a very simple and effective technique and looks great using modern fabrics. It uses lots of fabric so it a great stash buster project!
We think the star design looks very festive. It would be perfect for little table mats or placemats for your Christmas decorating.
If you would like to try this technique, we have written a few steps to guide you. Our Folded Star Mat measures 10 inches in diameter.
Fabrics and Materials:
5 Fat quarters of quilting cotton (inner layers of the star, backing)
1/2 yard (0.4 m) of quilting cotton (polka dot – outer layer of star)
1 yard (1 metre) bias binding
Firm fusible interfacing
Fabric Credit: We used 5 Fat Quarters from the Wallflowers range from Windham Fabrics for this project. 
Cut Fabrics
  • For the centre row, cut five 5 inch circles from Fabric 1
  • For the next three rows, cut eight 5 inch circles from each fabric.
  • For the outside row, cut eight 7 inch x 7 inch squares
  • Cut interfacing into a circle that measures 10 inches in diameter
Tip: I cut the 5 inch circles using the circle die on our Go Baby Fabric Cutter.
1. Fold the interfacing circle in half, then into quarters, and then into eighths. Use a marking pen to highlight the fold lines.
2. For the fabric circles. fold them all in half with the right side facing outwards, and press. Bring the outside points down to the centre and press. (Refer to Photo of grey circles)
3. For the fabric squares, fold in half, and press. Bring the outside points down to the centre front and press to form triangles. (Refer to Photo of Polka Dot Triangles).
4. Centre Row: Open up one of the circles and place it in the centre of the interfacing, matching up the fold lines. Place the remaining 4 triangles with the points meeting in the centre, lining up the guide lines. Tack the points together. Tack the outer edge in place.
5. Second Row: place the 8 triangles 3/4 inch from the centre points, being careful to line up with the fold lines on the interfacing. Tack the points and outer edge in place.
6. Third and Fourth Row: Repeat step 5 for next two rows but placing the points 1/2 inch from the previous row.
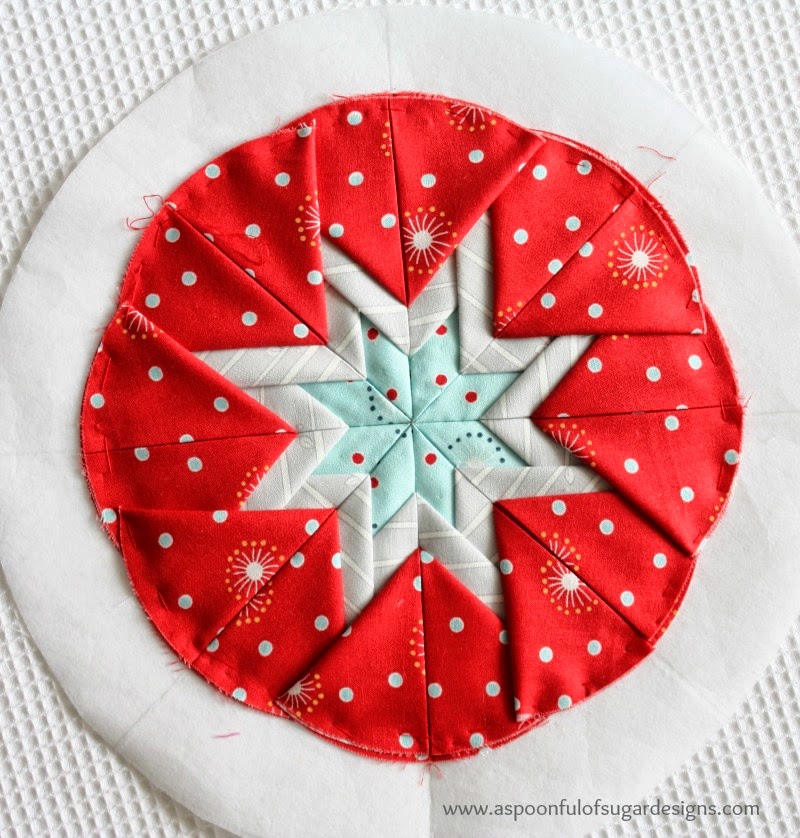
7. For the outside Row, repeat using the polka dot triangles.

8. Trim the outside of the mat so that it forms a circle that is 10 inches in diameter, using the interfacing as a guide. Turn the mat so that the interfacing is facing upwards. Layer a fat quarter over the interfacing with the right side facing upwards. Press in place so that it fuses to the interfacing. Trim the backing to the 10 inch circle. Stitch bias binding in place following manufacturer’s directions.
Folded Star Patchwork is a fun technique that can be adapted to different sizes. If you like this technique, check out our Folded Star Ornament. 
Folded Star Ornament
Disclosure: Thanks to Windham Fabrics for supplying the Wallflowers fabric that was used in this project. 
 
For other Stash Buster projects, check out our round-up of 15 Scrap Buster Tutorials.

Hello! Are you new here?

If so, be sure to sign up for our newsletter here and receive a bonus sewing pattern and welcome discount. Our newsletter includes free tutorials, articles, and new patterns. Welcome to the world of sewing enthusiasts.
Filed Under: Christmas, Sewing, Sewing Tutorials Tagged With: patchwork

« Halloween Cupcakes
Last Minute Halloween Ideas »

Comments

  1. Sherrill says

    October 15, 2013 at 8:03 pm

    Oh my gosh, my mom made a lot of these probably in the 80’s!! I may have to give these a whirl. Thank you for providing the directions.

    Reply
  2. Ольга Т. says

    October 15, 2013 at 9:26 pm

    Чудесный мат! Спасибо за подробный мастер-класс. Очень понятно.

    Reply
  3. Escargopotte bordados says

    October 16, 2013 at 12:36 am

    very nice ! I love it !

    Reply
  4. Jan says

    October 16, 2013 at 4:14 am

    thanks so much for the tutorial, Lisa and Sarah; I haven’t made one of these since the ’80s and had forgotten how lovely this design is. Must get cracking on one to brighten up my house for Christmas.

    Reply
  5. Allie and Me design says

    October 16, 2013 at 7:03 am

    Hello! This is so beautiful! May I invite you to my “Christmas magic link party”? I would be happy if you are there!
    many greetings, Gesine
    http://allie-and-me-design.blogspot.de/2013/10/weihnachtszauber.html

    Reply
  6. em's scrapbag says

    October 16, 2013 at 11:37 am

    My local quilt guild did this last month. I was unable to attend so I greatly appreciate your sharing a tute.

    Reply
  7. GardenOfDaisies says

    October 16, 2013 at 7:23 pm

    So pretty!!

    Reply
    • Eva Essa says

      February 6, 2014 at 4:35 pm

      It is really beautiful, can’t imagine it is that mauch easy – first i saw I thought very complicated job. but after seeing the pattern I felt how easy and amazing to do it right during the coming week-end.

      thanks dear all

      Reply
      • Eva Essa says

        February 6, 2014 at 4:38 pm

        Can we do similar with different colors and use it as a baby mat – I have a grand son 6 month old, don’t you thinkd this will be suitable for him?.

        Reply
        • A Spoonful of Sugar says

          February 6, 2014 at 4:52 pm

          You could make it as a baby mat – it would use up a lot of fabric though. You may need to stitch all the points down with a sewing machine to make it more robust for laundering.

          Reply
  8. Tine says

    October 21, 2013 at 2:12 am

    Wow, what a great idea. Thanks a lot for showing us this technique. I’m going to do one or two for Christmas.
    Tine from Bones&Needles

    Reply
  9. JG says

    October 22, 2013 at 7:55 am

    Looks so nice! Perfect gift for a special occasion. Thanks for the tutorial.
    ~Judy

    Reply
  10. Amy Morinaka says

    October 22, 2013 at 6:05 pm

    Wow this is fabulous! Love, love, love all your tutorials – they are truly the shining stars!

    Reply
  11. thesnailgarden says

    October 25, 2013 at 1:51 am

    Beautiful mat, would look great for Christmas time! Best wishes, Pj x

    Reply
  12. FiLuMas says

    November 13, 2013 at 1:21 am

    wow, it looks great!

    Liebe Grüße
    Christina

    Reply
  13. Ina says

    November 26, 2013 at 1:04 am

    It looks awesome!!!
    I´d like to invite you to my linkparty “Starlove” !
    http://immermalwasneues.blogspot.de/p/document.html
    I’d be proud, if your star would be there!
    Greatings Ina

    Reply
  14. Lauren Duffy says

    December 2, 2013 at 12:03 am

    It really is gorgeous! It’s such a shame that it wastes so much fabric to get that effect though. Decent fabric is expensive, far too expensive to waste 2 or more yards of it! Would be better to use a cheaper fabric rather than quilting cotton, but then again poly cotton burns if you iron it! Very beautiful though.

    Reply
  15. Heidee says

    February 18, 2014 at 8:52 pm

    This is beautiful! My mother in-law made a little ring cushion in this style when her son and I got married. It’s stunning and safely tucked away in a box for when my daughter gets married. I’m going to have to give this a try myself! x

    Reply
    • A Spoonful of Sugar says

      February 18, 2014 at 9:22 pm

      Thanks Heidee. How special that you are keeping the ring cushion for your daughter.

      Reply
  16. Stephanie Cook says

    March 9, 2014 at 2:59 pm

    Thank you so much for this tutorial, just made this in grey and pink and it looks adorable , I fact way too adorable to use! Thanks again from Tunbridge Wells in England. X

    Reply
    • A Spoonful of Sugar says

      March 9, 2014 at 9:36 pm

      You’re welcome Stephanie! Grey and Pink sounds like a pretty combination.

      Reply
  17. CrafTeeChic says

    April 2, 2014 at 6:10 am

    Was wondering if you could be more specific how and where you “tack” the pieces down for those of us like me that need more specific instructions. I’ve done some quilted ornaments, but I don’t understand how to do this. And what kind of fusible interfacing do you mean or recommend since there are so many. I’m more of a visual and do person then read and do person. Thank you.

    Reply
    • A Spoonful of Sugar says

      April 2, 2014 at 10:49 am

      Tack is the same as baste. At the point do a couple of little stitches to hold the point in place. Baste along the outer raw edges so that it stays in place and lies flat.

      Any light to medium weight fusible interfacing is good for this project. I don’t have a preference for any brand and just use what I have on hand.

      Reply
  18. Jenn says

    June 3, 2014 at 4:37 am

    I am new to sewing. Can you explain what you mean by “tack”? I understand how to place the fabric pieces but I don’t understand where to actually sew them. Thanks!

    Reply
    • A Spoonful of Sugar says

      June 3, 2014 at 4:21 pm

      Hi Jenn – Tack is to sew a few stitches in one spot, by hand or by machine sewing, to secure one item to another. You stitch the pieces at the rounded edge. Tackibng at the tip of each piece is optional, depending on whether you want to tips to be sewn down or left free. Hope that helps!

      Reply
  19. Julia Needham says

    July 31, 2014 at 11:37 am

    So if i want to make this star placemat a size 15 how would i do that

    Thanks, Julia

    Reply
    • A Spoonful of Sugar says

      August 3, 2014 at 5:54 pm

      Hi Julia

      I am not sure what a size 15 is exactly. If you want to make it larger, you just ad more rows. You will have to cut the fold fabric pieces larger as the mat gets bigger. I personally haven’t made any bigger than this one.

      Reply
  20. flo says

    August 23, 2014 at 9:59 am

    this is just adorable.to enlarge would you just add to each pattern as many inches as you want it to be enlarged to.

    Reply
  21. Sheryl says

    October 11, 2014 at 1:47 am

    Thanks for sharing… I found one that my Grandmother had made and was wondering how she did it… I’m excited to try a make a few – thanks again 🙂
    Sheryl K

    Reply
    • A Spoonful of Sugar says

      October 11, 2014 at 4:26 pm

      Thanks Sheryl – how lovely that you have one your grandmother made.

      Reply
  22. amy says

    October 11, 2014 at 9:59 am

    This is SO beautiful!! Thank you so much for posting this. My friend and I just saw one a couple of days ago and wondered how to make it. Then…I ran across your tut! Fortuitous! Thanks again!!!

    Reply
    • A Spoonful of Sugar says

      October 11, 2014 at 4:27 pm

      Thanks Amy – have making them – it is hard to stop at one!

      Reply
  23. anna says

    June 10, 2015 at 8:35 pm

    the design is absolutely fantastic, clearly written and with a little patience, nice in sewing. I just finished sewing the first mat. I made a mistake in choosing fabrics for sewing,but already planning the next mat.
    Thank you for sharing!
    If you would like to see my project, it will be a pleasure for me.
    Anna

    http://mamaniuni2.blogspot.ie/2015/06/podkadka-z-gwiazda.html

    Reply
  24. Lynda Cox says

    February 18, 2020 at 4:29 am

    I love your tutorial; very clear!
    Please tell me how to make my own Binding for this project.

    Thank you
    Lynda

    Reply
  25. Mary says

    October 27, 2025 at 4:19 am

    I have just discovered this tutorial and am so pleased. I used to make these in the past but had forgotten how to make them. 🤭
    Thank you for helping me get on track again.

    Mary :))

    Reply
    • A Spoonful of Sugar says

      November 3, 2025 at 3:22 pm

      You are so welcome Mary! Happy sewing.

      Reply

Leave a Reply Cancel reply

Your email address will not be published. Required fields are marked *

  • Email
  • Facebook
  • Instagram
  • Pinterest
  • Threads
  • TikTok
SUBSCRIBE TO NEWSLETTER
×

Categories

Archives

PURCHASE PDF PATTERNS

We offer over 100 affordable PDF sewing patterns available for download from our store website or Etsy store. Each pattern includes detailed instructions, numerous photos, and templates.

WEB STORE ETSY STORE

Instagram

A beautiful, captivating read by local author Tess A beautiful, captivating read by local author Tess Woods inspired this sweet little Heart Bookmark. I adored the way The Cairo Bridal Shop wove together family, secrets, and sisterhood — it’s one of those
stories that stays with you long after you close the cover. If you missed my book review, check my previous post.This tiny Heart Bookmark is scrap‑friendly, quick to sew, and perfect for book lovers or handmade gift‑givers.Comment BOOKMARK for the free Pattern or click on the link in my bio.Save this for when you are looking for quick handmade gift ideas.#freesewingpattern #scrapfriendlysewing #handmadegifts #bookloversofinstagram #sewingcommunity
A beautiful new read + a sweet sewing project insp A beautiful new read + a sweet sewing project inspired by the Albi sisters.Thanks to @tesswoods_author and @penguinbooksaus for the advance copy of this captivating story.⭐⭐⭐⭐⭐I’ve just finished reading The Cairo Bridal Shop by local author Tess Woods — and it completely swept me away.Set at the foot of the pyramids, the Albi Bridal Shop is home to three sisters fighting to break tradition and shape their own futures. Inspired by ancient pharaoh queens, they draw on generations of women, culture, sacrifice, and resilience to find their strength.Tess calls this “the book of her heart,” weaving her family history into a story of sisterhood, identity, faith, strong women, and delicious Egyptian food.While reading, I kept thinking about the three Albi sisters — Sarah, Aya, and Lola — each navigating their own challenges, each fighting for the life she deserves.So I stitched three Heart Bookmarks, one to represent each sister. A tiny handmade nod to their courage, creativity, and connection.Each bookmark is made from quilting cotton, wool felt, lace, and a silky tassel — quick to sew, lovely to gift, and perfect for marking your place in a story full of strong women.I was completely captivated by The Cairo Bridal Shop. The relationships between the sisters are truly the heart of the story — tender, complicated, loyal, and full of resilience.I loved the structure: six dresses, each inspired by a Pharaoh queen, each opening a new chapter of their lives. The cultural details, the food, the history, the Cairo setting — it all felt vivid and immersive.A beautiful, emotional story of family, identity, courage, and the strength we find in the women around us.If you only read one book this year, make sure it is The Cairo Bridal Shop.If you’d like to stitch your own Heart Bookmark, the pattern is free.Comment BOOKMARK and I’ll send you the link.A sweet, quick project — perfect paired with a good book.Thanks for being here — I love sharing small sewing projects that bring joy to your day.
A sweet little scrap project ✂️✨ The Zakka Scisso A sweet little scrap project ✂️✨The Zakka Scissor Keeper is one of my favourite small  makes — quick to sew, perfect for coordinated scraps, and so handy to keep your scissors protected in your sewing bag. I’ve never shared a reel of this one, so here’s a little peek at how it opens and closes.It’s also my Pattern of the Week, which means you can save 25% for a limited time. If you love small, satisfying projects, this one is a fun weekend sew.Comment SCISSOR and I’ll send you the link.#sewingprojects #scrapfriendlysewing #smallsewingprojects #zakka #sewingaddict
The Hexie Placemat Series ✂️ Six designs and endl The Hexie Placemat Series ✂️Six designs and endless ways to make your table feel special. From festive holiday colours to cosy autumn tones, these placemats are quick to sew, scrap‑friendly, and perfect for gifting or decorating your home.Featuring:
• Hexie Holiday – a Christmas favourite
• Hexie House – the newest addition
• Hexie Heart – sweet and sentimental
• Hexie Star – crisp and modern
• Hexie Pumpkin – warm autumn vibes
• Hexie Bunny – playful for springSwipe to see all the looks — each one has its own personality and is fun to customise with your favourite fabrics.Comment HEXIE and I’ll send you the link to the full series (available in my Pattern Store + Etsy Shop).#sewingprojects #quiltedplacemat #scrapfriendlysewing #pdfsewingpattern #sewingcommunity
The Easiest Oven Mitt You’ll Sew ✂️✨ The Baker’s The Easiest Oven Mitt You’ll Sew ✂️✨The Baker’s Buddy Mitt is one of those projects that never leaves my sewing table — smooth curves, no fiddly binding, and a construction that’s genuinely beginner‑friendly. It comes together fast, looks
beautifully shaped, and is one of my most‑gifted makes because it actually gets used in the kitchen.Here’s why makers love it:
• No binding (yes, really!)
• Modern silhouette that works with any stash fabric
• Insul‑Brite + batting layers for hand protection
• Quick, practical, and gift‑readyIf you’re after a satisfying project that looks impressive and is useful, this is the one.Comment BAKER and I’ll send you the pattern link (available in my Pattern Store and Etsy Shop).#sewinggifts #beginnersewing #quicksewingproject #scrapfriendlysewing
#bakersbuddy
Meet the Hexie House Placemat — a sweet, two‑size Meet the Hexie House Placemat — a sweet, two‑size project stitched here in Tilda Village Life. It’s beginner‑friendly, quick to sew, and perfect for adding a little handmade charm to your table.Want the link? Comment HEXIE and I'll send you the link to the Hexie House Placemat plus the other placemats in the series.Save this reel for your weekend sewing and tag me if you make one —I'd love to see your version. 🏡Pattern Details: Hexie House Placemat (2 Sizes) Sewing Pattern - Available in our Pattern Store and Etsy ShopFabric Credit: Tilda Village Life (releasing on 1 October), with thanks to @tilda_australia#hexiehouseplacemat #hexieplacemat  #fppsewing #tildafabric #tildavillagelife
Follow on Instagram

Featured Pattern

Travel Sewing Kit Pattern

Featured Tutorial

Retro Drawstring Bag

Featured Recipe

Lemon Pound Cake

Connect

  • Email
  • Facebook
  • Instagram
  • Pinterest
  • Threads
  • TikTok
SUBSCRIBE TO NEWSLETTER
×

Popular Posts

  • Rediscovering Your Fabric Stash: Hidden Treasures, Changing Tastes, and Fresh Inspiration
  • Apple Crumble Slice
  • Liberty Scrap Gift Tags – A Quick, Pretty Project for Using Tiny Fabric Offcuts
  • Lavender Sachets
  • Patchwork Fabric Tray
  • Charm Square Fabric Tray
  • 10 Beginner Friendly Sewing Projects for Kids Going Back to School

Copyright © 2026 Lisa. K. Cox - A Spoonful of Sugar