A Spoonful of Sugar: Sew 20 Simple Projects to Sweeten Your Surroundings Zakka Style

A Spoonful of Sugar

Make. Bake. Create.

Subscribe to our Newsletter

Menu
  • Home
  • About
    • About Us
    • Advertising
    • Press
    • FAQ
    • Disclosure
    • Grab a Button
    • Contact Us
  • Crafts
    • Crochet
    • DIY
    • Embroidery/Cross stitch
    • Gift Wrapping
    • Knitting
    • Miscellaneous
    • Paper Crafts
  • Holidays
    • New Year’s
    • Australia Day
    • Back to School
    • Valentines Day
    • Easter
    • ANZAC Day
    • Mother’s Day
    • Father’s Day
    • Halloween
    • Christmas
  • Recipes
    • Appetizers
    • Bars & Slices
    • Bread & Pastries
    • Cakes
    • Cookies
    • Confectionery
    • Cupcakes & Muffins
    • Desserts
    • Drinks
    • Ice Cream
    • Jams/Preserves
    • Main Meals
  • Sewing
    • Sewing Tutorials
    • Quilting
    • Sewing & Quilting Patterns
  • Family
    • Back to School
    • Family Fun
    • Our Home
    • Parenting
    • Travel
  • Shop
    • Etsy Store
    • Craftsy Store

Pyjama Bag

January 5, 2013 By Spoonful of Sugar - 17 Comments

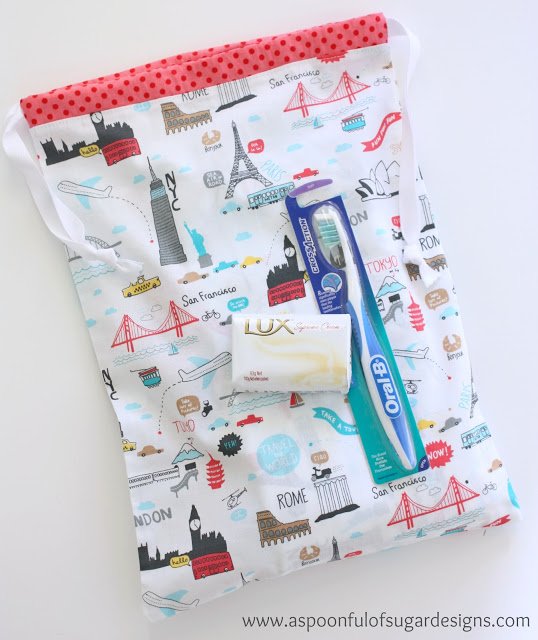
Drawstring bags are very handy to have in your suitcase to organise clothing and supplies. To store Sarah’s new travel themed PJ’s, I made up a little drawstring bag to match. It is an unlined drawstring bag as we didn’t want to add extra weight to our luggage! They will be perfect for storing the Pyjamas in her suitcase on our next holiday.

Colourful PJ’s pants, a drawstring bag, and some travel sized toiletries would make a great gift idea for a teenage girl.

Pyjama Bag

Size: 11 1/2 x 16 inches ( 29 x 40.5 cm)

Materials:

  • 2 rectangles of fabric measuring 12 x 16 inches (travel themed fabric)
  • 2 strips of fabric measuring 12 x 2 1/2 inches (pink polka dot)
  • 2 1/2 yards white twill tape (1/2 inch wide)  for drawstring

Method:

1. Place the two fabric rectangles with their right sides facing. Stitch around the bottom and the two sides using 1/4 inch seam allowance. Overlock (serge) the raw edges.
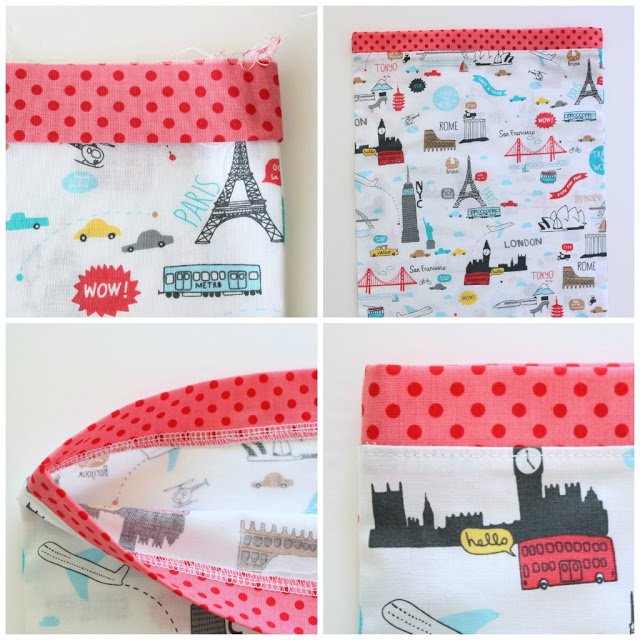
2.  Overlock (serge) the edges on the short sides of the polka dot strips. Place the two strips of fabric with their right sides facing.Stitch them together at each end, leaving a 1/2 inch opening as shown in the photo. (This is where the drawstring will pass through). The polka dot fabric is now a circular piece.
3. Press the seams on the polka dot fabric open. Fold the fabric in half lengthwise and press. Pin the raw edges of the polka dot fabric to the opening of the bag, with the seams aligned. Stitch in place around the opening of the bag. Overlock the edges. Press. Topstitch around the opening of the bag as shown in the photo.
4. Cut the twill tape in two. Thread the twill tape in one opening using a bodkin or safety pin. Thread the tape right around the drawstring casing until it comes out the same end that it started. Tie the ends together to secure. Thread the remaining piece of twill tape through the opening in the other side, pass it right around the casing, and back out the same gap. Tie ends together.
Pull both ends to gather up the bag.
Thanks to XO Gigi Fabrics for providing the fabric for this project.
For your daily sugar fix you can subscribe or follow us on facebook, pinterest, twitter, and google plus.

Filed Under: Sewing, Sewing Tutorials, Travel

Never miss a post.

Get fresh new ideas delivered right to your inbox!

« Spice Cakes
Patchwork Needlebook »

Comments

  1. Happy in red says

    January 6, 2013 at 2:24 am

    I LOVE that fabric, fabulous!!
    Esther.

    Reply
  2. Terriaw says

    January 6, 2013 at 10:12 am

    Adorable and so easy to make. I use drawstring bags for so many things.

    Reply
  3. JoJo Eloise says

    January 6, 2013 at 10:26 am

    So cute!! And your right,this would make a great gift for a teenage girl or frequent traveler 🙂 thanks for sharing it with us.
    Angelina

    Reply
  4. Carole says

    January 6, 2013 at 11:07 am

    I LOVE this way to make a drawstring bag! I’ve never seen it done this way before and it’s super-cute. Thank you for another great project.

    Reply
  5. Samelias Mum says

    January 6, 2013 at 4:40 pm

    Great Tute! Love the fabric too.

    Reply
  6. Cheryl says

    January 6, 2013 at 5:28 pm

    Love your fabric selection….and what a great tutorial!!! Thanks so much.

    Reply
  7. Darmowa Bramka says

    January 7, 2013 at 8:31 am

    Hiding pyjamas under the pillows is so boring. Thanks to you, my kid won’t have to do it ever again – I’m sure it will be so much fun for him to use such a cute bag!

    Reply
  8. Janine says

    January 12, 2013 at 1:18 am

    great tutorial … BUT … do you have a pj pattern? that’s what miss 15 really needs!

    Reply
  9. Pam @Threading My Way says

    January 17, 2013 at 4:52 am

    LOVE your fabric choice!!! It’s perfect for a drawstring bag to carry in luggage. This is the first time I’ve even seen the Sydney Harbour Bridge on fabric. I’m trying not to add any fabric to my ever growing stash, but this may well change my mind. I would love you to share the Pyjama Bag Tutorial at our Ongoing Link Party that’s just for Drawstring Bags .

    Reply
  10. Nancy Bandzuch says

    January 17, 2013 at 11:51 am

    Such a clear tutorial–even I think I could make this!
    Love for you to stop by and check out some of my project:
    http://www.dosmallthingswithlove.com
    Also, I host and “oldies” link party on Tuesdays–a way to get come traffic out of our awesome, but old projects we posted long ago.
    Hope to see you there–and excited to be following you via rss.
    Nancy

    Reply
  11. quadri on line says

    January 18, 2013 at 1:25 am

    Owww yea! *me gusta* It’s a very nice idea, thanks for the tutorial! I love my stuff organized!

    Reply
  12. Palak says

    August 9, 2013 at 6:07 pm

    I love the idea of a pyjama bag, and this one is so cute with the contrast band at the top! I wanted to let you know I feature it at Sewistry.com. Here’s the link: http://sewistry.com/2013/08/pyjama-bag/. Thanks!

    Reply
  13. Patricia Parson says

    April 26, 2016 at 8:28 pm

    Please explain the term serge the fabric

    Reply
    • A Spoonful of Sugar says

      May 1, 2016 at 9:32 pm

      Serge is the same as overlock. It means to finish the edges. If you don’t have an overlocker or serger machine, you can finish with a zigzag stitch to finish the raw edge.

      Reply
  14. Quadri astratti moderni says

    June 6, 2016 at 4:24 pm

    Good ideas, I love the order and be organized. Thank you

    Reply
  15. Anna says

    February 19, 2017 at 3:55 am

    Great tutorial thank you for sharing!!!

    Reply
  16. Anna says

    April 6, 2020 at 10:33 pm

    Hi, I just wanted to say a massive thank you for this pattern. In the midst of the covid-19 pandemic, I have used it to make bags for NHS workers in the UK who don’t wear scrubs and so have to take their uniforms home – they can put it all in a bag at the end of shift and then throw the whole lot in the wash. They are being very gratefully received! It’s a fab pattern that I can whip up in no time xx

    Reply

Leave a Reply Cancel reply

Your email address will not be published. Required fields are marked *

  • Email
  • Facebook
  • Google+
  • Instagram
  • Pinterest
  • RSS
  • Twitter
Follow on Bloglovin

My Book

Instagram

Throwback to last year's Valentine's sewing projec Throwback to last year's Valentine's sewing project - the Gifted With Love Pouch. A great way to practice your foundation paper piecing skills. 
.
Pink and red is always a winning combination.❤❤❤
.
Pattern: Gifted with Love Pouch PDF Pattern ( available in our Etsy store - link in profile).
.
#giftedwithlovepouch #makersgonnamake #stashbusting #scrapquilting #modernmaker #stashbustet #modernaussiequilter #makemodern #fpp #pouchmaker
Another Hexie Heart Placemat is in progress. This Another Hexie Heart Placemat is in progress. This one will be pink and mint green to match my favourite tea set. 
💚💗💚💗
.
Pattern: Hexie Heart Placemat ( link in profile).
.
.#hexieheartplacemat #aspoonfulofsugardesigns #hexie #fpp #patchworkfun #valentinessewing #sewathome #sewsewsew #giftstosew #etsyseller #quiltersgonnaquilt #sewyourscraps #scrapbuster #pdfpatterns #sewinglove #handmade #livecreatively
I couldnt resist sharing another photo of my Hexie I couldnt resist sharing another photo of my Hexie Heart Placemat. Red and pink is such a pretty combination . Featuring a foundation paper pieced heart and striped patchwork border, this placemat can be easily made in an afternoon. ❤❤❤

Pattern: Hexie Heart Placemat PDF Sewing Pattern ( link in profile).
.
#hexieheartplacemat #aspoonfulofsugardesigns #patchwork #quilting #valentinessewing #sewforhome #sew #sewinglove #quiltinglove #Etsy #quiltylove #sewingtherapy #sewyourstash #sewyourscraps #scrapbuster #fpp
***New Pattern Release*** The Hexie Heart Placema ***New Pattern Release***

The Hexie Heart Placemat PDF Sewing Pattern is now available in my Etsy store ( link in profile).. Featuring a foundation paper pieced heart with a simple patchwork border. It can be used as a placemat, mug rug, trivet or pot holder.  Pretty addition to your next afternoon tea or celebration.❤💗❤💗
.
#hexieheartplacemat #hexie #fpp #patchworkfun #sewforhome #valentinessewing #sewfun #sewsewsew #quiltersgonnaquilt #livecreatively #pink #red #heart #quilt #giftstosew #pdfsewingpatterns #etsyseller
Load More… Follow on Instagram

Featured Pattern

Travel Sewing Kit Pattern

Featured Tutorial

Harvest Drawstring Bags

Featured Recipe

Lemon Pound Cake

Subscribe via Email


A Spoonful of Sugar on Etsy

Categories

Archives

Connect

  • Email
  • Facebook
  • Google+
  • Instagram
  • Pinterest
  • RSS
  • Twitter

Popular Posts

  • Crocheted Scarf {Free Pattern}
  • Business Card Wallet
  • Triangle Pouch
  • Golden Syrup Cake
  • Retro Drawstring Bag
  • Pot Holder Pattern
  • Vintage Singer Sewing Machine

Copyright © 2021 - Powered by Genesis Framework and a Creative Life - Designed by: Bellano Web Studio - Log in