A Spoonful of Sugar

Make. Bake. Create.

Menu
  • Home
  • About
    • About Us
    • Press
    • FAQ
    • Disclosure Policy
    • Contact Us
  • Crafts
    • Crochet
    • DIY
    • Embroidery/Cross stitch
    • Gift Wrapping
    • Knitting
    • Miscellaneous
    • Paper Crafts
  • Holidays
    • New Year’s
    • Australia Day
    • Back to School
    • Valentines Day
    • Easter
    • ANZAC Day
    • Mother’s Day
    • Father’s Day
    • Halloween
    • Christmas
  • Recipes
    • Appetizers
    • Bars & Slices
    • Bread & Pastries
    • Cakes
    • Cookies
    • Confectionery
    • Cupcakes & Muffins
    • Desserts
    • Drinks
    • Ice Cream
    • Jams/Preserves
    • Main Meals
  • Sewing
    • Sewing Tutorials
    • Quilting
    • Sewing & Quilting Patterns
  • Family
    • Back to School
    • Family Fun
    • Our Home
    • Parenting
    • Travel
  • Shop
    • Pattern Store
    • Etsy Store

Tutorial: Scrappy Loyalty Card Wallet

March 12, 2009 By Spoonful of Sugar - 69 Comments

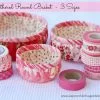
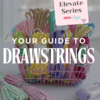
I had a few requests to make up a tutorial for my Loyalty Card Wallet. These wallets are a great scrap busting project!  You can find the tutorial here:

Tutorial – Scrappy Loyalty Card Wallet


Posted by Lisa

Filed Under: Sewing, Sewing Tutorials

« Softies, Supplies, and a Swap!
Tea Time Swap »

Comments

  1. Handmade says

    March 13, 2009 at 2:26 am

    Hi – I just found your great blog – I really like your stuff. thanks for this tutorial – an essential item!

    Reply
  2. sandra says

    March 12, 2009 at 10:52 pm

    I love them. Will have a go at making one on the weekend.

    Reply
  3. Christy says

    March 12, 2009 at 11:22 pm

    Looks fabulous! Can’t wait to make one soon!

    Reply
  4. Janellybelly says

    March 12, 2009 at 11:23 pm

    My favourite is the selvedge one, it’s so cool. Have a lovely time at the wedding tomorrow.
    Janelle xx

    Reply
  5. Bloom says

    March 12, 2009 at 11:37 pm

    This is genius! Thank you for such a wonderful tutorial. I so badly need one (or ten!) of these as my cards are spewing out of my wallet.

    Reply
  6. Lulabell says

    March 13, 2009 at 12:22 am

    What a good idea! I can never find the right card when you are at the register. Thanks!

    Reply
  7. Catherine says

    March 13, 2009 at 3:02 am

    Thanks for the Tutorial Lisa!! Love the idea…must make one. It would be great to have all the loyalty cards in their own wallet and not mixed up with the “important” cards!! Cathyx

    Reply
  8. K-Sue says

    March 13, 2009 at 3:28 am

    Thank you thank you thank you
    I hope to make one of these TODAY.

    Reply
  9. Stephanie says

    March 13, 2009 at 3:40 am

    Thank you. You share the best projects. I have made a little snap wallet using selvedges. :o)

    Reply
  10. Natasha says

    March 13, 2009 at 5:03 am

    I’m off to make one right now! Thanks.

    Reply
  11. Tracy says

    March 13, 2009 at 5:18 am

    Those are super…very smart little wallet…and great tutorial–thank you! Have a wonderful weekend! :o)((HUGS))

    Reply
  12. Knit and Sew City Girl says

    March 13, 2009 at 5:42 am

    I absolutely love your loyaty card wallets! I must add it to my list of thing to do!

    Thanks for sharing!

    Mary

    Reply
  13. Thimbleanna says

    March 13, 2009 at 6:16 am

    Very cute – I Looovveeee the selvedge one!

    Reply
  14. Shanghai Monkey says

    March 13, 2009 at 7:41 am

    Great tutorial ^_^ I’ll be making one this afternoon. Thanks!!

    Reply
  15. melissa s. says

    March 13, 2009 at 7:54 am

    LOVE these! thanks for the tute!

    Reply
  16. Sheri Howard says

    March 13, 2009 at 8:10 am

    Very nice tutorials, I loved them all. I wish tutorials were “my thing.” I guess we all have something we do well. Thanks for all those, I am going to make all three!

    Reply
  17. Carrie P. says

    March 13, 2009 at 10:36 am

    Another great idea. Thanks for sharing.

    Reply
  18. soyee says

    March 13, 2009 at 10:45 am

    they look very nice.

    Reply
  19. Rachel@oneprettything.com says

    March 13, 2009 at 12:14 pm

    LOVE the selvedge! This is so cool, thanks tons for sharing! I’ll be linking to this.

    Reply
  20. Shabby Raggy Roses says

    March 13, 2009 at 4:40 pm

    These are sooo cute! I’ll be making a few of these today I think! I just happen to have some selvedges stashed away… Thanks for the tutorial.
    Best wishes,
    Jenelle

    Reply
  21. Julie says

    March 13, 2009 at 4:51 pm

    Why is it called a Loyalty Card Wallet? What is a Loyalty Card? They are really cute.

    Reply
  22. handmaiden says

    March 13, 2009 at 8:09 pm

    Great idea Lisa, they would make a perfect Kris Kringle gift.

    Reply
  23. Jenny says

    March 14, 2009 at 1:47 am

    They are lovely and a very good tutorial-thanks for sharing

    Reply
  24. Simone de Klerk says

    March 14, 2009 at 3:57 am

    Thank you for the tutorial, Lisa. Something went wrong while opening it, but I’ll try again later. And it is really something we need these days, with all those cards! Looking forward to make it (O:
    Have a lovely weekend!

    Reply
  25. Rumi says

    March 14, 2009 at 4:50 am

    This is a great project. Thanks for the tutorial.

    Reply
  26. Michelle says

    March 14, 2009 at 5:01 am

    love them…especially the selvedge one…will pop over and checkout the tutorial asap…

    Reply
  27. A World in a PAN says

    March 14, 2009 at 6:12 am

    You ar SO talented!

    Reply
  28. lesley says

    March 14, 2009 at 6:25 am

    Hi, What a great idea. I can feel a making afternoon coming on. Thanks for the tutorial. xx

    Reply
  29. Fiona @ Dragonfly-Crafts says

    March 15, 2009 at 4:07 am

    Looks fantastic, great for all those small pieces we HATE throwing away. I’ll be saving this tutorial for sure. Thanks for sharing.

    Reply
  30. casserole says

    March 14, 2009 at 2:58 pm

    These are awesome! I posted a link to your tutorial on Craft Gossip Sewing Blog: http://sewing.craftgossip.com/tutorial-loyalty-card-wallettutorial-loyalty-card-wallet/2009/03/14/

    Reply
  31. Amy @ Park City Girl says

    March 14, 2009 at 9:08 pm

    Thank you!!

    Reply
  32. YayaOrchid says

    March 14, 2009 at 10:38 pm

    Hi! I’ve really enjoyed reading your blog. I hope you accept an award I’ve passed on to you. Pls visit my blog for details.

    Reply
  33. Cheryl says

    March 14, 2009 at 11:20 pm

    What a great project. I have a quilt retreat coming up and these would be fun to make while there!

    Reply
  34. silverpebble says

    March 15, 2009 at 2:17 am

    These are wonderful – I love a thrifty project using up little ends of fabric like this. My mum is about to hand my Gran’s sewing machine over to me too! How exciting.

    Reply
  35. crafty things says

    March 15, 2009 at 2:54 am

    Thanks for posting the tutorial. This is one that I will put on the list of things to try.

    Reply
  36. Jackie says

    March 15, 2009 at 11:17 am

    How cute! I saved the tutorial link for future use. Can’t view it now as it said something about bandwidth of the site exceeded?

    Reply
  37. Rabid says

    March 15, 2009 at 1:05 pm

    D’oh! I want the tute but bandwidth is currently exceeded. I could probably figure it out and I have some extra selvage, hmmm…

    Reply
  38. bubbachenille says

    March 15, 2009 at 2:37 pm

    Tahnks for this I am right on to it and your work is gorgeous.
    Miriam

    Reply
  39. Philigry says

    March 15, 2009 at 5:37 pm

    love this! i never save my selveges (horrible, I know) but after seeing all these great projects i think i need to!

    Reply
  40. Amber says

    March 16, 2009 at 10:37 am

    HI LIsa – the wallet is such a fantastic idea – I definitely need to make myself one! I can’t open the link though – should I just wait a little while ? If not (and you have the time), could you email it to me? Thanks!

    Amber

    akcarrillo@yahoo.com

    Reply
  41. CBear says

    March 16, 2009 at 11:19 am

    i can’t get the link to work, can you email it to me when you have a moment?

    fuzzysheepcrafts at gmail .dot. com

    Reply
  42. LizzieJane says

    March 15, 2009 at 10:27 pm

    How lovely are these, thank you very much for the tutorial.
    x

    Reply
  43. Angele says

    March 16, 2009 at 10:11 pm

    Beautiful choice of fabrics! I’ve already got a few special buttons in mind I can use for this project.

    I am unable to download your tutorial due to bandwidth problems. Would you please email me the tutorial when you have a chance? Thank you in advance!

    Angele
    angeleb@gmail.com

    Reply
  44. Renee says

    March 17, 2009 at 6:58 am

    Lisa what flabberghasts me is that you work outside the home and you still do this incredible job at making things with your daughter.

    You are truly amazing.

    xoxoxo

    Reply
  45. Larissa Wardrip says

    March 17, 2009 at 5:07 pm

    I LOVE the selvedge edge one! Can you please email me the tutorial? THANK YOU!

    Larissa789[at]msn[dot]com

    Reply
  46. K-Sue says

    March 19, 2009 at 7:27 pm

    Thanks again for such a nice tutorial. I have made my first card wallet. It was quick and fun and turned out very nice.

    Reply
  47. Debbie says

    March 23, 2009 at 7:55 pm

    Can you email me the tutorials too – especially the one for the loyalty cards? Such cute things. Thanks, debdewart@sbcglobal.net

    Reply
  48. Susan says

    March 28, 2009 at 4:29 am

    What a wonderful idea! I couldn’t view the pattern page either. Could you please email me the tutorial when you have a chance? Thanks!

    Reply
  49. Happy Cottage Quilter says

    March 28, 2009 at 7:15 am

    Love them. Thanks for sharing the picture of the selvage one. I am on a mission to make some of the wallets.

    Have a great day!
    Jocelyn

    Reply
  50. margot says

    March 28, 2009 at 7:16 am

    Couldn’t access the tutorials and my computer had problems with the email. Could you email the tutorial (plus the covered tape measure, passport protector and custom notebooks if it’s not too much trouble)? Just found your blog today through a link on Selvage Quilter’s blog and love it!

    Reply
  51. Liz Needle says

    March 29, 2009 at 4:35 am

    I love your gorgeous projects, but am unable to download the tutorials. Could you possibly send me the tutorials for the notebook and the loyalty cards wallet, please.

    Reply
  52. Geek+Nerd says

    March 29, 2009 at 7:33 am

    Thanks for the cute tutorial!

    Reply
  53. Mam says

    March 29, 2009 at 8:50 am

    Hi Lisa, I’ve tried for the past couple of days to link to the tutorial without success. Please email one to me at dcg@nbnet.nb.ca.
    Thanks.

    Reply
  54. pam says

    March 30, 2009 at 4:26 am

    These are the cutest things. I have been trying for a few days to get to the tutorial with no luck. If you are sending emails do you think you could include me?
    I think I have just enough selvedges to make one up. Thank you
    pam
    pamroever@gmail.com

    Reply
  55. Kate says

    March 29, 2009 at 6:07 pm

    I can not get any of your patterns to open. can you email it to me. Thanks kates(dot)1021(at)yahoo(dot)com Thanks again I look forward to making a few of these for gifts.

    Reply
  56. Sharon says

    March 30, 2009 at 1:47 pm

    I, too am having trouble not being able to get the tutorials for the wallet and the passport cover..please send.
    Thanks…skjpepper@aol.com

    Reply
  57. Amber says

    April 2, 2009 at 5:49 pm

    Can you send a copy of the tutorial to spazzo@tds.net??

    I’m making a bag and this wallet would go perfectly with it. 🙂
    Thanks!!

    Reply
  58. Bloom says

    April 7, 2009 at 11:20 pm

    Hi Lisa & Sarah! Just dropping by to let you know I have made up some of your Loyalty Card Wallets. Great tutorial. They worked beautifully. Thanks so much for sharing the tutorial with us. You can see how mine turned out at: http://bloomandblossom.blogspot.com/2009/04/march-of-loyalty-cards.html

    Reply
  59. Henrysmomsmusings says

    April 8, 2009 at 11:48 am

    Thank you so much for your wonderful tutorial. I downloaded it last night, saw the post on the “Bloom” blog this morning and decided that was a sign. Made my first wallet and since it was so much fun, there’ll be more. Thank you!

    Reply
  60. CJ says

    April 10, 2009 at 11:30 am

    These are so cute!! Alas I am not able to open the tutorial. Could you please send the directions to me?? Thanks!

    Reply
  61. AJ says

    April 27, 2009 at 2:05 pm

    Too cute!!! I may have to make one of my own.

    Reply
  62. Bronwyn says

    February 13, 2010 at 7:07 pm

    Thankyou for your awesome tutorial. I have never sewn before but attempted these passport protectors as Chrissy presents for the family using some really cool Indigenous material. It was the perfect starter project. I will send you some photos when I get organised. Thanks again.

    Reply
  63. Adele says

    February 19, 2010 at 9:48 pm

    Love it ! Please email me a copy of your tutorial

    adelemerrell@gmail.com

    Reply
  64. WHATUPDUCK says

    March 24, 2010 at 1:57 pm

    Those are great! Especially for a selvage small project. I’ll be making one soon, after I finish 125,795 other projects 😉

    Reply
  65. Jan says

    June 22, 2011 at 6:48 pm

    Thank you so much for the tutorial on the cute little wallets! I made one last night and plan to make many more!

    Reply
  66. Miss Pixie says

    June 26, 2011 at 11:50 am

    Thanks for the tutorial! I have made 2 already you can see one of them here:
    http://misspixiecrafts.blogspot.com/2011/06/scrappy-wallet-and-purse.html

    Reply
  67. Di says

    August 13, 2011 at 4:07 am

    Thanks Lisa! I had a ‘late decision’ visit to family in the UK and in the last 2 weeks before we went I managed to make 12 of your lovely loyalty wallets. (Yes 12! I work well under pressure! LOL) Everyone loved them… me most of all ….! I loved matching my scraps to get a good look and even found a bundle of fabrics which I just had to buy so the wallet matched a particular sister! I can’t thank you enough! A real winner! Regards. Di.

    Reply
  68. sorani says

    September 16, 2011 at 11:04 pm

    hi! thank you so much, i will try the turial tomorrow……..they are so nice ! bye, nico

    Reply
  69. cara says

    May 6, 2012 at 10:26 am

    Thanks for the tutorial! It was easy to follow, and my wallet turned out so cute using some leftover scraps from another project! 🙂

    Reply

Leave a Reply Cancel reply

Your email address will not be published. Required fields are marked *

  • Email
  • Facebook
  • Instagram
  • Pinterest
  • Threads
  • TikTok
SUBSCRIBE TO NEWSLETTER
×

Categories

Archives

PURCHASE PDF PATTERNS

We offer over 100 affordable PDF sewing patterns available for download from our store website or Etsy store. Each pattern includes detailed instructions, numerous photos, and templates.

WEB STORE ETSY STORE

Instagram

💡 No tricky binding, no stress! This Hexagon Tr 💡 No tricky binding, no stress! This Hexagon Trivet is the ultimate beginner friendly sewing project, and the best part? The raw edges are neatly enclosed INSIDE - just turn it right side out,  press and you're done! 🎉🌟 You can use 10 inch precut squares- perfect for those leftover fabrics in your stash. Whether you're sewing for yourself or gifting homemade kitchen decor, this pattern is a gamechanger.Comment TRIVET and I'll send you the pattern link.#handmadehome #precutfabric #easysewing #sewingforbeginners #handmade #easyhexagontrivetandcoaster #quiltingcotton
🎉 Beginner Quilters, This One is for You! 🎉 🎉 Beginner Quilters, This One is for You! 🎉Want to sew a colourful Hexagon Trivet with just straight line quilting? This easy sewing project is perfect for beginners. No tricky binding to sew and you get a neat professional finish.Plus you can use 10 inch precut squares for a quick and satisfying make. Perfect for adding a handmade touch to your kitchen or gifting to a friend.Comment TRIVET and I'll send you the link.#easysewing #precutfabric #quiltlover #sewingforbeginners #handmadehome #handmadegifts #simplesewing
🏡💜 Home is where your heart is ❤️🏡I 🏡💜 Home is where your heart is ❤️🏡Introducing the Heart House Foundation Paper Piecing Quilt Block - a cosy design  that brings the warmth of home to every stitch. Available in 5 sizes (2  inch, 3 inch, 4 inch, 5 inch, and 6 inch) this sweet block is perfect for quilts, pillows, pouches and more!Because family is the heart of the home, and every home deserves a little love.Want the pattern? Comment HEART below, and I'll send you the link.#hearthousequiltblock #foundationpaperpiecing #quiltlove #homesweethome #sewingcommunity #sewinglove
✂️ Tip of the Week! ✂️Sewing with Libert ✂️ Tip of the Week! ✂️Sewing with Liberty Tana Lawn? 🌸✨ This stunning fabric deserves the best treatment! A fine needle is key to smooth, snag-free stitches—size 70/10 or 60/8 works like magic, gliding through the delicate weave effortlessly. Pair it with a sharp, fresh needle for crisp, professional results that let those gorgeous Liberty prints shine!Want more sewing tips delivered straight to you? Comment "NEWSLETTER" and I'll send you the link to sign up! 💌💬 What’s your go-to tip for sewing with Liberty fabric? Let’s swap ideas!#LibertyFabric #TanaLawn #SewingTips #FabricLover #QuiltingCommunity #SewingForFun #HandmadeSewing #TextileArt #DIYSewing #SewingInspiration
Turn your fabric scraps into something beautiful! Turn your fabric scraps into something beautiful! These Happy Scrappy Cards are the perfect DIY project - quick, beginner friendly, and fun to create with kids. Plus, they make a thoughtful Mothers Day card!✨️ Want the free tutorial? Comment CARDS and I'll send you the link!#scrapbuster #DIYcards #mothersdaycraft #sewingforfun #handmadegift #makerslife
Sewing isn't just stitches - it's life lessons. Wa Sewing isn't just stitches - it's life lessons. Want to see all 12 lessons? Comment LESSON and I'll send you the link to our free blog article.Quilting is more than just a creative pastime- it's a journey filled with valuable  life lessons. Whether you're a beginner or an experienced quilter, the process teaches persistence, patience, problem solving and self-expression.Read our article to discover all the lessons you can learn. What has quilting taught you? Share your most important lesson in the comments.Love the pillow designs in this post? Find my sewing patterns in my Pattern Store - link in profile.#sewingpatterns #DIYhomedecor #quiltedpillow #handmadehome #sewingproject #scrapbuster #sewingforfun #beginnersewing
Follow on Instagram

Featured Pattern

Travel Sewing Kit Pattern

Featured Tutorial

Retro Drawstring Bag

Featured Recipe

Lemon Pound Cake

Connect

  • Email
  • Facebook
  • Instagram
  • Pinterest
  • Threads
  • TikTok
SUBSCRIBE TO NEWSLETTER
×

Popular Posts

  • Liberty Tissue Cover
  • Pretty Liberty Drawstring Pouch
  • Sewing with Liberty Fabric
  • {Back to School} Tissue Cover
  • 10 Gifts to Sew for Mother’s Day
  • Pin Perfection: Everything you Need to Know about Sewing Pins
  • Charm Square Fabric Tray

Copyright © 2025 Lisa. K. Cox - A Spoonful of Sugar