A Spoonful of Sugar

Make. Bake. Create.

Menu
  • Home
  • About
    • About Us
    • Press
    • FAQ
    • Disclosure Policy
    • Contact Us
  • Crafts
    • Crochet
    • DIY
    • Embroidery/Cross stitch
    • Gift Wrapping
    • Knitting
    • Miscellaneous
    • Paper Crafts
  • Holidays
    • New Year’s
    • Australia Day
    • Back to School
    • Valentines Day
    • Easter
    • ANZAC Day
    • Mother’s Day
    • Father’s Day
    • Halloween
    • Christmas
  • Recipes
    • Appetizers
    • Bars & Slices
    • Bread & Pastries
    • Cakes
    • Cookies
    • Confectionery
    • Cupcakes & Muffins
    • Desserts
    • Drinks
    • Ice Cream
    • Jams/Preserves
    • Main Meals
  • Sewing
    • Sewing Tutorials
    • Quilting
    • Sewing & Quilting Patterns
  • Family
    • Back to School
    • Family Fun
    • Our Home
    • Parenting
    • Travel
  • Shop
    • Pattern Store
    • Etsy Store

Tutorial: Eiffel Tower Smartphone Cover

March 11, 2012 By A Spoonful of Sugar - 33 Comments

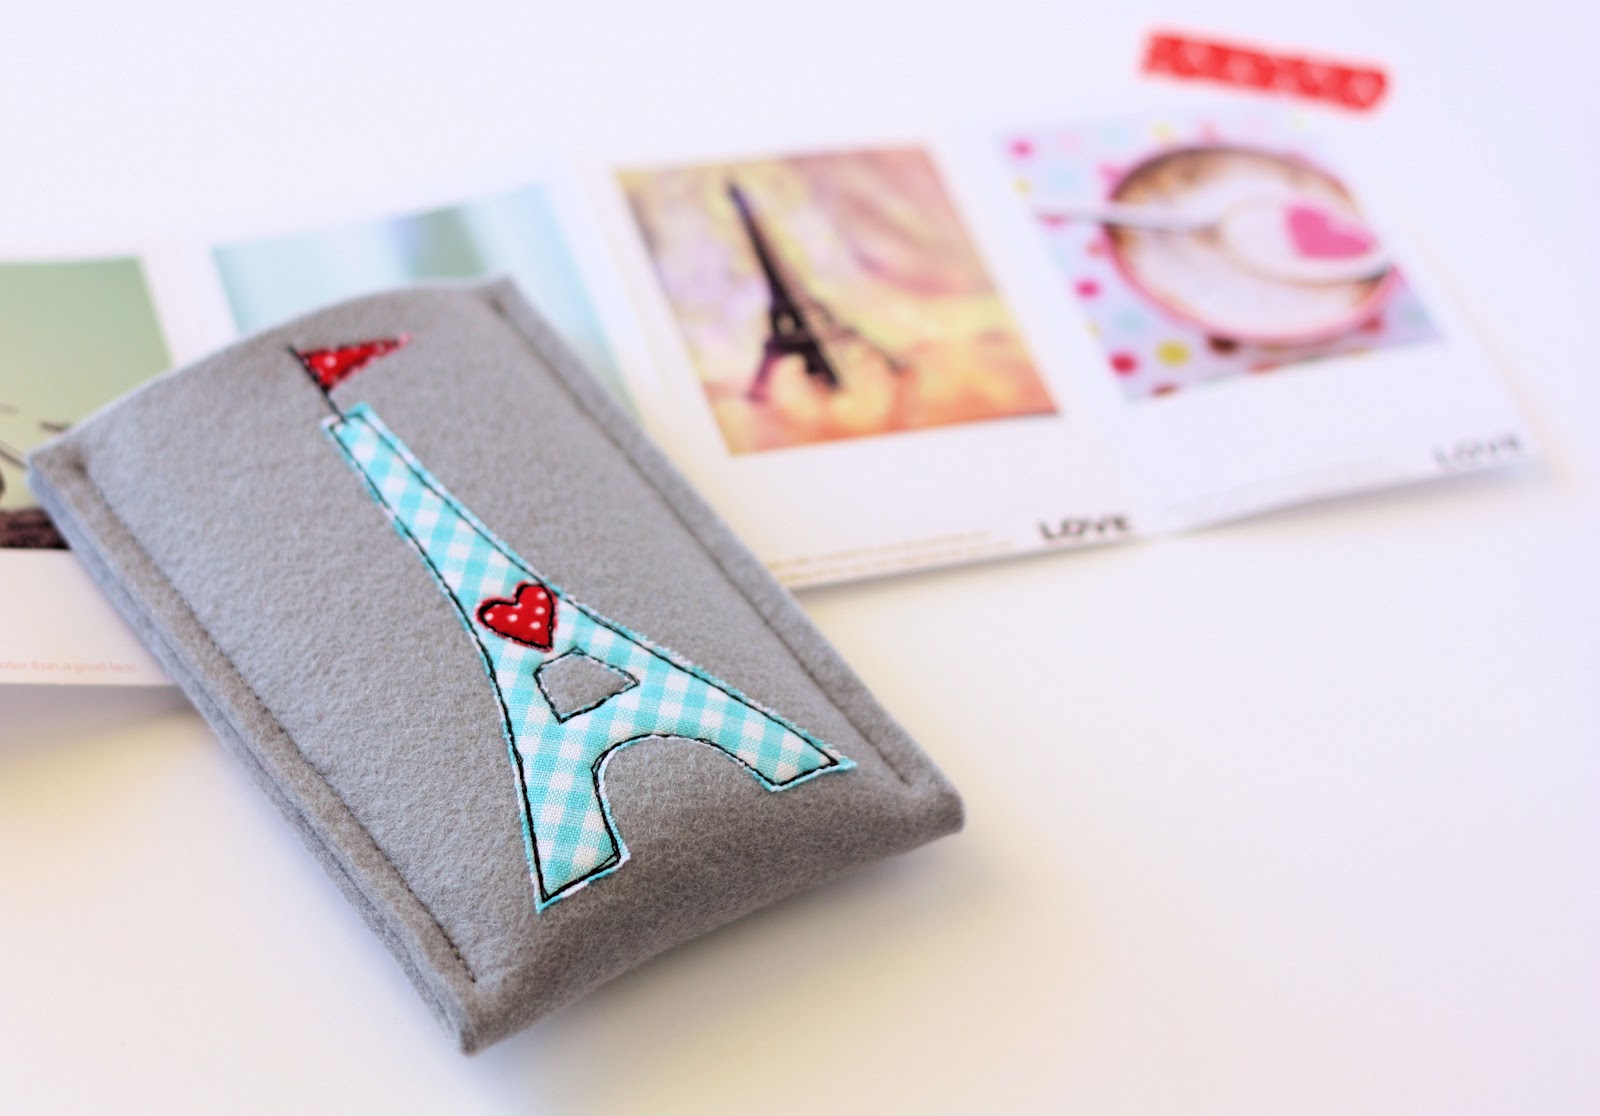
My smartphone has had a makeover with a new Parisian inspired cover. I love using thick industrial felt for phone covers – they protect the phone whilst in your handbag, and they are quick to construct so you can make up a batch of them as gifts for your technology loving friends!

If you would like to make one, here is the “How To”. The cover is sized to fit a Samsung Galaxy S or iPhone 4 (you can easily alter the dimensions of the felt to fit your model of phone). The cover should be a snug fit so that it doesn’t fall out of the cover.

Materials:

  • grey 1/8″ thick industrial felt: – 3 1/2 ” x 10 1/4″  (9 x 26 cm)
  • blue gingham fabric – 5 ” x 5 ” (12 x 12 cm)
  • red polka dot fabric – 2 ” x 2″  (5 x 5 cm)
  • appliqué film such as steam a seam or vliesofix
  • black and grey thread
Method:
  • On the middle of one of the short ends of felt, trace a semi circle (I used a 1 ” diameter cotton reel as a template), and cut out. 
  • Trace the appliqué templates onto the paper side of the appliqué film, and cut out, leaving a 1/4″ allowance. 
  • Iron the Eiffel tower onto the reverse side of the blue gingham. Iron the heart and flag onto the red polka dot fabric (as per manufacturer’s instructions). Cut out appliqué shapes.
  • Position the Eiffel Tower appliqué shapes on the top half of the piece of felt. Refer to photograph for placement. Press in place following manufacturer’s instructions using iron on wool setting.

  • Using black thread, stitch around the perimeter of the shapes using a scant seam allowance. Sew around each shape three times. Try not to stitch around the shape in exactly the same place so as to give a sketchy appearance. Tie off loose threads.

  • Fold the phone cover in half with the wrong sides facing. Secure the sides with bull dog clips to hold the felt together. Stitch up each side, starting and finishing 1/4″ from top and bottom fold. Over sew ends, and tie off loose threads.

You can find the appliqué templates here:
Appliqué Templates

Edit: You can find industrial felt by sarching for “industrial felt” or “thick wool felt” on Etsy.

You can check out some of my previous smartphone covers:

Felt Smartphone Covers

Crochet Smart Phone Cover

If you would like to subscribe to our newsletter (which is published every 3-4 weeks), you can do so here.

                                                    Subscribe to our newsletter 

Filed Under: Sewing Tutorials Tagged With: felt, Paris

« Crafts for All Occasions
Lucky Charm Quilt »

Comments

  1. Simone de Klerk says

    March 11, 2012 at 2:37 am

    This is so cute! I have to make it. Thank you for sharing such loveliness.

    Reply
  2. El mundo con fieltro... sabe mejor says

    March 11, 2012 at 2:54 am

    I love it!!! This is awesone!!!

    Reply
  3. notyet100 says

    March 11, 2012 at 3:21 am

    Cute 🙂

    Reply
  4. silvia says

    March 11, 2012 at 3:40 am

    Thanks for the tutorial, the project is very nice!
    Silvia

    Reply
  5. shez says

    March 11, 2012 at 3:55 am

    very cute Lisa.xx

    Reply
  6. Abracadacraft says

    March 11, 2012 at 3:59 am

    So cute ! Thank you for taking the time to share the tutorial.

    Reply
  7. Charis says

    March 11, 2012 at 4:30 am

    So nice!!

    Reply
  8. Terriaw says

    March 11, 2012 at 8:53 am

    Cute project, especially with the Eiffel Tower accent. I bet this is quite soft and cushy, good protection for your phone.

    Reply
  9. americanfeltandcraft says

    March 11, 2012 at 11:49 am

    Crazy Cute!

    Reply
  10. Janine says

    March 11, 2012 at 2:03 pm

    great tutorial … where do you get industrial felt from?

    Reply
    • Gem Bentick says

      March 15, 2012 at 5:04 am

      Was just going to ask the same thing 🙂

      Reply
  11. Jill says

    March 11, 2012 at 4:05 pm

    Beautiful Lisa!! Love the Eiffel Tower one!

    Thanks for linking to a Round Tuit!
    Hope you have a fabulous week!
    Jill @ Creating my way to Success
    http://www.jembellish.blogspot.com/

    Reply
  12. Lillabilly says

    March 11, 2012 at 9:27 pm

    What a gorgeous and functional project! And thanks for providing the industrial felt link…that was my next question!

    Reply
  13. neslininatölyesi.blogspot.com says

    March 12, 2012 at 5:15 am

    thank you for sharing, so cutee, love all 🙂

    Reply
  14. Handmade in Israel says

    March 12, 2012 at 7:10 am

    This is sweet! I love that little Eiffel Tower! Now I just need a smart phone, lol!

    Reply
  15. Sarah says

    March 12, 2012 at 10:18 am

    Gorgeous! My tatty old sunglasses sleeve I use to protect my phone is hanging its head in shame. At least now I know what I’m doing this weekend, so thanks for the cute project! 🙂

    http://blackcatoriginals.wordpress.com/

    Reply
  16. Debbie @ OtRD says

    March 13, 2012 at 10:14 am

    Lovely!!

    Reply
  17. Amy says

    March 17, 2012 at 12:54 am

    So cute! I think I need to make myself one soon.

    Reply
  18. flo says

    March 28, 2012 at 7:58 am

    I don’t have a smartphone, but I do have an Ipod so i’m going to make one for my Ipod I think. Thank you for charing!

    flo

    Reply
  19. Lisette Harzing says

    April 12, 2012 at 12:36 am

    ABFAB!!!!!

    Reply
  20. chillin with Quillin says

    May 9, 2012 at 7:46 am

    very nice, love it!!!
    Paula

    Reply
  21. Pearly Queen says

    September 4, 2012 at 2:45 am

    Would love to make this but Scribd won’t let me download the template unless I become a Premium User!

    Reply
  22. Kreasi dari Bunda says

    October 28, 2012 at 8:41 pm

    that is so cute but unfortunately there is no flap to covering

    Reply
  23. Aletta says

    December 12, 2012 at 1:22 am

    I found your tutorial on Pinkchalkfabrics. Thanks for sharing it! That Eiffel tower is so cute 🙂

    Reply
  24. Jennifer Dawn Oliver Shelton says

    January 2, 2013 at 7:10 pm

    So cute! I’d love it if you stopped by my weekly link party and linked this post up. 🙂 http://thelifeofjenniferdawn.blogspot.com/2013/01/a-little-bird-told-me-link-party-23.html

    Reply
  25. K Coake says

    January 3, 2013 at 8:26 am

    So cute! My daughter would love this (if she had a phone).
    KC

    Reply
  26. trapos a voar says

    January 4, 2013 at 6:08 pm

    Just what i was looking for, for my new smart ” toy”! I’m going to try it tomorrow! Thank you for sharing.

    Reply
  27. anji says

    November 11, 2016 at 2:45 pm

    nice post so cute

    Reply

Leave a Reply Cancel reply

Your email address will not be published. Required fields are marked *

  • Email
  • Facebook
  • Instagram
  • Pinterest
  • Threads
  • TikTok
SUBSCRIBE TO NEWSLETTER
×

Categories

Archives

PURCHASE PDF PATTERNS

We offer over 100 affordable PDF sewing patterns available for download from our store website or Etsy store. Each pattern includes detailed instructions, numerous photos, and templates.

WEB STORE ETSY STORE

Instagram

A lot can change in 10 years ❤️ It’s been fun look A lot can change in 10 years ❤️ It’s been fun looking back at where I was in 2016 and how far life has come since then. Swipe for a little trip down memory lane.Back in 2016, my priorities were firmly centred around family. I was working full‑time, sewing in the guest room, sharing tutorials on my blog, and slowly dipping my toes into selling a handful of patterns on Etsy. It was a busy, full season — and creativity was something I fitted in around everything else.  Fast forward to 2026… I’m now retired and living the creative life I once dreamed of. My kids have grown up and are living in their own homes nearby. My husband and I are free to travel, explore, and enjoy this stage of life. And I get to spend my days designing, sewing, and connecting with this beautiful community.Life looks different now — in the best possible way.Were you following me back then, or what has changed for you over the past 10 years? I’d love to hear your story too.Tagging the lovely makers of my quilt: @arabesquescissors @ministryoffabric @belloquacity @alittlepatchwork @sameliasmum coleandtaffy @quiltymamaof4 @shequiltsalot @downgrapevinelane @lizzierosesews @lovethatfabric @sew_mimi.k #2026isthenew2016 #10yeartransformation #sewingjourney #sewingcommunity #aspoonfulofsugardesigns
Fall in love with sewing all over again ❤️I’ve Fall in love with sewing all over again ❤️I’ve rounded up 10 heart‑themed makes — from quick gifts to charming quilt blocks — perfect for weekend stitching or using up your favourite scraps. Whether you’re sewing for Valentine’s Day, birthdays, or just because, there’s something sweet for every maker.Comment HEART and I’ll send you a link to my Heart Pattern Collection.#sewingproject #heartsewing #quiltblock #scrapsewing #easytosew
Raw edge appliqué doesn’t have to feel fiddly or i Raw edge appliqué doesn’t have to feel fiddly or intimidating. With a few simple techniques, you can create neat, crisp shapes — even tiny details like penguin beaks and hearts.I’ve put together My Top 5 Secrets for Raw Edge Appliqué to help you feel confident, whether you’re brand new to appliqué or looking to refine your finish. Save this for your next sewing session.If you’d love a quick, beginner‑friendly project to practise these tips, my Penguin Love Mugrug is the sweetest Valentine’s make — scrap‑friendly, gift‑ready, and such fun to sew.Comment PENGUIN and I’ll send you the link to the pattern. Available now in our Pattern Store and Etsy shop.  #rawedgeapplique #appliquetips #sewingtipsandtricks #mugrugpattern #penguinlove
If you’ve ever wanted to add eyelets or grommets t If you’ve ever wanted to add eyelets or grommets to your sewing projects, here’s a quick look at how I install them using my DK93 snap press. It’s the same tool I use for snaps — and it makes installing eyelets beautifully quick and consistent.For this Ribbon Pouch, I used the Liberty Gifts from the Garden collection (printed on Lasenby cotton and released in January 2026). The colours and motifs pair so well with the little ribbon tie detail.Here’s how to install the eyelets:Punch out the four holes using a hole‑cutting die.Place the eyelet into the hole.Press it into place using the snap press.That’s it — easy peasy, and it gives the pouch such an elevated, professional finish. I love how clean and sturdy the result is.Fabric is Gifts from the Garden by Liberty - kindly provided by @regent_street_fabrics — thank you!If you’d like the Ribbon Pouch pattern (it comes in 3 sizes), comment RIBBON and I’ll send the link straight to you.Ribbon Pouch Sewing Pattern: available in our Pattern Store and Etsy shop ( links in profile).#SewingInspiration #SewingProjects #Eyelets #Grommets #SnapPress
The Twirling Treasures Hot Pad & Placemat Set show The Twirling Treasures Hot Pad & Placemat Set showcases one of my favourite FPP designs — a stunning kaleidoscope‑style block that always turns out beautifully. Kaleidoscope blocks are some of my most popular FPP patterns, and this set is such a fun way to use them.  This set includes six sizes, making it incredibly versatile: use them as hot pads, trivets, placemats, or simply as a way to add a pop of colour to your kitchen.For these samples, I went with a monochromatic scrap‑busting approach, pairing fabrics from the same colour family with a low‑volume background. The black‑and‑white striped binding adds such a crisp, modern finish. It’s a wonderful project for building your FPP confidence — and a fantastic way to use up those treasured scraps.The Twirling Treasures Hot Pad set is our Pattern of the Week. It is currently 25% off this week in our Pattern Store and Etsy Shop.If you’d like to sew your own set, comment TWIRL and I’ll send the pattern link straight to you.Happy sewing! Lisa 🌸#FoundationPaperPiecing #Quilting #HotPads #ScrapBuster #KitchenSewing
The Ribbon Pouch is one of those little makes that The Ribbon Pouch is one of those little makes that feels special from the very first stitch. I made this sweet trio in the Liberty Gifts from the Garden collection, and the colours couldn’t be more perfect for gifting, organising, or adding a little beauty to your everyday.Each pouch features: 🌼 A simple ribbon tie closure 🎀 Optional sew‑in tags or DIY felt/fabric labels 🧵 Three practical sizes — perfect for notions, treats, or small gifts ✨ A quick, beginner‑friendly sewIf you’d like to make your own, comment RIBBON and I’ll send the pattern link straight to your inbox. Save this for your next weekend project — it’s such a satisfying little sew. Pattern is available in our Pattern Store.Thanks to @regent_street_fabric for the Gifts from the Garden fabric collection. (released Jan 2026)#SewingInspiration #SewingProjects #LibertyFabric #SewingPatterns #BeginnerSewing
Follow on Instagram

Featured Pattern

Travel Sewing Kit Pattern

Featured Tutorial

Retro Drawstring Bag

Featured Recipe

Lemon Pound Cake

Connect

  • Email
  • Facebook
  • Instagram
  • Pinterest
  • Threads
  • TikTok
SUBSCRIBE TO NEWSLETTER
×

Popular Posts

  • Charm Square Fabric Tray
  • Merry Little Christmas Sewing Projects
  • {Back to School} Tissue Cover
  • Raw Edge Applique Tips
  • Sewing Gifts 101: Easy and Affordable Ideas for Your Crafty Friends
  • Fabric Gift Pouch
  • Free Holiday Sewing Tutorials

Copyright © 2026 Lisa. K. Cox - A Spoonful of Sugar