A Spoonful of Sugar

Make. Bake. Create.

Menu
  • Home
  • About
    • About Us
    • Press
    • FAQ
    • Disclosure Policy
    • Contact Us
  • Crafts
    • Crochet
    • DIY
    • Embroidery/Cross stitch
    • Gift Wrapping
    • Knitting
    • Miscellaneous
    • Paper Crafts
  • Holidays
    • New Year’s
    • Australia Day
    • Back to School
    • Valentines Day
    • Easter
    • ANZAC Day
    • Mother’s Day
    • Father’s Day
    • Halloween
    • Christmas
  • Recipes
    • Appetizers
    • Bars & Slices
    • Bread & Pastries
    • Cakes
    • Cookies
    • Confectionery
    • Cupcakes & Muffins
    • Desserts
    • Drinks
    • Ice Cream
    • Jams/Preserves
    • Main Meals
  • Sewing
    • Sewing Tutorials
    • Quilting
    • Sewing & Quilting Patterns
  • Family
    • Back to School
    • Family Fun
    • Our Home
    • Parenting
    • Travel
  • Shop
    • Pattern Store
    • Etsy Store

Quick Gift Bags

July 6, 2009 By Spoonful of Sugar - 67 Comments

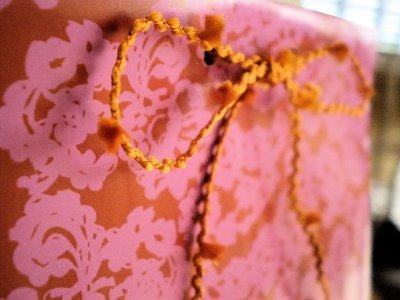
Sarah and I are always baking and love to give our home baked goodies to friends. Here is a quick method for a  gift bag – perfect for holding a stack of cookies or muffins. (We usually place the cookies in a clear cellophane bag first).

Ikea stock a range of double sided gift wrap which is perfect for this project! If you are after a more durable gift bag – scrap booking paper would make a more professional result.

Find a box that is the size you want for the gift bag. Tissue boxes work well. Cut the paper as if you were wrapping the box. Wrap the paper around the circumference of the box and secure with double sided tape. Ensure you get a crisp edge on each of the four sides of the box. 

Fold down the paper at the bottom of the box and secure with tape. Remove the tissue box. 

With the front of the gift bag facing you, push the sides inwards and fold.

Fold down the top opening of the bag and punch two holes in the top of the bag. When the gift bag has been filled, thread some ribbon through the holes, and tie to secure.

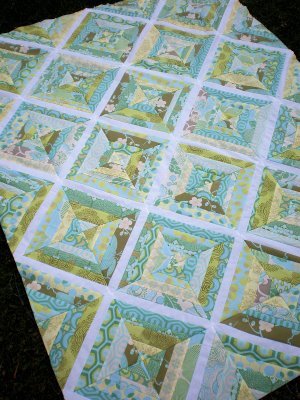
I have finished sewing my quilt top together and now need to add the borders. I am loving how it is shaping up!

We are coming up to 150 posts this month – so stay tuned – we have an exciting giveaway planned!

Posted by Lisa

Filed Under: Uncategorized

« Snippets
Pretty Little Presents »

Comments

  1. Kelly says

    July 7, 2009 at 12:19 am

    Your Quilt top looks amazing, I love the colours!

    Reply
  2. Cassie @ You Go Girl says

    July 7, 2009 at 3:35 pm

    Very clever bags. And the quilt top is smashing, Lisa.

    Reply
  3. acornmoon says

    July 7, 2009 at 1:02 am

    That is a really great idea!

    I love your quilt, it is very neat with all the corners matching up, something I cannot do at all.

    Reply
  4. Jenni says

    July 7, 2009 at 1:12 am

    Fabulous gift bag idea!

    Love the quilt too! Haven’t tried quilting(yet)- not sure I have the patience!

    Reply
  5. Gina says

    July 7, 2009 at 1:17 am

    The giftbags are a great idea especially with the double sided paper. Your quilt top looks gorgeous.

    Reply
  6. suzitee says

    July 7, 2009 at 1:24 am

    Thanks for the instructions Lisa and Sarah…and I will be your friend (wink). Your quilt top is looking fabulous! Those Amy Butler fabrics are just stunning. Hope you’re enjoying your holidays so far 🙂

    Reply
  7. driftwood says

    July 7, 2009 at 1:25 am

    love the bags! we might be going to ikea tomorrow, I hope it has some of that gorgeous paper xox

    Reply
  8. Cathy says

    July 7, 2009 at 1:30 am

    thanks for idea about the bags – I am always looking for something to put cookies in.

    Your quilt top looks amazing>

    Reply
  9. Melissa Antolovic says

    July 7, 2009 at 1:34 am

    the quilt top looks great!

    Reply
  10. Shiree says

    July 7, 2009 at 1:55 am

    hey thanks heaps for the tutorial,that is a great idea, and your quilt top is so fabulous, I really love your colour choices, so cool and refreshing

    Reply
  11. Kleiner Berliner says

    July 7, 2009 at 2:06 am

    Oh Lisa, what a beautiful quilt!!! I am impressed. Greetings from Germany sends Julie

    Reply
  12. Jessica says

    July 7, 2009 at 3:49 am

    That gift bag idea is wonderful…I have some gifts to give next weekend and I’ll surely be using it! I love the fabrics in your quilt top too…it looks great!!!!

    Reply
  13. nima says

    July 7, 2009 at 3:51 am

    wow…great idea

    your quilt top looks fabulous

    Reply
  14. Tracy says

    July 7, 2009 at 4:16 am

    The quilt top is GORGEOUS…I love those colors and all the white–so fresh and crisp! :o) That gift bag is s super idea. I love Ikea gift wrapping papers… And they are recyclable too! Happy Days ((HUGS))

    Reply
  15. Angel.Pearls says

    July 7, 2009 at 4:17 am

    Cute giftbag!//Eva

    Reply
  16. Rumi says

    July 7, 2009 at 4:40 am

    Wonderful quilt!

    Contact me–you won my bag giveaway!

    Reply
  17. Cardygirl says

    July 7, 2009 at 4:46 am

    Love the bags…quick & smart looking. Quilt looks great too.

    Reply
  18. Terriaw says

    July 7, 2009 at 5:18 am

    What a great project for presenting lovely gifts! I also really love your quilt – gorgeous fabrics!

    Reply
  19. QuiltedSimple says

    July 7, 2009 at 5:28 am

    What a great idea!!! Thank you!!! And I love your quilt – the colors are so pretty.
    Kris

    Reply
  20. Tania says

    July 7, 2009 at 5:31 am

    I can’t believe you have given me a sound excuse to visit Ikea – it’s DANGEROUS in there!

    Reply
  21. em's scrapbag says

    July 7, 2009 at 5:37 am

    I love how calm and relaxing your quilt is. Good job!

    Reply
  22. Aimee says

    July 7, 2009 at 5:43 am

    Great idea for the gift bag – thanks for sharing! I love the way your quilt turned out!

    Reply
  23. Sew Useful Designs says

    July 7, 2009 at 6:16 am

    Wow – I really love the way your eye draws into the quilt – great dimensions!!! Not sure if that is the right word actually, ‘depth of field’ might be better!

    Thank you for the gift bag idea – that’s a great one, and good to know that you can buy double-sided wrap in Ikea, I’m guessing that is cheaper than scrapbooking paper.

    Hugs! Vikki x

    Reply
  24. Ale says

    July 7, 2009 at 7:44 am

    ¡¡¡great idea!!1…quick and easy.. ;D lovely quilt…

    Reply
  25. imquilternity says

    July 7, 2009 at 8:30 am

    Very clever idea…I love it. Your quilt is just beautiful too.

    Reply
  26. Thimbleanna says

    July 7, 2009 at 9:12 am

    What a great idea. Your gift bag is really cute. And your quilt is beautiful — I love the pretty muted colors!

    Reply
  27. Happy Cottage Quilter says

    July 7, 2009 at 9:26 am

    My daughter and I just went to the new IKEA store in Florida on Saturday. What a place! Although my dd said the one in Chicago is bigger ! Great gift bag idea. Thanks for sharing.

    Reply
  28. sewtakeahike says

    July 7, 2009 at 10:57 am

    Your bag looks so professional Lisa! Thanks for walking us through how you made it! I know I told you this already, but I’m loving the colors of your quilt! And it looks totally fabulous all together, very nice work!

    Reply
  29. Fabric Mom says

    July 7, 2009 at 11:35 am

    Gift bag is cute and I love the quilt.

    Reply
  30. sewkalico says

    July 7, 2009 at 11:51 am

    I’m loving your quilt top too! fantastic job and the gift bag is pretty cool too!

    Reply
  31. Henrysmomsmusings says

    July 7, 2009 at 12:26 pm

    I love your quilt, the colors are just gorgeous!
    Those gift bags are such a clever idea. I have rolls and rolls of gift wrap (meant for making envelopes) and just have to try the bags.
    Thank you!

    Reply
  32. Alison Boon says

    July 7, 2009 at 2:06 pm

    I am loving the colours you’ve used for the quilt, they remind me of the ocean.

    Reply
  33. karin says

    July 8, 2009 at 5:08 am

    That quilt top looks really beautiful! And those gift bags too ofcourse, very pretty and a smart idea. Never thought about how to make those, but now I read this I think I will try it too. Thanks!

    Reply
  34. parTea lady says

    July 7, 2009 at 3:42 pm

    That is a great way to make gift bags. Your quilt is beautiful – wonderful colors.

    Reply
  35. ~ Kim ~ says

    July 7, 2009 at 4:49 pm

    I’m sooo loving the quilt top. It’s just devine. Can’t wait to see the finished product.

    Reply
  36. ~ Kim ~ says

    July 7, 2009 at 4:49 pm

    I’m sooo loving the quilt top. It’s just devine. Can’t wait to see the finished product.

    Reply
  37. ~ Kim ~ says

    July 7, 2009 at 4:49 pm

    I’m sooo loving the quilt top. It’s just devine. Can’t wait to see the finished product.

    Reply
  38. ~ Kim ~ says

    July 7, 2009 at 4:49 pm

    I’m sooo loving the quilt top. It’s just devine. Can’t wait to see the finished product.

    Reply
  39. ~ Kim ~ says

    July 7, 2009 at 4:49 pm

    I’m sooo loving the quilt top. It’s just devine. Can’t wait to see the finished product.

    Reply
  40. two hippos says

    July 8, 2009 at 8:21 am

    I love the quilt top and the paper gift bag is brilliant. Now to find some double sided tape..

    Reply
  41. Mary on Lake Pulaski says

    July 7, 2009 at 5:30 pm

    Such a beautiful quilt – can’t wait to see it finished!! Border(s)??

    Reply
  42. Janellybelly says

    July 7, 2009 at 6:10 pm

    Your gift bags give Smiggle a run for their money, they’re great! The quilt top looks fantastic too. Hooray for School holidays 🙂
    Janelle xx

    Reply
  43. beewitchinstitchin says

    July 7, 2009 at 6:35 pm

    The quilt top is beautiful..I love it! Thanks for sharing…Kathy

    Reply
  44. Lulabell says

    July 7, 2009 at 8:07 pm

    Have to save that bag making tut for all those times I just dont want to wrap something the standard way!
    Your quilt looks fab! The white strips really make it

    Reply
  45. melissa s. says

    July 7, 2009 at 10:08 pm

    what a great idea. And love the quilt!!

    Reply
  46. Sonnja says

    July 7, 2009 at 10:48 pm

    Fabulous gift bag idea!
    Kind regards, Beertje Zonn

    Reply
  47. Journeying Five says

    July 7, 2009 at 11:24 pm

    that gift bag really is easy! awesome idea. liking the quilt, looks like some amy butler in ther!

    Reply
  48. Simone de Klerk says

    July 8, 2009 at 1:14 am

    What a clever idea, to make those bags! And your quilt is wonderful! The colors are so ‘good feeling’!

    Reply
  49. texmorg says

    July 8, 2009 at 1:56 am

    Lisa your quilt looks amazing and thanks for the great gift bag tutorial I will never be stuck again. I really loved it.
    Linda
    PS you are so clever.

    Reply
  50. REread says

    July 8, 2009 at 4:23 am

    you won the penguin brooch on my blog … my email address is mantahay@yahoo.com.au send me a postal address and I will pop him in the mail for you 🙂

    Reply
  51. upstateLisa says

    July 8, 2009 at 4:59 am

    I love your string quilt!

    Reply
  52. Christy says

    July 8, 2009 at 5:39 am

    cute and practical idea!

    Reply
  53. LizzieJane says

    July 8, 2009 at 8:15 am

    What a great idea for gift bags. I always have such pretty wrapping paper on hand and never think to make bags…until now!
    Your quilt is fabulous, it sure didn’t take you long to make it.
    x

    Reply
  54. *AMY* says

    July 8, 2009 at 12:41 pm

    I just found your site the other day and I love it. Thank you for this great giftbag idea. Can’t wait to make one.

    Reply
  55. MichelleB says

    July 8, 2009 at 2:18 pm

    What a wonderful bag idea! I always needs bags – and never have them. Thanks!

    Reply
  56. Leanne says

    July 8, 2009 at 5:13 pm

    You have so many brilliant ideas.

    Reply
  57. Sandi says

    July 8, 2009 at 5:50 pm

    Great idea for a gift bag, and with easy to follow instructions! Gotta love Ikea!
    The quilt top is fabulous!

    Reply
  58. Dorrie says

    July 8, 2009 at 8:35 pm

    We have sister quilts. . .my string looks very much like yours, with the exception of fabric lines, mine is mostly Daisy Chain! So nice!

    Reply
  59. Maree says

    July 8, 2009 at 9:00 pm

    Thanks so much for the tip on how to make the Gift Bags…Your Quilt is looking Lovely…
    cheers

    Reply
  60. Anonymous says

    July 8, 2009 at 9:22 pm

    Love all of your ideas. I’ve been trying to open your tutorial for the cute wallet and it won’t open. The other tutorials come up and I would love to get the wallet one. Thanks a lot

    Reply
  61. handmaiden says

    July 9, 2009 at 12:31 am

    Lisa, you must have shares in Ikea, always great ideas from u and I love that kaleidoscope quilt top that fabric choices are fab

    Reply
  62. Renee says

    July 9, 2009 at 6:45 am

    I am not kidding, I’m like ‘What the heck, they made the bag?’ You guys are crazy and crazy talented.

    The quilt is magnificent.

    What a talented mother and daughter team.

    Love Renee xoxo

    Reply
  63. raining sheep says

    July 9, 2009 at 5:01 pm

    What a great tutorial – that is one I for certain will use. That quilt is looking amazing. Those colors just blend beautifully.

    Reply
  64. Alison says

    July 9, 2009 at 5:29 pm

    That’s just beautiful!

    Reply
  65. JG says

    July 10, 2009 at 2:49 pm

    Knowing how to make the gift bag will be so handy for goodies! Thank you.

    Your quilt is beautiful.

    Reply
  66. Jodie says

    July 11, 2009 at 7:49 am

    LOVE the colors and pattern of that quilt! Can’t wait to see the final product.

    Reply
  67. Cascade Lily says

    July 18, 2009 at 1:22 am

    Oh wow the quilt is looking fantastic! Well done!

    Reply

Leave a Reply Cancel reply

Your email address will not be published. Required fields are marked *

  • Email
  • Facebook
  • Instagram
  • Pinterest
  • Threads
  • TikTok
SUBSCRIBE TO NEWSLETTER
×

Categories

Archives

PURCHASE PDF PATTERNS

We offer over 100 affordable PDF sewing patterns available for download from our store website or Etsy store. Each pattern includes detailed instructions, numerous photos, and templates.

WEB STORE ETSY STORE

Instagram

A lot can change in 10 years ❤️ It’s been fun look A lot can change in 10 years ❤️ It’s been fun looking back at where I was in 2016 and how far life has come since then. Swipe for a little trip down memory lane.Back in 2016, my priorities were firmly centred around family. I was working full‑time, sewing in the guest room, sharing tutorials on my blog, and slowly dipping my toes into selling a handful of patterns on Etsy. It was a busy, full season — and creativity was something I fitted in around everything else.  Fast forward to 2026… I’m now retired and living the creative life I once dreamed of. My kids have grown up and are living in their own homes nearby. My husband and I are free to travel, explore, and enjoy this stage of life. And I get to spend my days designing, sewing, and connecting with this beautiful community.Life looks different now — in the best possible way.Were you following me back then, or what has changed for you over the past 10 years? I’d love to hear your story too.Tagging the lovely makers of my quilt: @arabesquescissors @ministryoffabric @belloquacity @alittlepatchwork @sameliasmum coleandtaffy @quiltymamaof4 @shequiltsalot @downgrapevinelane @lizzierosesews @lovethatfabric @sew_mimi.k #2026isthenew2016 #10yeartransformation #sewingjourney #sewingcommunity #aspoonfulofsugardesigns
Fall in love with sewing all over again ❤️I’ve Fall in love with sewing all over again ❤️I’ve rounded up 10 heart‑themed makes — from quick gifts to charming quilt blocks — perfect for weekend stitching or using up your favourite scraps. Whether you’re sewing for Valentine’s Day, birthdays, or just because, there’s something sweet for every maker.Comment HEART and I’ll send you a link to my Heart Pattern Collection.#sewingproject #heartsewing #quiltblock #scrapsewing #easytosew
Raw edge appliqué doesn’t have to feel fiddly or i Raw edge appliqué doesn’t have to feel fiddly or intimidating. With a few simple techniques, you can create neat, crisp shapes — even tiny details like penguin beaks and hearts.I’ve put together My Top 5 Secrets for Raw Edge Appliqué to help you feel confident, whether you’re brand new to appliqué or looking to refine your finish. Save this for your next sewing session.If you’d love a quick, beginner‑friendly project to practise these tips, my Penguin Love Mugrug is the sweetest Valentine’s make — scrap‑friendly, gift‑ready, and such fun to sew.Comment PENGUIN and I’ll send you the link to the pattern. Available now in our Pattern Store and Etsy shop.  #rawedgeapplique #appliquetips #sewingtipsandtricks #mugrugpattern #penguinlove
If you’ve ever wanted to add eyelets or grommets t If you’ve ever wanted to add eyelets or grommets to your sewing projects, here’s a quick look at how I install them using my DK93 snap press. It’s the same tool I use for snaps — and it makes installing eyelets beautifully quick and consistent.For this Ribbon Pouch, I used the Liberty Gifts from the Garden collection (printed on Lasenby cotton and released in January 2026). The colours and motifs pair so well with the little ribbon tie detail.Here’s how to install the eyelets:Punch out the four holes using a hole‑cutting die.Place the eyelet into the hole.Press it into place using the snap press.That’s it — easy peasy, and it gives the pouch such an elevated, professional finish. I love how clean and sturdy the result is.Fabric is Gifts from the Garden by Liberty - kindly provided by @regent_street_fabrics — thank you!If you’d like the Ribbon Pouch pattern (it comes in 3 sizes), comment RIBBON and I’ll send the link straight to you.Ribbon Pouch Sewing Pattern: available in our Pattern Store and Etsy shop ( links in profile).#SewingInspiration #SewingProjects #Eyelets #Grommets #SnapPress
The Twirling Treasures Hot Pad & Placemat Set show The Twirling Treasures Hot Pad & Placemat Set showcases one of my favourite FPP designs — a stunning kaleidoscope‑style block that always turns out beautifully. Kaleidoscope blocks are some of my most popular FPP patterns, and this set is such a fun way to use them.  This set includes six sizes, making it incredibly versatile: use them as hot pads, trivets, placemats, or simply as a way to add a pop of colour to your kitchen.For these samples, I went with a monochromatic scrap‑busting approach, pairing fabrics from the same colour family with a low‑volume background. The black‑and‑white striped binding adds such a crisp, modern finish. It’s a wonderful project for building your FPP confidence — and a fantastic way to use up those treasured scraps.The Twirling Treasures Hot Pad set is our Pattern of the Week. It is currently 25% off this week in our Pattern Store and Etsy Shop.If you’d like to sew your own set, comment TWIRL and I’ll send the pattern link straight to you.Happy sewing! Lisa 🌸#FoundationPaperPiecing #Quilting #HotPads #ScrapBuster #KitchenSewing
The Ribbon Pouch is one of those little makes that The Ribbon Pouch is one of those little makes that feels special from the very first stitch. I made this sweet trio in the Liberty Gifts from the Garden collection, and the colours couldn’t be more perfect for gifting, organising, or adding a little beauty to your everyday.Each pouch features: 🌼 A simple ribbon tie closure 🎀 Optional sew‑in tags or DIY felt/fabric labels 🧵 Three practical sizes — perfect for notions, treats, or small gifts ✨ A quick, beginner‑friendly sewIf you’d like to make your own, comment RIBBON and I’ll send the pattern link straight to your inbox. Save this for your next weekend project — it’s such a satisfying little sew. Pattern is available in our Pattern Store.Thanks to @regent_street_fabric for the Gifts from the Garden fabric collection. (released Jan 2026)#SewingInspiration #SewingProjects #LibertyFabric #SewingPatterns #BeginnerSewing
Follow on Instagram

Featured Pattern

Travel Sewing Kit Pattern

Featured Tutorial

Retro Drawstring Bag

Featured Recipe

Lemon Pound Cake

Connect

  • Email
  • Facebook
  • Instagram
  • Pinterest
  • Threads
  • TikTok
SUBSCRIBE TO NEWSLETTER
×

Popular Posts

  • Charm Square Fabric Tray
  • Merry Little Christmas Sewing Projects
  • {Back to School} Tissue Cover
  • Raw Edge Applique Tips
  • Sewing Gifts 101: Easy and Affordable Ideas for Your Crafty Friends
  • Fabric Gift Pouch
  • Hexagon Fabric Tray

Copyright © 2026 Lisa. K. Cox - A Spoonful of Sugar