A Spoonful of Sugar

Make. Bake. Create.

Menu
  • Home
  • About
    • About Us
    • Press
    • FAQ
    • Disclosure Policy
    • Contact Us
  • Crafts
    • Crochet
    • DIY
    • Embroidery/Cross stitch
    • Gift Wrapping
    • Knitting
    • Miscellaneous
    • Paper Crafts
  • Holidays
    • New Year’s
    • Australia Day
    • Back to School
    • Valentines Day
    • Easter
    • ANZAC Day
    • Mother’s Day
    • Father’s Day
    • Halloween
    • Christmas
  • Recipes
    • Appetizers
    • Bars & Slices
    • Bread & Pastries
    • Cakes
    • Cookies
    • Confectionery
    • Cupcakes & Muffins
    • Desserts
    • Drinks
    • Ice Cream
    • Jams/Preserves
    • Main Meals
  • Sewing
    • Sewing Tutorials
    • Quilting
    • Sewing & Quilting Patterns
  • Family
    • Back to School
    • Family Fun
    • Our Home
    • Parenting
    • Travel
  • Shop
    • Pattern Store
    • Etsy Store

Notions Jar

November 5, 2008 By Spoonful of Sugar - 46 Comments


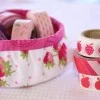
I collect jars to use for all manner of things – homemade jams, preserves, sauces; to store buttons and other notions. Jars come in such a great range of sizes and shapes – perfect for so many projects. Here is a quick project to “pretty” up a jar.
Materials:

• glass jar with label removed
• strip of fabric 1 3/4 inch wide and slightly longer than circumference of jar
• mod podge
• co-ordinating ribbon
• fabric glue
• masking tape (painters tape)

Cut the fabric strip to size and press with a hot iron. Use spray on starch to make the fabric stiff. Position a strip of masking tape just below where you want the fabric strip to be positioned. This is to prevent getting glue/mod podge on the jar. Position another strip just above where you want the fabric to sit. Apply mod podge to the jar (where the fabric will sit) with a foam brush. Position the fabric on the mod podge and smooth out, and allow to dry. When it is dry, add a layer of mod podge to the top of the fabric to seal and protect the fabric.
When this has dried, remove the masking tape. Using fabric glue, glue a strip of narrow ribbon around the top and bottom of the fabric panel if desired. Add a circle of fabric to the jar lid using mod podge.
Next up I am going to make a set of these for Sarah’s room to match her new bed linen. She can use them to store desk supplies or pencils.
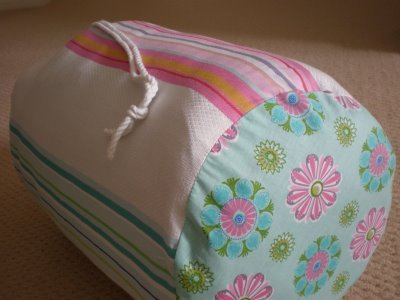
I have made up a sleeping bag cover for Sarah. Not that practical for camping but will look cute on her next sleep over!!
Thanks for all the great suggestions for “encyclopedia craft” and repurposing old books. I am currently compiling all the ideas and will post a summary soon.

Thanks also to Cassie from You Go Girl for tagging us recently. It was much appreciated! Cassie makes the best bags and children’s clothing – such fresh and funky designs!

Posted by Lisa

Filed Under: Uncategorized

« Bedroom Makeover and More
More Paper Crafts and Baking »

Comments

  1. randi says

    November 5, 2008 at 8:43 am

    What a cute idea for the jar! And that bag is adorable!

    Reply
  2. Hannah says

    November 5, 2008 at 10:07 am

    I love the jar, sooo cute. I will be saving my jars from now on and decorating them! The sleeping bag cover is adorable! I love it.

    Reply
  3. LollyChops says

    November 5, 2008 at 11:18 am

    Thanks for the great jar covering idea! I love little jars too.. and that bag is really awesome! I could see using something like that to tote around crochet and knitting supplies!

    Reply
  4. Dancin' Puffin says

    November 5, 2008 at 3:34 pm

    Sarah will be the envy of all her friends with a sleeping bag cover like that! I love jars too… though I have to regularly rescue them from our recycling as hubby keeps throwing them out 🙂

    Reply
  5. The Faerie Queen says

    November 5, 2008 at 4:08 pm

    That is a great idea for the jars, I keep all my suff in little jars, now I shall have to cover them all. Never heard of modge podge, I assume PVA glue is the same.

    Reply
  6. Tine says

    November 5, 2008 at 1:16 am

    The jar looks really wonderful! I collect them too, and this will greatly improve the look of my shelves! LOL!

    Reply
  7. princess pudge says

    November 5, 2008 at 1:50 am

    i never thought to keep jars for this purpose, very very cool. love the sleeping bag cover, you are so so talented!

    Reply
  8. Anonymous says

    November 5, 2008 at 2:09 am

    not very handy for camping, but otherwise very,very nice.

    Reply
  9. Simone de Klerk says

    November 5, 2008 at 3:34 am

    Really like the jar idea. Think I might use it to put all my little things I tend to collect in, such as buttons, ribbons, beads etc. Thank you for sharing. Really like your sleeping bag cover. Good idea. It gives an old sleeping bag something new.

    Reply
  10. Jenny says

    November 5, 2008 at 4:33 am

    Thanks for sharing another useful and lovely idea:)

    Reply
  11. Tara says

    November 5, 2008 at 5:04 am

    Love your site. The bag is to cool. Thank you for another idea for jars. You deserve the tag from You go Girl.

    Reply
  12. jacquie says

    November 5, 2008 at 5:20 am

    another good idea. it’s fun to make storage look pretty!

    Reply
  13. Knit and Sew City Girl says

    November 5, 2008 at 5:41 am

    Hi! I keep all my buttons in jars, they are so handy.

    The sleeping bag cover looks great, the circular bottom is done so well.

    Mary

    Reply
  14. upstateLisa says

    November 5, 2008 at 5:44 am

    great idea! I use lots of jars too! I have to get some modge podge, you ladies seem to use it quite a bit!

    Reply
  15. Suzanne says

    November 5, 2008 at 5:45 am

    Oh I can just see Brooke loving that sleeping bag cover, what a great idea, sleeping bags never fit back in properly. Who cares if its not pratical it sure is pretty.
    I like your jar too.

    Reply
  16. Hoppo Bumpo says

    November 5, 2008 at 5:57 am

    The jar looks so pretty. Thank you for sharing how you did it.

    Now that I have read your blog for a while, I think I’m finally convinced that I need to buy some Mod Podge!!

    Reply
  17. Natasha says

    November 5, 2008 at 6:37 am

    Great jar – yet another good reason to go and find a jar of modge podge. Not sure I can find that here in Germany though. Is normal pva glue the same?

    Reply
  18. Mama de Saga says

    November 5, 2008 at 6:50 am

    I have collected some glass jars and I can’t wait to use your tutorial. They will look beautiful on my desk.

    Reply
  19. melissa s. says

    November 5, 2008 at 7:45 am

    what a great idea for displaying notions! may have to copy you 😉

    Reply
  20. méri says

    November 5, 2008 at 8:14 am

    I also use jars for all kind of things, but without that pretty decoration!
    Thanks for sharing, Lisa! Once more.

    Reply
  21. Katherine says

    November 5, 2008 at 9:11 am

    Pretty idea for jars! A whole shelf of this kind of goodness would be a treat to look at.

    Sarah will be the talk of her next sleepover with such a lovely sleeping bag cover! I bet you may get asked to make some for her friends….

    Reply
  22. Terriaw says

    November 5, 2008 at 11:36 am

    This is a great storage idea for notions! And great directions too. I have been into the drawstring bags lately, so I like the looks of that storage bag.

    Reply
  23. Catherine says

    November 5, 2008 at 11:51 am

    Great idea with the jars and I love the sleeping bag cover…pretty doesnt need to be practical!! Cathy

    Reply
  24. Philigry says

    November 5, 2008 at 12:04 pm

    i love that sleeping bag cover!

    Reply
  25. Christy says

    November 5, 2008 at 4:59 pm

    You are very clever! What a cute way to pretty up a jar!

    Reply
  26. MammaDucky says

    November 5, 2008 at 8:54 pm

    Found you through a comment left on Grace Violet. Your cupcake picture drew me in. I want that cupcake!
    Cute idea for the jar. I save all my jars..ya know, just in case I need to use them for things such as this!

    Reply
  27. our shabby cottage says

    November 5, 2008 at 11:00 pm

    You are unreal Lisa!!

    Reply
  28. Suzie says

    November 6, 2008 at 12:43 am

    I’ll look for Modge Podge, I hope I can find it here, the covered jars look so good! The sleeping bag cover is also great, and I think it is practical!

    Reply
  29. Kathryn says

    November 6, 2008 at 1:42 am

    Have only recently discovered your blog, and have added you to my favourites. It is the most inspirational blogg I have seen to date. You are my cup of tea.
    With Smiles
    Kathryn

    Reply
  30. Roseanne says

    November 6, 2008 at 4:08 am

    what a great idea with the jars.I have lot in my shed.The sleeping bag cover is great. It would allso be good for kids pyjamas.

    Reply
  31. stitchin' girl says

    November 6, 2008 at 6:53 am

    What a cute idea!! These would make great gifts – I can’t wait to make one!

    Reply
  32. Sara's Sweet Surprise says

    November 6, 2008 at 10:13 am

    I’ve just strolled in for a visit.
    What wonderful ideas you’ve got. I’m always looking for creative storage that’s functional and pretty.
    Thanks for sharing.

    Sweet Wishes,
    Sara

    Reply
  33. lesley says

    November 6, 2008 at 11:44 am

    Great idea! I have a garage full of jars that I save for various uses from home made chutneys, jams to buttons and bows. Thanks for sharing, can’t wait to get started on decorating them. xx

    Reply
  34. Indigo Blue says

    November 6, 2008 at 3:37 pm

    I like jaro, simply because you can see what is in there. i do have one that is shaped like a teddy bear! The sleeping bag cover is great, very stylish, who cares about it being practical or not.

    Reply
  35. Jacoline (Lien) says

    November 6, 2008 at 5:08 pm

    You are so talented. It looks great again.

    Reply
  36. Melanie Gray Augustin says

    November 6, 2008 at 7:20 pm

    What a great idea and how cute! I know I’ll be doing this!

    Reply
  37. handmaiden says

    November 7, 2008 at 5:58 am

    you are certainly getting good use out of the fabric u got for Lisa’s linen…and the jar is a cute idea

    Reply
  38. Chelsea Ling says

    November 7, 2008 at 8:48 am

    Very cute jar! and thanks for the tutorial… I love those pink and white buttons in the photo

    Reply
  39. Tracy says

    November 7, 2008 at 9:17 am

    Oooo…me likes that jar–very pretty how you’ve dressed it up! And love the sleeping bag! Reminds me of something I had as a kid that my mom made. I would love to be a kid at your house! ;o) Happy weekend to you all ((HUGS))

    Reply
  40. LizzieJane says

    November 7, 2008 at 10:01 am

    What a great idea, thank you for sharing. I think the sleeping bag cover is lovely, so much nicer than those old plain ones.

    Reply
  41. Kellie says

    November 7, 2008 at 6:32 pm

    Hi Lisa! How are you? Great ideas as always :). I haven’t used Mod Podge … I am going to have to have a go at it when we get home!

    Reply
  42. Corrie says

    November 8, 2008 at 1:12 am

    oh wow gorgeous!!!!!!! I love all your crafts and just need to get a wee bit more time to do my crafts!

    Corrie:)

    Reply
  43. Rachel says

    November 9, 2008 at 2:41 pm

    Love the sleeping bag cover! It’s the prettiest one I’ve ever seen, that’s for sure!

    Reply
  44. Vintage Crafts says

    November 9, 2008 at 4:43 pm

    I love the idea of a decorative notions jar!

    I inherited a large collection of buttons, zippers, binding tape and other sewing-related stuff that my mother (a professional seamstress) amassed. Some of it even came from my grandmother. What a great way this would be to prettify the collection!

    Reply
  45. Wendy says

    November 10, 2008 at 6:59 pm

    I love how you put the circle of fabric just on the top of the lid. I’m redoing my button jars (the ones I have are too small for a growing collection) and wanted to cover the lids in fabric the color of the buttons inside. Your idea eliminates cutting the edges to mold down on the sides. Now I just have to make sure I’ve spray painted them all the same color before I start.

    Reply
  46. Katherine says

    November 16, 2008 at 9:09 am

    That is such a cute jar! I found some really cute ribbon and linen tape I’ve been wondering what to do with, now I have a great idea!

    Reply

Leave a Reply Cancel reply

Your email address will not be published. Required fields are marked *

  • Email
  • Facebook
  • Instagram
  • Pinterest
  • Threads
  • TikTok
SUBSCRIBE TO NEWSLETTER
×

Categories

Archives

PURCHASE PDF PATTERNS

We offer over 100 affordable PDF sewing patterns available for download from our store website or Etsy store. Each pattern includes detailed instructions, numerous photos, and templates.

WEB STORE ETSY STORE

Instagram

If you love foundation paper piecing, you’re going If you love foundation paper piecing, you’re going to enjoy this one — a bundle of four woven‑style FPP quilt blocks, each with its own beautiful twist. These blocks look intricate, but the FPP method makes them wonderfully achievable, even if you’re still building your skills.They’re perfect for using up scraps, experimenting with colour, or creating striking mini quilts, cushions, bags, or table decor. Each block has that satisfying “woven” illusion that always gets a second look.Whether you prefer bold brights, soft pastels, or a monochromatic palette, these designs shine in every colourway. And the best part? You get all four blocks together in one bundle.If you’d like the pattern set, comment WOVEN and I’ll send the link straight to you. Woven bundle is available in our Pattern Store.#SewingInspiration #FPP #FoundationPaperPiecing #QuiltBlocks #WovenQuiltBlock
If you love quick, practical sewing projects, the  If you love quick, practical sewing projects, the Baker’s Buddy Mitt is such a fun one to make. It’s scrap‑friendly, gift‑ready, and perfect for anyone who loves to bake.The Bakers Buddy Mitt is 25% off this week only. Comment BAKER and I’ll send you the link to the pattern.  #SewingProject #ScrapFriendlySewing #KitchenSewing #SewingGifts #SewingCommunity
Adding a handmade label is one of my favourite way Adding a handmade label is one of my favourite ways to personalise a project — and these little fabric + felt labels are so quick and satisfying to make.For this Ribbon Pouch, I used the Liberty Gifts from the Garden collection, which has the sweetest fruit motifs. They make perfect tiny labels for pouches, bags, and gifts.Here’s how to make your own:Press a piece of double‑sided fusible web to the back of your fabric.Cut around your chosen motif.Peel off the paper backing.Press the motif onto wool felt.Trim the felt with scalloped scissors.Sew the label onto the front of your pouch.Such a simple detail, but it adds so much charm. Fabric kindly gifted by @regent_street_fabrics — thank you!If you’d like to sew the Ribbon Pouch (3 sizes), comment RIBBON and I’ll send the pattern link straight to you.#SewingInspiration #FabricLabels #DIYLabels #LibertyFabric #LibertyGiftsFromTheGarden
A lot can change in 10 years ❤️ It’s been fun look A lot can change in 10 years ❤️ It’s been fun looking back at where I was in 2016 and how far life has come since then. Swipe for a little trip down memory lane.Back in 2016, my priorities were firmly centred around family. I was working full‑time, sewing in the guest room, sharing tutorials on my blog, and slowly dipping my toes into selling a handful of patterns on Etsy. It was a busy, full season — and creativity was something I fitted in around everything else.  Fast forward to 2026… I’m now retired and living the creative life I once dreamed of. My kids have grown up and are living in their own homes nearby. My husband and I are free to travel, explore, and enjoy this stage of life. And I get to spend my days designing, sewing, and connecting with this beautiful community.Life looks different now — in the best possible way.Were you following me back then, or what has changed for you over the past 10 years? I’d love to hear your story too.Tagging the lovely makers of my quilt: @arabesquescissors @ministryoffabric @belloquacity @alittlepatchwork @sameliasmum coleandtaffy @quiltymamaof4 @shequiltsalot @downgrapevinelane @lizzierosesews @lovethatfabric @sew_mimi.k #2026isthenew2016 #10yeartransformation #sewingjourney #sewingcommunity #aspoonfulofsugardesigns
Fall in love with sewing all over again ❤️I’ve Fall in love with sewing all over again ❤️I’ve rounded up 10 heart‑themed makes — from quick gifts to charming quilt blocks — perfect for weekend stitching or using up your favourite scraps. Whether you’re sewing for Valentine’s Day, birthdays, or just because, there’s something sweet for every maker.Comment HEART and I’ll send you a link to my Heart Pattern Collection.#sewingproject #heartsewing #quiltblock #scrapsewing #easytosew
Raw edge appliqué doesn’t have to feel fiddly or i Raw edge appliqué doesn’t have to feel fiddly or intimidating. With a few simple techniques, you can create neat, crisp shapes — even tiny details like penguin beaks and hearts.I’ve put together My Top 5 Secrets for Raw Edge Appliqué to help you feel confident, whether you’re brand new to appliqué or looking to refine your finish. Save this for your next sewing session.If you’d love a quick, beginner‑friendly project to practise these tips, my Penguin Love Mugrug is the sweetest Valentine’s make — scrap‑friendly, gift‑ready, and such fun to sew.Comment PENGUIN and I’ll send you the link to the pattern. Available now in our Pattern Store and Etsy shop.  #rawedgeapplique #appliquetips #sewingtipsandtricks #mugrugpattern #penguinlove
Follow on Instagram

Featured Pattern

Travel Sewing Kit Pattern

Featured Tutorial

Retro Drawstring Bag

Featured Recipe

Lemon Pound Cake

Connect

  • Email
  • Facebook
  • Instagram
  • Pinterest
  • Threads
  • TikTok
SUBSCRIBE TO NEWSLETTER
×

Popular Posts

  • Charm Square Fabric Tray
  • Merry Little Christmas Sewing Projects
  • {Back to School} Tissue Cover
  • Hexagon Fabric Tray
  • Raw Edge Applique Tips
  • Sewing Gifts 101: Easy and Affordable Ideas for Your Crafty Friends
  • Finding More Time to Sew

Copyright © 2026 Lisa. K. Cox - A Spoonful of Sugar