A Spoonful of Sugar

Make. Bake. Create.

Menu
  • Home
  • About
    • About Us
    • Press
    • FAQ
    • Disclosure Policy
    • Contact Us
  • Crafts
    • Crochet
    • DIY
    • Embroidery/Cross stitch
    • Gift Wrapping
    • Knitting
    • Miscellaneous
    • Paper Crafts
  • Holidays
    • New Year’s
    • Australia Day
    • Back to School
    • Valentines Day
    • Easter
    • ANZAC Day
    • Mother’s Day
    • Father’s Day
    • Halloween
    • Christmas
  • Recipes
    • Appetizers
    • Bars & Slices
    • Bread & Pastries
    • Cakes
    • Cookies
    • Confectionery
    • Cupcakes & Muffins
    • Desserts
    • Drinks
    • Ice Cream
    • Jams/Preserves
    • Main Meals
  • Sewing
    • Sewing Tutorials
    • Quilting
    • Sewing & Quilting Patterns
  • Family
    • Back to School
    • Family Fun
    • Our Home
    • Parenting
    • Travel
  • Shop
    • Pattern Store
    • Etsy Store

Harvest Leaf Coasters

August 20, 2017 By A Spoonful of Sugar - 7 Comments

Harvest Leaf Coaster - free sewing tutorial by A Spoonful of Sugar www.aspoonfulofsugardesigns.com

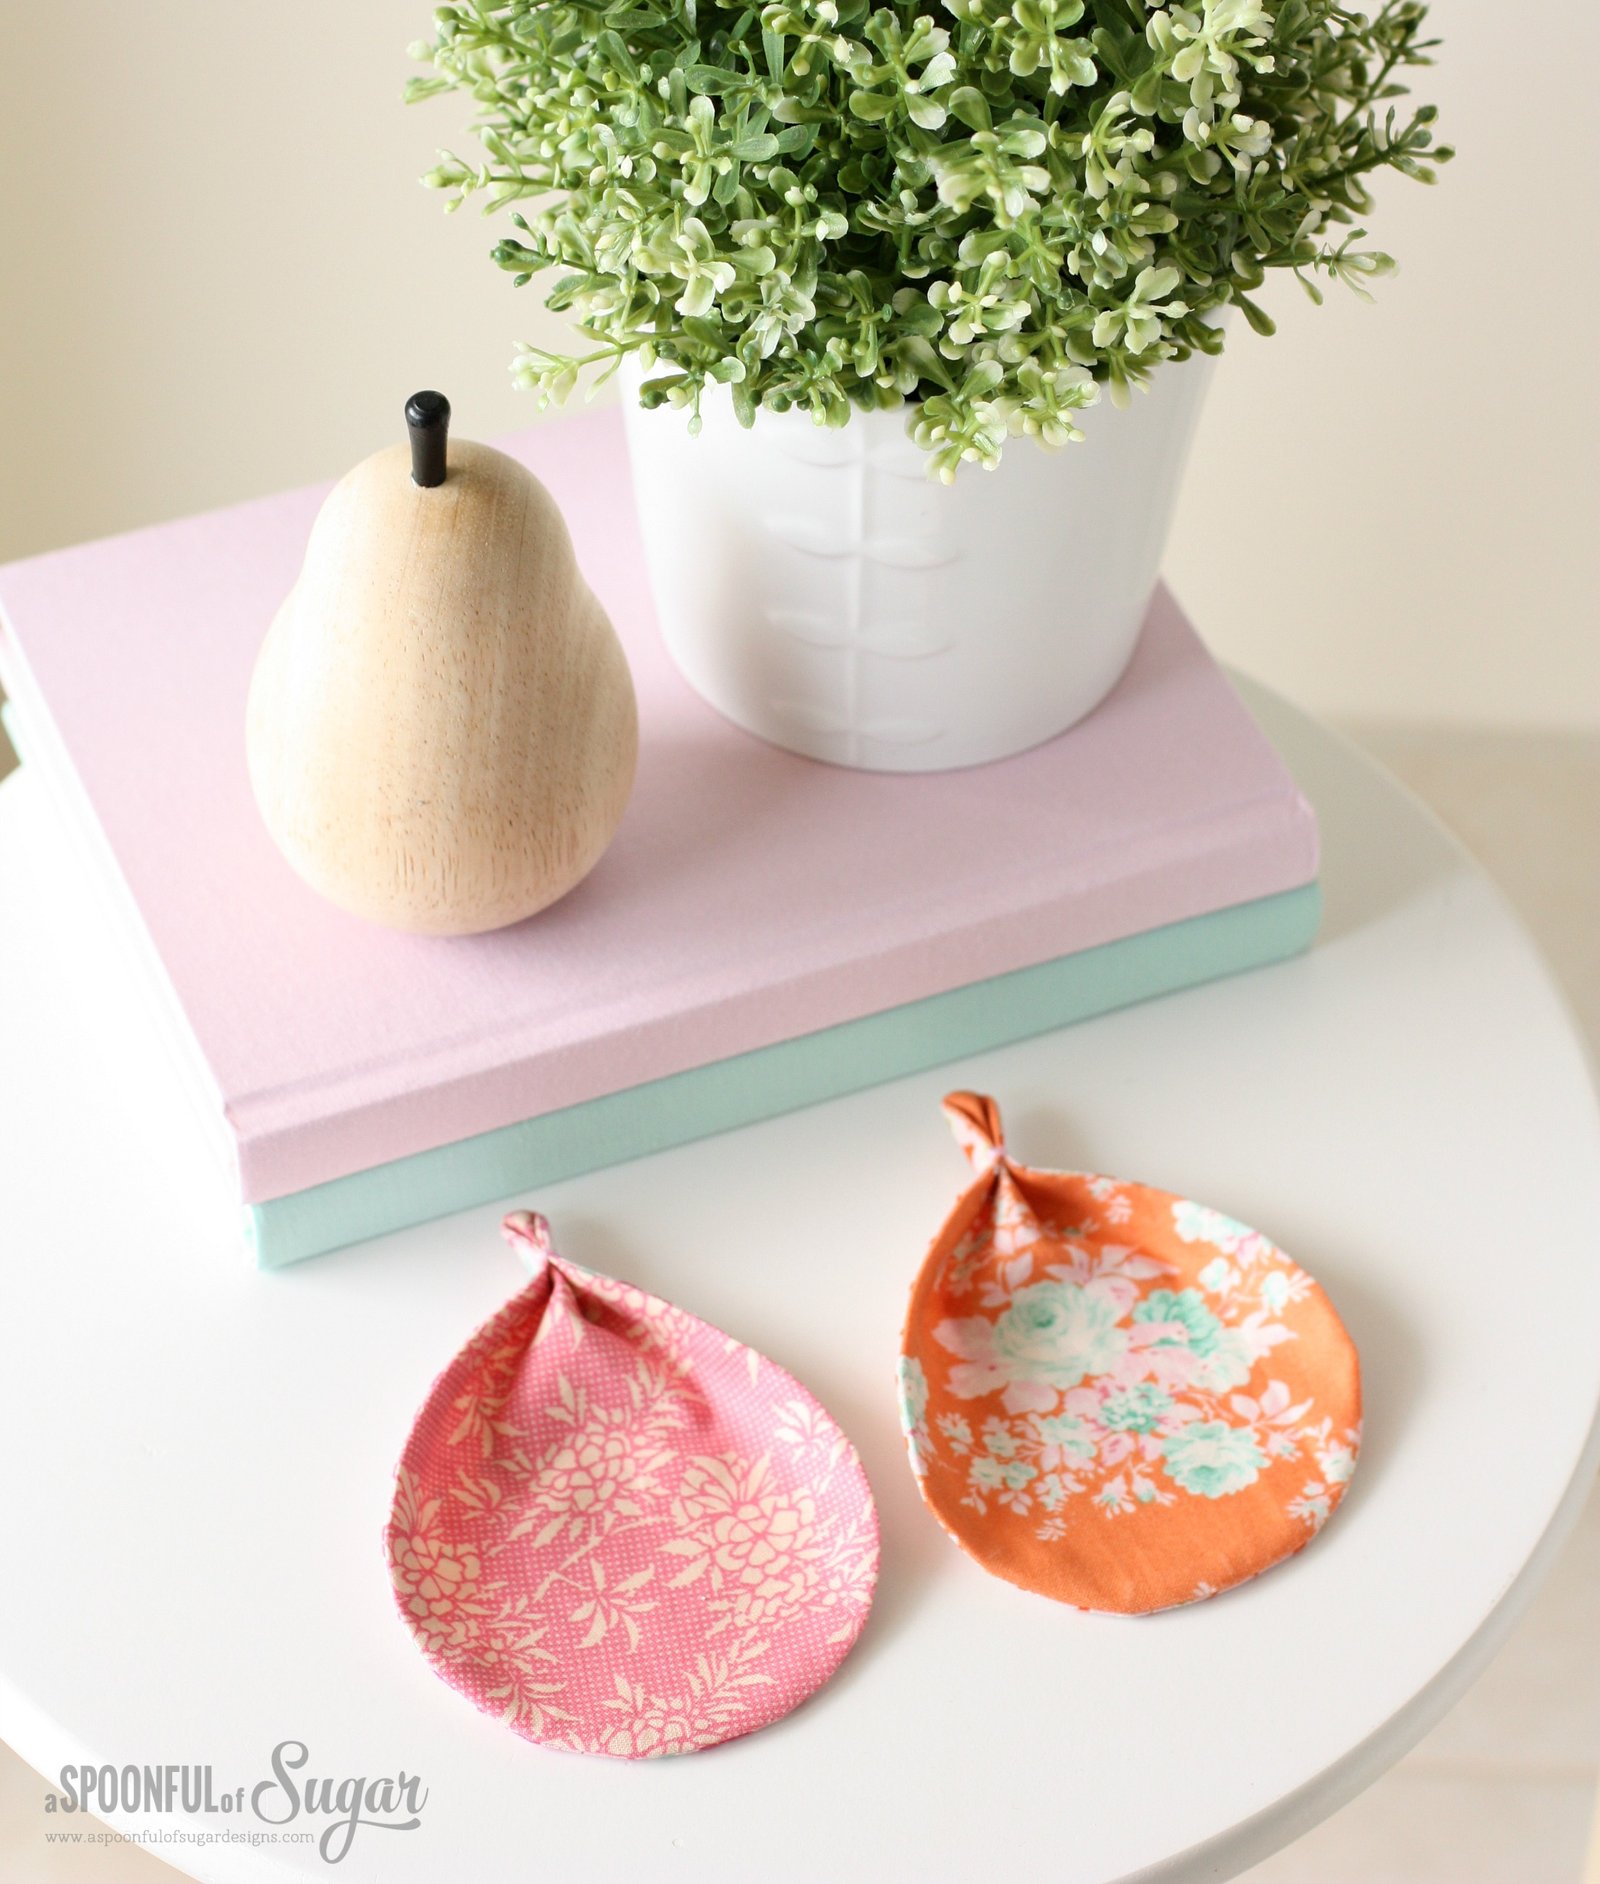
I have recently given my home office nook a Scandi inspired makeover. It is decorated in white, gold, and pastels – and it is such an inviting corner of my family room. I usually have a cup of tea on hand when I am working at my computer, so some new coasters were needed. The Harvest Leaf Coasters are a modern design and are a quick, easy project – perfect for beginners! They are made from two pieces of fabric. The top edge of the coaster is gathered and stitched in place with some co-ordinating embroidery floss, which gives them their leaf shape.

Harvest Leaf Coaster - free sewing tutorial by A Spoonful of Sugar www.aspoonfulofsugardesigns.com

If you would like to make your own Harvest Leaf Coasters, you will need:

  • two pieces of fabric, each measuring 4 1/2 x 6 inches
  • embroidery floss
  • Harvest Leaf Coaster

Harvest Leaf Coaster - free sewing tutorial by A Spoonful of Sugar www.aspoonfulofsugardesigns.com

Assembly:

  1. Using the template, cut two leaf coaster shapes from the two pieces of fabric.
  2. Pin the coaster front and back together with the right sides facing and the edges aligned. Sew around the outside using a 1/4 inch seam allowance, leaving a gap where marked on the template.
  3. Clip the corners and turn the coaster out the right way through the gap in the seam. Press. Hand stitch the opening closed.
  4. At the top of the coaster, fold the fabric so that it forms a W shape – i.e. the midpoint and the outside edges are folded to the top. Secure with a few stitches of embroidery thread, approx 3/4 inch from the top of the coaster. Secure the bottom of the coaster in the same way. Press.

These are such a quick project and make sweet gifts. You could partner it with a tea cup or some favourite tea varieties to make a thoughtful gift.

Harvest Leaf Coaster - free sewing tutorial by A Spoonful of Sugar www.aspoonfulofsugardesigns.com

You can find more Tilda inspired projects here.

Disclaimer: The fabric used in this project is Harvest Fabric by Tilda and was provided by Two Green Zebras. 

Filed Under: Sewing Tutorials Tagged With: gifts, scrap buster, sewing tutorials, Tilda

« {Book Review} A Piece of Cake
Allsorts Pillow »

Comments

  1. Simone de Klerk says

    August 27, 2017 at 2:07 pm

    Gorgeous and thank you for the pattern!

    Reply
  2. Helen White Ellerbacj says

    May 21, 2019 at 7:22 am

    It has been months since I have been on your site. The beautiful 55 and over apt complex I lived in, had a deadly fire in one of apts and mass casualties 11/17/18 in Littleton Co. after a couple of months trying to find suitable housing moved back to Rapid City,
    end of Jan. Weather had been awful. -37? -38
    Etc still waiting for Spring and it is May 20. Love your site. Helen

    Reply
    • A Spoonful of Sugar says

      June 1, 2019 at 6:21 am

      Sorry to hear that Helen! Take care.

      Reply
  3. Jewel says

    October 17, 2023 at 2:51 am

    Love your different projects you design. Thank you for all your hard work you do to date with us.

    Reply
    • A Spoonful of Sugar says

      October 17, 2023 at 7:25 am

      Thanks Jewel for your lovely feedback.

      Reply
  4. Lenora Harper says

    October 18, 2023 at 9:31 pm

    Truly enjoyed your pattern. Thank you

    Reply
  5. Lillian says

    August 31, 2025 at 9:32 pm

    This is such a darling project! Quick, easy and a thoughtful gift.
    Thank you for all of your projects!

    Enjoy!
    Lillian

    Reply

Leave a Reply Cancel reply

Your email address will not be published. Required fields are marked *

  • Email
  • Facebook
  • Instagram
  • Pinterest
  • Threads
  • TikTok
SUBSCRIBE TO NEWSLETTER
×

Categories

Archives

PURCHASE PDF PATTERNS

We offer over 100 affordable PDF sewing patterns available for download from our store website or Etsy store. Each pattern includes detailed instructions, numerous photos, and templates.

WEB STORE ETSY STORE

Instagram

A lot can change in 10 years ❤️ It’s been fun look A lot can change in 10 years ❤️ It’s been fun looking back at where I was in 2016 and how far life has come since then. Swipe for a little trip down memory lane.Back in 2016, my priorities were firmly centred around family. I was working full‑time, sewing in the guest room, sharing tutorials on my blog, and slowly dipping my toes into selling a handful of patterns on Etsy. It was a busy, full season — and creativity was something I fitted in around everything else.  Fast forward to 2026… I’m now retired and living the creative life I once dreamed of. My kids have grown up and are living in their own homes nearby. My husband and I are free to travel, explore, and enjoy this stage of life. And I get to spend my days designing, sewing, and connecting with this beautiful community.Life looks different now — in the best possible way.Were you following me back then, or what has changed for you over the past 10 years? I’d love to hear your story too.Tagging the lovely makers of my quilt: @arabesquescissors @ministryoffabric @belloquacity @alittlepatchwork @sameliasmum coleandtaffy @quiltymamaof4 @shequiltsalot @downgrapevinelane @lizzierosesews @lovethatfabric @sew_mimi.k #2026isthenew2016 #10yeartransformation #sewingjourney #sewingcommunity #aspoonfulofsugardesigns
Fall in love with sewing all over again ❤️I’ve Fall in love with sewing all over again ❤️I’ve rounded up 10 heart‑themed makes — from quick gifts to charming quilt blocks — perfect for weekend stitching or using up your favourite scraps. Whether you’re sewing for Valentine’s Day, birthdays, or just because, there’s something sweet for every maker.Comment HEART and I’ll send you a link to my Heart Pattern Collection.#sewingproject #heartsewing #quiltblock #scrapsewing #easytosew
Raw edge appliqué doesn’t have to feel fiddly or i Raw edge appliqué doesn’t have to feel fiddly or intimidating. With a few simple techniques, you can create neat, crisp shapes — even tiny details like penguin beaks and hearts.I’ve put together My Top 5 Secrets for Raw Edge Appliqué to help you feel confident, whether you’re brand new to appliqué or looking to refine your finish. Save this for your next sewing session.If you’d love a quick, beginner‑friendly project to practise these tips, my Penguin Love Mugrug is the sweetest Valentine’s make — scrap‑friendly, gift‑ready, and such fun to sew.Comment PENGUIN and I’ll send you the link to the pattern. Available now in our Pattern Store and Etsy shop.  #rawedgeapplique #appliquetips #sewingtipsandtricks #mugrugpattern #penguinlove
If you’ve ever wanted to add eyelets or grommets t If you’ve ever wanted to add eyelets or grommets to your sewing projects, here’s a quick look at how I install them using my DK93 snap press. It’s the same tool I use for snaps — and it makes installing eyelets beautifully quick and consistent.For this Ribbon Pouch, I used the Liberty Gifts from the Garden collection (printed on Lasenby cotton and released in January 2026). The colours and motifs pair so well with the little ribbon tie detail.Here’s how to install the eyelets:Punch out the four holes using a hole‑cutting die.Place the eyelet into the hole.Press it into place using the snap press.That’s it — easy peasy, and it gives the pouch such an elevated, professional finish. I love how clean and sturdy the result is.Fabric is Gifts from the Garden by Liberty - kindly provided by @regent_street_fabrics — thank you!If you’d like the Ribbon Pouch pattern (it comes in 3 sizes), comment RIBBON and I’ll send the link straight to you.Ribbon Pouch Sewing Pattern: available in our Pattern Store and Etsy shop ( links in profile).#SewingInspiration #SewingProjects #Eyelets #Grommets #SnapPress
The Twirling Treasures Hot Pad & Placemat Set show The Twirling Treasures Hot Pad & Placemat Set showcases one of my favourite FPP designs — a stunning kaleidoscope‑style block that always turns out beautifully. Kaleidoscope blocks are some of my most popular FPP patterns, and this set is such a fun way to use them.  This set includes six sizes, making it incredibly versatile: use them as hot pads, trivets, placemats, or simply as a way to add a pop of colour to your kitchen.For these samples, I went with a monochromatic scrap‑busting approach, pairing fabrics from the same colour family with a low‑volume background. The black‑and‑white striped binding adds such a crisp, modern finish. It’s a wonderful project for building your FPP confidence — and a fantastic way to use up those treasured scraps.The Twirling Treasures Hot Pad set is our Pattern of the Week. It is currently 25% off this week in our Pattern Store and Etsy Shop.If you’d like to sew your own set, comment TWIRL and I’ll send the pattern link straight to you.Happy sewing! Lisa 🌸#FoundationPaperPiecing #Quilting #HotPads #ScrapBuster #KitchenSewing
The Ribbon Pouch is one of those little makes that The Ribbon Pouch is one of those little makes that feels special from the very first stitch. I made this sweet trio in the Liberty Gifts from the Garden collection, and the colours couldn’t be more perfect for gifting, organising, or adding a little beauty to your everyday.Each pouch features: 🌼 A simple ribbon tie closure 🎀 Optional sew‑in tags or DIY felt/fabric labels 🧵 Three practical sizes — perfect for notions, treats, or small gifts ✨ A quick, beginner‑friendly sewIf you’d like to make your own, comment RIBBON and I’ll send the pattern link straight to your inbox. Save this for your next weekend project — it’s such a satisfying little sew. Pattern is available in our Pattern Store.Thanks to @regent_street_fabric for the Gifts from the Garden fabric collection. (released Jan 2026)#SewingInspiration #SewingProjects #LibertyFabric #SewingPatterns #BeginnerSewing
Follow on Instagram

Featured Pattern

Travel Sewing Kit Pattern

Featured Tutorial

Retro Drawstring Bag

Featured Recipe

Lemon Pound Cake

Connect

  • Email
  • Facebook
  • Instagram
  • Pinterest
  • Threads
  • TikTok
SUBSCRIBE TO NEWSLETTER
×

Popular Posts

  • Charm Square Fabric Tray
  • Merry Little Christmas Sewing Projects
  • {Back to School} Tissue Cover
  • Raw Edge Applique Tips
  • Sewing Gifts 101: Easy and Affordable Ideas for Your Crafty Friends
  • Fabric Gift Pouch
  • Free Holiday Sewing Tutorials

Copyright © 2026 Lisa. K. Cox - A Spoonful of Sugar