A Spoonful of Sugar

Make. Bake. Create.

Menu
  • Home
  • About
    • About Us
    • Press
    • FAQ
    • Disclosure Policy
    • Contact Us
  • Crafts
    • Crochet
    • DIY
    • Embroidery/Cross stitch
    • Gift Wrapping
    • Knitting
    • Miscellaneous
    • Paper Crafts
  • Holidays
    • New Year’s
    • Australia Day
    • Back to School
    • Valentines Day
    • Easter
    • ANZAC Day
    • Mother’s Day
    • Father’s Day
    • Halloween
    • Christmas
  • Recipes
    • Appetizers
    • Bars & Slices
    • Bread & Pastries
    • Cakes
    • Cookies
    • Confectionery
    • Cupcakes & Muffins
    • Desserts
    • Drinks
    • Ice Cream
    • Jams/Preserves
    • Main Meals
  • Sewing
    • Sewing Tutorials
    • Quilting
    • Sewing & Quilting Patterns
  • Family
    • Back to School
    • Family Fun
    • Our Home
    • Parenting
    • Travel
  • Shop
    • Pattern Store
    • Etsy Store

Gingham Stars

November 7, 2012 By Spoonful of Sugar - 19 Comments

I remember making Christmas decorations with my Mum and Nan when I was a child. They were usually made from materials we had on hand – such as paper, recycled Christmas cards, wool, fabric etc. Making decorations each year adds to the excitement and is always part of the Christmas preparations in our family. It is the Christmas traditions that you make as a family that are most important aspect of Christmas for me.

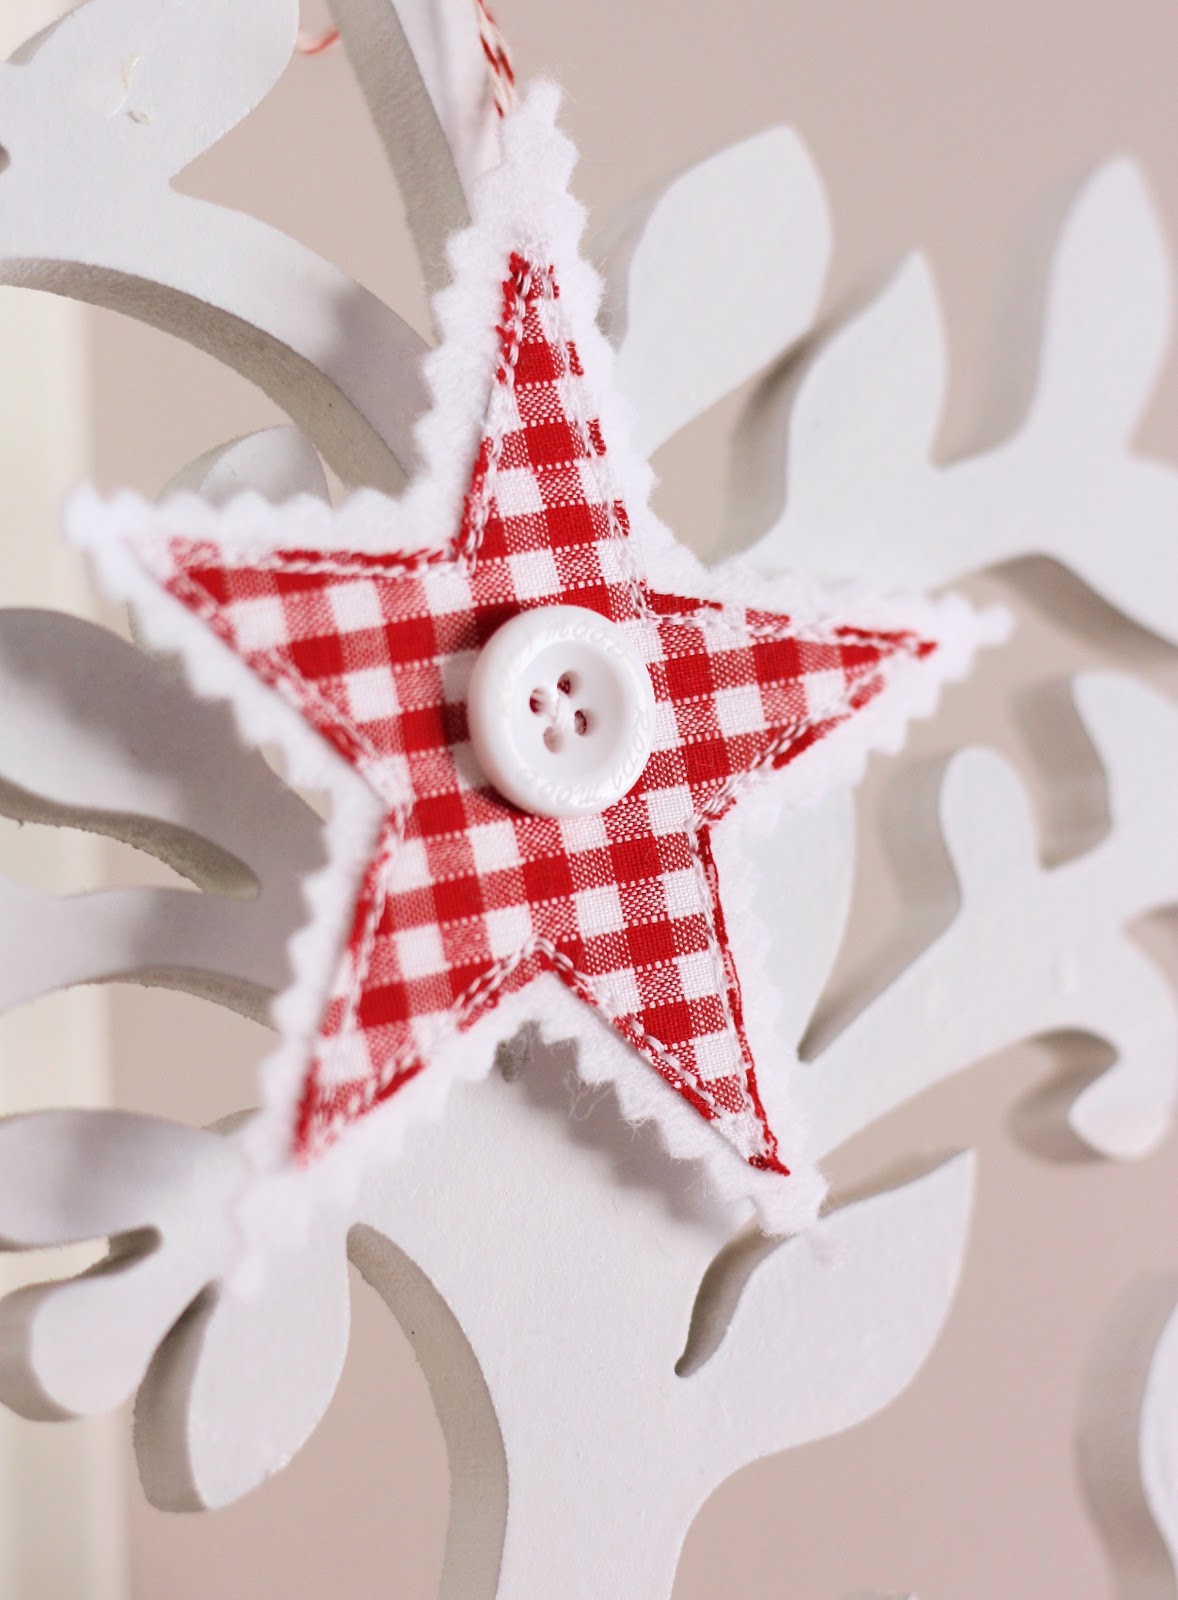
To fit with our Red Gingham theme, we have made some Gingham Stars from gingham, felt, twine, and buttons to add to our tree this year. These are simple decorations to make, and can be made in colours/fabrics to match your own theme.

They look sweet hanging on our wooden tree over our fireplace. Can’t wait to get our Christmas tree set up in a few weeks and see how they look on that.

Materials:
  • white felt (we used acrylic felt)
  • fabric (red gingham)
  • heavy duty fusible interfacing
  • white buttons
  • red/white bakers twine

1. Print out a 5 pointed star or trace a star that is the size you want. We used a star that measured 2 1/2 inches from top to bottom. Trace the star onto fusible interfacing and cut out leaving 1/4 inch clearance.
2. Iron the fusible interfacing onto the wrong side of your fabric, and cut out the star. (The fusible interfacing adds stiffness to the star. You could also use double sided appliqué film but the star will be less stiff).
3. Position the star onto felt and pin in place. Stitch around the outside of the star three times in white thread. Try not to stitch in exactly the same spot so that it gives a sketchy appearance.
4. Cut out the star using pinking shears. Leave 1/4 inch of the felt around the star. Stitch a white button to the centre of the star. Cut a 10 inch length of bakers twine. Thread it onto a needle. Make a hanging loop on the back of the ornament, and tie the ends together.
We are going to pop the gingham stars on our water bottles to add some festive cheer to our Christmas table.

Other Christmas ornament tutorials include:
Charming Ornaments
Felt Mushroom Ornaments
Felt Bauble Ornaments

For your daily sugar fix you can subscribe or follow us on facebook, twitter, and google plus. 

Filed Under: Christmas, Sewing Tagged With: applique, felt, gingham

« 10 Easy Christmas Gift Tags and Cards
Words to Live By »

Comments

  1. Simone de Klerk says

    November 8, 2012 at 1:39 am

    Lovely stars! Thank you for sharing it with us.

    Reply
  2. Chocolate Cat says

    November 8, 2012 at 2:52 am

    Love them!

    Reply
  3. Ann says

    November 8, 2012 at 3:28 am

    Love love! So simple but so pretty and effective. I’m going to try these for sure. The perfect addition to a tree, window or pressie! Thank you for sharing – you girls are fab!

    Reply
  4. Mariana says

    November 8, 2012 at 7:21 am

    I’ve just discovered you! Wow! a mother and a daughter! this a beautiful idea for a blog. Together… that must be great, to share your hobbies and show them to the world in a blog…
    Great!
    Nice to meet u!

    Reply
  5. Anonymous says

    November 8, 2012 at 8:49 am

    Thank you both for such an excellent idea, and so very clearly described. Well done!!

    Reply
  6. ~ko says

    November 8, 2012 at 9:16 am

    Adorable and simple! I love them 🙂

    Reply
  7. Ladyfée says

    November 9, 2012 at 12:16 am

    j’adore ces petites étoiles, mais aussi les coeurs et les champignons et les boules ! tout est beau ! merci et bonne journée à toutes les deux ! Ladyfée

    Reply
  8. Kate says

    November 9, 2012 at 9:42 am

    They are quite lovely.

    Reply
  9. CJ Stitching and Blooms says

    November 13, 2012 at 6:08 am

    Your Ornaments are lovely. I also love you White Tree?? Do you sell them, and if so how much does it cost??? Hugs Judy

    Reply
  10. Sqquee says

    December 5, 2012 at 9:35 am

    Those are really sweet! Thanks for the tutorial!

    Reply
  11. Anonymous says

    December 22, 2012 at 12:14 am

    These are lovely, I made some and they are now adorning my Christmas tree. Thanks for sharing.
    Maggie

    Reply
  12. Asha Dsouza says

    October 29, 2013 at 3:33 am

    Dear Lisa and Sarah,
    i love your wonderul Christmas decorations.
    Georgeous !.

    Reply
  13. Anki-Kreativ-Design says

    November 16, 2013 at 12:02 pm

    The star looks great !!
    Also the wooden tree is lovely. Do you made it by your own ?
    Thanks for the tutorial.

    Hugs Andrea

    Reply
  14. Linda Reinhardt says

    December 18, 2013 at 4:07 am

    Thank you for sharing these Beautiful folded stars. I made six of them to give as a gift. They are so nice and easy to make. I just learned how to make prairie point pot holders, So when I saw these, It was an instant Must make! Thank you, Linda

    Reply
  15. Emily Tarsha says

    December 10, 2014 at 3:15 am

    Thank you for sharing. I found these on Pinterest and fell in love. I made a set of six in aqua, red, and green and shared them on my blog. http://www.auntieemscrafts.com/fabric-felt-star-ornaments/.
    -Emily

    Reply
    • A Spoonful of Sugar says

      December 10, 2014 at 7:20 am

      They look great in polka dot fabric! So colourful and fun. Thanks for linking. Lisa

      Reply

Leave a Reply Cancel reply

Your email address will not be published. Required fields are marked *

  • Email
  • Facebook
  • Instagram
  • Pinterest
  • Threads
  • TikTok
SUBSCRIBE TO NEWSLETTER
×

Categories

Archives

PURCHASE PDF PATTERNS

We offer over 100 affordable PDF sewing patterns available for download from our store website or Etsy store. Each pattern includes detailed instructions, numerous photos, and templates.

WEB STORE ETSY STORE

Instagram

Sharing a closer look at the Handy Drawstring Pouc Sharing a closer look at the Handy Drawstring Pouch today — a sweet little project that’s as practical as it is pretty. I stitched this one in the blue and gold colourway of the Tilda Songbird collection and love how the soft watercolour florals shine in a small make. The pouch features cleverly shaped panels (with no boxed corners), stands tall when in use, and folds completely flat for storage. It’s also reversible, which makes it such a fun and versatile sew.   These little pouches are perfect for organising your sewing room, gifting to a friend, or popping into a project bag.The pattern includes three sizes, and you can find it in both my Pattern Store and Etsy shop. Comment HANDY and I’ll send the link straight to your inbox.A big thank you to @tilda_australia for gifting the beautiful fabric.#tildasongbird #drawstringbagpattern #aspoonfulofsugardesigns #tildafabrics #sewingproject
Why sewists love the Baker’s Buddy… Smooth curves, Why sewists love the Baker’s Buddy… Smooth curves, no fiddly binding, and a beginner‑friendly construction that comes together fast. It’s practical, gift‑friendly, and one of my most popular patterns because it actually gets used in the kitchen.If you’re looking for a quick win that looks impressive and is useful, this is the one. Comment BAKER and I’ll send you the link to the pattern (available in our Pattern Store and Etsy shop).#sewinggifts #beginnerfriendlysewing #smallquiltedgift #quicksewing #sewingcommunity
I’ve had so much fun sewing with the beautiful new I’ve had so much fun sewing with the beautiful new Tilda Songbird collection — soft pastels, tiny motifs, and so many sweet details. Here’s a look at the beginner‑friendly projects I’ve made so far, perfect for gifting or using up your favourite scraps.You’ll find the paid patterns in my shop, and both free patterns (Love Tag + Threaded Tokens) are linked in my profile. What project is your favourite?Thanks for following along with my Songbird projects this month. I can’t wait to share more. Thanks to @Tilda_Australia for the fabric.#tildasongbird #iloveTilda #smallsewingprojects #makersgonnamake #sewingpatterns
A tiny basket that’s endlessly useful and so much A tiny basket that’s endlessly useful and so much fun to sew. This Bitsy Basket is made in the beautiful Tilda Songbird collection and filled with a few sewing favourites — the perfect way to turn small scraps into something sweet and giftable.It comes together quickly, uses very little fabric, and looks adorable with a Threaded Token atrached (the Threaded Token pattern is free — you’ll find the link in my profile).Comment BASKET and I’ll send you the link to the Bitsy Basket pattern in my shop.Shown in the gorgeous Tilda Songbird range. Thanks to @tilda_australia . Styled with a few sewing goodies from @sohmo_au  
#sewingproject #sewinglove #quicksewingproject #scrapsewing #tildasongbird
A little Valentine’s stitching, penguin‑style. The A little Valentine’s stitching, penguin‑style. These sweet penguins always make people smile — which one would you sew first?Comment PENGUIN for the pattern link (available in our pattern store and Etsy shop).Pattern: Penguin Love Mugrug#penguinlove #valentinesewing #sewingproject #scrapfriendlysewing #makersgonnamake
A tiny sewing moment for today — threading the cor A tiny sewing moment for today — threading the cord through the Pocketful of Sunshine Bag using a bodkin. It’s such a simple step, but it gives the sweetest finish to this little drawstring bag. I’ve been loving making these in the Tilda Songbird range lately… the colours, the tiny motifs, the soft palette — everything works beautifully together.If you’d like to sew your own, comment SUNSHINE and I’ll send the pattern link straight to you. You’ll also find it in our pattern store and Etsy shop — links are in our profile.Shown in the gorgeous Tilda Songbird collection with thanks to @tilda_australia#ilovetilda #tildasongbird #beginnersewist #sewingtips #drawstringbag
Follow on Instagram

Featured Pattern

Travel Sewing Kit Pattern

Featured Tutorial

Retro Drawstring Bag

Featured Recipe

Lemon Pound Cake

Connect

  • Email
  • Facebook
  • Instagram
  • Pinterest
  • Threads
  • TikTok
SUBSCRIBE TO NEWSLETTER
×

Popular Posts

  • Charm Square Fabric Tray
  • Merry Little Christmas Sewing Projects
  • Hexagon Fabric Tray
  • Sew-In Tags: Your Complete Guide
  • Retro Drawstring Bag
  • Valentines Matchbook Needle Holder
  • Raw Edge Applique Tips

Copyright © 2026 Lisa. K. Cox - A Spoonful of Sugar