A Spoonful of Sugar

Make. Bake. Create.

Menu
  • Home
  • About
    • About Us
    • Press
    • FAQ
    • Disclosure Policy
    • Contact Us
  • Crafts
    • Crochet
    • DIY
    • Embroidery/Cross stitch
    • Gift Wrapping
    • Knitting
    • Miscellaneous
    • Paper Crafts
  • Holidays
    • New Year’s
    • Australia Day
    • Back to School
    • Valentines Day
    • Easter
    • ANZAC Day
    • Mother’s Day
    • Father’s Day
    • Halloween
    • Christmas
  • Recipes
    • Appetizers
    • Bars & Slices
    • Bread & Pastries
    • Cakes
    • Cookies
    • Confectionery
    • Cupcakes & Muffins
    • Desserts
    • Drinks
    • Ice Cream
    • Jams/Preserves
    • Main Meals
  • Sewing
    • Sewing Tutorials
    • Quilting
    • Sewing & Quilting Patterns
  • Family
    • Back to School
    • Family Fun
    • Our Home
    • Parenting
    • Travel
  • Shop
    • Pattern Store
    • Etsy Store

Envelope Pouches

March 9, 2010 By A Spoonful of Sugar - 17 Comments

Anyone who has children at school, knows that you are constantly shelling out change for all sorts of things, including raffles, icy poles, sausage sizzles and the like.  Coins can easily become lost in school bags, so I was excited to discover this handy envelope pouch that can be easily made from recycled envelopes. 

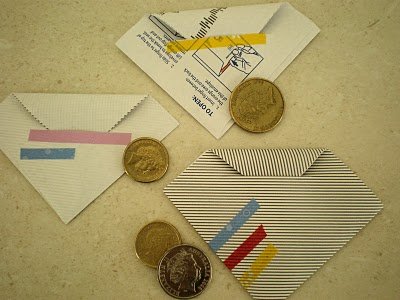
It couldn’t be easier – simply cut off a square from one corner of the envelope , and then cut a slit in it diagonally. (Refer to line marked on envelope below). Slip the top corner through the slit to secure. Of course I couldn’t resist adding some offcuts of masking tape that were left over form a recent project:) 

One of my favourite cakes to bake is a Chocolate Marble Cake. If I make up 1 1/2 quantities, it is enough for a large bundt tin, plus a smaller tin, which is what I did on the weekend. We had one cake for eating, and I made the smaller one to give to my parents. With some brown paper, string, doiley and some masking tape – it was ready to gift. 


Marble Cake

Ingredients:

  •  

    4 eggs (separated)

  • 250 g unsalted butter, softened
  • 1 cup castor sugar
  • 2 and a quarter cups self raising flour, sifted
  • half cup milk
  • one and a half tablespoons cocoa
  • Vanilla essence


Method:

Preheat oven to 170°C.

Grease and flour a bundt tin (25 cm diameter).

Whisk egg whites until soft peaks form.

Cream butter and sugar with electric mixer. Gradually add egg yolks; mix well.

Add flour and milk, alternately; stir.

Gently fold in whisked egg whites.

Divide mixture in half. Add cocoa and vanilla essence to one half of the mixture and carefully stir in.

Add big spoonfuls of both light and dark mixtures alternately into cake tin. Pull a fork through the mixture once to make the swirl.

Bake in a moderate oven about 50 -60 minutes until golden brown.

Serve dusted with icing sugar.

Serves 12


Posted by Lisa

Filed Under: Uncategorized

« Resistance is Futile…
Nectarines and Needlecraft »

Comments

  1. Margaret says

    March 9, 2010 at 7:16 pm

    You have made my day with your great ideas.

    Reply
  2. Terriaw says

    March 9, 2010 at 7:16 pm

    We had marble cake at our wedding, so I adore it. I love how it looks from a bundt pan too. Cute idea for the coin pouches – so easy peasy too.

    Reply
  3. Thimbleanna says

    March 9, 2010 at 7:20 pm

    Very clever little envelopes Lisa! And don’t you love it when a recipe makes enough to share? That cake looks yummy — thanks for sharing with us!

    Reply
  4. texmorg says

    March 9, 2010 at 11:44 pm

    Oh Yum i will have to try that on the week end. Glad to see that you have found a use for your offcuts of tape.
    Linda

    Reply
  5. Thimbelina says

    March 9, 2010 at 11:54 pm

    Your parcels always look so gorgeous…. and your cake looks delicious too!

    Reply
  6. Simone de Klerk says

    March 10, 2010 at 2:14 am

    Great idea, with the envelope and thank you for the recipe!

    Reply
  7. Posie Patchwork says

    March 10, 2010 at 2:58 am

    So much fun, what a ball you’re having there. So much fun with paper, string, tape & cake, awesome. Love Posie

    Reply
  8. Janellybelly says

    March 10, 2010 at 4:22 am

    There is definitely something special about brown paper packages tied up with string 🙂 I love your latest tapes, there is even one that matches your Prints Charming fabric!

    Reply
  9. Tracy says

    March 10, 2010 at 6:41 am

    That cake is distracting me…LOL! Thank you for the recipe, Lisa! Those little envelopes are very sweet. I love brown paper-wrapped packages too–so easy to pretty them up. Love what you’ve done with these. Happy Days :o) ((HUGS))

    Reply
  10. Rumi says

    March 10, 2010 at 7:24 am

    Geez, I wish I knew this great trick when my kids were little!

    Thanks for the yummy looking cake recipe too!

    Reply
  11. Celestial Charms says

    March 10, 2010 at 7:58 am

    It is amazing what you come up with to use all your pretty tape. Love it.
    Maureen

    Reply
  12. Junie Moon says

    March 10, 2010 at 8:04 am

    What a great idea for holding change. Although I don’t have any wee children, I can see also using it to stash coins in my car for tolls, parking meters, and stuff like that.

    That cake looks outstanding and I appreciate your sharing the recipe. Today I’m making a simply yellow cake with white frosting at the request of my husband, but I’ll give your recipe a try soon, too.

    Reply
  13. suzitee says

    March 11, 2010 at 1:31 am

    Thanks for the recipe Lisa…might have to try that one out! Your little envelope pouches are such a good idea.

    Reply
  14. Anita says

    March 11, 2010 at 5:32 am

    Hi Lisa! Hey, great little money pocket idea and I just love the yummy cake. I might get some time on the weekend to bake that one. Kind regards, Anita.

    Reply
  15. themsrevolution says

    March 11, 2010 at 5:52 am

    that is one beautiful cake! thanks for the recipe. we must be on the same wavelength, because i’ve been making envelopes around here too!

    Reply
  16. ricebabies says

    March 11, 2010 at 10:24 am

    Thanks for sharing, will give both of those a try. Although I love to bake, I am afriad mine would never come out as fluffy and perfect as yours. I tell myself, as long as it tatses good. ha ha

    http://ricebabies-ca.blogspot.com/

    Reply
  17. AMIT says

    March 17, 2010 at 11:44 pm

    Beautiful recipe shared here of marble cake.

    home jobs india

    Reply

Leave a Reply Cancel reply

Your email address will not be published. Required fields are marked *

  • Email
  • Facebook
  • Instagram
  • Pinterest
  • Threads
  • TikTok
SUBSCRIBE TO NEWSLETTER
×

Categories

Archives

PURCHASE PDF PATTERNS

We offer over 100 affordable PDF sewing patterns available for download from our store website or Etsy store. Each pattern includes detailed instructions, numerous photos, and templates.

WEB STORE ETSY STORE

Instagram

Adding a handmade label is one of my favourite way Adding a handmade label is one of my favourite ways to personalise a project — and these little fabric + felt labels are so quick and satisfying to make.For this Ribbon Pouch, I used the Liberty Gifts from the Garden collection, which has the sweetest fruit motifs. They make perfect tiny labels for pouches, bags, and gifts.Here’s how to make your own:Press a piece of double‑sided fusible web to the back of your fabric.Cut around your chosen motif.Peel off the paper backing.Press the motif onto wool felt.Trim the felt with scalloped scissors.Sew the label onto the front of your pouch.Such a simple detail, but it adds so much charm. Fabric kindly gifted by @regent_street_fabrics — thank you!If you’d like to sew the Ribbon Pouch (3 sizes), comment RIBBON and I’ll send the pattern link straight to you.#SewingInspiration #FabricLabels #DIYLabels #LibertyFabric #LibertyGiftsFromTheGarden
A lot can change in 10 years ❤️ It’s been fun look A lot can change in 10 years ❤️ It’s been fun looking back at where I was in 2016 and how far life has come since then. Swipe for a little trip down memory lane.Back in 2016, my priorities were firmly centred around family. I was working full‑time, sewing in the guest room, sharing tutorials on my blog, and slowly dipping my toes into selling a handful of patterns on Etsy. It was a busy, full season — and creativity was something I fitted in around everything else.  Fast forward to 2026… I’m now retired and living the creative life I once dreamed of. My kids have grown up and are living in their own homes nearby. My husband and I are free to travel, explore, and enjoy this stage of life. And I get to spend my days designing, sewing, and connecting with this beautiful community.Life looks different now — in the best possible way.Were you following me back then, or what has changed for you over the past 10 years? I’d love to hear your story too.Tagging the lovely makers of my quilt: @arabesquescissors @ministryoffabric @belloquacity @alittlepatchwork @sameliasmum coleandtaffy @quiltymamaof4 @shequiltsalot @downgrapevinelane @lizzierosesews @lovethatfabric @sew_mimi.k #2026isthenew2016 #10yeartransformation #sewingjourney #sewingcommunity #aspoonfulofsugardesigns
Fall in love with sewing all over again ❤️I’ve Fall in love with sewing all over again ❤️I’ve rounded up 10 heart‑themed makes — from quick gifts to charming quilt blocks — perfect for weekend stitching or using up your favourite scraps. Whether you’re sewing for Valentine’s Day, birthdays, or just because, there’s something sweet for every maker.Comment HEART and I’ll send you a link to my Heart Pattern Collection.#sewingproject #heartsewing #quiltblock #scrapsewing #easytosew
Raw edge appliqué doesn’t have to feel fiddly or i Raw edge appliqué doesn’t have to feel fiddly or intimidating. With a few simple techniques, you can create neat, crisp shapes — even tiny details like penguin beaks and hearts.I’ve put together My Top 5 Secrets for Raw Edge Appliqué to help you feel confident, whether you’re brand new to appliqué or looking to refine your finish. Save this for your next sewing session.If you’d love a quick, beginner‑friendly project to practise these tips, my Penguin Love Mugrug is the sweetest Valentine’s make — scrap‑friendly, gift‑ready, and such fun to sew.Comment PENGUIN and I’ll send you the link to the pattern. Available now in our Pattern Store and Etsy shop.  #rawedgeapplique #appliquetips #sewingtipsandtricks #mugrugpattern #penguinlove
If you’ve ever wanted to add eyelets or grommets t If you’ve ever wanted to add eyelets or grommets to your sewing projects, here’s a quick look at how I install them using my DK93 snap press. It’s the same tool I use for snaps — and it makes installing eyelets beautifully quick and consistent.For this Ribbon Pouch, I used the Liberty Gifts from the Garden collection (printed on Lasenby cotton and released in January 2026). The colours and motifs pair so well with the little ribbon tie detail.Here’s how to install the eyelets:Punch out the four holes using a hole‑cutting die.Place the eyelet into the hole.Press it into place using the snap press.That’s it — easy peasy, and it gives the pouch such an elevated, professional finish. I love how clean and sturdy the result is.Fabric is Gifts from the Garden by Liberty - kindly provided by @regent_street_fabrics — thank you!If you’d like the Ribbon Pouch pattern (it comes in 3 sizes), comment RIBBON and I’ll send the link straight to you.Ribbon Pouch Sewing Pattern: available in our Pattern Store and Etsy shop ( links in profile).#SewingInspiration #SewingProjects #Eyelets #Grommets #SnapPress
The Twirling Treasures Hot Pad & Placemat Set show The Twirling Treasures Hot Pad & Placemat Set showcases one of my favourite FPP designs — a stunning kaleidoscope‑style block that always turns out beautifully. Kaleidoscope blocks are some of my most popular FPP patterns, and this set is such a fun way to use them.  This set includes six sizes, making it incredibly versatile: use them as hot pads, trivets, placemats, or simply as a way to add a pop of colour to your kitchen.For these samples, I went with a monochromatic scrap‑busting approach, pairing fabrics from the same colour family with a low‑volume background. The black‑and‑white striped binding adds such a crisp, modern finish. It’s a wonderful project for building your FPP confidence — and a fantastic way to use up those treasured scraps.The Twirling Treasures Hot Pad set is our Pattern of the Week. It is currently 25% off this week in our Pattern Store and Etsy Shop.If you’d like to sew your own set, comment TWIRL and I’ll send the pattern link straight to you.Happy sewing! Lisa 🌸#FoundationPaperPiecing #Quilting #HotPads #ScrapBuster #KitchenSewing
Follow on Instagram

Featured Pattern

Travel Sewing Kit Pattern

Featured Tutorial

Retro Drawstring Bag

Featured Recipe

Lemon Pound Cake

Connect

  • Email
  • Facebook
  • Instagram
  • Pinterest
  • Threads
  • TikTok
SUBSCRIBE TO NEWSLETTER
×

Popular Posts

  • Charm Square Fabric Tray
  • Merry Little Christmas Sewing Projects
  • {Back to School} Tissue Cover
  • Hexagon Fabric Tray
  • Raw Edge Applique Tips
  • Sewing Gifts 101: Easy and Affordable Ideas for Your Crafty Friends
  • Finding More Time to Sew

Copyright © 2026 Lisa. K. Cox - A Spoonful of Sugar